
Manuals
Page 1
Operating Instructions Hardware Guide 1 Guide to read "Safety Information" before you use this machine and keep it handy for future reference. For safe and correct use, be sure to the Printer 2 Setting Up the Printer 3 Installing Options 4 Connecting the Printer 5 Configuration 6 Loading Paper 7 Maintaining the Printer 8 Adjusting the Printer 9 Troubleshooting 10 Removing Misfed Paper 11 Appendix Read this manual carefully before using the machine.
Operating Instructions Hardware Guide 1 Guide to read "Safety Information" before you use this machine and keep it handy for future reference. For safe and correct use, be sure to the Printer 2 Setting Up the Printer 3 Installing Options 4 Connecting the Printer 5 Configuration 6 Loading Paper 7 Maintaining the Printer 8 Adjusting the Printer 9 Troubleshooting 10 Removing Misfed Paper 11 Appendix Read this manual carefully before using the machine.
Manuals
Page 3
...Power...36 Turning off the Power...38 Selecting the Display Language...42 Test Printing...43 3. Guide to Install...26 Unpacking...30 Turning the Printer's Power On and Off...36 Turning on the Computer 12 1. TABLE OF CONTENTS How to Read This Manual...6 Symbols...6 Model-Specific... Information...7 Positions of WARNING and CAUTION Labels 8 Power Switch Symbols...9 Manuals for This Printer...10 List of Option Installation...45 Where to Install Options...45 Attaching the Paper Feed Unit...48 Installing the Memory Expansion Units...51 ...
...Power...36 Turning off the Power...38 Selecting the Display Language...42 Test Printing...43 3. Guide to Install...26 Unpacking...30 Turning the Printer's Power On and Off...36 Turning on the Computer 12 1. TABLE OF CONTENTS How to Read This Manual...6 Symbols...6 Model-Specific... Information...7 Positions of WARNING and CAUTION Labels 8 Power Switch Symbols...9 Manuals for This Printer...10 List of Option Installation...45 Where to Install Options...45 Attaching the Paper Feed Unit...48 Installing the Memory Expansion Units...51 ...
Manuals
Page 4
Connecting the Printer Ethernet Cable Connection...69 Reading the LED Lamps...72 USB Cable Connection...73 Digital Camera Connection...74 Parallel Cable Connection...77 5. Loading Paper Supported Paper ...
Connecting the Printer Ethernet Cable Connection...69 Reading the LED Lamps...72 USB Cable Connection...73 Digital Camera Connection...74 Parallel Cable Connection...77 5. Loading Paper Supported Paper ...
Manuals
Page 6
... Appear on the Control Panel 201 Status Messages (in alphabetical order 201 Alert Messages (in alphabetical order 202 Panel Tones...208 Printer Does Not Print...209 Checking the Port Connection...210 Other Printing Problems...212 When You Cannot Print Properly...212 Paper Misfeeds Occur ...Frequently...215 The printed image is different from the image on the computer 217 When Printer is Jammed...225 Paper Misfeed Message (A)...227 4 Removing Misfed Paper When Paper is Not Functioning Properly 219 Additional Troubleshooting...222 10....
... Appear on the Control Panel 201 Status Messages (in alphabetical order 201 Alert Messages (in alphabetical order 202 Panel Tones...208 Printer Does Not Print...209 Checking the Port Connection...210 Other Printing Problems...212 When You Cannot Print Properly...212 Paper Misfeeds Occur ...Frequently...215 The printed image is different from the image on the computer 217 When Printer is Jammed...225 Paper Misfeed Message (A)...227 4 Removing Misfed Paper When Paper is Not Functioning Properly 219 Additional Troubleshooting...222 10....
Manuals
Page 7
Appendix Moving and Transporting the Printer...237 Moving the Printer in a Short Distance...238 Consumables...239 Print Cartridge...239 Waste Toner Bottle...240 Intermediate Transfer Unit...240 Maintenance Kit...241 Specifications...242 Mainframe...242 Options...245 Trademarks...249 INDEX...251 5 Misfeed Tray 1...227 Misfeed Bypass Tray...229 Paper Misfeed Message (B)...231 Paper Misfeed Message (Y)...234 Paper Misfeed Message (Z)...235 11.
Appendix Moving and Transporting the Printer...237 Moving the Printer in a Short Distance...238 Consumables...239 Print Cartridge...239 Waste Toner Bottle...240 Intermediate Transfer Unit...240 Maintenance Kit...241 Specifications...242 Mainframe...242 Options...245 Trademarks...249 INDEX...251 5 Misfeed Tray 1...227 Misfeed Bypass Tray...229 Paper Misfeed Message (B)...231 Paper Misfeed Message (Y)...234 Paper Misfeed Message (Z)...235 11.
Manuals
Page 10
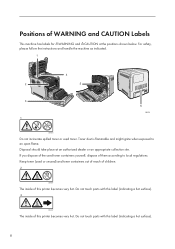
... (indicating a hot surface). 8 If you dispose of the used toner containers yourself, dispose of them according to an open flame. CBK007 The inside of this printer becomes very hot. Positions of WARNING and CAUTION Labels This machine has labels for WARNING and CAUTION at an authorized dealer or an appropriate collection... regulations. CBK002 CBK003 Do not incinerate spilled toner or used or unused) and toner containers out of reach of children. 2 CBK004 The inside of this printer becomes very hot. Disposal should take place at the positions shown below.
... (indicating a hot surface). 8 If you dispose of the used toner containers yourself, dispose of them according to an open flame. CBK007 The inside of this printer becomes very hot. Positions of WARNING and CAUTION Labels This machine has labels for WARNING and CAUTION at an authorized dealer or an appropriate collection... regulations. CBK002 CBK003 Do not incinerate spilled toner or used or unused) and toner containers out of reach of children. 2 CBK004 The inside of this printer becomes very hot. Disposal should take place at the positions shown below.

Manuals
Page 11
...opening or closing the top cover. If you dispose of the used toner containers yourself, dispose of children. Keep toner (used toner. CBK010 The printer weighs approximately 29 kg (64.0 lb.). CBK009 Do not incinerate spilled toner or used or unused) and toner containers out of reach of them... according to local regulations. Disposal should take place at an authorized dealer or an appropriate collection site. When moving the printer, use the inset grips on this machine are as follows: • : POWER ON • : POWER OFF 9 Power Switch Symbols The meanings of the...
...opening or closing the top cover. If you dispose of the used toner containers yourself, dispose of children. Keep toner (used toner. CBK010 The printer weighs approximately 29 kg (64.0 lb.). CBK009 Do not incinerate spilled toner or used or unused) and toner containers out of reach of them... according to local regulations. Disposal should take place at an authorized dealer or an appropriate collection site. When moving the printer, use the inset grips on this machine are as follows: • : POWER ON • : POWER OFF 9 Power Switch Symbols The meanings of the...
Manuals
Page 12
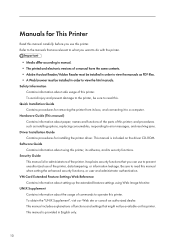
...manual is provided in order to a computer. Quick Installation Guide Contains procedures for This Printer Read this manual carefully before you can use to prevent unauthorized use this printer. Be sure to view the manuals as installing options, replacing consumables, responding to read.../Adobe Reader must be sure to error messages, and resolving jams. Driver Installation Guide Contains procedures for administrators of this printer. It explains security functions that might not be installed in order to read this manual when setting the enhanced security functions...
...manual is provided in order to a computer. Quick Installation Guide Contains procedures for This Printer Read this manual carefully before you can use to prevent unauthorized use this printer. Be sure to view the manuals as installing options, replacing consumables, responding to read.../Adobe Reader must be sure to error messages, and resolving jams. Driver Installation Guide Contains procedures for administrators of this printer. It explains security functions that might not be installed in order to read this manual when setting the enhanced security functions...
Manuals
Page 13
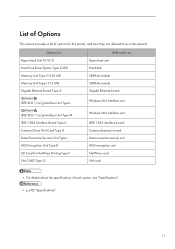
... Camera direct print card Data overwrite security unit HDD encryption unit NetWare card VM card • For details about the specifications of options for this printer, and how they are referred to as in this manual.
... Camera direct print card Data overwrite security unit HDD encryption unit NetWare card VM card • For details about the specifications of options for this printer, and how they are referred to as in this manual.
Manuals
Page 17
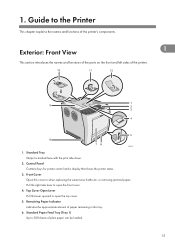
...replacing the waste toner bottle etc. Standard Tray Output is stacked here with the print side down. 2. Front Cover Open this lever upward to the Printer This chapter explains the names and functions of plain paper can be loaded. 15 Control Panel Contains keys for... printer control and a display that shows the printer status. 3. Guide to open the front cover. 4. Pull the right side lever to 500 sheets of the printer's components. or removing jammed paper. Standard Paper Feed Tray (Tray 1) Up to...
...replacing the waste toner bottle etc. Standard Tray Output is stacked here with the print side down. 2. Front Cover Open this lever upward to the Printer This chapter explains the names and functions of plain paper can be loaded. 15 Control Panel Contains keys for... printer control and a display that shows the printer status. 3. Guide to open the front cover. 4. Pull the right side lever to 500 sheets of the printer's components. or removing jammed paper. Standard Paper Feed Tray (Tray 1) Up to...
Manuals
Page 18
...this to support sheets that is toward the rear of the printer. • For details about the messages which appear on the screen to prompt you to stop Legal-size prints falling behind the printer. 12. Guide to 100 sheets of the arrow) to... replace the print cartridge. 10. Bypass Tray Up to the Printer 7. Stop Fence (Legal-size prints) Raise the rear fence (by pushing down on the end that come out... be loaded. 8. Standard Tray Extension Use this cover to stop A4/Lettersize prints falling behind the printer. 11.
...this to support sheets that is toward the rear of the printer. • For details about the messages which appear on the screen to prompt you to stop Legal-size prints falling behind the printer. 12. Guide to 100 sheets of the arrow) to... replace the print cartridge. 10. Bypass Tray Up to the Printer 7. Stop Fence (Legal-size prints) Raise the rear fence (by pushing down on the end that come out... be loaded. 8. Standard Tray Extension Use this cover to stop A4/Lettersize prints falling behind the printer. 11.

Manuals
Page 19
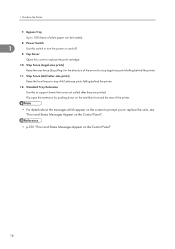
...slot. 7. SD Card Slots Remove the cover and install SD cards here. USB Port B Use a USB cable to connect the printer to the printer here. Optional Interface Board Slot Insert an optional Wireless LAN interface unit, Gigabit Ethernet board, or IEEE 1284 interface board in this ... a computer. 10. Front Cover Open Lever Pull this cover to install the additional SDRAM module and hard disk (optional). 2. Insert the other end of the printer. 1 10 9 8 7 1 6 5 2 4 3 CBK013 1. Exterior: Rear View Exterior: Rear View This section introduces the names and functions of the parts...
...slot. 7. SD Card Slots Remove the cover and install SD cards here. USB Port B Use a USB cable to connect the printer to the printer here. Optional Interface Board Slot Insert an optional Wireless LAN interface unit, Gigabit Ethernet board, or IEEE 1284 interface board in this ... a computer. 10. Front Cover Open Lever Pull this cover to install the additional SDRAM module and hard disk (optional). 2. Insert the other end of the printer. 1 10 9 8 7 1 6 5 2 4 3 CBK013 1. Exterior: Rear View Exterior: Rear View This section introduces the names and functions of the parts...

Manuals
Page 20
Guide to the Printer • For details about the messages which appear on the screen to prompt you to replace the units, see "Error and Status Messages Appear on the Control Panel". 1 • p.201 "Error and Status Messages Appear on the Control Panel" 18 1.
Guide to the Printer • For details about the messages which appear on the screen to prompt you to replace the units, see "Error and Status Messages Appear on the Control Panel". 1 • p.201 "Error and Status Messages Appear on the Control Panel" 18 1.
Manuals
Page 21
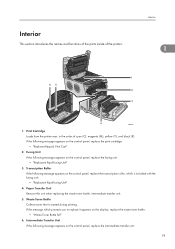
... to replace it appears on the control panel, replace the transcription roller, which is wasted during printing. Print Cartridge Loads from the printer rear, in the order of the printer. 2 Interior 1 1 65 2 3 4 CBK014 1. Interior This section introduces the names and functions of the parts inside of cyan (C), magenta (M), yellow (Y), and black (K). Fusing...
... to replace it appears on the control panel, replace the transcription roller, which is wasted during printing. Print Cartridge Loads from the printer rear, in the order of the printer. 2 Interior 1 1 65 2 3 4 CBK014 1. Interior This section introduces the names and functions of the parts inside of cyan (C), magenta (M), yellow (Y), and black (K). Fusing...

Manuals
Page 22
Guide to the Printer • "Replacemnt Requird:IntTrans" • For details about the messages which appear on the screen to prompt you to replace the units, see 1 "Error and Status Messages Appears on the Control Panel". • p.201 "Error and Status Messages Appear on the Control Panel" 20 1.
Guide to the Printer • "Replacemnt Requird:IntTrans" • For details about the messages which appear on the screen to prompt you to replace the units, see 1 "Error and Status Messages Appears on the Control Panel". • p.201 "Error and Status Messages Appear on the Control Panel" 20 1.
Manuals
Page 23
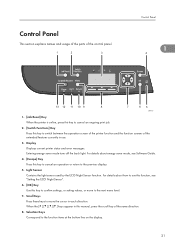
... Contains the light sensor used by the ECO Night Sensor function. Scroll Keys Press these keys to the previous display. 5. Display Displays current printer status and error messages. Entering energy saver mode turns off the back light. Control Panel This section explains names and usage of the parts of... the control panel. 1 2 3 Control Panel 1 4 13 12 11 10 9 8 7 65 CBK015 1. [Job Reset] Key When the printer is online, press this key to cancel an ongoing print job. 2. [Switch Functions] Key Press this key to switch between the operation screen of the...
... Contains the light sensor used by the ECO Night Sensor function. Scroll Keys Press these keys to the previous display. 5. Display Displays current printer status and error messages. Entering energy saver mode turns off the back light. Control Panel This section explains names and usage of the parts of... the control panel. 1 2 3 Control Panel 1 4 13 12 11 10 9 8 7 65 CBK015 1. [Job Reset] Key When the printer is online, press this key to cancel an ongoing print job. 2. [Switch Functions] Key Press this key to switch between the operation screen of the...
Manuals
Page 24
...specified in energy saver mode. 13. [Suspend/Resume] Key Press this to receive data from a computer. Power Indicator Lights up when the printer is receiving data from a computer. The indicator remains lit as long as print cartridge. Resumption of a suspended job will soon require maintenance or...Guide. • p.39 "Setting the ECO Night Sensor" 22 Steady red: printing is not possible, or is warming up or flashes when a printer error occurs. Follow the instructions that appear on the left below the initial screen. 9. [Menu] Key 1 Press this key again. The data ...
...specified in energy saver mode. 13. [Suspend/Resume] Key Press this to receive data from a computer. Power Indicator Lights up when the printer is receiving data from a computer. The indicator remains lit as long as print cartridge. Resumption of a suspended job will soon require maintenance or...Guide. • p.39 "Setting the ECO Night Sensor" 22 Steady red: printing is not possible, or is warming up or flashes when a printer error occurs. Follow the instructions that appear on the left below the initial screen. 9. [Menu] Key 1 Press this key again. The data ...

Manuals
Page 25
...display. Select [General Settings], then [Display Supply Info], and then select [Off]. • Adjust the brightness if the screen is installed in the printer. • By default, the remaining amount of the display panel. To adjust the display contrast, press the [Menu] key, and then select [... from a computer. 4. [Supplies] Press to display the information of supplies for the printer. • [Prt.Jobs] is displayed only when the hard disk is dark. Operational Status or Messages Displays the printer status or the messages. 2. [Option] Press to display the following screen appears when ...
...display. Select [General Settings], then [Display Supply Info], and then select [Off]. • Adjust the brightness if the screen is installed in the printer. • By default, the remaining amount of the display panel. To adjust the display contrast, press the [Menu] key, and then select [... from a computer. 4. [Supplies] Press to display the information of supplies for the printer. • [Prt.Jobs] is displayed only when the hard disk is dark. Operational Status or Messages Displays the printer status or the messages. 2. [Option] Press to display the following screen appears when ...

Manuals
Page 26
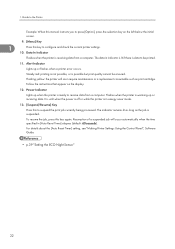
1. Guide to the Printer 1 24
1. Guide to the Printer 1 24
Manuals
Page 27
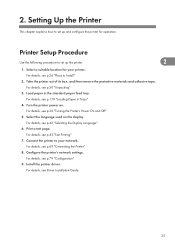
... box, and then remove the protective materials and adhesive tape. For details, see Driver Installation Guide. 25 Install the printer driver. Setting Up the Printer This chapter explains how to set up the printer. 2 1. For details, see p.43 "Test Printing" 7. Load paper in Trays" 4. For details, see p.30 "Unpacking" 3. Select the language used...
... box, and then remove the protective materials and adhesive tape. For details, see Driver Installation Guide. 25 Install the printer driver. Setting Up the Printer This chapter explains how to set up the printer. 2 1. For details, see p.43 "Test Printing" 7. Load paper in Trays" 4. For details, see p.30 "Unpacking" 3. Select the language used...


