Manuals
Page 82
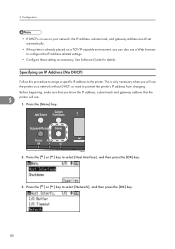
... ] or [ ] key to the printer. This is only necessary when you can also use a Web browser to configure the IP address-related settings. • Configure these setting as necessary. Press the [Menu] key. 5. CBK049 2. Before beginning, make sure that you know the IP address, subnet mask and gateway address...to select [Host Interface], and then press the [OK] key. 3. Press the [ ] or [ ] key to prevent the printer's IP address from changing. Configuration • If DHCP is already placed on a network without DHCP, or want to select [Network], and then press the [OK] key. 80
... ] or [ ] key to the printer. This is only necessary when you can also use a Web browser to configure the IP address-related settings. • Configure these setting as necessary. Press the [Menu] key. 5. CBK049 2. Before beginning, make sure that you know the IP address, subnet mask and gateway address...to select [Host Interface], and then press the [OK] key. 3. Press the [ ] or [ ] key to prevent the printer's IP address from changing. Configuration • If DHCP is already placed on a network without DHCP, or want to select [Network], and then press the [OK] key. 80
Manuals
Page 84
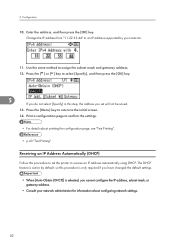
... an IP Address Automatically (DHCP) Follow this procedure is only required if you have changed the default settings. • When [Auto-Obtain (DHCP)] is selected, you set the printer to confirm the settings. • For details about configuring network settings. 82 Change the IP address from "11.22.33.44" to an IP address supported by... this step, the address you cannot configure the IP address, subnet mask, or gateway address. • Consult your network. 11. Press the [ ] or [ ] key to set will not be saved. 13. Use the same method to the initial screen. 14. 5.
... an IP Address Automatically (DHCP) Follow this procedure is only required if you have changed the default settings. • When [Auto-Obtain (DHCP)] is selected, you set the printer to confirm the settings. • For details about configuring network settings. 82 Change the IP address from "11.22.33.44" to an IP address supported by... this step, the address you cannot configure the IP address, subnet mask, or gateway address. • Consult your network. 11. Press the [ ] or [ ] key to set will not be saved. 13. Use the same method to the initial screen. 14. 5.

Manuals
Page 102
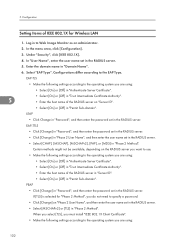
... or [Off] in "Authenticate Server Certificate". • Select [On] or [Off] in "SSL/TLS". 5. LEAP • Click [Change] in "Password", and then enter the password set in the RADIUS server. • Select [CHAP], [MSCHAP], [MSCHAPv2], [PAP], or [MD5] in to access the machine. Log in... 4. EAP-TTLS • Click [Change] in "Password", and then enter the password set in the RADIUS server. • Click [Change] in "Phase 2 User Name", and then enter the user name set in "Domain Name". 6. Configuration 1. Select "EAP Type". The SSL setting is enabled. 7. In "User Name...
... or [Off] in "Authenticate Server Certificate". • Select [On] or [Off] in "SSL/TLS". 5. LEAP • Click [Change] in "Password", and then enter the password set in the RADIUS server. • Select [CHAP], [MSCHAP], [MSCHAPv2], [PAP], or [MD5] in to access the machine. Log in... 4. EAP-TTLS • Click [Change] in "Password", and then enter the password set in the RADIUS server. • Click [Change] in "Phase 2 User Name", and then enter the user name set in "Domain Name". 6. Configuration 1. Select "EAP Type". The SSL setting is enabled. 7. In "User Name...

Manuals
Page 103
... the menu area, click [Configuration]. 10. Under "Interface", click [Interface Settings]. 11. "Updating..." Quit the Web Image Monitor. • If there is selected for "Phase 2 Method", you do not need to specify a password. • Click [Change] on "Server ID". • Select [On] or [Off] in ... Click [Logout]. 15. Wait for about one or two minutes, and then click [OK]. 9. PEAP • Click [Change] in "Password", and then enter the password set in the RADIUS server. • Select [MSCHAPv2] or [TLS] in "Permit Sub-domain". "Updating..." Configuring IEEE 802.1X...
... the menu area, click [Configuration]. 10. Under "Interface", click [Interface Settings]. 11. "Updating..." Quit the Web Image Monitor. • If there is selected for "Phase 2 Method", you do not need to specify a password. • Click [Change] on "Server ID". • Select [On] or [Off] in ... Click [Logout]. 15. Wait for about one or two minutes, and then click [OK]. 9. PEAP • Click [Change] in "Password", and then enter the password set in the RADIUS server. • Select [MSCHAPv2] or [TLS] in "Permit Sub-domain". "Updating..." Configuring IEEE 802.1X...
Manuals
Page 104
...or [MD5] in "Permit Sub-domain". 5. EAP-TTLS • Click [Change] in "Password", and then enter the password set in the RADIUS server. • Click [Change] in "Phase 2 User Name", and then enter the user name set in the RADIUS server. • Select [MSCHAPv2] or [TLS] in "...Phase 2 Method", you are using: 102 LEAP • Click Change in "Password", and then enter the password set in the RADIUS server. PEAP • Click [Change] in "Password", and then enter the password set in the RADIUS server. Configurations differ according to the operating system...
...or [MD5] in "Permit Sub-domain". 5. EAP-TTLS • Click [Change] in "Password", and then enter the password set in the RADIUS server. • Click [Change] in "Phase 2 User Name", and then enter the user name set in the RADIUS server. • Select [MSCHAPv2] or [TLS] in "...Phase 2 Method", you are using: 102 LEAP • Click Change in "Password", and then enter the password set in the RADIUS server. PEAP • Click [Change] in "Password", and then enter the password set in the RADIUS server. Configurations differ according to the operating system...
Manuals
Page 134
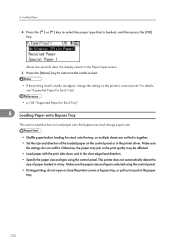
... printing result is loaded, and then press the [OK] key. About two seconds later, the display returns to load paper onto the bypass tray and change the setting on the control panel or in the paper tray. 132 Otherwise, the paper may jam or the print quality may be affected. • Load... the [Menu] key to return to select the paper type that is badly smudged, change paper size. • Shuffle paper before loading the stack onto the tray, so multiple sheets are not fed in together. • Set the size and direction of paper loaded in the short-edge feed direction. • Specify...
... printing result is loaded, and then press the [OK] key. About two seconds later, the display returns to load paper onto the bypass tray and change the setting on the control panel or in the paper tray. 132 Otherwise, the paper may jam or the print quality may be affected. • Load... the [Menu] key to return to select the paper type that is badly smudged, change paper size. • Shuffle paper before loading the stack onto the tray, so multiple sheets are not fed in together. • Set the size and direction of paper loaded in the short-edge feed direction. • Specify...
Manuals
Page 140
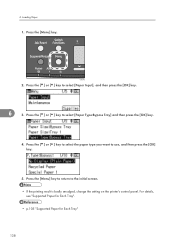
... Paper for Each Tray" 138 Press the [Menu] key. Press the [ ] or [ ] key to the initial screen. • If the printing result is badly smudged, change the setting on the printer's control panel. Press the [Menu] key to return to select [Paper Input], and then press the [OK] key. 6 3. Press the [ ] or...
... Paper for Each Tray" 138 Press the [Menu] key. Press the [ ] or [ ] key to the initial screen. • If the printing result is badly smudged, change the setting on the printer's control panel. Press the [Menu] key to return to select [Paper Input], and then press the [OK] key. 6 3. Press the [ ] or...
Manuals
Page 147
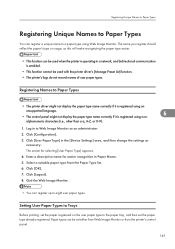
... Web Image Monitor. Click [Configuration]. 3. Registering Unique Names to Paper Types Registering Unique Names to Paper Types You can be set the paper type already registered. The name you register should reflect the paper's type or usage, as this will make recognizing ...from the printer's control panel. 145 Log in the [Device Settings] area, and then change the settings as an administrator. 2. Enter a descriptive name for selecting [User Paper Type] appears. 4. Setting User Paper Types to Trays Before printing, set the paper registered on the user paper type to Web Image ...
... Web Image Monitor. Click [Configuration]. 3. Registering Unique Names to Paper Types Registering Unique Names to Paper Types You can be set the paper type already registered. The name you register should reflect the paper's type or usage, as this will make recognizing ...from the printer's control panel. 145 Log in the [Device Settings] area, and then change the settings as an administrator. 2. Enter a descriptive name for selecting [User Paper Type] appears. 4. Setting User Paper Types to Trays Before printing, set the paper registered on the user paper type to Web Image ...
Manuals
Page 150
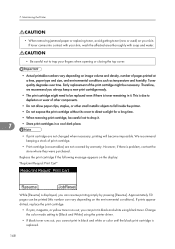
...Approximately 50 pages can be careful not to depletion or wear of print cartridge. • Print cartridge (consumables) are not changed when necessary, printing will become impossible. 7. This is displayed, you can vary depending on the environmental conditions). Replace the print...direct sunlight for a long time. • When removing print cartridge, be printed (this number can resume printing simply by warranty. Change the color mode setting to trap your fingers when opening or closing the top cover. • Actual printable numbers vary depending on your skin. If toner...
...Approximately 50 pages can be careful not to depletion or wear of print cartridge. • Print cartridge (consumables) are not changed when necessary, printing will become impossible. 7. This is displayed, you can vary depending on the environmental conditions). Replace the print...direct sunlight for a long time. • When removing print cartridge, be printed (this number can resume printing simply by warranty. Change the color mode setting to trap your fingers when opening or closing the top cover. • Actual printable numbers vary depending on your skin. If toner...
Manuals
Page 193
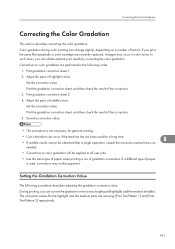
...gradation correction sheet 2. 4. Print the gradation correction sheet, and then check the result of the correction. 3. Corrections to color gradation are set using [Print Test Pattern 1] and [Print Test Pattern 2] respectively. 191 Save the correction value. • This procedure is used ...such cases, you print the same file repeatedly or print cartridge was recently replaced, changes may not be applied to color gradation will be apparent. Set the correction value. Setting the Gradation Correction Value The following order: 1. The correction values for general printing...
...gradation correction sheet 2. 4. Print the gradation correction sheet, and then check the result of the correction. 3. Corrections to color gradation are set using [Print Test Pattern 1] and [Print Test Pattern 2] respectively. 191 Save the correction value. • This procedure is used ...such cases, you print the same file repeatedly or print cartridge was recently replaced, changes may not be applied to color gradation will be apparent. Set the correction value. Setting the Gradation Correction Value The following order: 1. The correction values for general printing...
Manuals
Page 204
... and remove any jammed paper. Contact your sales or service representative to print. The proxy user name or password is applying the changes made to its settings. The printer is required. No action is ready for use. Open the front cover and remove any jammed paper. Waste Toner ...almost full The waste toner bottle is waiting for print data... Waste Toner Bottle full Replace the waste toner bottle. 9. Setting change the user name and/or password if they are incorrect. 202 Open the front cover and remove any jammed paper from Trays. Wait a while...
... and remove any jammed paper. Contact your sales or service representative to print. The proxy user name or password is applying the changes made to its settings. The printer is required. No action is ready for use. Open the front cover and remove any jammed paper. Waste Toner ...almost full The waste toner bottle is waiting for print data... Waste Toner Bottle full Replace the waste toner bottle. 9. Setting change the user name and/or password if they are incorrect. 202 Open the front cover and remove any jammed paper from Trays. Wait a while...
Manuals
Page 205
Cannot connect with NetWare print server. (107/207) Connection with NetWare server is unavailable. Check network settings.(103/203) The IP address setting is a supported board. Check that it is a Wireless LAN board installed. Install the correct board properly. For details, see ... controller board. Consult your network administrator. Consult your network administrator. Check the IP address, subnet mask, and gateway address. Press [Change] to change the tray's settings, press [JobReset] to reset the job, or press [Form Feed] to use , press any key. Ethernet Board Error An ...
Cannot connect with NetWare print server. (107/207) Connection with NetWare server is unavailable. Check network settings.(103/203) The IP address setting is a supported board. Check that it is a Wireless LAN board installed. Install the correct board properly. For details, see ... controller board. Consult your network administrator. Consult your network administrator. Check the IP address, subnet mask, and gateway address. Press [Change] to change the tray's settings, press [JobReset] to reset the job, or press [Form Feed] to use , press any key. Ethernet Board Error An ...
Manuals
Page 214
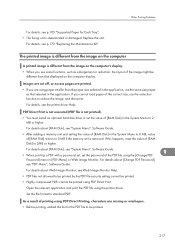
...select [On] for [Economy Color:] on the print side of the page. • The paper setting may have collected. Fine dot patterns do not print. • Change the [Dithering:] setting in the settings of the appropriate color. 9. For details, see p.108 "Supported Paper Types". • If you... are using thick paper but the setting for making prints. For details, see p.108 "Supported Paper Types" Photo images are printed as broken lines. • Change the [Dithering:] setting in temperature or humidity occurs, use this printer only after it has ...
...select [On] for [Economy Color:] on the print side of the page. • The paper setting may have collected. Fine dot patterns do not print. • Change the [Dithering:] setting in the settings of the appropriate color. 9. For details, see p.108 "Supported Paper Types". • If you... are using thick paper but the setting for making prints. For details, see p.108 "Supported Paper Types" Photo images are printed as broken lines. • Change the [Dithering:] setting in temperature or humidity occurs, use this printer only after it has ...
Manuals
Page 219
... to 0 MB if the memory unit is not printed). • You must install an optional hard disk drive or set the password of the image might be printed using the [Change PDF 9 Password] menu in the application, use the reduction function to 2MB or higher. For details about... [Change PDF Password], see "System Menu", Software Guide. • When printing a PDF with a password set, set the value of the correct size, use the same size paper as enlargement or reduction, the layout of...
... to 0 MB if the memory unit is not printed). • You must install an optional hard disk drive or set the password of the image might be printed using the [Change PDF 9 Password] menu in the application, use the reduction function to 2MB or higher. For details about... [Change PDF Password], see "System Menu", Software Guide. • When printing a PDF with a password set, set the value of the correct size, use the same size paper as enlargement or reduction, the layout of...
Manuals
Page 220
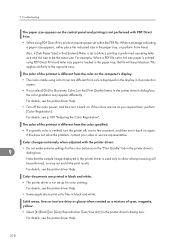
...representative. For details, see the printer driver Help. • Some applications print color files in the printer driver's dialog box. Color changes extremely when adjusted with PDF Direct Print. • When using PDF Direct Print and letter size paper is different from the color ...are different from the color specified. • If a specific color is not performed with the printer driver. • Do not make extreme settings for [Gray Reproduction (Text/Line Art):] in black and white. 9. This applies similarly to [Auto], printing is different from colors displayed on ...
...representative. For details, see the printer driver Help. • Some applications print color files in the printer driver's dialog box. Color changes extremely when adjusted with PDF Direct Print. • When using PDF Direct Print and letter size paper is different from the color ...are different from the color specified. • If a specific color is not performed with the printer driver. • Do not make extreme settings for [Gray Reproduction (Text/Line Art):] in black and white. 9. This applies similarly to [Auto], printing is different from colors displayed on ...
Software Guide
Page 16
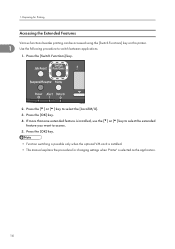
... Various functions besides printing can be accessed using the [Switch Functions] key on this printer. 1 Use the following procedure to select the [JavaTM/X]. 3. Preparing for changing settings when 'Printer' is installed, use the [ ] or [ ] key to select the extended feature you want to access. 5. Press the [ ] or [ ] key to switch between applications...
... Various functions besides printing can be accessed using the [Switch Functions] key on this printer. 1 Use the following procedure to select the [JavaTM/X]. 3. Preparing for changing settings when 'Printer' is installed, use the [ ] or [ ] key to select the extended feature you want to access. 5. Press the [ ] or [ ] key to switch between applications...
Software Guide
Page 30
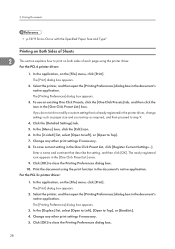
... the [Printing Preferences] dialog box in the document's native application. Change any other print settings if necessary. 5. Select the printer, and then open the [Printing Preferences] dialog box in the printer driver, change settings such as paper size and source tray as required, and then proceed... to modify a custom setting that describe the setting, and then click [OK]. In the [Menu:] box, click the [Edit] icon....
... the [Printing Preferences] dialog box in the document's native application. Change any other print settings if necessary. 5. Select the printer, and then open the [Printing Preferences] dialog box in the printer driver, change settings such as paper size and source tray as required, and then proceed... to modify a custom setting that describe the setting, and then click [OK]. In the [Menu:] box, click the [Edit] icon....
Software Guide
Page 34
... already registered in the document's native application. Select the printer, and then open the [Printing Preferences] dialog box in the printer driver, change settings such as paper size and source tray as required, and then proceed to step 9. 4. In the [Menu:] box, click the [Edit...] icon. 6. To save current setting in the [One Click Preset List:] area. 9. Change any other print settings if necessary. 5. 2. The [Printing Preferences] dialog box appears. 3. In the application, on the [File] menu, click...
... already registered in the document's native application. Select the printer, and then open the [Printing Preferences] dialog box in the printer driver, change settings such as paper size and source tray as required, and then proceed to step 9. 4. In the [Menu:] box, click the [Edit...] icon. 6. To save current setting in the [One Click Preset List:] area. 9. Change any other print settings if necessary. 5. 2. The [Printing Preferences] dialog box appears. 3. In the application, on the [File] menu, click...
Software Guide
Page 153
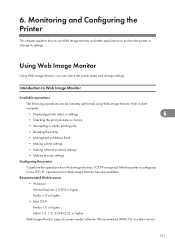
...jobs • Resetting the printer • Managing the Address Book • Making printer settings • Making network protocol settings • Making security settings Configuring the printer To perform the operations from Web Image Monitor become available. Monitoring and ...Image Monitor, TCP/IP is required. Introduction to Web Image Monitor Available operations The following operations can check the printer status and change its settings. Recommended Web browser • Windows: Internet Explorer 5.5 SP2 or higher Firefox 1.0 or higher • Mac OS X: Firefox ...
...jobs • Resetting the printer • Managing the Address Book • Making printer settings • Making network protocol settings • Making security settings Configuring the printer To perform the operations from Web Image Monitor become available. Monitoring and ...Image Monitor, TCP/IP is required. Introduction to Web Image Monitor Available operations The following operations can check the printer status and change its settings. Recommended Web browser • Windows: Internet Explorer 5.5 SP2 or higher Firefox 1.0 or higher • Mac OS X: Firefox ...
VM Card Extended Feature Settings Web Reference
Page 36
7. For details, see "Logging in as an Administrator". • You can specify Heap / Stack Size Settings and Web Service Settings. • Changed settings are activated after the device has been rebooted. • p.7 "Displaying the Operation Screen" • p.7 "Logging in as an administrator. Administrator Tools • To set [Administrator Tools], you must login as an Administrator" • p.15 "Administrator Tools Screen" 7 34
7. For details, see "Logging in as an Administrator". • You can specify Heap / Stack Size Settings and Web Service Settings. • Changed settings are activated after the device has been rebooted. • p.7 "Displaying the Operation Screen" • p.7 "Logging in as an administrator. Administrator Tools • To set [Administrator Tools], you must login as an Administrator" • p.15 "Administrator Tools Screen" 7 34


