User Guide
Page 8
... the Size of Paper for Printing Copies 251 Specifying the Tray for Printing Faxes 252 Specifying the Tray Priority for the Printer Function 253 Configuring Toner Saver Mode 253 Registering Destinations 254 Restricting Machine Functions According to User 255 Configuring the Network Settings 256 Checking the Network Status 256 Configuring the...
... the Size of Paper for Printing Copies 251 Specifying the Tray for Printing Faxes 252 Specifying the Tray Priority for the Printer Function 253 Configuring Toner Saver Mode 253 Registering Destinations 254 Restricting Machine Functions According to User 255 Configuring the Network Settings 256 Checking the Network Status 256 Configuring the...

User Guide
Page 40
... cartridge's photo conductor unit. 30 BSP024S Consult a doctor if necessary. • If toner or used toner is swallowed, dilute by drinking a large amount of water. Consult a doctor if necessary. • If toner or used toner gets into a fresh air environment. chine. ❒ Keep uncovered print cartridges away from... when exposed to fall inside the ma- The machine will be installed. R WARNING: 2 • Do not incinerate used toner, or toner containers in place while moving the machine, use the inset grips on the tray area when lifting the machine. ❒ Do...
... cartridge's photo conductor unit. 30 BSP024S Consult a doctor if necessary. • If toner or used toner is swallowed, dilute by drinking a large amount of water. Consult a doctor if necessary. • If toner or used toner gets into a fresh air environment. chine. ❒ Keep uncovered print cartridges away from... when exposed to fall inside the ma- The machine will be installed. R WARNING: 2 • Do not incinerate used toner, or toner containers in place while moving the machine, use the inset grips on the tray area when lifting the machine. ❒ Do...
User Guide
Page 68
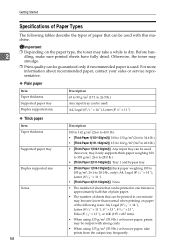
... paper. • The number of sheets that can be printed in one minute may take prints from the output tray frequently. Otherwise, the toner may smudge. ❒ Print quality can be used . Getting Started Specifications of Paper Types The following tables describe the types of the following sizes... using 135 g/m2 (35.9 lb.) or heavier paper, prints may be output with this machine. Important ❒ Depending on the paper type, the toner may become lower than normal when printing on paper of paper that can be used (however, tray 2 only supports thick paper weighing 100 to 105...
... paper. • The number of sheets that can be printed in one minute may take prints from the output tray frequently. Otherwise, the toner may smudge. ❒ Print quality can be used . Getting Started Specifications of Paper Types The following tables describe the types of the following sizes... using 135 g/m2 (35.9 lb.) or heavier paper, prints may be output with this machine. Important ❒ Depending on the paper type, the toner may become lower than normal when printing on paper of paper that can be used (however, tray 2 only supports thick paper weighing 100 to 105...
User Guide
Page 95
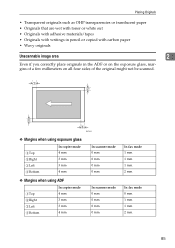
... fax mode 0 mm 1 mm 1 mm 2 mm 85 Placing Originals • Transparent originals such as OHP transparencies or translucent paper • Originals that are wet with toner or white out • Originals with adhesive materials/tapes • Originals with writings in pencil or copied with carbon paper • Wavy originals Unscannable image...
... fax mode 0 mm 1 mm 1 mm 2 mm 85 Placing Originals • Transparent originals such as OHP transparencies or translucent paper • Originals that are wet with toner or white out • Originals with adhesive materials/tapes • Originals with writings in pencil or copied with carbon paper • Wavy originals Unscannable image...
User Guide
Page 96
... should be aligned to reproduce, they might open or be fed into the ADF. Important ❒ Do not place originals before any correction fluid and toner has completely 2 dried.
... should be aligned to reproduce, they might open or be fed into the ADF. Important ❒ Do not place originals before any correction fluid and toner has completely 2 dried.
User Guide
Page 210
... Directory ({User Tools} key setting) Quick Dial Entry Speed Dial Entry ❖ Machine Settings ({User Tools} key setting) Speaker Volume Paper Settings I/O Timeout Auto Continue Toner Saver Mode Cartridge&Parts 7 Scanner Carriage Low Humidity Mode Scan Warm-up Time User Registration ❖ Network Settings ({User Tools} key setting) Ethernet IP Configuration...
... Directory ({User Tools} key setting) Quick Dial Entry Speed Dial Entry ❖ Machine Settings ({User Tools} key setting) Speaker Volume Paper Settings I/O Timeout Auto Continue Toner Saver Mode Cartridge&Parts 7 Scanner Carriage Low Humidity Mode Scan Warm-up Time User Registration ❖ Network Settings ({User Tools} key setting) Ethernet IP Configuration...
User Guide
Page 232
..., , 222 placing) (Needs re(Needs re(Needs re(Needs re- Default: [Off] • On • Off ❖ Toner Saver Mode Sets the machine to ignore an error with the exposure glass. This setting appears only when the user restriction function is output...Image Monitor. Default: [Off] • On 7 • Off ❖ Cartridge&Parts Displays information about consumables. • Print Cartridge Displays the remaining amount of toner. • Black Life (New), , , , , placing) • Fuser Unit • Fuser Unit Life Displays the remaining life of the fusing unit. (...
..., , 222 placing) (Needs re(Needs re(Needs re(Needs re- Default: [Off] • On • Off ❖ Toner Saver Mode Sets the machine to ignore an error with the exposure glass. This setting appears only when the user restriction function is output...Image Monitor. Default: [Off] • On 7 • Off ❖ Cartridge&Parts Displays information about consumables. • Print Cartridge Displays the remaining amount of toner. • Black Life (New), , , , , placing) • Fuser Unit • Fuser Unit Life Displays the remaining life of the fusing unit. (...
User Guide
Page 239
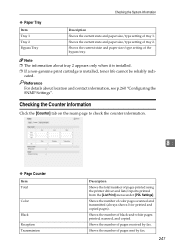
... paper size and type settings. • Tray 2 Shows paper size and type settings. ❖ Cartridge & Parts Information Shows the information about supply levels. • Black Toner • Fuser Unit • Transfer Roller • Paper Feed Roller 7 229
... paper size and type settings. • Tray 2 Shows paper size and type settings. ❖ Cartridge & Parts Information Shows the information about supply levels. • Black Toner • Fuser Unit • Transfer Roller • Paper Feed Roller 7 229
User Guide
Page 256
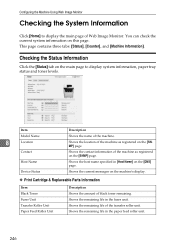
... unit. 246 Configuring the Machine Using Web Image Monitor Checking the System Information Click [Home] to display system information, paper tray status and toner levels. Shows the location of black toner remaining. Shows the host name specified in [Host Name] on the machine's display. ❖ Print Cartridge & Replaceable Parts Information Item Black...
... unit. 246 Configuring the Machine Using Web Image Monitor Checking the System Information Click [Home] to display system information, paper tray status and toner levels. Shows the location of black toner remaining. Shows the host name specified in [Host Name] on the machine's display. ❖ Print Cartridge & Replaceable Parts Information Item Black...
User Guide
Page 257
Reference For details about tray 2 appears only when it is installed. ❒ If a non-genuine print cartridge is installed, toner life cannot be reliably indi- Shows the current state and paper size/type setting of pages sent by fax. Shows the number of the bypass ...
Reference For details about tray 2 appears only when it is installed. ❒ If a non-genuine print cartridge is installed, toner life cannot be reliably indi- Shows the current state and paper size/type setting of pages sent by fax. Shows the number of the bypass ...

User Guide
Page 259
... the beep that sounds when a job error occurs from 0 (sound off ) to 3. This page contains six tabs: [Speaker Volume], [Paper Settings], [Copy], [Fax], [Printer], and [Toner Saver Mode].
... the beep that sounds when a job error occurs from 0 (sound off ) to 3. This page contains six tabs: [Speaker Volume], [Paper Settings], [Copy], [Fax], [Printer], and [Toner Saver Mode].
User Guide
Page 263
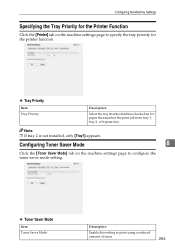
Note ❒ If tray 2 is not installed, only [Tray1] appears. Configuring Toner Saver Mode 8 Click the [Toner Saver Mode] tab on the machine settings page to print using a reduced amount of toner. 253 Configuring the Machine Settings Specifying the Tray Priority for the Printer Function Click the... [Printer] tab on the machine settings page to configure the toner saver mode setting. ❖ Toner Saver Mode Item Toner Saver Mode Description Enable this setting to specify the tray priority for the printer function. ❖ Tray ...
Note ❒ If tray 2 is not installed, only [Tray1] appears. Configuring Toner Saver Mode 8 Click the [Toner Saver Mode] tab on the machine settings page to print using a reduced amount of toner. 253 Configuring the Machine Settings Specifying the Tray Priority for the Printer Function Click the... [Printer] tab on the machine settings page to configure the toner saver mode setting. ❖ Toner Saver Mode Item Toner Saver Mode Description Enable this setting to specify the tray priority for the printer function. ❖ Tray ...
User Guide
Page 269
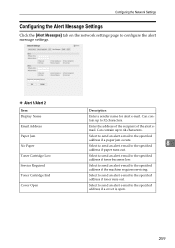
...contain up to configure the alert message settings. ❖ Alert 1/Alert 2 Item Display Name Email Address Paper Jam No Paper Toner Cartridge Low Service Required Toner Cartridge End Cover Open Description Enter a sender name for alert e-mail. Select to send an alert e-mail to the specified ...alert e-mail to the specified address if a paper jam occurs. Select to send an alert e-mail to the specified address if toner runs out. Configuring the Network Settings Configuring the Alert Message Settings Click the [Alert Messages] tab on the network settings page to 32 ...
...contain up to configure the alert message settings. ❖ Alert 1/Alert 2 Item Display Name Email Address Paper Jam No Paper Toner Cartridge Low Service Required Toner Cartridge End Cover Open Description Enter a sender name for alert e-mail. Select to send an alert e-mail to the specified ...alert e-mail to the specified address if a paper jam occurs. Select to send an alert e-mail to the specified address if toner runs out. Configuring the Network Settings Configuring the Alert Message Settings Click the [Alert Messages] tab on the network settings page to 32 ...

User Guide
Page 281
... paper guides to remove the gaps. • Avoid printing on the paper guide. • Make sure that contain large solid areas, which consume a lot of toner. • Use supported types of the machine and paper. Paper gets wrinkles. • Paper is too thin. Paper Feed Problems Paper Feed Problems If the...
... paper guides to remove the gaps. • Avoid printing on the paper guide. • Make sure that contain large solid areas, which consume a lot of toner. • Use supported types of the machine and paper. Paper gets wrinkles. • Paper is too thin. Paper Feed Problems Paper Feed Problems If the...

User Guide
Page 282
... the paper curl is severe, take prints from the output tray more frequently. • Paper is damp. Be careful not to get toner on your hands or clothes. ❒ Toner on the screen: "Bypass Tray Paper Misfeed Jam" "Duplex Jam Duplex Misfeed Jam" "Inner Jam" "Lower Misfeed Jam" "Outer Jam" "Upper Misfeed... will cause further jams and possibly damage the machine. 272 Troubleshooting Problem Solution The printed paper is curled. • Load the paper upside down in toner.
... the paper curl is severe, take prints from the output tray more frequently. • Paper is damp. Be careful not to get toner on your hands or clothes. ❒ Toner on the screen: "Bypass Tray Paper Misfeed Jam" "Duplex Jam Duplex Misfeed Jam" "Inner Jam" "Lower Misfeed Jam" "Outer Jam" "Upper Misfeed... will cause further jams and possibly damage the machine. 272 Troubleshooting Problem Solution The printed paper is curled. • Load the paper upside down in toner.
User Guide
Page 284
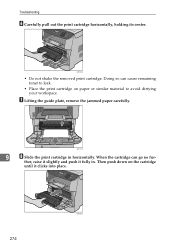
Then push down on paper or similar material to avoid dirtying your workspace. BSP036S • Do not shake the removed print cartridge. Doing so can go no fur- When the cartridge can cause remaining toner to leak. • Place the print cartridge on the cartridge until it fully in horizontally. G Lifting the guide plate, remove the jammed paper carefully. BSP121S 9 H Slide the print cartridge in . Troubleshooting F Carefully pull out the print cartridge horizontally, holding its center. ther, raise it slightly and push it clicks into place. 274 BSP039S
Then push down on paper or similar material to avoid dirtying your workspace. BSP036S • Do not shake the removed print cartridge. Doing so can go no fur- When the cartridge can cause remaining toner to leak. • Place the print cartridge on the cartridge until it fully in horizontally. G Lifting the guide plate, remove the jammed paper carefully. BSP121S 9 H Slide the print cartridge in . Troubleshooting F Carefully pull out the print cartridge horizontally, holding its center. ther, raise it slightly and push it clicks into place. 274 BSP039S
User Guide
Page 286
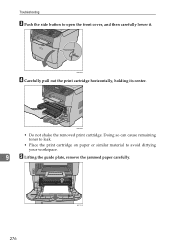
Troubleshooting C Push the side button to avoid dirtying your workspace. 9 E Lifting the guide plate, remove the jammed paper carefully. 276 BSP121S Doing so can cause remaining toner to leak. • Place the print cartridge on paper or similar material to open the front cover, and then carefully lower it. BSP032S D Carefully pull out the print cartridge horizontally, holding its center. BSP036S • Do not shake the removed print cartridge.
Troubleshooting C Push the side button to avoid dirtying your workspace. 9 E Lifting the guide plate, remove the jammed paper carefully. 276 BSP121S Doing so can cause remaining toner to leak. • Place the print cartridge on paper or similar material to open the front cover, and then carefully lower it. BSP032S D Carefully pull out the print cartridge horizontally, holding its center. BSP036S • Do not shake the removed print cartridge.
User Guide
Page 291
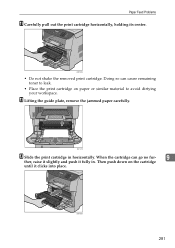
BSP036S • Do not shake the removed print cartridge. BSP121S M Slide the print cartridge in . BSP039S 281 L Lifting the guide plate, remove the jammed paper carefully. Then push down on paper or similar material to leak. • Place the print cartridge on the cartridge until it fully in horizontally. Paper Feed Problems K Carefully pull out the print cartridge horizontally, holding its center. When the cartridge can cause remaining toner to avoid dirtying your workspace. Doing so can go no fur- 9 ther, raise it slightly and push it clicks into place.
BSP036S • Do not shake the removed print cartridge. BSP121S M Slide the print cartridge in . BSP039S 281 L Lifting the guide plate, remove the jammed paper carefully. Then push down on paper or similar material to leak. • Place the print cartridge on the cartridge until it fully in horizontally. Paper Feed Problems K Carefully pull out the print cartridge horizontally, holding its center. When the cartridge can cause remaining toner to avoid dirtying your workspace. Doing so can go no fur- 9 ther, raise it slightly and push it clicks into place.
User Guide
Page 299
... whole printout is damp. Solution • Paper is blurred. See p.56 "Paper and Other Media". • If you enable [Toner Saver Mode] under [Machine Settings], printing is generally less dense. • Toner is damp. Solution Check that the page layout settings are properly configured in the printer properties dialog box matches the...
... whole printout is damp. Solution • Paper is blurred. See p.56 "Paper and Other Media". • If you enable [Toner Saver Mode] under [Machine Settings], printing is generally less dense. • Toner is damp. Solution Check that the page layout settings are properly configured in the printer properties dialog box matches the...
User Guide
Page 303
... is not set correctly. See p.131 "Selecting the Document Type According to scan originals unclearly. See p.130 "Adjusting Image Density". • Toner on the exposure glass, make sure that toner or correction fluid is dirty. high humidity. • Place the original on the exposure glass, and then place two or three sheets...
... is not set correctly. See p.131 "Selecting the Document Type According to scan originals unclearly. See p.130 "Adjusting Image Density". • Toner on the exposure glass, make sure that toner or correction fluid is dirty. high humidity. • Place the original on the exposure glass, and then place two or three sheets...


