User Guide
Page 9
Print Quality Problems 287 Checking the Condition of the Machine 287 Printer Problems 288 Changing the Printer Driver Settings 289 Print Positions Do Not Match Display Positions 289 Adjusting Printing Position 290 Copier Problems 293 Scanner ......319 Where to Inquire 320 Consumables ...321 Print Cartridges ...321 11.Appendix Specifications of the Machine 323 General Function Specifications 323 Printer Function Specifications 325 Copier Function Specifications 325 Scanner Function Specifications 326 Fax Function Specifications 327 Specifications of Options 328 Paper Feed Unit ...
Print Quality Problems 287 Checking the Condition of the Machine 287 Printer Problems 288 Changing the Printer Driver Settings 289 Print Positions Do Not Match Display Positions 289 Adjusting Printing Position 290 Copier Problems 293 Scanner ......319 Where to Inquire 320 Consumables ...321 Print Cartridges ...321 11.Appendix Specifications of the Machine 323 General Function Specifications 323 Printer Function Specifications 325 Copier Function Specifications 325 Scanner Function Specifications 326 Fax Function Specifications 327 Specifications of Options 328 Paper Feed Unit ...
User Guide
Page 19
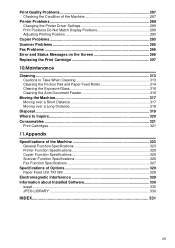
...are available: • USB connection • Network connection Connecting via USB You can connect this machine as a printer via USB To use this machine as a printer, two types of the machine. 1 Important ❒ Certain functions require special machine configuration. ❒ This machine...with USB Cable" and the instructions provided on the computer. Using the Machine as a Printer To use this machine directly to a computer using a USB cable, and install the printer driver on the driver CD-ROM. 9 For details, contact your sales or service representative, or visit the ...
...are available: • USB connection • Network connection Connecting via USB You can connect this machine as a printer via USB To use this machine as a printer, two types of the machine. 1 Important ❒ Certain functions require special machine configuration. ❒ This machine...with USB Cable" and the instructions provided on the computer. Using the Machine as a Printer To use this machine directly to a computer using a USB cable, and install the printer driver on the driver CD-ROM. 9 For details, contact your sales or service representative, or visit the ...
User Guide
Page 20
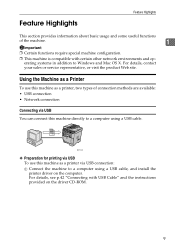
... a network You can password protect your print job. Printing confidential documents If you use it as a network printer. 1 BSP003S ❖ Preparation for network connection. C Install the printer driver on the driver CD-ROM. Important ❒ This function is printed only after you can connect this machine to a network. For details, see p.46... Connecting via network connection: A Connect the machine to a network and use the Locked Print function, you enter the password using the PCL6 printer driver. 10 BSP004S For details, see p.42 "Connecting with Network Cable".
... a network You can password protect your print job. Printing confidential documents If you use it as a network printer. 1 BSP003S ❖ Preparation for network connection. C Install the printer driver on the driver CD-ROM. Important ❒ This function is printed only after you can connect this machine to a network. For details, see p.46... Connecting via network connection: A Connect the machine to a network and use the Locked Print function, you enter the password using the PCL6 printer driver. 10 BSP004S For details, see p.42 "Connecting with Network Cable".
User Guide
Page 21
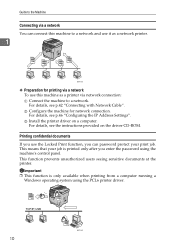
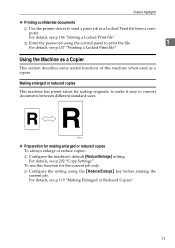
... machine's default [Reduce/Enlarge] setting. To use this machine when used as a Locked Print file from a com- Feature Highlights ❖ Printing confidential documents A Use the printer driver to send a print job as a copier. puter. For details, see p.119 "Making Enlarged or Reduced Copies". 11 BSP091S ❖ Preparation for scaling originals, to make...
... machine's default [Reduce/Enlarge] setting. To use this machine when used as a Locked Print file from a com- Feature Highlights ❖ Printing confidential documents A Use the printer driver to send a print job as a copier. puter. For details, see p.119 "Making Enlarged or Reduced Copies". 11 BSP091S ❖ Preparation for scaling originals, to make...
User Guide
Page 52
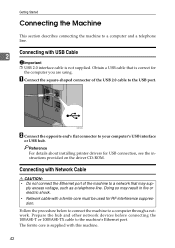
... a computer through a network. Follow the procedure below to connect the machine to the machine's Ethernet port. Reference For details about installing printer drivers for RF interference suppression. Obtain a USB cable that may result in fire or electric shock. • Network cable with a ferrite core... must be used for USB connection, see the instructions provided on the driver CD-ROM. Connecting with this machine. 42 ply excess voltage, such as a telephone line. Connecting with USB Cable 2 Important ❒ ...
... a computer through a network. Follow the procedure below to connect the machine to the machine's Ethernet port. Reference For details about installing printer drivers for RF interference suppression. Obtain a USB cable that may result in fire or electric shock. • Network cable with a ferrite core... must be used for USB connection, see the instructions provided on the driver CD-ROM. Connecting with this machine. 42 ply excess voltage, such as a telephone line. Connecting with USB Cable 2 Important ❒ ...
User Guide
Page 53
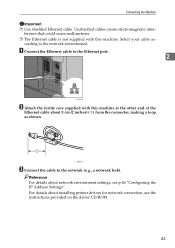
...shielded Ethernet cable. BBM011S C Connect the cable to the network environment. cording to the network (e.g., a network hub). For details about installing printer drivers for network connection, see p.46 "Configuring the IP Address Settings". Select your cable ac- A Connect the Ethernet cable to the Ethernet port....with this machine at the other end of the Ethernet cable about network environment settings, see the instructions provided on the driver CD-ROM. 43 Unshielded cables create electromagnetic inter- ference that could cause malfunctions. ❒ The Ethernet cable is not...
...shielded Ethernet cable. BBM011S C Connect the cable to the network environment. cording to the network (e.g., a network hub). For details about installing printer drivers for network connection, see p.46 "Configuring the IP Address Settings". Select your cable ac- A Connect the Ethernet cable to the Ethernet port....with this machine at the other end of the Ethernet cable about network environment settings, see the instructions provided on the driver CD-ROM. 43 Unshielded cables create electromagnetic inter- ference that could cause malfunctions. ❒ The Ethernet cable is not...
User Guide
Page 63
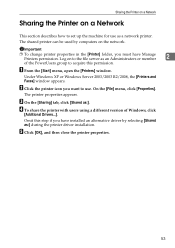
... by selecting [Shared as:] during the printer driver installation. On the [File] menu, click [Properties]. Sharing the Printer on a Network Sharing the Printer on a Network This section describes how to acquire this step if you have Manage Printers permission. A From the [Start] menu, open the [Printers] window. D To share the printer with users using a different version of...
... by selecting [Shared as:] during the printer driver installation. On the [File] menu, click [Properties]. Sharing the Printer on a Network Sharing the Printer on a Network This section describes how to acquire this step if you have Manage Printers permission. A From the [Start] menu, open the [Printers] window. D To share the printer with users using a different version of...
User Guide
Page 65
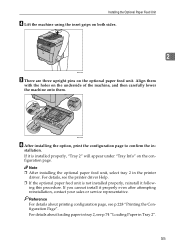
... it is not installed properly, reinstall it follow- BSP035S F After installing the option, print the configuration page to confirm the in the printer driver. Reference For details about loading paper in Tray 2". 55 Align them with the holes on the optional paper feed unit. If it properly..., contact your sales or service representative. ing this procedure. stallation. For details, see p.74 "Loading Paper in tray 2, see the printer driver Help. ❒ If the optional paper feed unit is installed properly, "Tray 2" will appear under "Tray Info" on the configuration page.
... it is not installed properly, reinstall it follow- BSP035S F After installing the option, print the configuration page to confirm the in the printer driver. Reference For details about loading paper in Tray 2". 55 Align them with the holes on the optional paper feed unit. If it properly..., contact your sales or service representative. ing this procedure. stallation. For details, see p.74 "Loading Paper in tray 2, see the printer driver Help. ❒ If the optional paper feed unit is installed properly, "Tray 2" will appear under "Tray Info" on the configuration page.
User Guide
Page 72
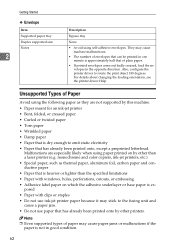
Also, configure the printer driver to the fusing unit and cause a paper jam. • Do not use ink-jet printer paper because it may stick to rotate the print object 180 degrees. Getting Started ❖ Envelope Item Supported paper tray Duplex supported size ... • Special paper, such as they are especially likely when using self-adhesive envelopes. For details about changing the loading orientation, see the printer driver Help. Unsupported Types of Paper Avoid using the following paper as thermal paper, aluminum foil, carbon paper and conductive paper • Paper that ...
Also, configure the printer driver to the fusing unit and cause a paper jam. • Do not use ink-jet printer paper because it may stick to rotate the print object 180 degrees. Getting Started ❖ Envelope Item Supported paper tray Duplex supported size ... • Special paper, such as they are especially likely when using self-adhesive envelopes. For details about changing the loading orientation, see the printer driver Help. Unsupported Types of Paper Avoid using the following paper as thermal paper, aluminum foil, carbon paper and conductive paper • Paper that ...

User Guide
Page 74
Getting Started ❖ Envelope 2 BSP057S A Print area B Feed direction C Approximately 4.2 mm (0.17 inches) D Approximately 4.2 mm (0.17 inches) Note ❒ The print area may vary depending on the paper size, printer language and printer driver settings. ❒ For better envelope printing, we recommend you set the right, left, top, and bottom print margins to at least 15 mm (0.6 inches) each. 64
Getting Started ❖ Envelope 2 BSP057S A Print area B Feed direction C Approximately 4.2 mm (0.17 inches) D Approximately 4.2 mm (0.17 inches) Note ❒ The print area may vary depending on the paper size, printer language and printer driver settings. ❒ For better envelope printing, we recommend you set the right, left, top, and bottom print margins to at least 15 mm (0.6 inches) each. 64
User Guide
Page 87
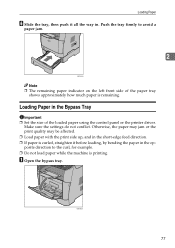
... avoid a paper jam. 2 BSP081S Note ❒ The remaining paper indicator on the left front side of the loaded paper using the control panel or the printer driver. Push the tray firmly to the curl, for example. ❒ Do not load paper while the machine is printing.
... avoid a paper jam. 2 BSP081S Note ❒ The remaining paper indicator on the left front side of the loaded paper using the control panel or the printer driver. Push the tray firmly to the curl, for example. ❒ Do not load paper while the machine is printing.
User Guide
Page 88
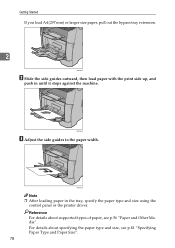
..., then load paper with the print side up, and push in the tray, specify the paper type and size using the control panel or the printer driver. Reference For details about specifying the paper type and size, see p.56 "Paper and Other Media". BSP073S Note ❒ After loading paper in until it...
..., then load paper with the print side up, and push in the tray, specify the paper type and size using the control panel or the printer driver. Reference For details about specifying the paper type and size, see p.56 "Paper and Other Media". BSP073S Note ❒ After loading paper in until it...
User Guide
Page 91
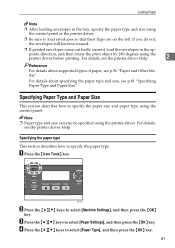
Specifying Paper Type and Paper Size This section describes how to specify the paper size and paper type using the control panel or the printer driver. ❒ Be sure to load envelopes so that their flaps are on the left. A Press the {User Tools} key. Loading ...Paper Note ❒ After loading envelopes in the op- posite direction, and then rotate the print object by 180 degrees using the printer driver. For details about supported types of paper, see p.56 "Paper and Other Media". For details, see p.81 "Specifying Paper Type and Paper Size...
Specifying Paper Type and Paper Size This section describes how to specify the paper size and paper type using the control panel or the printer driver. ❒ Be sure to load envelopes so that their flaps are on the left. A Press the {User Tools} key. Loading ...Paper Note ❒ After loading envelopes in the op- posite direction, and then rotate the print object by 180 degrees using the printer driver. For details about supported types of paper, see p.56 "Paper and Other Media". For details, see p.81 "Specifying Paper Type and Paper Size...
User Guide
Page 93
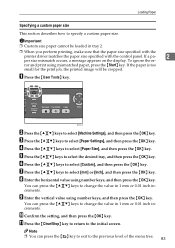
.... You can press the {U}{T} keys to change the value in tray 2. ❒ When you perform printing, make sure that the paper size specified with the printer driver matches the paper size specified with the control panel. J Confirm the setting, and then press the {OK} key. K Press the {Clear/Stop} key to return...
.... You can press the {U}{T} keys to change the value in tray 2. ❒ When you perform printing, make sure that the paper size specified with the printer driver matches the paper size specified with the control panel. J Confirm the setting, and then press the {OK} key. K Press the {Clear/Stop} key to return...
User Guide
Page 107
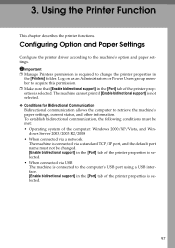
... to acquire this permission. ❒ Make sure that [Enable bidirectional support] in the [Printers] folder. 3. Configuring Option and Paper Settings Configure the printer driver according to retrieve the machine's paper settings, current status, and other information. Important ❒ Manage Printers permission is not selected. ❖ Conditions for Bidirectional Communication Bidirectional communication allows the computer...
... to acquire this permission. ❒ Make sure that [Enable bidirectional support] in the [Printers] folder. 3. Configuring Option and Paper Settings Configure the printer driver according to retrieve the machine's paper settings, current status, and other information. Important ❒ Manage Printers permission is not selected. ❖ Conditions for Bidirectional Communication Bidirectional communication allows the computer...
User Guide
Page 110
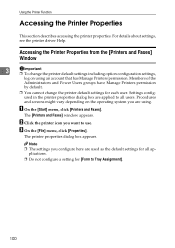
...] window appears. For details about settings, see the printer driver Help. C On the [File] menu, click [Properties]. B Click the printer icon you configure here are applied to all ap- A On the [Start] menu, click [Printers and Faxes]. The printer properties dialog box appears. Accessing the Printer Properties from the [Printers and Faxes] Window 3 Important ❒ To change...
...] window appears. For details about settings, see the printer driver Help. C On the [File] menu, click [Properties]. B Click the printer icon you configure here are applied to all ap- A On the [Start] menu, click [Printers and Faxes]. The printer properties dialog box appears. Accessing the Printer Properties from the [Printers and Faxes] Window 3 Important ❒ To change...
User Guide
Page 116
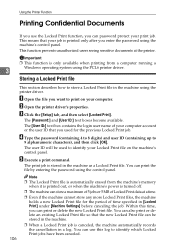
...Print job. Note ❒ The Locked Print file is automatically erased from a computer running a 3 Windows operating system using the printer driver. You can print or delete the new Locked Print file. You can also print or delete an existing Locked Print file so ...name of your print job. E Execute a print command. Within this log to identify which Locked Print jobs have been canceled. 106 B Open the printer driver's properties. Storing a Locked Print file This section describes how to 9 alphanumeric characters), and then click [OK]. D Type the password (containing 4 ...
...Print job. Note ❒ The Locked Print file is automatically erased from a computer running a 3 Windows operating system using the printer driver. You can print or delete the new Locked Print file. You can also print or delete an existing Locked Print file so ...name of your print job. E Execute a print command. Within this log to identify which Locked Print jobs have been canceled. 106 B Open the printer driver's properties. Storing a Locked Print file This section describes how to 9 alphanumeric characters), and then click [OK]. D Type the password (containing 4 ...
User Guide
Page 117
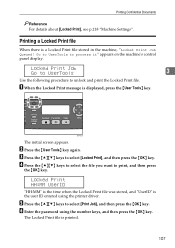
... Print file. E Press the {U}{T} keys to select [Locked Print], and then press the {OK} key. BSP051S The initial screen appears. F Enter the password using the printer driver. A When the Locked Print message is printed. 107 C Press the {U}{T} keys to select [Print Job], and then press the {OK} key. Locked Print HH:MM...
... Print file. E Press the {U}{T} keys to select [Locked Print], and then press the {OK} key. BSP051S The initial screen appears. F Enter the password using the printer driver. A When the Locked Print message is printed. 107 C Press the {U}{T} keys to select [Print Job], and then press the {OK} key. Locked Print HH:MM...
User Guide
Page 119
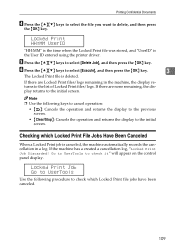
... machine, the display returns to check which Locked Print File Jobs Have Been Canceled When a Locked Print job is the User ID entered using the printer driver. E Press the {U}{T} keys to check it" will appear on the control panel display. Checking which Locked Print file jobs have been canceled. 109 F Press the...
... machine, the display returns to check which Locked Print File Jobs Have Been Canceled When a Locked Print job is the User ID entered using the printer driver. E Press the {U}{T} keys to check it" will appear on the control panel display. Checking which Locked Print file jobs have been canceled. 109 F Press the...
User Guide
Page 120
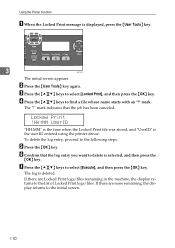
... the job has been canceled. G Press the {U}{T} keys to delete is deleted. E Press the {OK} key. Using the Printer Function A When the Locked Print message is the user ID entered using the printer driver. B Press the {User Tools} key again. The "!" If there are none remaining, the display returns to select [Locked Print...
... the job has been canceled. G Press the {U}{T} keys to delete is deleted. E Press the {OK} key. Using the Printer Function A When the Locked Print message is the user ID entered using the printer driver. B Press the {User Tools} key again. The "!" If there are none remaining, the display returns to select [Locked Print...


