User Guide
Page 8
... Alert Message Settings 259 Configuring the SNMP Settings 260 Configuring the SMTP Settings 261 Printing Reports 263 Configuring the Administrator Settings 264 Configuring the Password 264 Restoring the Default Settings 264 Backing Up the Machine's Settings 265 Restoring the Machine's Settings from a Backup File 266 Configuring the Date and Time Settings 267...
... Alert Message Settings 259 Configuring the SNMP Settings 260 Configuring the SMTP Settings 261 Printing Reports 263 Configuring the Administrator Settings 264 Configuring the Password 264 Restoring the Default Settings 264 Backing Up the Machine's Settings 265 Restoring the Machine's Settings from a Backup File 266 Configuring the Date and Time Settings 267...
User Guide
Page 21
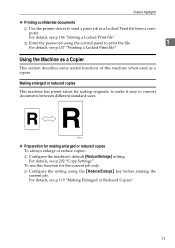
... useful functions of this function for making enlarged or reduced copies To always enlarge or reduce copies: A Configure the machine's default [Reduce/Enlarge] setting. For details, see p.202 "Copy Settings". B Enter the password using the {Reduce/Enlarge} key before starting the current job. For details, see p.106 "Storing a Locked Print file". For...
... useful functions of this function for making enlarged or reduced copies To always enlarge or reduce copies: A Configure the machine's default [Reduce/Enlarge] setting. For details, see p.202 "Copy Settings". B Enter the password using the {Reduce/Enlarge} key before starting the current job. For details, see p.106 "Storing a Locked Print file". For...

User Guide
Page 235
... is displayed with an "p" symbol, indicating that it is provided as an example. Ethernet LINK Setting F Press the {U}{T} keys to enter a password, enter the password using the num- Menu 7 Network Settings C If you are requested to select the network speed, and then press the {OK} key. Changing... Network Settings The procedure for changing the network speed is now the default. 225 Network Settings Ethernet E Press the {U}{T} keys to select [...
... is displayed with an "p" symbol, indicating that it is provided as an example. Ethernet LINK Setting F Press the {U}{T} keys to enter a password, enter the password using the num- Menu 7 Network Settings C If you are requested to select the network speed, and then press the {OK} key. Changing... Network Settings The procedure for changing the network speed is now the default. 225 Network Settings Ethernet E Press the {U}{T} keys to select [...
User Guide
Page 236
...the [Network Settings] menu can be specified in [Admin Menu Lock]. ❒ You can press the { } key to exit to the initial screen. Default: [Auto] • Auto • 100M Full Dup • 100M Half Dup • 10M Full Dup • 10M Half Dup 226 Reference For...cable is the optimum setting. Configuring the Machine Using the Control Panel G Confirm the setting, and then press the { } key. Note ❒ A password for Ethernet communication. H Press the {Clear/Stop} key to return to the previous level of the menu tree. Select a speed that matches your network environment...
...the [Network Settings] menu can be specified in [Admin Menu Lock]. ❒ You can press the { } key to exit to the initial screen. Default: [Auto] • Auto • 100M Full Dup • 100M Half Dup • 10M Full Dup • 10M Half Dup 226 Reference For...cable is the optimum setting. Configuring the Machine Using the Control Panel G Confirm the setting, and then press the { } key. Note ❒ A password for Ethernet communication. H Press the {Clear/Stop} key to return to the previous level of the menu tree. Select a speed that matches your network environment...

User Guide
Page 243
... {OK} key. 7 Menu Admin Settings C If you are requested to the initial screen. 233 Default Mode Copy * The new setting is provided as an example. G Press the {Clear/Stop} key to return to enter a password, enter the password using the num- Changing Administrator Settings The procedure for changing the start-up mode after... select [Copy] or [Fax], and then press the {OK} key. F Confirm the setting, and then press the { } key. A Press the {User Tools} key. Admin Settings Default Mode E Press the {U}{T} keys to select [Default Mode], and then press the {OK} key.
... {OK} key. 7 Menu Admin Settings C If you are requested to the initial screen. 233 Default Mode Copy * The new setting is provided as an example. G Press the {Clear/Stop} key to return to enter a password, enter the password using the num- Changing Administrator Settings The procedure for changing the start-up mode after... select [Copy] or [Fax], and then press the {OK} key. F Confirm the setting, and then press the { } key. A Press the {User Tools} key. Admin Settings Default Mode E Press the {U}{T} keys to select [Default Mode], and then press the {OK} key.

User Guide
Page 244
...characters and symbols. 234 Reference For details about [Admin Menu Lock], see p.233 "Administrator Settings". Configuring the Machine Using the Control Panel Note ❒ A password for sending a fax. • User Fax # Specifies the fax number of the machine using up to 20 characters, including 0 to 9, space, and "+".... 31 • Date format: Mm/Dd/Yyyy, Dd/Mm Yyyy, or Yyyy Mm/Dd • Time Setting Sets the time of the machine's internal clock. Default for [Time Format]: [12 hours], [24 hours] • Time format: 24 hours, 12 hours • Time: Am, Pm (for 12 hours) &#...
...characters and symbols. 234 Reference For details about [Admin Menu Lock], see p.233 "Administrator Settings". Configuring the Machine Using the Control Panel Note ❒ A password for sending a fax. • User Fax # Specifies the fax number of the machine using up to 20 characters, including 0 to 9, space, and "+".... 31 • Date format: Mm/Dd/Yyyy, Dd/Mm Yyyy, or Yyyy Mm/Dd • Time Setting Sets the time of the machine's internal clock. Default for [Time Format]: [12 hours], [24 hours] • Time format: 24 hours, 12 hours • Time: Am, Pm (for 12 hours) &#...
User Guide
Page 247
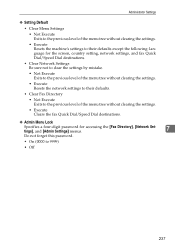
... • Not Execute Exits to the previous level of the menu tree without clearing the settings. • Execute Resets the machine's settings to their defaults except the following: language for the screen, country setting, network settings, and fax Quick Dial/Speed Dial destinations. • Clear Network Settings Be sure... menu tree without clearing the settings. • Execute Clears the fax Quick Dial/Speed Dial destinations. ❖ Admin Menu Lock Specifies a four-digit password for accessing the [Fax Directory], [Network Settings], and [Admin Settings] menus. 7 Do not forget this...
... • Not Execute Exits to the previous level of the menu tree without clearing the settings. • Execute Resets the machine's settings to their defaults except the following: language for the screen, country setting, network settings, and fax Quick Dial/Speed Dial destinations. • Clear Network Settings Be sure... menu tree without clearing the settings. • Execute Clears the fax Quick Dial/Speed Dial destinations. ❖ Admin Menu Lock Specifies a four-digit password for accessing the [Fax Directory], [Network Settings], and [Admin Settings] menus. 7 Do not forget this...
User Guide
Page 253
... • Printing reports • Registering scan and fax destinations • Configuring the user restriction settings • Configuring network settings • Setting a password for changing the machine's configuration • Restoring the default values for the machine's configuration • Creating backup files of the machine's configuration • Restoring the machine's configuration from backup files...
... • Printing reports • Registering scan and fax destinations • Configuring the user restriction settings • Configuring network settings • Setting a password for changing the machine's configuration • Restoring the default values for the machine's configuration • Creating backup files of the machine's configuration • Restoring the machine's configuration from backup files...
User Guide
Page 274
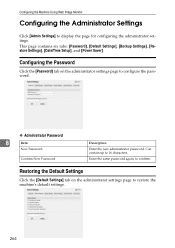
... the Machine Using Web Image Monitor Configuring the Administrator Settings Click [Admin Settings] to 16 characters. This page contains six tabs: [Password], [Default Settings], [Backup Settings], [Restore Settings], [Date/Time Setup], and [Power Saver]. Enter the same password again, to configure the password. ❖ Administrator Password 8 Item New Password Confirm New Password Description Enter the new administrator...
... the Machine Using Web Image Monitor Configuring the Administrator Settings Click [Admin Settings] to 16 characters. This page contains six tabs: [Password], [Default Settings], [Backup Settings], [Restore Settings], [Date/Time Setup], and [Power Saver]. Enter the same password again, to configure the password. ❖ Administrator Password 8 Item New Password Confirm New Password Description Enter the new administrator...
User Guide
Page 275
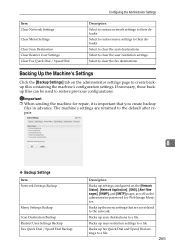
...tab on the [Network Status], [Network Application], [DNS], [Alert Messages], [SNMP], and [SMTP] pages, as well as the administrator password for repair, it is important that are returned to restore previous configurations. Important ❒ When sending the machine for Web Image Monitor. Backs ...Dial settings to a file. Select to clear the user restriction settings. If necessary, these backup files can be used to the default after repair. 8 ❖ Backup Settings Item Network Settings Backup Menu Settings Backup Scan Destination Backup Restrict User Settings Backup Fax ...
...tab on the [Network Status], [Network Application], [DNS], [Alert Messages], [SNMP], and [SMTP] pages, as well as the administrator password for repair, it is important that are returned to restore previous configurations. Important ❒ When sending the machine for Web Image Monitor. Backs ...Dial settings to a file. Select to clear the user restriction settings. If necessary, these backup files can be used to the default after repair. 8 ❖ Backup Settings Item Network Settings Backup Menu Settings Backup Scan Destination Backup Restrict User Settings Backup Fax ...

User Guide
Page 276
...10066; When the machine is returned from repair, it is important that you wish to back up. The machine's settings are returned to the default after repair. 8 ❖ Restore Settings Item Select file to restore Description Enter the file path and name of data you restore the machine's ...settings from a previously created backup file. B Enter the administrator password if required. C Click [OK]. F Specify a name for the type of the file to restore, or click [Browse] to select the file. E ...
...10066; When the machine is returned from repair, it is important that you wish to back up. The machine's settings are returned to the default after repair. 8 ❖ Restore Settings Item Select file to restore Description Enter the file path and name of data you restore the machine's ...settings from a previously created backup file. B Enter the administrator password if required. C Click [OK]. F Specify a name for the type of the file to restore, or click [Browse] to select the file. E ...
User Guide
Page 354
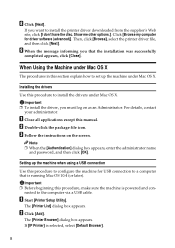
...To install the driver, you must log on the screen. Note ❒ When the [Authentication] dialog box appears, enter the administrator name and password, and then click [OK]. nected to install the drivers under Mac OS X. Show me other options.]. When Using the Machine under Mac OS..., make sure the machine is running Mac OS 10.4 (or later). A Start [Printer Setup Utility]. If [IP Printer] is selected, select [Default Browser]. 8 I don't have the disc. Click [Browse my computer for USB connection to a computer that the installation was successfully completed appears, click...
...To install the driver, you must log on the screen. Note ❒ When the [Authentication] dialog box appears, enter the administrator name and password, and then click [OK]. nected to install the drivers under Mac OS X. Show me other options.]. When Using the Machine under Mac OS..., make sure the machine is running Mac OS 10.4 (or later). A Start [Printer Setup Utility]. If [IP Printer] is selected, select [Default Browser]. 8 I don't have the disc. Click [Browse my computer for USB connection to a computer that the installation was successfully completed appears, click...


