Software Installation Guide
Page 1
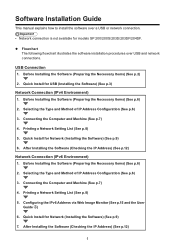
Software Installation Guide This manual explains how to install the software over USB and network connections. Quick Install for models SP 200/200S/203S/203SF/204SF. ◆ Flowchart The following flowchart illustrates the software installation procedures over a USB or network connection. • Network connection is not ...
Software Installation Guide This manual explains how to install the software over USB and network connections. Quick Install for models SP 200/200S/203S/203SF/204SF. ◆ Flowchart The following flowchart illustrates the software installation procedures over a USB or network connection. • Network connection is not ...
Software Installation Guide
Page 7
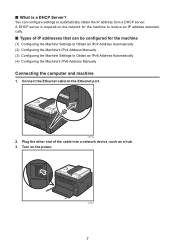
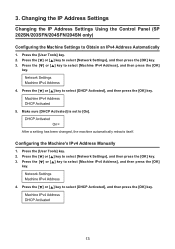
... the machine (1) Configuring the Machine Settings to Obtain an IPv4 Address Automatically (2) Configuring the Machine's IPv4 Address Manually (3) Configuring the Machine Settings to Obtain an IPv6 Address Automatically (4) Configuring the Machine's IPv6 Address Manually Connecting the computer and machine 1. You can be configured for the machine to receive an IP address automatically...
... the machine (1) Configuring the Machine Settings to Obtain an IPv4 Address Automatically (2) Configuring the Machine's IPv4 Address Manually (3) Configuring the Machine Settings to Obtain an IPv6 Address Automatically (4) Configuring the Machine's IPv6 Address Manually Connecting the computer and machine 1. You can be configured for the machine to receive an IP address automatically...
Software Installation Guide
Page 9
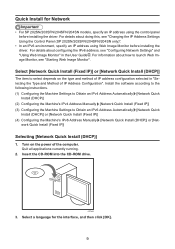
... [Network Quick Install (DHCP)] 1. For details about doing this, see "Changing the IP Address Settings Using the Control Panel (SP 202SN/203SFN/204SFN/204SN only)". • In an IPv6 environment, specify an IP address using the control panel before installing the driver. Install the software...how to Obtain an IPv6 Address Automatically [Network Quick Install (DHCP)] or [Network Quick Install (Fixed IP)] (4) Configuring the Machine's IPv6 Address Manually [Network Quick Install (DHCP)] or [Net- Insert the CD-ROM into the CD-ROM drive. Quick Install for the interface, and then click...
... [Network Quick Install (DHCP)] 1. For details about doing this, see "Changing the IP Address Settings Using the Control Panel (SP 202SN/203SFN/204SFN/204SN only)". • In an IPv6 environment, specify an IP address using the control panel before installing the driver. Install the software...how to Obtain an IPv6 Address Automatically [Network Quick Install (DHCP)] or [Network Quick Install (Fixed IP)] (4) Configuring the Machine's IPv6 Address Manually [Network Quick Install (DHCP)] or [Net- Insert the CD-ROM into the CD-ROM drive. Quick Install for the interface, and then click...
Software Installation Guide
Page 13
...User Tools] key. 2. Press the [ ] or [ ] key to select [Network Settings], and then press the [OK] key. 3. Configuring the Machine's IPv4 Address Manually 1. Press the [ ] or [ ] key to select [Machine IPv4 Address], and then press the [OK] key. 4. Changing the IP Address Settings Changing the IP ...Address Settings Using the Control Panel (SP 202SN/203SFN/204SFN/204SN only) Configuring the Machine Settings to [On]. Press the [User Tools] key. 2. Make sure [DHCP Activated] is set to ...
...User Tools] key. 2. Press the [ ] or [ ] key to select [Network Settings], and then press the [OK] key. 3. Configuring the Machine's IPv4 Address Manually 1. Press the [ ] or [ ] key to select [Machine IPv4 Address], and then press the [OK] key. 4. Changing the IP Address Settings Changing the IP ...Address Settings Using the Control Panel (SP 202SN/203SFN/204SFN/204SN only) Configuring the Machine Settings to [On]. Press the [User Tools] key. 2. Make sure [DHCP Activated] is set to ...
Software Installation Guide
Page 16
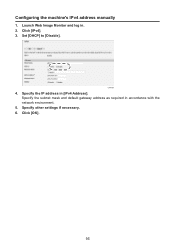
Specify the IP address in accordance with the network environment. 5. CTT167 4. Click [OK]. 16 Specify the subnet mask and default gateway address as required in [IPv4 Address]. Click [IPv4]. 3. Set [DHCP] to [Disable]. Specify other settings if necessary. 6. Configuring the machine's IPv4 address manually 1. Launch Web Image Monitor and log in. 2.
Specify the IP address in accordance with the network environment. 5. CTT167 4. Click [OK]. 16 Specify the subnet mask and default gateway address as required in [IPv4 Address]. Click [IPv4]. 3. Set [DHCP] to [Disable]. Specify other settings if necessary. 6. Configuring the machine's IPv4 address manually 1. Launch Web Image Monitor and log in. 2.
User Guide
Page 3
......27 Print Area...28 Loading Paper...31 Loading Paper into Tray 1...31 Loading Paper into Bypass Tray...34 1 TABLE OF CONTENTS How to Read This Manual...6 Introduction...6 Legal Prohibition...6 Disclaimer...6 About IP Address...7 Differences in the State of Facsimile Unit...11 NOTICE TO USERS (NEW ZEALAND)...11 Important Safety Instructions ...12...
......27 Print Area...28 Loading Paper...31 Loading Paper into Tray 1...31 Loading Paper into Bypass Tray...34 1 TABLE OF CONTENTS How to Read This Manual...6 Introduction...6 Legal Prohibition...6 Disclaimer...6 About IP Address...7 Differences in the State of Facsimile Unit...11 NOTICE TO USERS (NEW ZEALAND)...11 Important Safety Instructions ...12...
User Guide
Page 8
... this machine, losses of the registered data, or the use or non-use of the machine. Disclaimer Contents of the data registered in this manual in the product. 6 In no responsibility for which reproduction is prohibited by local law: bank notes, revenue stamps, bonds, stock certificates, bank... extent permitted by you using the machine. Copying or printing the following items is not inclusive. Some illustrations or explanations in this manual carefully before using this machine or any damage or expense that might result from the use genuine toner from your safety and benefit,...
... this machine, losses of the registered data, or the use or non-use of the machine. Disclaimer Contents of the data registered in this manual in the product. 6 In no responsibility for which reproduction is prohibited by local law: bank notes, revenue stamps, bonds, stock certificates, bank... extent permitted by you using the machine. Copying or printing the following items is not inclusive. Some illustrations or explanations in this manual carefully before using this machine or any damage or expense that might result from the use genuine toner from your safety and benefit,...
User Guide
Page 9
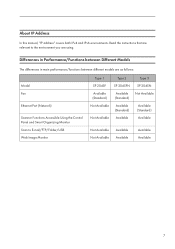
... to E-mail/FTP/Folder/USB Web Image Monitor Type 1 SP 204SF Available (Standard) Not Available Not Available Type 2 SP 204SFN Available (Standard) Available (Standard) Available Type 3 SP 204SN Not Available Available (Standard) Available Not Available Not Available Available Available Available Available 7 About IP Address In this manual, "IP address" covers both IPv4 and IPv6 environments...
... to E-mail/FTP/Folder/USB Web Image Monitor Type 1 SP 204SF Available (Standard) Not Available Not Available Type 2 SP 204SFN Available (Standard) Available (Standard) Available Type 3 SP 204SN Not Available Available (Standard) Available Not Available Not Available Available Available Available Available 7 About IP Address In this manual, "IP address" covers both IPv4 and IPv6 environments...
User Guide
Page 10
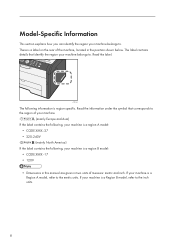
... a Region A model, refer to the metric units. CTT110 The following , your machine is a region B model: • CODE XXXX -17 • 120V • Dimensions in this manual are given in two units of the machine, located in the position shown below. If your machine belongs to. Read the label. If your machine...
... a Region A model, refer to the metric units. CTT110 The following , your machine is a region B model: • CODE XXXX -17 • 120V • Dimensions in this manual are given in two units of the machine, located in the position shown below. If your machine belongs to. Read the label. If your machine...
User Guide
Page 11
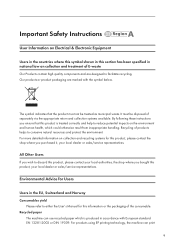
... shop where you ensure that the product must be treated as municipal waste. It must not be disposed of products helps to either the User's Manual for this product is produced in the EU, Switzerland and Norway Consumables yield Please refer to conserve natural resources and protect the environment. For more...
... shop where you ensure that the product must be treated as municipal waste. It must not be disposed of products helps to either the User's Manual for this product is produced in the EU, Switzerland and Norway Consumables yield Please refer to conserve natural resources and protect the environment. For more...
User Guide
Page 23
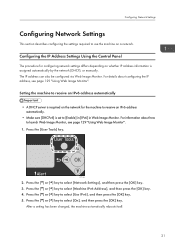
... reboots itself. 21 For details about how to receive an IPv6 address automatically. • Make sure [DHCPv6] is assigned automatically by the network (DHCP), or manually.
... reboots itself. 21 For details about how to receive an IPv6 address automatically. • Make sure [DHCPv6] is assigned automatically by the network (DHCP), or manually.
User Guide
Page 24
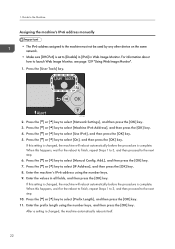
...see page 129 "Using Web Image Monitor". 1. Enter the prefix length using the number keys. 9. Guide to the Machine Assigning the machine's IPv6 address manually • The IPv6 address assigned to the machine must not be used by any other device on the same network. • Make sure [DHCPv6] ...[OK] key. Enter the machine's IPv6 address using the number keys, and then press the [OK] key. Press the [ ] or [ ] key to select [Manual Config. When this setting is complete. If this happens, wait for the reboot to finish, repeat Steps 1 to 3, and then proceed to the next step...
...see page 129 "Using Web Image Monitor". 1. Enter the prefix length using the number keys. 9. Guide to the Machine Assigning the machine's IPv6 address manually • The IPv6 address assigned to the machine must not be used by any other device on the same network. • Make sure [DHCPv6] ...[OK] key. Enter the machine's IPv6 address using the number keys, and then press the [OK] key. Press the [ ] or [ ] key to select [Manual Config. When this setting is complete. If this happens, wait for the reboot to finish, repeat Steps 1 to 3, and then proceed to the next step...
User Guide
Page 54
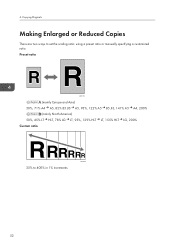
Preset ratio CES103 (mainly Europe and Asia) 50%, 71% A4 A5, 82% B5 JIS A5, 93%, 122% A5 B5 JIS, 141% A5 A4, 200% (mainly North America) 50%, 65% LT HLT, 78% LG LT, 93%, 129% HLT LT, 155% HLT LG, 200% Custom ratio CES106 25% to set the scaling ratio: using a preset ratio or manually specifying a customized ratio. Copying Originals Making Enlarged or Reduced Copies There are two ways to 400% in 1% increments. 52 4.
Preset ratio CES103 (mainly Europe and Asia) 50%, 71% A4 A5, 82% B5 JIS A5, 93%, 122% A5 B5 JIS, 141% A5 A4, 200% (mainly North America) 50%, 65% LT HLT, 78% LG LT, 93%, 129% HLT LT, 155% HLT LG, 200% Custom ratio CES106 25% to set the scaling ratio: using a preset ratio or manually specifying a customized ratio. Copying Originals Making Enlarged or Reduced Copies There are two ways to 400% in 1% increments. 52 4.
User Guide
Page 77
.../ Contrast, Sharpness, Curves, Levels, Color Balance, and Hue/Saturation. The scan settings that can be applied to all settings can adjust the image quality. When [Manual] is selected, the default values will be adjusted are as required. • For details, see the TWAIN driver help. Original Scan Method Specify the method...
.../ Contrast, Sharpness, Curves, Levels, Color Balance, and Hue/Saturation. The scan settings that can be applied to all settings can adjust the image quality. When [Manual] is selected, the default values will be adjusted are as required. • For details, see the TWAIN driver help. Original Scan Method Specify the method...
User Guide
Page 87
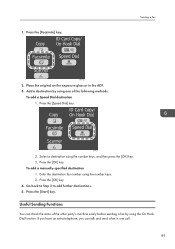
... next original on the exposure glass and Memory Transmission mode is canceled immediately. Sending a Fax CTT131 Depending on the other party's machine. 85 If you manually entered the destination fax number. Repeat this case, an error is displayed on the machine's settings, you may become full while scanning the originals. 4. Press...
... next original on the exposure glass and Memory Transmission mode is canceled immediately. Sending a Fax CTT131 Depending on the other party's machine. 85 If you manually entered the destination fax number. Repeat this case, an error is displayed on the machine's settings, you may become full while scanning the originals. 4. Press...
User Guide
Page 91
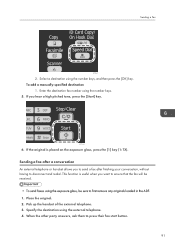
... the original on the exposure glass or in one of the other party's machine easily before sending a fax by using one call. 89 To add a manually-specified destination 1. Go back to Step 3 to add further destinations. 5. If you have an extra telephone, you can check the status of the following methods...
... the original on the exposure glass or in one of the other party's machine easily before sending a fax by using one call. 89 To add a manually-specified destination 1. Go back to Step 3 to add further destinations. 5. If you have an extra telephone, you can check the status of the following methods...
User Guide
Page 93
... using the external telephone. 4. Pick up the handset of the external telephone. 3. When the other party answers, ask them to disconnect and redial. To add a manually-specified destination 1. If you to send a fax after a conversation An external telephone or handset allows you hear a high pitched tone, press the [Start] key. Select...
... using the external telephone. 4. Pick up the handset of the external telephone. 3. When the other party answers, ask them to disconnect and redial. To add a manually-specified destination 1. If you to send a fax after a conversation An external telephone or handset allows you hear a high pitched tone, press the [Start] key. Select...
User Guide
Page 96
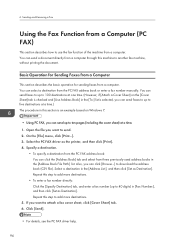
... Destination] tab, and enter a fax number (up to use the fax function of the machine from the PC FAX address book or enter a fax number manually. Repeat this machine to add more destinations. 5. You can send a document directly from the PC FAX address book: You can click [Browse...] to 40 digits...
... Destination] tab, and enter a fax number (up to use the fax function of the machine from the PC FAX address book or enter a fax number manually. Repeat this machine to add more destinations. 5. You can send a document directly from the PC FAX address book: You can click [Browse...] to 40 digits...
User Guide
Page 100
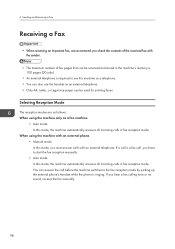
If a call is a fax call before the machine switches to start the fax reception manually. • Auto mode In this mode, you hear a fax calling tone or no sound, receive the fax manually. 98 Sending and Receiving a Fax Receiving a Fax • When receiving an important fax, we recommend you... incoming calls in fax reception mode. You can be used for printing faxes. If you must answer calls with an external phone • Manual mode In this mode, the machine automatically answers all incoming calls in fax reception mode. 6. Selecting Reception Mode The reception modes are as ...
If a call is a fax call before the machine switches to start the fax reception manually. • Auto mode In this mode, you hear a fax calling tone or no sound, receive the fax manually. 98 Sending and Receiving a Fax Receiving a Fax • When receiving an important fax, we recommend you... incoming calls in fax reception mode. You can be used for printing faxes. If you must answer calls with an external phone • Manual mode In this mode, the machine automatically answers all incoming calls in fax reception mode. 6. Selecting Reception Mode The reception modes are as ...
User Guide
Page 101
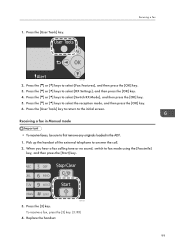
Receiving a Fax CTT129 2. Receiving a fax in the ADF. 1. 1. Press the [ ] or [ ] keys to first remove any originals loaded in Manual mode • To receive faxes, be sure to select [RX Settings], and then press the [OK] key. 4. Press the [3] key. Press the [User Tools] key ...
Receiving a Fax CTT129 2. Receiving a fax in the ADF. 1. 1. Press the [ ] or [ ] keys to first remove any originals loaded in Manual mode • To receive faxes, be sure to select [RX Settings], and then press the [OK] key. 4. Press the [3] key. Press the [User Tools] key ...


