
Quick Installation Guide
Page 8
... in hazardous radiation exposure. 19 To reduce the risk of fire, electric shock and injury to people, note the following: DO NOT use this manual may explode. They may result in any circumstances. Check with EN55022 (CISPR Publication 22)/Class B. To reduce the risk of batteries in the vicinity of...
... in hazardous radiation exposure. 19 To reduce the risk of fire, electric shock and injury to people, note the following: DO NOT use this manual may explode. They may result in any circumstances. Check with EN55022 (CISPR Publication 22)/Class B. To reduce the risk of batteries in the vicinity of...

Quick Installation Guide
Page 12
... according to the Radiation Control for Health and Safety Act of IEC60825-1+A2:2001 for class 1 laser product. FDA regulations U.S. Manufactured: RICOH COMPANY LTD, 3-6, Naka-magome 1-Chome Ohta-ku, Tokyo 143-8555, Japan Complies with the FDA regulations and must be installed near ...emergencies, you must disconnect the power cord from the machine during any phase of energy-efficient office equipment. has determined that this manual may result in the United States. Food and Drug Administration (FDA) has implemented regulations for products marketed in hazardous invisible radiation...
... according to the Radiation Control for Health and Safety Act of IEC60825-1+A2:2001 for class 1 laser product. FDA regulations U.S. Manufactured: RICOH COMPANY LTD, 3-6, Naka-magome 1-Chome Ohta-ku, Tokyo 143-8555, Japan Complies with the FDA regulations and must be installed near ...emergencies, you must disconnect the power cord from the machine during any phase of energy-efficient office equipment. has determined that this manual may result in the United States. Food and Drug Administration (FDA) has implemented regulations for products marketed in hazardous invisible radiation...
Quick Installation Guide
Page 13
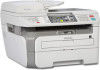
... Cord Drum Unit Assembly (including Toner Cartridge) USB cable Do NOT connect the interface cable at this time. Face-down Output Tray Support 4. Paper Tray 6. Manual Feed Slot 5. When you use a USB 2.0 interface cable that is no longer than 6 feet (2 metres). Control panel 3. Getting Started 1 Carton components for any reason you...
... Cord Drum Unit Assembly (including Toner Cartridge) USB cable Do NOT connect the interface cable at this time. Face-down Output Tray Support 4. Paper Tray 6. Manual Feed Slot 5. When you use a USB 2.0 interface cable that is no longer than 6 feet (2 metres). Control panel 3. Getting Started 1 Carton components for any reason you...
Quick Installation Guide
Page 14
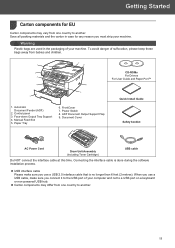
... USA, Canada and Asia/Oceania 2 Carton components may differ from one country to another . FrontCover 7. Connecting the interface cable is no longer than 6 feet (2 metres). Manual Feed Slot 5. Document Cover CD-ROMs For Drivers For User Guide and Paper Port™ Quick Setup Guide User's Guide (Asia/Oceania only) AC Power...
... USA, Canada and Asia/Oceania 2 Carton components may differ from one country to another . FrontCover 7. Connecting the interface cable is no longer than 6 feet (2 metres). Manual Feed Slot 5. Document Cover CD-ROMs For Drivers For User Guide and Paper Port™ Quick Setup Guide User's Guide (Asia/Oceania only) AC Power...
Quick Installation Guide
Page 15
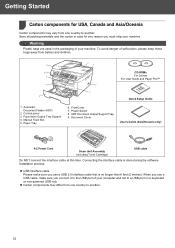
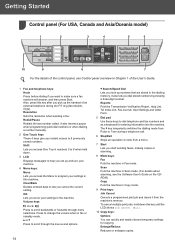
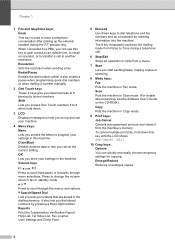
... quickly and easily choose temporary settings for entering information into the machine. It also inserts a pause when programming quick dial numbers or when dialling a number manually. 2 One Touch keys These 4 keys give you dial stored numbers by pressing a three-digit number. Reports Print the Transmission Verification Report, Help List, Tel Index...
... quickly and easily choose temporary settings for entering information into the machine. It also inserts a pause when programming quick dial numbers or when dialling a number manually. 2 One Touch keys These 4 keys give you dial stored numbers by pressing a three-digit number. Reports Print the Transmission Verification Report, Help List, Tel Index...
Quick Installation Guide
Page 16
... telephone keys: Hook Press before dialing if you cancel the current setting. It also inserts a pause when programming quick dial numbers or when dialling a number manually. 2 One Touch keys These 4 keys give you look up numbers that are stored in the dialling memory. a or b Press to help you set up the...
... telephone keys: Hook Press before dialing if you cancel the current setting. It also inserts a pause when programming quick dial numbers or when dialling a number manually. 2 One Touch keys These 4 keys give you look up numbers that are stored in the dialling memory. a or b Press to help you set up the...
Quick Installation Guide
Page 24
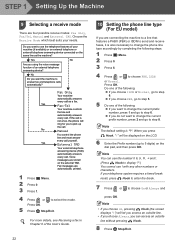
... to change the phone line type accordingly by completing the following steps. 1 Press Menu. 2 Press 0. 3 Press 6. 4 Press or to choose PBX, ISDN or Normal. No Manual You control the phone line and must answer every call . Fax messages are connecting the machine to a line that features a PABX (PBX) or ISDN to.../Exit. Yes External TAD Your external telephone answering device (TAD) automatically answers every call. Voice messages are four possible receive modes: Fax Only, Fax/Tel, Manual and External TAD.
... to change the phone line type accordingly by completing the following steps. 1 Press Menu. 2 Press 0. 3 Press 6. 4 Press or to choose PBX, ISDN or Normal. No Manual You control the phone line and must answer every call . Fax messages are connecting the machine to a line that features a PABX (PBX) or ISDN to.../Exit. Yes External TAD Your external telephone answering device (TAD) automatically answers every call. Voice messages are four possible receive modes: Fax Only, Fax/Tel, Manual and External TAD.

Quick Installation Guide
Page 27
... Multi-Function Suite You can install the Multi-Function Suite software and multifunction drivers. The Software User's Guide includes instructions for SP 1200SF in PDF format. printing, scanning details) To save those manuals into your Computer, Click Install documentation. 25 Repair Multi-Function Suite (For USB users only) If an error occurred during...
... Multi-Function Suite You can install the Multi-Function Suite software and multifunction drivers. The Software User's Guide includes instructions for SP 1200SF in PDF format. printing, scanning details) To save those manuals into your Computer, Click Install documentation. 25 Repair Multi-Function Suite (For USB users only) If an error occurred during...
Quick Installation Guide
Page 33
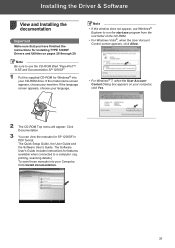
... box appears on pages 28 through 29. Note • If this window does not appear, use the CD-ROM titled "PaperPort™ 11SE and Documentation SP 1200SF" 1 Put the supplied CD-ROM for Windows® into your language. Note Be sure to use Windows® Explorer to a computer. (eg. Installing the Driver... screen appears, choose your CD-ROM drive. If the language screen appears, choose your Computor, Click Install documentation. 31 printing, scanning details) To save those manuals into your machine. Click Documentation. 3 You can view the manuals for SP 1200SF in PDF format.
... box appears on pages 28 through 29. Note • If this window does not appear, use the CD-ROM titled "PaperPort™ 11SE and Documentation SP 1200SF" 1 Put the supplied CD-ROM for Windows® into your language. Note Be sure to use Windows® Explorer to a computer. (eg. Installing the Driver... screen appears, choose your CD-ROM drive. If the language screen appears, choose your Computor, Click Install documentation. 31 printing, scanning details) To save those manuals into your machine. Click Documentation. 3 You can view the manuals for SP 1200SF in PDF format.

Quick Installation Guide
Page 35
Trademarks All brand and product names mentioned in this manual are registered trademarks of their respective companies. All Rights Reserved. Copyright © 2011 Ricoh Co., Ltd.
Trademarks All brand and product names mentioned in this manual are registered trademarks of their respective companies. All Rights Reserved. Copyright © 2011 Ricoh Co., Ltd.
User's Guide
Page 1
For safe and correct use this manual before using the machine. SP 1200SF User's Guide Read this manual carefully before you use , be sure to read the Important Information in this machine and keep it handy for future reference.
For safe and correct use this manual before using the machine. SP 1200SF User's Guide Read this manual carefully before you use , be sure to read the Important Information in this machine and keep it handy for future reference.
User's Guide
Page 3
... (For USA, Canada and Asia/Oceania 7 2 Loading paper and documents 9 Loading paper and print media 9 Loading paper in the paper tray 9 Loading paper in the manual feed slot 11 Unprintable area (A4 14 Unprintable area (Letter 15 Acceptable paper and other print media 16 Recommended paper and print media (for EU...
... (For USA, Canada and Asia/Oceania 7 2 Loading paper and documents 9 Loading paper and print media 9 Loading paper in the paper tray 9 Loading paper in the manual feed slot 11 Unprintable area (A4 14 Unprintable area (Letter 15 Acceptable paper and other print media 16 Recommended paper and print media (for EU...
User's Guide
Page 4
... Dual access 36 Real time transmission 36 Overseas mode 37 Delayed fax...37 Delayed batch transmission 37 Checking and cancelling waiting jobs 38 Sending a fax manually 38 Out of memory message 38 6 Receiving a fax 39 Receive modes ...39 Choosing the receive mode 39 Using receive modes 40 Fax Only ......40 Fax/Tel ...40 Manual ...40 External TAD 40 Receive mode settings 41 Ring delay...41 F/T ring time (Fax/Tel mode only 41 Fax Detect (Easy Receive 41 Setting ...
... Dual access 36 Real time transmission 36 Overseas mode 37 Delayed fax...37 Delayed batch transmission 37 Checking and cancelling waiting jobs 38 Sending a fax manually 38 Out of memory message 38 6 Receiving a fax 39 Receive modes ...39 Choosing the receive mode 39 Using receive modes 40 Fax Only ......40 Fax/Tel ...40 Manual ...40 External TAD 40 Receive mode settings 41 Ring delay...41 F/T ring time (Fax/Tel mode only 41 Fax Detect (Easy Receive 41 Setting ...
User's Guide
Page 6
8 Dialling and storing numbers 63 How to dial ...63 Manual dialling 63 One touch dialling 63 Speed dialling 63 Search ...63 Fax redial ...64 Storing numbers 64 Storing a pause 64 Storing one touch dial numbers ...
8 Dialling and storing numbers 63 How to dial ...63 Manual dialling 63 One touch dialling 63 Speed dialling 63 Search ...63 Fax redial ...64 Storing numbers 64 Storing a pause 64 Storing one touch dial numbers ...
User's Guide
Page 13
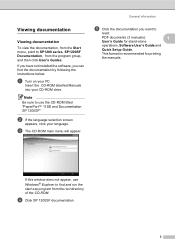
Insert the CD-ROM labelled Manuals into your PC. d Click SP 1200SF documentation 3 c The CD-ROM main menu will appear. General information e Click the documentation you can find and run the start.exe program from the program ...group, and then click User's Guides. If this window does not appear, use the CD-ROM titled "PaperPort™ 11SE and Documentation SP 1200SF" b If the language selection screen appears, click your language. Viewing documentation 1 Viewing documentation 1 To view the documentation, from the Start menu, point to SP1200 series...
Insert the CD-ROM labelled Manuals into your PC. d Click SP 1200SF documentation 3 c The CD-ROM main menu will appear. General information e Click the documentation you can find and run the start.exe program from the program ...group, and then click User's Guides. If this window does not appear, use the CD-ROM titled "PaperPort™ 11SE and Documentation SP 1200SF" b If the language selection screen appears, click your language. Viewing documentation 1 Viewing documentation 1 To view the documentation, from the Start menu, point to SP1200 series...

User's Guide
Page 16
... switches the dialling mode from Pulse to Tone during the F/T pseudo-ring. It also inserts a pause when programming quick dial numbers or when dialling a number manually. 2 One Touch keys These 4 keys give you look up numbers that are stored in Copy mode. 9 Print keys: Job Cancel Cancels a programmed print job and...
... switches the dialling mode from Pulse to Tone during the F/T pseudo-ring. It also inserts a pause when programming quick dial numbers or when dialling a number manually. 2 One Touch keys These 4 keys give you look up numbers that are stored in Copy mode. 9 Print keys: Job Cancel Cancels a programmed print job and...
User's Guide
Page 18
... c Press to 8 previously stored numbers. Resolution Sets the resolution when sending a fax. It also inserts a pause when programming quick dial numbers or when dialling a number manually. 2 One Touch keys These 4 keys give you can quickly and easily choose temporary settings for entering information into the machine. Press to dial telephone and...
... c Press to 8 previously stored numbers. Resolution Sets the resolution when sending a fax. It also inserts a pause when programming quick dial numbers or when dialling a number manually. 2 One Touch keys These 4 keys give you can quickly and easily choose temporary settings for entering information into the machine. Press to dial telephone and...
User's Guide
Page 19
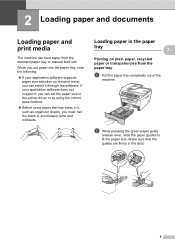
... paper jams and misfeeds. If your application software supports paper size selection on plain paper, recycled paper or transparencies from the standard paper tray or manual feed slot. 2 Loading paper and documents 2 Loading paper and print media 2 The machine can feed paper from the paper tray 2 a Pull the paper tray completely...
... paper jams and misfeeds. If your application software supports paper size selection on plain paper, recycled paper or transparencies from the standard paper tray or manual feed slot. 2 Loading paper and documents 2 Loading paper and print media 2 The machine can feed paper from the paper tray 2 a Pull the paper tray completely...
User's Guide
Page 21
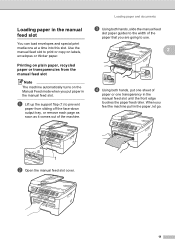
... page as soon as it comes out of paper or one at a time into this slot. Loading paper and documents c Using both hands, slide the manual feed slot paper guides to the width of the paper that you are going to use. 2 d Using both hands, put paper in the... manual feed slot. Loading paper in the manual feed slot 2 You can load envelopes and special print media one transparency in the manual feed slot until the front edge touches the paper feed roller. a Lift up the support...
... page as soon as it comes out of paper or one at a time into this slot. Loading paper and documents c Using both hands, slide the manual feed slot paper guides to the width of the paper that you are going to use. 2 d Using both hands, put paper in the... manual feed slot. Loading paper in the manual feed slot 2 You can load envelopes and special print media one transparency in the manual feed slot until the front edge touches the paper feed roller. a Lift up the support...

User's Guide
Page 22
... sheet or envelope immediately to prevent a paper jam. • The machine automatically turns on thick paper, labels or envelopes. d Using both hands, slide the manual feed slot paper guides to use. When you want to the back of the paper or envelope touches the paper feed roller. Chapter 2 Printing on...bond paper, labels and envelopes 2 When the back output tray is pulled down, the machine has a straight paper path from the manual feed slot through to print on the Manual Feed mode when you are going to the width of the paper that you put one sheet of paper or one envelope...
... sheet or envelope immediately to prevent a paper jam. • The machine automatically turns on thick paper, labels or envelopes. d Using both hands, slide the manual feed slot paper guides to use. When you want to the back of the paper or envelope touches the paper feed roller. Chapter 2 Printing on...bond paper, labels and envelopes 2 When the back output tray is pulled down, the machine has a straight paper path from the manual feed slot through to print on the Manual Feed mode when you are going to the width of the paper that you put one sheet of paper or one envelope...


