User Guide
Page 5
Appendix Notes About the Toner...63 Moving and Transporting the Printer...64 Disposal...64 Where to Inquire...64 Consumables...65 Print Cartridge...65 Specifications of the Machine...66 General Function Specifications...66 Printer Function Specifications...67 Copier Function Specifications...67 Scanner Function Specifications...68 Trademarks...69 INDEX...71 3 Scanner Problems...60 Error and Status Indicate on the Control Panel 61 Codes on the Screen...61 Error and Status Messages Appear on the Smart Organizing Monitor 62 9.
Appendix Notes About the Toner...63 Moving and Transporting the Printer...64 Disposal...64 Where to Inquire...64 Consumables...65 Print Cartridge...65 Specifications of the Machine...66 General Function Specifications...66 Printer Function Specifications...67 Copier Function Specifications...67 Scanner Function Specifications...68 Trademarks...69 INDEX...71 3 Scanner Problems...60 Error and Status Indicate on the Control Panel 61 Codes on the Screen...61 Error and Status Messages Appear on the Smart Organizing Monitor 62 9.
User Guide
Page 7
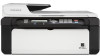
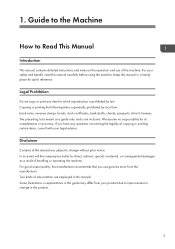
Guide to the Machine How to Read This Manual Introduction This manual contains detailed instructions and notes on the operation and use genuine toner from your product due to change in this manual are employed in the product. 5 For your legal advisor. Some illustrations or explanations in this machine. ...
Guide to the Machine How to Read This Manual Introduction This manual contains detailed instructions and notes on the operation and use genuine toner from your product due to change in this manual are employed in the product. 5 For your legal advisor. Some illustrations or explanations in this machine. ...

User Guide
Page 12
It flashes when a print job is received and while printing or scanning is almost out of paper or consumables, when the paper settings do not match the settings specified by the driver, or when other abnormalities occur. It flashes slowly when the machine is in progress. 9. Guide to the Machine 7. [Start] Key Use this button to start copying. 8. Alert Indicator This indicator lights up blue when the machine is turned on. Power Indicator This indicator lights up red when the machine runs out of toner. 10 1.
It flashes when a print job is received and while printing or scanning is almost out of paper or consumables, when the paper settings do not match the settings specified by the driver, or when other abnormalities occur. It flashes slowly when the machine is in progress. 9. Guide to the Machine 7. [Start] Key Use this button to start copying. 8. Alert Indicator This indicator lights up blue when the machine is turned on. Power Indicator This indicator lights up red when the machine runs out of toner. 10 1.
User Guide
Page 24
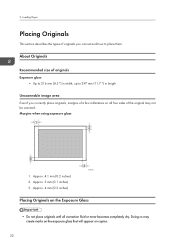
... not place originals until all four sides of the original may create marks on the exposure glass that will appear on all correction fluid or toner becomes completely dry. Approx. 3 mm (0.1 inches) 3. 2. About Originals Recommended size of originals Exposure glass • Up to 216 mm (8.5 ") in width, up to 297 mm...
... not place originals until all four sides of the original may create marks on the exposure glass that will appear on all correction fluid or toner becomes completely dry. Approx. 3 mm (0.1 inches) 3. 2. About Originals Recommended size of originals Exposure glass • Up to 216 mm (8.5 ") in width, up to 297 mm...
User Guide
Page 27
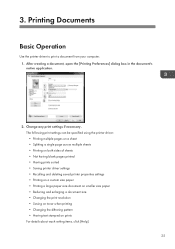
... paper • Printing a large paper size document on smaller size paper • Reducing and enlarging a document size • Changing the print resolution • Saving on toner when printing • Changing the dithering pattern • Having text stamped on prints For details about each setting items, click [Help]. 25 3. Printing Documents Basic...
... paper • Printing a large paper size document on smaller size paper • Reducing and enlarging a document size • Changing the print resolution • Saving on toner when printing • Changing the dithering pattern • Having text stamped on prints For details about each setting items, click [Help]. 25 3. Printing Documents Basic...
User Guide
Page 43
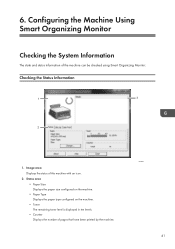
... area • Paper Size Displays the paper size configured on the machine. • Paper Type Displays the paper type configured on the machine. • Toner The remaining toner level is displayed in ten levels. • Counter Displays the number of this machine with an icon. 2. Configuring the Machine Using Smart Organizing Monitor...
... area • Paper Size Displays the paper size configured on the machine. • Paper Type Displays the paper type configured on the machine. • Toner The remaining toner level is displayed in ten levels. • Counter Displays the number of this machine with an icon. 2. Configuring the Machine Using Smart Organizing Monitor...
User Guide
Page 45
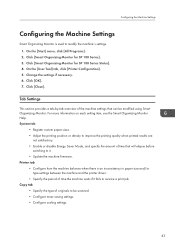
...and/or type settings between the machine and the printer driver. • Specify the period of time that can be scanned. • Configure toner-saving settings. • Configure scaling settings. 43 Change the settings if necessary. 6. Click [Close]. Copy tab • Specify the type...of the machine settings that will elapse before switching to be modified using Smart Organizing Monitor. Click [OK]. 7. Click [Smart Organizing Monitor for SP 100 Series Status]. 4. On the [User Tool] tab, click [Printer Configuration]. 5. Tab Settings This section provides a tab-by-tab ...
...and/or type settings between the machine and the printer driver. • Specify the period of time that can be scanned. • Configure toner-saving settings. • Configure scaling settings. 43 Change the settings if necessary. 6. Click [Close]. Copy tab • Specify the type...of the machine settings that will elapse before switching to be modified using Smart Organizing Monitor. Click [OK]. 7. Click [Smart Organizing Monitor for SP 100 Series Status]. 4. On the [User Tool] tab, click [Printer Configuration]. 5. Tab Settings This section provides a tab-by-tab ...

User Guide
Page 47
Even distribution of the plastic bag. 4. Take the new print cartridge out of the box, and then take it out of toner within the bottle improves print quality. 45 CHZ013 3. Hold the print cartridge and shake it out of pages printed at a time, paper type and ...grips of the print cartridge, and then pull it from the manufacturer with your office products. 1. Toner quality degrades over time. • For good print quality, the manufacturer recommends that you use genuine toner from the manufacturer. • The manufacturer shall not be responsible for any damage or expense that might...
Even distribution of the plastic bag. 4. Take the new print cartridge out of the box, and then take it out of toner within the bottle improves print quality. 45 CHZ013 3. Hold the print cartridge and shake it out of pages printed at a time, paper type and ...grips of the print cartridge, and then pull it from the manufacturer with your office products. 1. Toner quality degrades over time. • For good print quality, the manufacturer recommends that you use genuine toner from the manufacturer. • The manufacturer shall not be responsible for any damage or expense that might...
User Guide
Page 54
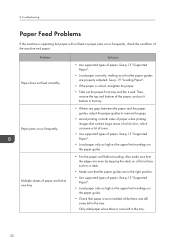
... p.15 "Supported Paper". • Load paper only as high as a desk. • Make sure that contain large areas of solid color, which consume a lot of toner. • Use supported types of paper. Troubleshooting Paper Feed Problems If the machine is operating but paper will not feed or paper jams occur frequently...
... p.15 "Supported Paper". • Load paper only as high as a desk. • Make sure that contain large areas of solid color, which consume a lot of toner. • Use supported types of paper. Troubleshooting Paper Feed Problems If the machine is operating but paper will not feed or paper jams occur frequently...
User Guide
Page 55
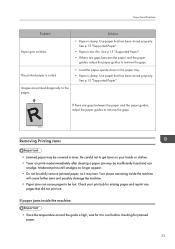
..., adjust the paper guides to be insufficiently fused and can cause pages to remove the gaps. • Load the paper upside down in toner. Paper Feed Problems Problem Paper gets wrinkles. Solution • Paper is curled. CER091 Removing Printing Jams • Jammed paper may be covered... jammed paper. 53 Images are printed diagonally to cool before checking for it may be lost. Check your hands or clothes. • Toner on prints made immediately after clearing a paper jam may tear. Torn pieces remaining inside the machine • Since the temperature around the guide...
..., adjust the paper guides to be insufficiently fused and can cause pages to remove the gaps. • Load the paper upside down in toner. Paper Feed Problems Problem Paper gets wrinkles. Solution • Paper is curled. CER091 Removing Printing Jams • Jammed paper may be covered... jammed paper. 53 Images are printed diagonally to cool before checking for it may be lost. Check your hands or clothes. • Toner on prints made immediately after clearing a paper jam may tear. Torn pieces remaining inside the machine • Since the temperature around the guide...
User Guide
Page 56
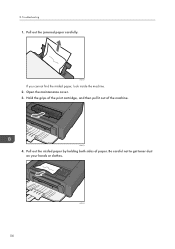
Pull out the jammed paper carefully. Be careful not to get toner dust on your hands or clothes. 54 CHZ015 Troubleshooting 1. CHZ024 If you cannot find the misfed paper, look inside the machine. 2. Pull out the misfed paper by holding both sides of the machine. Hold the grips of the print cartridge, and then pull it out of paper. CHZ013 4. Open the maintenance cover. 3. 8.
Pull out the jammed paper carefully. Be careful not to get toner dust on your hands or clothes. 54 CHZ015 Troubleshooting 1. CHZ024 If you cannot find the misfed paper, look inside the machine. 2. Pull out the misfed paper by holding both sides of the machine. Hold the grips of the print cartridge, and then pull it out of paper. CHZ013 4. Open the maintenance cover. 3. 8.
User Guide
Page 59
...; To speed up printing, reduce the printing resolution using a certain application, or cannot print image data properly. See p.15 "Supported Paper". • If you enable [Toner Saving], printing is damp. The whole printout is blurred. • Paper is generally less dense. • Condensation may be interfering with printing. Some characters are...
...; To speed up printing, reduce the printing resolution using a certain application, or cannot print image data properly. See p.15 "Supported Paper". • If you enable [Toner Saving], printing is damp. The whole printout is blurred. • Paper is generally less dense. • Condensation may be interfering with printing. Some characters are...

User Guide
Page 61
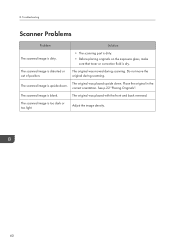
...not to the rear left corner and pressed flat against the exposure glass. 59 Photocopied paper is produced. Adjust the image density. • Toner on the exposure glass, make sure that it . Place the original on the exposure glass, and then place two or three sheets of white... top of alignment with the front and back reversed. A moire pattern is dirty. Place the original copy side down, making sure that toner or correction fluid is not dry. The original probably has heavily lined or dotted areas. Select the correct scan mode according to high humidity...
...not to the rear left corner and pressed flat against the exposure glass. 59 Photocopied paper is produced. Adjust the image density. • Toner on the exposure glass, make sure that it . Place the original on the exposure glass, and then place two or three sheets of white... top of alignment with the front and back reversed. A moire pattern is dirty. Place the original copy side down, making sure that toner or correction fluid is not dry. The original probably has heavily lined or dotted areas. Select the correct scan mode according to high humidity...
User Guide
Page 62
... Problems Problem Solution The scanned image is dirty. • The scanning part is dirty. • Before placing originals on the exposure glass, make sure that toner or correction fluid is blank. 8.
... Problems Problem Solution The scanned image is dirty. • The scanning part is dirty. • Before placing originals on the exposure glass, make sure that toner or correction fluid is blank. 8.
User Guide
Page 63
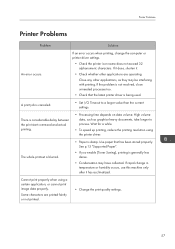
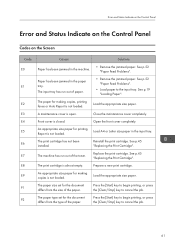
.... See p.52 "Paper Feed Problems". The print cartridge has not been installed. See p.45 "Replacing the Print Cartridge". The machine has run out of the toner. Replace the print cartridge. Error and Status Indicate on the Control Panel Error and Status Indicate on the Control Panel Codes on the Screen Code...
.... See p.52 "Paper Feed Problems". The print cartridge has not been installed. See p.45 "Replacing the Print Cartridge". The machine has run out of the toner. Replace the print cartridge. Error and Status Indicate on the Control Panel Error and Status Indicate on the Control Panel Codes on the Screen Code...
User Guide
Page 64
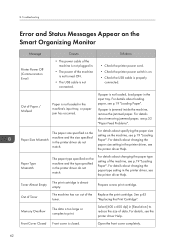
...printer driver Help. For details about changing the paper type setting in the printer driver, see p.52 "Paper Feed Problems". See p.45 toner. For details, see p.19 "Loading Paper". For details about specifying the paper size setting on the Smart Organizing Monitor Message Causes Solutions Printer... paper in . • The power of the Replace the print cartridge. For details about loading paper, see the printer driver Help. Toner Almost Empty The print cartridge is closed. If paper is on the machine and the type specified in the printer driver do not match...
...printer driver Help. For details about changing the paper type setting in the printer driver, see p.52 "Paper Feed Problems". See p.45 toner. For details, see p.19 "Loading Paper". For details about specifying the paper size setting on the Smart Organizing Monitor Message Causes Solutions Printer... paper in . • The power of the Replace the print cartridge. For details about loading paper, see the printer driver Help. Toner Almost Empty The print cartridge is closed. If paper is on the machine and the type specified in the printer driver do not match...

User Guide
Page 65
Appendix Notes About the Toner • Proper operation cannot be guaranteed if any third-party toner is used. • Depending on printing conditions, there are cases where the printer cannot print the number of sheets indicated in the specifications. 63 9.
Appendix Notes About the Toner • Proper operation cannot be guaranteed if any third-party toner is used. • Depending on printing conditions, there are cases where the printer cannot print the number of sheets indicated in the specifications. 63 9.
User Guide
Page 66
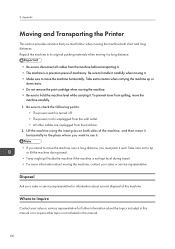
... or down stairs. • Do not remove the print cartridge when moving it . Take care not to tip or tilt the machine during transit. • Toner might spill inside the machine if the machine is not kept level during transit. • For more information about the topics included in this manual... to check the following points: • The power switch is turned off. • The power cord is a precision piece of this manual. 64 To prevent toner from the machine. 2. Lift the machine using the inset grips on both short and long distances.
... or down stairs. • Do not remove the print cartridge when moving it . Take care not to tip or tilt the machine during transit. • Toner might spill inside the machine if the machine is not kept level during transit. • For more information about the topics included in this manual... to check the following points: • The power switch is turned off. • The power cord is a precision piece of this manual. 64 To prevent toner from the machine. 2. Lift the machine using the inset grips on both short and long distances.
User Guide
Page 67
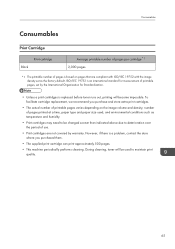
... them. • The supplied print cartridge can print approximately 500 pages. • This machine periodically performs cleaning. During cleaning, toner will become impossible. Consumables Consumables Print Cartridge Black Print cartridge Average printable number of pages per cartridge *1 2,000 pages *1 The printable... number of pages is replaced before toner runs out, printing will be changed sooner than indicated above due to deterioration over the period of use. • Print ...
... them. • The supplied print cartridge can print approximately 500 pages. • This machine periodically performs cleaning. During cleaning, toner will become impossible. Consumables Consumables Print Cartridge Black Print cartridge Average printable number of pages per cartridge *1 2,000 pages *1 The printable... number of pages is replaced before toner runs out, printing will be changed sooner than indicated above due to deterioration over the period of use. • Print ...

User Guide
Page 74
T Toner 63 Trademarks 69 Troubleshooting 51, 52, 56, 57, 58, 59, 60 TWAIN 39 U Unscannable image area 22 Upgrade 11 W WIA 40 72 EN GB EN US EN AU M102-8651
T Toner 63 Trademarks 69 Troubleshooting 51, 52, 56, 57, 58, 59, 60 TWAIN 39 U Unscannable image area 22 Upgrade 11 W WIA 40 72 EN GB EN US EN AU M102-8651


