Manuals
Page 1
Read this manual carefully before using the machine. For safe and correct use this manual, refer to read the Safety Information in this machine and keep it handy for future reference. User Guide What You Can Do with This Machine Getting Started Copy Fax Print Scan Document Server Web Image Monitor Adding Paper and Toner Troubleshooting Appendix For information not in "Read This First" before you use , be sure to the HTML/PDF files on the supplied CD-ROM.
Read this manual carefully before using the machine. For safe and correct use this manual, refer to read the Safety Information in this machine and keep it handy for future reference. User Guide What You Can Do with This Machine Getting Started Copy Fax Print Scan Document Server Web Image Monitor Adding Paper and Toner Troubleshooting Appendix For information not in "Read This First" before you use , be sure to the HTML/PDF files on the supplied CD-ROM.
Manuals
Page 3
... 33 Guide to the Names and Functions of the Machine's Control Panel 45 How to Use the [Home] Screen...48 Adding Icons to Read the Manuals...6 Symbols Used in a Network Environment 22 You Can Prevent Information Leakage (Security Functions 23 You Can Monitor and Set the Machine Using a Computer 24 You... You Can Send and Receive Faxes by Using the Machine without Fax Unit Installed 21 You Can Use the Facsimile and the Scanner in the Manuals...6 Model-Specific Information...7 Names of Programs...55 Turning On/Off the Power...59 Turning On the Main Power...59 1
... 33 Guide to the Names and Functions of the Machine's Control Panel 45 How to Use the [Home] Screen...48 Adding Icons to Read the Manuals...6 Symbols Used in a Network Environment 22 You Can Prevent Information Leakage (Security Functions 23 You Can Monitor and Set the Machine Using a Computer 24 You... You Can Send and Receive Faxes by Using the Machine without Fax Unit Installed 21 You Can Use the Facsimile and the Scanner in the Manuals...6 Model-Specific Information...7 Names of Programs...55 Turning On/Off the Power...59 Turning On the Main Power...59 1
Manuals
Page 5
Storing a Document...97 Sending Stored Documents...98 Printing the Journal Manually...100 5. Print Quick Install...101 Displaying the Printer Driver Properties...102 Standard Printing...103 When Using the PCL 6 Printer Driver...103 Locked Print...104... Computer Running Windows/Confirming a Computer's Information...112 Registering an SMB Folder...114 Deleting an SMB Registered Folder...117 Entering the Path to the Destination Manually 118 Basic Procedure for Sending Scan Files by E-mail 119 Registering an E-mail Destination...120 Deleting an E-mail Destination...121 Entering an E-mail Address...
Storing a Document...97 Sending Stored Documents...98 Printing the Journal Manually...100 5. Print Quick Install...101 Displaying the Printer Driver Properties...102 Standard Printing...103 When Using the PCL 6 Printer Driver...103 Locked Print...104... Computer Running Windows/Confirming a Computer's Information...112 Registering an SMB Folder...114 Deleting an SMB Registered Folder...117 Entering the Path to the Destination Manually 118 Basic Procedure for Sending Scan Files by E-mail 119 Registering an E-mail Destination...120 Deleting an E-mail Destination...121 Entering an E-mail Address...

Manuals
Page 8
...symbols. It indicates where you can find further relevant information. [ ] Indicates the names of keys on resolving user errors. How to Read the Manuals Symbols Used in the functions of Region A and Region B models are indicated by the symbol that corresponds to the region of the model you... are using. Indicates instructions stored in a file on a provided CD-ROM. (mainly Europe and Asia) (mainly North America) Differences in the Manuals This manual uses the following symbols: Indicates points to pay attention to read these explanations. This symbol is located at the end of sections.
...symbols. It indicates where you can find further relevant information. [ ] Indicates the names of keys on resolving user errors. How to Read the Manuals Symbols Used in the functions of Region A and Region B models are indicated by the symbol that corresponds to the region of the model you... are using. Indicates instructions stored in a file on a provided CD-ROM. (mainly Europe and Asia) (mainly North America) Differences in the Manuals This manual uses the following symbols: Indicates points to pay attention to read these explanations. This symbol is located at the end of sections.
Manuals
Page 9
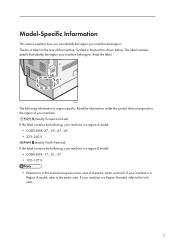
... that identify the region your machine belongs to . There is a region B model: • CODE XXXX -17, -51, -57 • 120-127 V • Dimensions in this manual are given in two units of the machine, located in the position shown below. CJS021 The following , your machine is a label on the rear of...
... that identify the region your machine belongs to . There is a region B model: • CODE XXXX -17, -51, -57 • 120-127 V • Dimensions in this manual are given in two units of the machine, located in the position shown below. CJS021 The following , your machine is a label on the rear of...
Manuals
Page 10
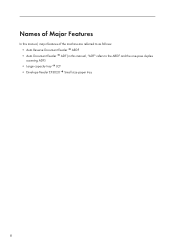
Names of Major Features In this manual, major features of the machine are referred to as follows: • Auto Reverse Document Feeder ARDF • Auto Document Feeder ADF (in this manual, "ADF" refers to the ARDF and the one-pass duplex scanning ADF) • Large capacity tray LCT • Envelope Feeder EF3020 Small size paper tray 8
Names of Major Features In this manual, major features of the machine are referred to as follows: • Auto Reverse Document Feeder ARDF • Auto Document Feeder ADF (in this manual, "ADF" refers to the ARDF and the one-pass duplex scanning ADF) • Large capacity tray LCT • Envelope Feeder EF3020 Small size paper tray 8
Manuals
Page 13
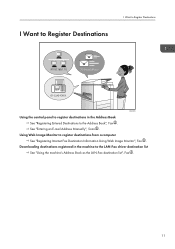
Downloading destinations registered in the Address Book See "Registering Entered Destinations to the Address Book", Fax . Using Web Image Monitor to the LAN-Fax driver destination list See "Using the machine's Address Book as the LAN-Fax destination list", Fax . 11 I Want to Register Destinations I Want to Register Destinations BRL060S Using the control panel to register destinations in the machine to register destinations from a computer See "Registering Internet Fax Destination Information Using Web Image Monitor", Fax . See "Entering an E-mail Address Manually", Scan .
Downloading destinations registered in the Address Book See "Registering Entered Destinations to the Address Book", Fax . Using Web Image Monitor to the LAN-Fax driver destination list See "Using the machine's Address Book as the LAN-Fax destination list", Fax . 11 I Want to Register Destinations I Want to Register Destinations BRL060S Using the control panel to register destinations in the machine to register destinations from a computer See "Registering Internet Fax Destination Information Using Web Image Monitor", Fax . See "Entering an E-mail Address Manually", Scan .

Manuals
Page 37
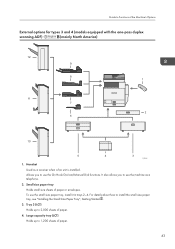
To use the On Hook Dial and Manual Dial functions. Tray 3 (LCT) Holds up to 1,200 sheets of paper. 35 Small size paper tray Holds small size sheets of paper. 4. Large capacity tray (...
To use the On Hook Dial and Manual Dial functions. Tray 3 (LCT) Holds up to 1,200 sheets of paper. 35 Small size paper tray Holds small size sheets of paper. 4. Large capacity tray (...
Manuals
Page 41
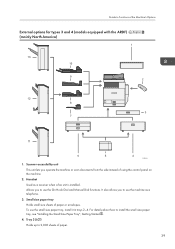
... about how to install the small size paper tray, see "Installing the Small Size Paper Tray", Getting Started . 4. To use the On Hook Dial and Manual Dial functions. Handset Used as a telephone. 3. Tray 3 (LCT) Holds up to 2,000 sheets of the Machine's Options External options for types 3 and 4 (models equipped with...
... about how to install the small size paper tray, see "Installing the Small Size Paper Tray", Getting Started . 4. To use the On Hook Dial and Manual Dial functions. Handset Used as a telephone. 3. Tray 3 (LCT) Holds up to 2,000 sheets of the Machine's Options External options for types 3 and 4 (models equipped with...
Manuals
Page 45
... a telephone. 2. It also allows you to use the small size paper tray, install it in trays 2-4. Allows you to use the On Hook Dial and Manual Dial functions. Large capacity tray (LCT) Holds up to install the small size paper tray, see "Installing the Small Size Paper Tray", Getting Started . 3.
... a telephone. 2. It also allows you to use the small size paper tray, install it in trays 2-4. Allows you to use the On Hook Dial and Manual Dial functions. Large capacity tray (LCT) Holds up to install the small size paper tray, see "Installing the Small Size Paper Tray", Getting Started . 3.
Manuals
Page 99
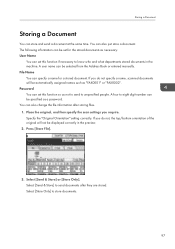
... the original, and then specify the scan settings you do not specify a name, scanned documents will not be selected from the Address Book or entered manually. Select [Store Only] to send documents after storing files. 1.
... the original, and then specify the scan settings you do not specify a name, scanned documents will not be selected from the Address Book or entered manually. Select [Store Only] to send documents after storing files. 1.

Manuals
Page 100
...number keys, and then press [OK]. If you have selected [Send & Store], specify the receiver. 7. To specify an unregistered user name, press [Manual Entry], and then enter the name. Re-enter the password for confirmation, and then press [OK]. 5. Fax 4. The documents stored in the Document ...are deleted. You cannot use the following transmission methods: • Immediate Transmission • Parallel Memory Transmission • On Hook Dial • Manual Dial 98 Set the user name, file name, and password as necessary. • User Name Press [User Name], and then select a user name. ...
...number keys, and then press [OK]. If you have selected [Send & Store], specify the receiver. 7. To specify an unregistered user name, press [Manual Entry], and then enter the name. Re-enter the password for confirmation, and then press [OK]. 5. Fax 4. The documents stored in the Document ...are deleted. You cannot use the following transmission methods: • Immediate Transmission • Parallel Memory Transmission • On Hook Dial • Manual Dial 98 Set the user name, file name, and password as necessary. • User Name Press [User Name], and then select a user name. ...

Manuals
Page 102
... User Prints the results of communications in the order made. Select the printing method. 4. Press [TX/RX Status / Print]. 2. Fax Printing the Journal Manually To print the Journal manually, select the printing method: "All", "Print per File No.", or "Print per User" in step 3, enter a 4-digit file number using the number keys...
... User Prints the results of communications in the order made. Select the printing method. 4. Press [TX/RX Status / Print]. 2. Fax Printing the Journal Manually To print the Journal manually, select the printing method: "All", "Print per File No.", or "Print per User" in step 3, enter a 4-digit file number using the number keys...
Manuals
Page 103
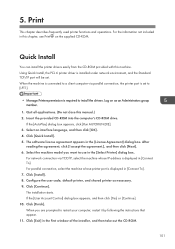
... [I accept the agreement.], and then click [Next]. 6. Click [Continue]. Quick Install You can install the printer drivers easily from the CD-ROM provided with this manual.) 2. Select the machine model you are prompted to use in [Connect To]. 7. Quit all applications. (Do not close this machine. The installation starts. Click [Exit...
... [I accept the agreement.], and then click [Next]. 6. Click [Continue]. Quick Install You can install the printer drivers easily from the CD-ROM provided with this manual.) 2. Select the machine model you are prompted to use in [Connect To]. 7. Quit all applications. (Do not close this machine. The installation starts. Click [Exit...
Manuals
Page 117
..., and then press [OK]. 15. Press [Auth. Enter the login user name of File Transfer settings are applied. 10. You can either enter the path manually or locate the folder by browsing the network. 18. Info] on the right side of "Folder Authentication". To specify a folder, you have specified in the...
..., and then press [OK]. 15. Press [Auth. Enter the login user name of File Transfer settings are applied. 10. You can either enter the path manually or locate the folder by browsing the network. 18. Info] on the right side of "Folder Authentication". To specify a folder, you have specified in the...

Manuals
Page 118
... addresses, include the destination computer's IP address in the path. Network display only lists client computers you are authorized to access. 2. Locating the SMB folder manually 1. If the network does not allow automatic obtaining of the destination computer. Press [Browse Network]. The client computers sharing the same network as the machine...
... addresses, include the destination computer's IP address in the path. Network display only lists client computers you are authorized to access. 2. Locating the SMB folder manually 1. If the network does not allow automatic obtaining of the destination computer. Press [Browse Network]. The client computers sharing the same network as the machine...

Manuals
Page 120
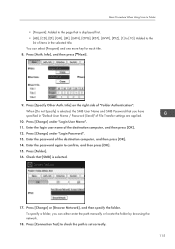
...] to the right of the path field. 4. Press [SMB]. 3. Press [OK]. 6. Press [Manual Entry]. 2. Press [Manual Entry] on the destination setting, enter the user name for the folder. Press [Manual Entry] for logging in to display the soft keyboard. 7. A connection test is "desk01": \\desk01\user 5. Press [OK]. 118 Depending on the right side... to display the soft keyboard. 8. In the following example path, the shared folder name is "user" and the computer name is performed to the Destination Manually 1. Press [Connection Test].
...] to the right of the path field. 4. Press [SMB]. 3. Press [OK]. 6. Press [Manual Entry]. 2. Press [Manual Entry] on the destination setting, enter the user name for the folder. Press [Manual Entry] for logging in to display the soft keyboard. 7. A connection test is "desk01": \\desk01\user 5. Press [OK]. 118 Depending on the right side... to display the soft keyboard. 8. In the following example path, the shared folder name is "user" and the computer name is performed to the Destination Manually 1. Press [Connection Test].
Manuals
Page 124
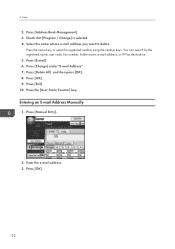
Check that [Program / Change] is selected. 4. Press [Change] under "E-mail Address". 7. Press [Exit]. 10. Press [Manual Entry]. 2. 6. Select the name whose e-mail address you want to delete. Press [E-mail]. 6. Entering an E-mail Address Manually 1. Press the name key, or enter the registered number using the number keys. You can search by the registered...
Check that [Program / Change] is selected. 4. Press [Change] under "E-mail Address". 7. Press [Exit]. 10. Press [Manual Entry]. 2. 6. Select the name whose e-mail address you want to delete. Press [E-mail]. 6. Entering an E-mail Address Manually 1. Press the name key, or enter the registered number using the number keys. You can search by the registered...

Manuals
Page 126
... Settings] to specify scanner settings such as resolution and scan size. 9. You can select more than one file. 3. To specify an unregistered user name, press [Manual Entry], and then enter the name. 6.
... Settings] to specify scanner settings such as resolution and scan size. 9. You can select more than one file. 3. To specify an unregistered user name, press [Manual Entry], and then enter the name. 6.
Manuals
Page 130
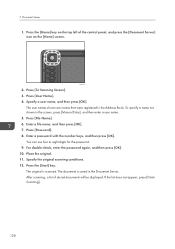
... Server 1. Press [To Scanning Screen]. 3. Specify a user name, and then press [OK]. The user names shown are names that were registered in the screen, press [Manual Entry], and then enter a user name. 5. Enter a file name, and then press [OK]. 7.
... Server 1. Press [To Scanning Screen]. 3. Specify a user name, and then press [OK]. The user names shown are names that were registered in the screen, press [Manual Entry], and then enter a user name. 5. Enter a file name, and then press [OK]. 7.


