
User Guide
Page 3
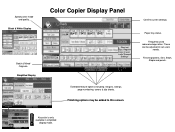
Register keys in simplified display mode. margins, stamps, page numbering, covers & slip sheets. Black & White Display Batch & Mixed Originals. Finishing options. Key color is only available in user tools "General Settings" Paper tray status. Short cut keys. Simplified Display Color Copier Display Panel Confirm current settings. Extended feature options including; Frequently used reduce/enlarge ratios. These can be added to suit users needs. Finishing options may be adjusted to this screen. Specify color mode and quality. Sort, Stack, Staple and punch.
Register keys in simplified display mode. margins, stamps, page numbering, covers & slip sheets. Black & White Display Batch & Mixed Originals. Finishing options. Key color is only available in user tools "General Settings" Paper tray status. Short cut keys. Simplified Display Color Copier Display Panel Confirm current settings. Extended feature options including; Frequently used reduce/enlarge ratios. These can be added to suit users needs. Finishing options may be adjusted to this screen. Specify color mode and quality. Sort, Stack, Staple and punch.
User Guide
Page 4
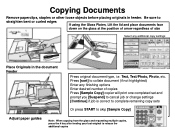
... using the Glass Platen, Lift the lid and place documents face down on the glass at the position of arrow regardless of size Select any finishing options Enter desired number of copies Press [Sample Copy] copier will print one completed set and prompt you [Suspend] to cancel job or change settings...
... using the Glass Platen, Lift the lid and place documents face down on the glass at the position of arrow regardless of size Select any finishing options Enter desired number of copies Press [Sample Copy] copier will print one completed set and prompt you [Suspend] to cancel job or change settings...
User Guide
Page 6
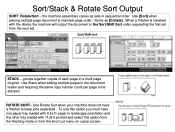
... installed with 11x8.5 portrait and select this option you must have a finisher to maintain page order - Use Stack when setting multiple pages in the Sort/Shift Sort order, separating the first set . Same as sets in a multi-...] when placing multiple page document to keep jobs separated . Sort/Stack & Rotate Sort Output SORT Rotate/Sort - ROTATE SORT- To use this option from the finishing mode or from the next set from the short cut menu on copier screen.
... installed with 11x8.5 portrait and select this option you must have a finisher to maintain page order - Use Stack when setting multiple pages in the Sort/Shift Sort order, separating the first set . Same as sets in a multi-...] when placing multiple page document to keep jobs separated . Sort/Stack & Rotate Sort Output SORT Rotate/Sort - ROTATE SORT- To use this option from the finishing mode or from the next set from the short cut menu on copier screen.
User Guide
Page 7
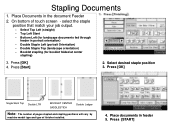
... fed through feeder in portrait orientation) - Select desired staple position 3. Stapling Documents 1. Place documents in the document Feeder 2. Place Documents in feeder 5. On bottom of finisher installed. 4. select the staple position that match your job output. - Press [OK] 4. Double Staple Top (landscape orientation) - Press [OK] Single Slant Top Double LTR BOOKLET...
... fed through feeder in portrait orientation) - Select desired staple position 3. Stapling Documents 1. Place documents in the document Feeder 2. Place Documents in feeder 5. On bottom of finisher installed. 4. select the staple position that match your job output. - Press [OK] 4. Double Staple Top (landscape orientation) - Press [OK] Single Slant Top Double LTR BOOKLET...
User Guide
Page 10
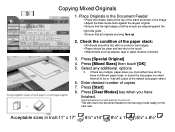
Place Originals in the Document Feeder Place the smaller sizes at the top of the stack as staples, tags or tapes must either have finished. Press [Start] 8. Enter desired number of all the sheets are aligned against the largest original. Ensure that the right edges of copies 7. Selecting Duplexing ...
Place Originals in the Document Feeder Place the smaller sizes at the top of the stack as staples, tags or tapes must either have finished. Press [Start] 8. Enter desired number of all the sheets are aligned against the largest original. Ensure that the right edges of copies 7. Selecting Duplexing ...
User Guide
Page 24
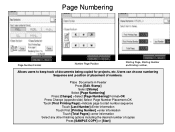
..., Allows users to start number sequence Touch [Last Number]>Enter information Touch First [Printing Number] >enter information Touch [Total Pages] >enter information Select any other finishing options including the desired number of numbers.
..., Allows users to start number sequence Touch [Last Number]>Enter information Touch First [Printing Number] >enter information Touch [Total Pages] >enter information Select any other finishing options including the desired number of numbers.

User Guide
Page 26
Users can choose to have the job stapled and folded. Book - Series - Use to 2 single pages. When the booklet finisher is installed, Users can choose different size pager for output. output documents from 2 Sided to 1 Sided Copy 2 face forwarding pages of a book to copy 2 face ...
Users can choose to have the job stapled and folded. Book - Series - Use to 2 single pages. When the booklet finisher is installed, Users can choose different size pager for output. output documents from 2 Sided to 1 Sided Copy 2 face forwarding pages of a book to copy 2 face ...
User Guide
Page 38
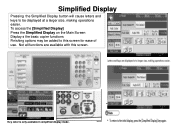
Key color is only available in simplified display mode. Simplified Display Pressing the Simplified Display button will cause letters and keys to this screen. To access the [Simplified Display] Press the Simplified Display on the Main Screen Display s the basic copier functions Finishing options may be added to be displayed at a larger size, making operations easier. Not all functions are available with this screen for ease of use.
Key color is only available in simplified display mode. Simplified Display Pressing the Simplified Display button will cause letters and keys to this screen. To access the [Simplified Display] Press the Simplified Display on the Main Screen Display s the basic copier functions Finishing options may be added to be displayed at a larger size, making operations easier. Not all functions are available with this screen for ease of use.
User Guide
Page 43
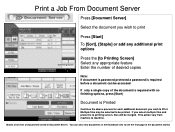
... document stored. Multiple files may be selected to be merged. You can be accessed If only a single copy of the document is required with no finishing options, press [Start) Document is Printed Continue the above process for each additional document you select multiple files and press the to printing screen, files...
... document stored. Multiple files may be selected to be merged. You can be accessed If only a single copy of the document is required with no finishing options, press [Start) Document is Printed Continue the above process for each additional document you select multiple files and press the to printing screen, files...
User Guide
Page 46
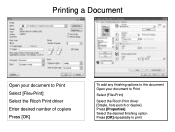
Printing a Document Open your document to Print Select [File>Print] Select the Ricoh Print driver Enter desired number of copiers Press [OK] To add any finishing options to the document Open your document to Print Select [File>Print) Select the Ricoh Print driver [Staple, hole punch or duplex] Press [Properties] Select the desired finishing option Press [OK] repeatedly to print
Printing a Document Open your document to Print Select [File>Print] Select the Ricoh Print driver Enter desired number of copiers Press [OK] To add any finishing options to the document Open your document to Print Select [File>Print) Select the Ricoh Print driver [Staple, hole punch or duplex] Press [Properties] Select the desired finishing option Press [OK] repeatedly to print
Control Panel Instructions
Page 1
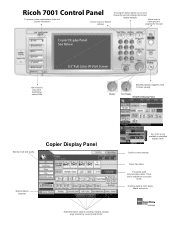
Short cut keys. Register keys in simplified display mode. Finishing options. margins, stamps, page numbering, covers & slip sheets. These can be adjusted to interrupt job in progress for new job Copier Display Panel... Simplified display magnifies fonts for easy viewing. Extended feature options including; Not Ready Simplified Display Panel Specif.y mode and quality Batch & Mixed Originals. Ricoh 7001 Control Panel To access system administrator tools and counter information Clears screen to default settings The program button allows you to store frequently used reduce...
Short cut keys. Register keys in simplified display mode. Finishing options. margins, stamps, page numbering, covers & slip sheets. These can be adjusted to interrupt job in progress for new job Copier Display Panel... Simplified display magnifies fonts for easy viewing. Extended feature options including; Not Ready Simplified Display Panel Specif.y mode and quality Batch & Mixed Originals. Ricoh 7001 Control Panel To access system administrator tools and counter information Clears screen to default settings The program button allows you to store frequently used reduce...

Operating Instructions
Page 6
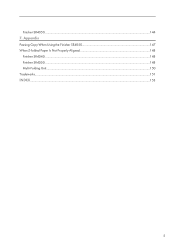
......124 When D is Displayed...125 When E is Displayed...126 When F is Displayed...127 When N6 - R12 is Displayed in the Case of Finisher SR 4030 131 When R5 - N5 is Displayed...126 When N1 - R4 is Displayed in the Case of... Displayed...136 When W is Displayed in the Case of Finisher SR 4040 133 When R8 - R7 is Displayed...137 Removing Jammed Staples...138 Finisher SR4030 / SR4040...138 Finisher SR4040 (Saddle Stitch)...139 Finisher SR4050...139 Removing Punch Waste...141 Finisher SR4030 / SR4040...141 Finisher SR4050...142 Removing Staple Waste...144 4 N22 is Displayed......
......124 When D is Displayed...125 When E is Displayed...126 When F is Displayed...127 When N6 - R12 is Displayed in the Case of Finisher SR 4030 131 When R5 - N5 is Displayed...126 When N1 - R4 is Displayed in the Case of... Displayed...136 When W is Displayed in the Case of Finisher SR 4040 133 When R8 - R7 is Displayed...137 Removing Jammed Staples...138 Finisher SR4030 / SR4040...138 Finisher SR4040 (Saddle Stitch)...139 Finisher SR4050...139 Removing Punch Waste...141 Finisher SR4030 / SR4040...141 Finisher SR4050...142 Removing Staple Waste...144 4 N22 is Displayed......
Operating Instructions
Page 7
Appendix Pausing Copy When Using the Finisher SR4050 147 When Z-folded Paper Is Not Properly Aligned 148 Finisher SR4040...148 Finisher SR4050...148 Multi-Folding Unit...150 Trademarks...151 INDEX...153 5 Finisher SR4050...144 7.
Appendix Pausing Copy When Using the Finisher SR4050 147 When Z-folded Paper Is Not Properly Aligned 148 Finisher SR4040...148 Finisher SR4050...148 Multi-Folding Unit...150 Trademarks...151 INDEX...153 5 Finisher SR4050...144 7.
Operating Instructions
Page 16
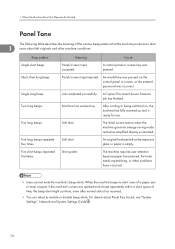
... various beep patterns that the machine produces to enable or disable beep alerts. Single long beep. Job completed successfully. A Copier/Document Server Features job has finished. Five long beeps. Strong alert. For details about left on the exposure glass or paper is empty. Beep pattern Meaning Cause Single short beep. Panel...
... various beep patterns that the machine produces to enable or disable beep alerts. Single long beep. Job completed successfully. A Copier/Document Server Features job has finished. Five long beeps. Strong alert. For details about left on the exposure glass or paper is empty. Beep pattern Meaning Cause Single short beep. Panel...
Operating Instructions
Page 25
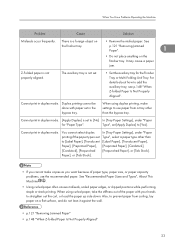
... staple or stack printing. Also, to [Yes]. When You Have Problems Operating the Machine Problem Cause Solution Misfeeds occur frequently. See the finisher tray. You cannot select duplex printing if the paper type is set [Apply Duplex] to prevent paper from a tray other than the bypass...not properly aligned. Cannot print in duplex mode. Type", set to use paper from curling, lay paper on the finisher tray. In [Tray Paper Settings], under "Paper for the Finisher Tray or Multi-Folding Unit Tray. The auxiliary tray is set . • Set the auxiliary tray for "Paper...
... staple or stack printing. Also, to [Yes]. When You Have Problems Operating the Machine Problem Cause Solution Misfeeds occur frequently. See the finisher tray. You cannot select duplex printing if the paper type is set [Apply Duplex] to prevent paper from a tray other than the bypass...not properly aligned. Cannot print in duplex mode. Type", set to use paper from curling, lay paper on the finisher tray. In [Tray Paper Settings], under "Paper for the Finisher Tray or Multi-Folding Unit Tray. The auxiliary tray is set . • Set the auxiliary tray for "Paper...

Operating Instructions
Page 28
...; If the machine is factory-preset to "Display Mode". For details about Output Tray Settings, see "General Features", Network and System Settings Guide . 1 • When Finisher SR4030, Finisher SR4040, or Finisher SR4050 is in "Print Priority". 1.
...; If the machine is factory-preset to "Display Mode". For details about Output Tray Settings, see "General Features", Network and System Settings Guide . 1 • When Finisher SR4030, Finisher SR4040, or Finisher SR4050 is in "Print Priority". 1.
Operating Instructions
Page 39
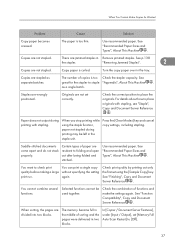
... and Types", About This Machine . "Removing Jammed Staples". 2 Copies are wrongly positioned. Copies are resistant to place originals with stapling. Staples are not stapled. See "Finishing", Copy and Document Server Reference . Check the combination of paper are stapled as a single batch. The memory became full in the middle of copies is...
... and Types", About This Machine . "Removing Jammed Staples". 2 Copies are wrongly positioned. Copies are resistant to place originals with stapling. Staples are not stapled. See "Finishing", Copy and Document Server Reference . Check the combination of paper are stapled as a single batch. The memory became full in the middle of copies is...

Operating Instructions
Page 123
Removing Jammed Paper This section describes how to the letter displayed on the sticker inside the finisher or front cover. Caution should be taken when removing misfed paper. 6 • Keep your hands clear of paper inside the machine. • Contact your copy ... occurred in the place corresponding to locate and remove jammed paper. • The inside the machine). Do not touch any torn scraps of the booklet finisher tray when pulling out or pushing in this machine might be very hot. Locating Jammed Paper If a misfeed happens, remove the misfed paper or original...
Removing Jammed Paper This section describes how to the letter displayed on the sticker inside the finisher or front cover. Caution should be taken when removing misfed paper. 6 • Keep your hands clear of paper inside the machine. • Contact your copy ... occurred in the place corresponding to locate and remove jammed paper. • The inside the machine). Do not touch any torn scraps of the booklet finisher tray when pulling out or pushing in this machine might be very hot. Locating Jammed Paper If a misfeed happens, remove the misfed paper or original...

Operating Instructions
Page 125
... A1 is complete, press [Next]. Wait for the duplex unit to cool down before clearing a paper jam in loss of print quality. • Inside the finisher, or inside the front cover, there is removed, restore the machine to the original state. • More than one misfeed may be indicated. When this...
... A1 is complete, press [Next]. Wait for the duplex unit to cool down before clearing a paper jam in loss of print quality. • Inside the finisher, or inside the front cover, there is removed, restore the machine to the original state. • More than one misfeed may be indicated. When this...
Operating Instructions
Page 133
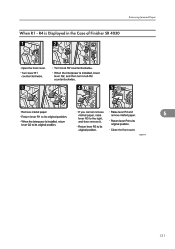
R4 is Displayed in the Case of Finisher SR 4030 6 BQN017S 131 Removing Jammed Paper When R1 -
R4 is Displayed in the Case of Finisher SR 4030 6 BQN017S 131 Removing Jammed Paper When R1 -


