Quick Start Guide
Page 1
www.ricoh-usa.com Ricoh Product Line Segment 2 thru 6 MP/5000/5001, MP C5000/C6000/C6501, MP7000/8000, MP6001/7001, MP8001/9001, MP907EX This guide is not intended to replace your users manual, features and options will vary by machine type, model and finisher type installed.
www.ricoh-usa.com Ricoh Product Line Segment 2 thru 6 MP/5000/5001, MP C5000/C6000/C6501, MP7000/8000, MP6001/7001, MP8001/9001, MP907EX This guide is not intended to replace your users manual, features and options will vary by machine type, model and finisher type installed.
Quick Start Guide
Page 11
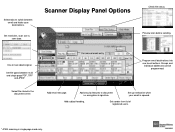
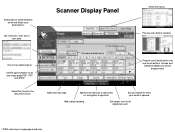
... multi and single page PDF, TIFF and JPEG* Select file stored in single page mode only. Add subject heading. Set sender from list of registered users. * JPEG scanning in the document server. Set resolution, scan size & scan type. Groups and individual addresses can be programmed. encryption & signature. Scanner Display Panel Options...
... multi and single page PDF, TIFF and JPEG* Select file stored in single page mode only. Add subject heading. Set sender from list of registered users. * JPEG scanning in the document server. Set resolution, scan size & scan type. Groups and individual addresses can be programmed. encryption & signature. Scanner Display Panel Options...
User Guide
Page 52
... file stored in single page mode only. One or two sided original. Add email message. Set sender from list of registered users. * JPEG scanning in the document server. For manual email entry Program email destinations into one touch buttons. Add subject heading. Set file types between email and folder scan destinations. Set...
... file stored in single page mode only. One or two sided original. Add email message. Set sender from list of registered users. * JPEG scanning in the document server. For manual email entry Program email destinations into one touch buttons. Add subject heading. Set file types between email and folder scan destinations. Set...
User Guide
Page 60
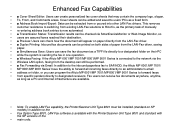
...SAF/HDD, the Aficio MP 6001/MP 7001/ • MP 8001/MP 9001 Series' have the ability to forward all incoming faxes directly to designated receivers. This removes • customer resistance to switching from existing LAN-Fax solutions to Ricoh's, as the primary task of manually • re...and Comments areas. Enhanced Fax Capabilities • ■ Cover Sheet Editor: Users can be installed (standard on SP models) in one operation. • ■ Wireless Faxing: If the Aficio MP 6001/MP 7001/MP 8001/MP 9001 Series is available with the Printer/Scanner Unit Type 9001 and standard with...
...SAF/HDD, the Aficio MP 6001/MP 7001/ • MP 8001/MP 9001 Series' have the ability to forward all incoming faxes directly to designated receivers. This removes • customer resistance to switching from existing LAN-Fax solutions to Ricoh's, as the primary task of manually • re...and Comments areas. Enhanced Fax Capabilities • ■ Cover Sheet Editor: Users can be installed (standard on SP models) in one operation. • ■ Wireless Faxing: If the Aficio MP 6001/MP 7001/MP 8001/MP 9001 Series is available with the Printer/Scanner Unit Type 9001 and standard with...

General Settings Guide
Page 1
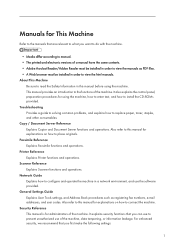
For safe and correct use, be sure to read the Safety Information in "About This Machine" before you use this manual carefully before using the machine. Operating Instructions General Settings Guide 1 Connecting the Machine 2 System Settings 3 Copier/Document Server Features 4 Facsimile Features 5 Printer Features 6 Scanner Features 7 Registering Addresses and Users for Facsimile/Scanner Functions 8 Other User Tools 9 Appendix Read this machine and keep it handy for future reference.
For safe and correct use, be sure to read the Safety Information in "About This Machine" before you use this manual carefully before using the machine. Operating Instructions General Settings Guide 1 Connecting the Machine 2 System Settings 3 Copier/Document Server Features 4 Facsimile Features 5 Printer Features 6 Scanner Features 7 Registering Addresses and Users for Facsimile/Scanner Functions 8 Other User Tools 9 Appendix Read this machine and keep it handy for future reference.
General Settings Guide
Page 3
... using the machine, how to enter text, and how to read the Safety Information in order to view the manuals as registering fax numbers, e-mail addresses, and user codes. For enhanced security, we recommend that you first make the following settings: 1 About This Machine Be sure to...that you can use of the machine. General Settings Guide Explains User Tools settings, and Address Book procedures such as PDF files. • A Web browser must be installed in order to view the html manuals. This manual provides an introduction to prevent unauthorized use to the functions of ...
... using the machine, how to enter text, and how to read the Safety Information in order to view the manuals as registering fax numbers, e-mail addresses, and user codes. For enhanced security, we recommend that you first make the following settings: 1 About This Machine Be sure to...that you can use of the machine. General Settings Guide Explains User Tools settings, and Address Book procedures such as PDF files. • A Web browser must be installed in order to view the html manuals. This manual provides an introduction to prevent unauthorized use to the functions of ...

General Settings Guide
Page 4
... that might not be available on the machine, and information about the trademarks of product names used in the manuals. Information Contains general notes on this manual when setting the enhanced security functions, or user and administrator authentication. UNIX Supplement For "UNIX Supplement", please visit our Web site or consult an authorized dealer...
... that might not be available on the machine, and information about the trademarks of product names used in the manuals. Information Contains general notes on this manual when setting the enhanced security functions, or user and administrator authentication. UNIX Supplement For "UNIX Supplement", please visit our Web site or consult an authorized dealer...

General Settings Guide
Page 5
TABLE OF CONTENTS Manuals for This Machine...1 How to Use Network TWAIN Scanner 40 Ethernet...40 Wireless LAN...41 3 Connecting the Machine Connecting to the Interfaces...15 Connecting to ......34 Wireless LAN...35 Network Settings Required to Use the Network Delivery Scanner 37 Ethernet...37 Wireless LAN...38 Network Settings Required to Read This Manual...10 Symbols...10 Display Panel...11 Accessing User Tools...12 Changing Default Settings...12 Quitting...
TABLE OF CONTENTS Manuals for This Machine...1 How to Use Network TWAIN Scanner 40 Ethernet...40 Wireless LAN...41 3 Connecting the Machine Connecting to the Interfaces...15 Connecting to ......34 Wireless LAN...35 Network Settings Required to Use the Network Delivery Scanner 37 Ethernet...37 Wireless LAN...38 Network Settings Required to Read This Manual...10 Symbols...10 Display Panel...11 Accessing User Tools...12 Changing Default Settings...12 Quitting...
General Settings Guide
Page 12
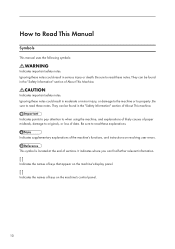
... of data. They can be found in serious injury or death. Be sure to originals, or loss of the machine's functions, and instructions on resolving user errors. Be sure to read these notes could result in the "Safety Information" section of About This Machine. Be sure to read these notes could... property. Ignoring these explanations. It indicates where you can be found in moderate or minor injury, or damage to the machine or to Read This Manual Symbols This manual uses the following symbols: Indicates important safety notes.
... of data. They can be found in serious injury or death. Be sure to originals, or loss of the machine's functions, and instructions on resolving user errors. Be sure to read these notes could result in the "Safety Information" section of About This Machine. Be sure to read these notes could... property. Ignoring these explanations. It indicates where you can be found in moderate or minor injury, or damage to the machine or to Read This Manual Symbols This manual uses the following symbols: Indicates important safety notes.
General Settings Guide
Page 71
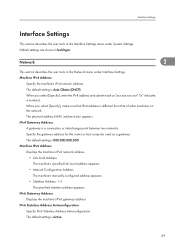
... the machine's IPv6 network address. • Link-local Address The machine's specified link-local address appears. • Manual Configuration Address The machine's manually configured address appears. • Stateless Address: 1-5 The specified stateless address appears. The default setting is Active. 69 The...is Auto-Obtain (DHCP). The default setting is a connection or interchange point between two networks. Network 2 This section describes the user tools in bold type. When you select [Specify], enter the IPv4 address and subnet mask as a gateway. IPv6 Gateway Address ...
... the machine's IPv6 network address. • Link-local Address The machine's specified link-local address appears. • Manual Configuration Address The machine's manually configured address appears. • Stateless Address: 1-5 The specified stateless address appears. The default setting is Active. 69 The...is Auto-Obtain (DHCP). The default setting is a connection or interchange point between two networks. Network 2 This section describes the user tools in bold type. When you select [Specify], enter the IPv4 address and subnet mask as a gateway. IPv6 Gateway Address ...
General Settings Guide
Page 127
... Features. For details on . Notice • E-mail TX Results • BCC Transmission • Std. General Settings This section describes the user tools in the Facsimile Features menu. Quick Operation Key (1-3) Frequently used functions programmed as Quick Operation keys are shown on the menu immediately after... the power is selected, the Quick Operation keys can be programmed with the following items: 4 • On • Manual E-mail RX • Send Later • Subject • Text • Recept. If [On] is turned on how to access Facsimile Features,...
... Features. For details on . Notice • E-mail TX Results • BCC Transmission • Std. General Settings This section describes the user tools in the Facsimile Features menu. Quick Operation Key (1-3) Frequently used functions programmed as Quick Operation keys are shown on the menu immediately after... the power is selected, the Quick Operation keys can be programmed with the following items: 4 • On • Manual E-mail RX • Send Later • Subject • Text • Recept. If [On] is turned on how to access Facsimile Features,...

General Settings Guide
Page 201
5. For details on how to one of the following types of Auto Job Cancel and jobs canceled manually from the control panel can print in the Test Print menu under Printer Features. Configuration Page You can print the current configuration and installed PCL ... are 5 stored in the error log. PCL Configuration / Font Page You can print the machine's current configuration values. List / Test Print This section describes the user tools in the Hex Dump mode. 199 The most recent 30 errors are 30 errors already stored, the oldest error is installed. Hex Dump You...
5. For details on how to one of the following types of Auto Job Cancel and jobs canceled manually from the control panel can print in the Test Print menu under Printer Features. Configuration Page You can print the current configuration and installed PCL ... are 5 stored in the error log. PCL Configuration / Font Page You can print the machine's current configuration values. List / Test Print This section describes the user tools in the Hex Dump mode. 199 The most recent 30 errors are 30 errors already stored, the oldest error is installed. Hex Dump You...
General Settings Guide
Page 248
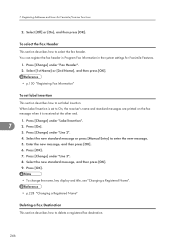
...and then press [OK]. 6. Press [Change] under "Line 2". 4. Select the new standard message, and then press [OK]. 9. Registering Addresses and Users for Facsimile Features. 1. Select [1st Name] or [2nd Name], and then press [OK]. • p.150 "Registering Fax Information" To set label insertion ...This section describes how to set to select the fax header. Press [Change] under "Line 3". 8. Select the new standard message or press [Manual Entry] to delete a registered fax destination. 246 Press [Change] under "Label Insertion". 7 2. Press [OK]. • To change the name...
...and then press [OK]. 6. Press [Change] under "Line 2". 4. Select the new standard message, and then press [OK]. 9. Registering Addresses and Users for Facsimile Features. 1. Select [1st Name] or [2nd Name], and then press [OK]. • p.150 "Registering Fax Information" To set label insertion ...This section describes how to set to select the fax header. Press [Change] under "Line 3". 8. Select the new standard message or press [Manual Entry] to delete a registered fax destination. 246 Press [Change] under "Label Insertion". 7 2. Press [OK]. • To change the name...

General Settings Guide
Page 254
... select the Fax Header 7 This section describes how to enter the new message. 5. Press [On]. 3. Select the new standard message or press [Manual Entry] to select the fax header. 1. To set the International TX Mode This section describes how to set to On, the receiver's name and ... under "Line 2". 4. Select the new standard message, and then press [OK]. 252 To enter a password, press [Change] under "Password (PWD)". 5. 7. Registering Addresses and Users for Facsimile/Scanner Functions To program the SEP Code This section describes how to set label insertion.
... select the Fax Header 7 This section describes how to enter the new message. 5. Press [On]. 3. Select the new standard message or press [Manual Entry] to select the fax header. 1. To set the International TX Mode This section describes how to set to On, the receiver's name and ... under "Line 2". 4. Select the new standard message, and then press [OK]. 252 To enter a password, press [Change] under "Password (PWD)". 5. 7. Registering Addresses and Users for Facsimile/Scanner Functions To program the SEP Code This section describes how to set label insertion.
General Settings Guide
Page 263
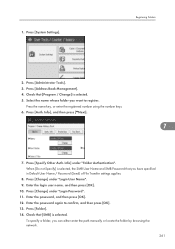
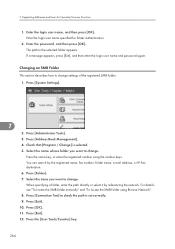
...applies. 8. Registering Folders 2. Press [Specify Other Auth. Enter the login user name, and then press [OK]. 10. Press [Change] under "Login User Name". 9. Press [Auth. When [Do not Specify] is selected, the SMB User Name and SMB Password that [SMB] is selected. 5. Press [Address Book... Management]. 4. Enter the password again to register. To specify a folder, you can either enter the path manually or locate the folder by browsing the network. 261...
...applies. 8. Registering Folders 2. Press [Specify Other Auth. Enter the login user name, and then press [OK]. 10. Press [Change] under "Login User Name". 9. Press [Auth. When [Do not Specify] is selected, the SMB User Name and SMB Password that [SMB] is selected. 5. Press [Address Book... Management]. 4. Enter the password again to register. To specify a folder, you can either enter the path manually or locate the folder by browsing the network. 261...
General Settings Guide
Page 264
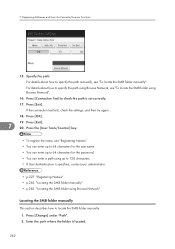
... "To locate the SMB folder using Browse Network, see "To locate the SMB folder manually". For details about how to check the path is located. 262 Press [OK]. 19. Press the [User Tools/Counter] key. • To register the name, see "Registering Names". •...up to 128 characters. • If User Authentication is specified, contact your administrator. • p.227 "Registering Names" • p.262 "Locating the SMB folder manually" • p.263 "Locating the SMB folder using Browse Network" Locating the SMB folder manually This section describes how to specify the path...
... "To locate the SMB folder using Browse Network, see "To locate the SMB folder manually". For details about how to check the path is located. 262 Press [OK]. 19. Press the [User Tools/Counter] key. • To register the name, see "Registering Names". •...up to 128 characters. • If User Authentication is specified, contact your administrator. • p.227 "Registering Names" • p.262 "Locating the SMB folder manually" • p.263 "Locating the SMB folder using Browse Network" Locating the SMB folder manually This section describes how to specify the path...
General Settings Guide
Page 266
...name key, or enter the registered number using Browse Network". 8. Enter the login user name specified for Facsimile/Scanner Functions 1. Press [Folder]. 7. For details, see "To locate the SMB folder manually" and "To locate the SMB folder using the number keys. Press [System ...Settings]. 7 2. Registering Addresses and Users for folder authentication. 2. Press [Connection Test] to the selected folder appears. Check that...
...name key, or enter the registered number using Browse Network". 8. Enter the login user name specified for Facsimile/Scanner Functions 1. Press [Folder]. 7. For details, see "To locate the SMB folder manually" and "To locate the SMB folder using the number keys. Press [System ...Settings]. 7 2. Registering Addresses and Users for folder authentication. 2. Press [Connection Test] to the selected folder appears. Check that...

General Settings Guide
Page 275
... [Change] under "Path". 2. If you can either enter the path manually or locate the folder by the name of the context where the user object is "context", enter "user.context". 16. Press [Exit]. 19. Press [Exit]. 21. Press the [User Tools/Counter] key. • To register the name, see "To... tree, press [NDS]. Select "Connection Type". Specify the path. For details about how to specify the path manually, see "Registering Names". • You can enter up to 64 characters for the user name. 7 • You can enter up to 64 characters for the password. • To specify a folder...
... [Change] under "Path". 2. If you can either enter the path manually or locate the folder by the name of the context where the user object is "context", enter "user.context". 16. Press [Exit]. 19. Press [Exit]. 21. Press the [User Tools/Counter] key. • To register the name, see "To... tree, press [NDS]. Select "Connection Type". Specify the path. For details about how to specify the path manually, see "Registering Names". • You can enter up to 64 characters for the user name. 7 • You can enter up to 64 characters for the password. • To specify a folder...

General Settings Guide
Page 277
... path manually or locate the folder by the registered name, fax number, folder name, e-mail address, or IP-Fax destination. 6. If you can search by browsing the network. 9. Press [Exit]. 11. Press [Address Book Management]. 4. Specify the folder. Press the [User Tools/... folder on a NetWare server, press [Bindery]. 8. Press [Exit]. 13. Check that [Program / Change] is set correctly. 10. 1. Select the user of the registered folder you want to specify a folder in an NDS tree, press [NDS]. Press [System Settings]. Press [Administrator Tools]. 3. Select "...
... path manually or locate the folder by the registered name, fax number, folder name, e-mail address, or IP-Fax destination. 6. If you can search by browsing the network. 9. Press [Exit]. 11. Press [Address Book Management]. 4. Specify the folder. Press the [User Tools/... folder on a NetWare server, press [Bindery]. 8. Press [Exit]. 13. Check that [Program / Change] is set correctly. 10. 1. Select the user of the registered folder you want to specify a folder in an NDS tree, press [NDS]. Press [System Settings]. Press [Administrator Tools]. 3. Select "...
General Settings Guide
Page 320
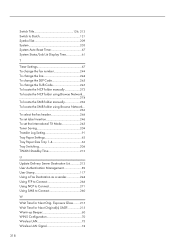
... To change the SEP Code 245 To change the SUB Code 245 To locate the NCP folder manually 273 To locate the NCP folder using Browse Network 274 To locate the SMB folder manually 262 To locate the SMB folder using Browse Network 263 To select the fax header 246 To... 91 Tray Paper Settings 63 Tray Paper Size Tray 1-4 63 Tray Switching 206 TWAIN Standby Time 213 U Update Delivery Server Destination List............213 User Authentication Management 89 User Stamp 117 Using a Fax Destination as a sender 244 Using FTP to Connect 266 Using NCP to Connect 271 Using SMB to Connect 260...
... To change the SEP Code 245 To change the SUB Code 245 To locate the NCP folder manually 273 To locate the NCP folder using Browse Network 274 To locate the SMB folder manually 262 To locate the SMB folder using Browse Network 263 To select the fax header 246 To... 91 Tray Paper Settings 63 Tray Paper Size Tray 1-4 63 Tray Switching 206 TWAIN Standby Time 213 U Update Delivery Server Destination List............213 User Authentication Management 89 User Stamp 117 Using a Fax Destination as a sender 244 Using FTP to Connect 266 Using NCP to Connect 271 Using SMB to Connect 260...


