
User Guide
Page 7
......191 Restricting Printer Functions...193 Locking the Keys...193 Unlocking the Keys...193 Replacing a Print Cartridge...195 Checking the Remaining Ink...195 Replacing a Print Cartridge...197 Handling Print Cartridges...199 Replacing an Ink Collector Unit...201 Cleaning...204 Cleaning the Power Cable Plug...204 Moving...205 Moving a Short Distance...205 Moving a Long...
......191 Restricting Printer Functions...193 Locking the Keys...193 Unlocking the Keys...193 Replacing a Print Cartridge...195 Checking the Remaining Ink...195 Replacing a Print Cartridge...197 Handling Print Cartridges...199 Replacing an Ink Collector Unit...201 Cleaning...204 Cleaning the Power Cable Plug...204 Moving...205 Moving a Short Distance...205 Moving a Long...
User Guide
Page 8
... Cover Open...264 Cover Open / Print Cartridge(s) Not Detected 266 Duplex Unit Not Detected...268 Cartridge Almost Empty...269 Cartridge Empty...270 Used Cartridge...271 Ink Collector Unit Not Detected...272 Ink Collector Unit Almost Full...274 Ink Collector Unit Full...274 Used...
... Cover Open...264 Cover Open / Print Cartridge(s) Not Detected 266 Duplex Unit Not Detected...268 Cartridge Almost Empty...269 Cartridge Empty...270 Used Cartridge...271 Ink Collector Unit Not Detected...272 Ink Collector Unit Almost Full...274 Ink Collector Unit Full...274 Used...
User Guide
Page 14
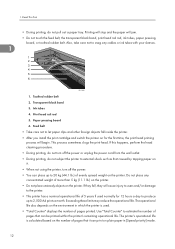
... rail rod 5. Also, take care not to 20 kg (44.1 lb.) of 5 years if used . • "Total Counter" displays the number of pages printed. Ink tubes 4. The operational life also depends on for 12 hours a day to produce up to snag any concentrated weight of pages that it . • When.../or damage to the printer. • This printer has a nominal operational life of evenly spread weight on the printer. Do not place any cables or ink tubes with your sleeves. 1 1 12 23 34 45 56 BYJ164S 1. If this happens, perform the head cleaning procedure. • During printing, do not pull...
... rail rod 5. Also, take care not to 20 kg (44.1 lb.) of 5 years if used . • "Total Counter" displays the number of pages printed. Ink tubes 4. The operational life also depends on for 12 hours a day to produce up to snag any concentrated weight of pages that it . • When.../or damage to the printer. • This printer has a nominal operational life of evenly spread weight on the printer. Do not place any cables or ink tubes with your sleeves. 1 1 12 23 34 45 56 BYJ164S 1. If this happens, perform the head cleaning procedure. • During printing, do not pull...
User Guide
Page 15
...after a period of inactivity, we recommended you want to ensure consistent print quality. Maintenance is selected in the printer properties dialog box, all ink colors will not be used for 150,000 pages. • Depending on a level surface and safe from shock and vibration. • ...• Single-sided copies are no longer usable for at least once a month. • Do not move the printer while it . An "Ink Collector almost full" message appears shortly before their packaging. • Cartridges that are printed at higher density than normal. Because the printer consumes a ...
...after a period of inactivity, we recommended you want to ensure consistent print quality. Maintenance is selected in the printer properties dialog box, all ink colors will not be used for 150,000 pages. • Depending on a level surface and safe from shock and vibration. • ...• Single-sided copies are no longer usable for at least once a month. • Do not move the printer while it . An "Ink Collector almost full" message appears shortly before their packaging. • Cartridges that are printed at higher density than normal. Because the printer consumes a ...
User Guide
Page 23
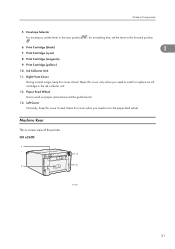
Print Cartridge (cyan) 8. Ink Collector Unit 11. Paper Feed Wheel Use to Components 5. Machine Rear This is a rear view of the printer. Envelope Selector For envelopes, set the lever ... (black) 1 7. for everything else, set the lever to the forward position 6. Open this cover when you need to install or replace an ink cartridge or the ink collector unit. 12. GX e2600 1 4 7 5 BYJ260S 21 Print Cartridge (magenta) 9. Print Cartridge (yellow) 10. Guide to wind out paper jammed around the guide board. 13. Open...
Print Cartridge (cyan) 8. Ink Collector Unit 11. Paper Feed Wheel Use to Components 5. Machine Rear This is a rear view of the printer. Envelope Selector For envelopes, set the lever ... (black) 1 7. for everything else, set the lever to the forward position 6. Open this cover when you need to install or replace an ink cartridge or the ink collector unit. 12. GX e2600 1 4 7 5 BYJ260S 21 Print Cartridge (magenta) 9. Print Cartridge (yellow) 10. Guide to wind out paper jammed around the guide board. 13. Open...

User Guide
Page 31
Space Host Interface Menu I/O Timeout Network Setup** USB Setting PCL Menu* Menu Orientation Form Lines Font Source Font Number Point Size Font Pitch Symbol Set Courier Font Making Printer Settings Using the Control Panel 1 29 Error Ink C.U. Print* Tray Switching* Uni-direct.Prt.* Density* Color Mode* Recycl.Ppr.Mode Env.Slctr.Alert Pg Recov. Menu Blank Pg.
Space Host Interface Menu I/O Timeout Network Setup** USB Setting PCL Menu* Menu Orientation Form Lines Font Source Font Number Point Size Font Pitch Symbol Set Courier Font Making Printer Settings Using the Control Panel 1 29 Error Ink C.U. Print* Tray Switching* Uni-direct.Prt.* Density* Color Mode* Recycl.Ppr.Mode Env.Slctr.Alert Pg Recov. Menu Blank Pg.
User Guide
Page 44
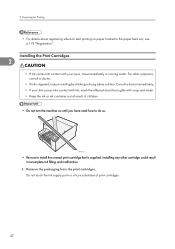
...about registering where to install the unused print cartridge that is ingested, induce vomiting by drinking a strong saline solution. Do not touch the ink supply ports or silicon substrates of children. • Do not turn the machine on paper loaded in the paper feed unit, see ...p.174 "Registration". Installing the Print Cartridges 2 • If ink comes into contact with ink, wash the affected area thoroughly with your eyes, rinse immediately in incomplete ink filling and malfunction. 1. Consult a doctor immediately. • If your skin comes into contact ...
...about registering where to install the unused print cartridge that is ingested, induce vomiting by drinking a strong saline solution. Do not touch the ink supply ports or silicon substrates of children. • Do not turn the machine on paper loaded in the paper feed unit, see ...p.174 "Registration". Installing the Print Cartridges 2 • If ink comes into contact with ink, wash the affected area thoroughly with your eyes, rinse immediately in incomplete ink filling and malfunction. 1. Consult a doctor immediately. • If your skin comes into contact ...
User Guide
Page 46
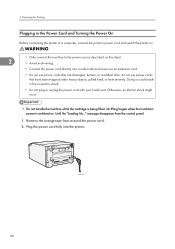
...2 • Avoid multi-wiring. • Connect the power cord directly into the printer. Remove the orange tape from the control panel. 1. Ink filling begins when the machine's power is being filled. 2. Doing so could result in the Power Cord and Turning the Power On Before connecting the... printer's power cord and switch the printer on. • Only connect the machine to the power source described on . Until the "Loading Ink..." Also, do not use power cords that have been trapped under heavy objects, pulled hard, or bent severely. Preparing for Printing Plugging in fire...
...2 • Avoid multi-wiring. • Connect the power cord directly into the printer. Remove the orange tape from the control panel. 1. Ink filling begins when the machine's power is being filled. 2. Doing so could result in the Power Cord and Turning the Power On Before connecting the... printer's power cord and switch the printer on. • Only connect the machine to the power source described on . Until the "Loading Ink..." Also, do not use power cords that have been trapped under heavy objects, pulled hard, or bent severely. Preparing for Printing Plugging in fire...
User Guide
Page 47
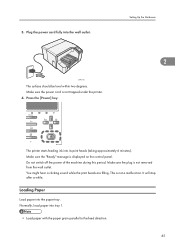
... grain parallel to the feed direction. 45 BPR117S The surface should be level within two degrees. Setting Up the Hardware 2 BYJ118S The printer starts feeding ink into the paper tray. Loading Paper Load paper into its print heads (taking approximately 6 minutes).
... grain parallel to the feed direction. 45 BPR117S The surface should be level within two degrees. Setting Up the Hardware 2 BYJ118S The printer starts feeding ink into the paper tray. Loading Paper Load paper into its print heads (taking approximately 6 minutes).
User Guide
Page 65
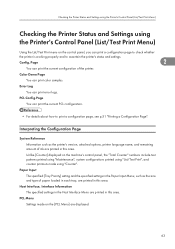
... samples. Paper Input The specified [Tray Priority] setting and the specified settings in this area. Color Demo Page You can print the current configuration of ink are displayed. 63 Unlike [Counter] displayed on the [PCL Menu] are printed in the Paper Input Menu, such as the printer's version, attached options, printer...
... samples. Paper Input The specified [Tray Priority] setting and the specified settings in this area. Color Demo Page You can print the current configuration of ink are displayed. 63 Unlike [Counter] displayed on the [PCL Menu] are printed in the Paper Input Menu, such as the printer's version, attached options, printer...

User Guide
Page 84
... write on glossy paper for Printing Paper This section explains the available paper types and how to load paper. Since it does not have an ink-absorbent coating, you can use it is normally used for copying and printing. Unlike inkjet plain paper or glossy paper, it for photocopying, just like...
... write on glossy paper for Printing Paper This section explains the available paper types and how to load paper. Since it does not have an ink-absorbent coating, you can use it is normally used for copying and printing. Unlike inkjet plain paper or glossy paper, it for photocopying, just like...
User Guide
Page 90
...cause the paper to curl, which creates patchy print. For details, see the instructions supplied with continuous feeding of image being printed (such as ink-heavy images). Glossy paper • The time it takes for the prints to [Quality priority]. • When using these sheets, see ...This allows printing at higher quality. • In the printer properties dialog box, when [Inkjet Plain Paper] is selected, only one . • Ink smearing can be caused by one -sided printing is not supported. 88 Paper Type Precautions Plain paper 2 • Use the bypass tray to print...
...cause the paper to curl, which creates patchy print. For details, see the instructions supplied with continuous feeding of image being printed (such as ink-heavy images). Glossy paper • The time it takes for the prints to [Quality priority]. • When using these sheets, see ...This allows printing at higher quality. • In the printer properties dialog box, when [Inkjet Plain Paper] is selected, only one . • Ink smearing can be caused by one -sided printing is not supported. 88 Paper Type Precautions Plain paper 2 • Use the bypass tray to print...
User Guide
Page 91
... can insert paper with the print side face up into the bypass tray. • Insert paper with weights up to dry. Otherwise, the ink may smudge. • The ink may take a while to 255 g/m2 (60 lb.) into the bypass tray. • Duplex printing is not supported. Cautions to Observe ...After Printing Depending on the paper type, the ink may smear depending on (such as the back of image. If this happens, set the envelope selector to static buildup • already printed on the...
... can insert paper with the print side face up into the bypass tray. • Insert paper with weights up to dry. Otherwise, the ink may smudge. • The ink may take a while to 255 g/m2 (60 lb.) into the bypass tray. • Duplex printing is not supported. Cautions to Observe ...After Printing Depending on the paper type, the ink may smear depending on (such as the back of image. If this happens, set the envelope selector to static buildup • already printed on the...

User Guide
Page 101
... release, and then slide the paper guides into tray. To print on both sides, content other than text is printed at lower density. • If ink smears appear and characters are sharply creased by rubbing the edges with the print side face up in the optional bypass tray unit. 3 • When...
... release, and then slide the paper guides into tray. To print on both sides, content other than text is printed at lower density. • If ink smears appear and characters are sharply creased by rubbing the edges with the print side face up in the optional bypass tray unit. 3 • When...
User Guide
Page 109
.... 5. 4. Monitoring and Configuring the Printer Using the Status Monitor Using the Status monitor, you can check the print job status, error messages amount of remaining ink, and other printer status information. • p.195 "Replacing a Print Cartridge" • p.255 "Status Monitor Errors" 4 • p.103 "Canceling Printing from the Status Monitor" Receiving Notification...
.... 5. 4. Monitoring and Configuring the Printer Using the Status Monitor Using the Status monitor, you can check the print job status, error messages amount of remaining ink, and other printer status information. • p.195 "Replacing a Print Cartridge" • p.255 "Status Monitor Errors" 4 • p.103 "Canceling Printing from the Status Monitor" Receiving Notification...
User Guide
Page 117
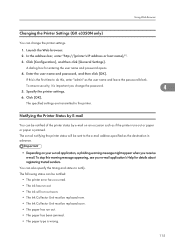
...Help for entering the user name and password opens. 4. The following status can be notified: • The printer error has occurred. • The ink has run out. • The paper has been jammed. • The paper type is the first time to the e-mail address specified as the...is jammed. The specified settings are transmitted to notify. Specify the printer settings. 6. Launch the Web browser. 2. Using Web Browser Changing the Printer Settings (GX e3350N only) You can change the password. 4 5. Click [OK]. To stop this , enter "admin" as if the printer runs out or paper...
...Help for entering the user name and password opens. 4. The following status can be notified: • The printer error has occurred. • The ink has run out. • The paper has been jammed. • The paper type is the first time to the e-mail address specified as the...is jammed. The specified settings are transmitted to notify. Specify the printer settings. 6. Launch the Web browser. 2. Using Web Browser Changing the Printer Settings (GX e3350N only) You can change the password. 4 5. Click [OK]. To stop this , enter "admin" as if the printer runs out or paper...

User Guide
Page 122
Functions Selectable value Printer Error ON 4 OFF Cartridge Empty ON OFF Cartridge Almost Empty ON OFF Replace Ink Collector Unit ON OFF Ink Collector Unit Near Full ON OFF No Paper ON OFF Paper Misfeed ON OFF Paper Size Mismatch ON OFF Paper Type Mismatch ON OFF Paper ...
Functions Selectable value Printer Error ON 4 OFF Cartridge Empty ON OFF Cartridge Almost Empty ON OFF Replace Ink Collector Unit ON OFF Ink Collector Unit Near Full ON OFF No Paper ON OFF Paper Misfeed ON OFF Paper Size Mismatch ON OFF Paper Type Mismatch ON OFF Paper ...

User Guide
Page 125
Functions Notify within Cartridge Almost Empty Functions Notify when error Notify within Replace Ink Collector Unit Functions Notify when error Notify within Using Web Browser Selectable value 0 5 10 15 5 20 25 30 (minutes) Default 4 Selectable value Default Occurs Occurs & Fixed Occurs 10 20 10 30 (%) Selectable value Occurs 0 5 10 15 20 25 30 (minutes) Occurs Default 5 123
Functions Notify within Cartridge Almost Empty Functions Notify when error Notify within Replace Ink Collector Unit Functions Notify when error Notify within Using Web Browser Selectable value 0 5 10 15 5 20 25 30 (minutes) Default 4 Selectable value Default Occurs Occurs & Fixed Occurs 10 20 10 30 (%) Selectable value Occurs 0 5 10 15 20 25 30 (minutes) Occurs Default 5 123
User Guide
Page 126
Monitoring and Configuring the Printer Ink Collector Unit Near Full Functions Notify when error Notify within 4 No Paper Functions Notify when error Notify within Paper Misfeed Functions Notify when error Selectable value Occurs 0 5 10 15 20 25 30 (minutes) Selectable value Occurs Occurs & Fixed 0 5 10 15 20 25 30 (minutes) Selectable value Occurs Occurs & Fixed Occurs Default 5 Default Occurs 5 Default Occurs 124 4.
Monitoring and Configuring the Printer Ink Collector Unit Near Full Functions Notify when error Notify within 4 No Paper Functions Notify when error Notify within Paper Misfeed Functions Notify when error Selectable value Occurs 0 5 10 15 20 25 30 (minutes) Selectable value Occurs Occurs & Fixed 0 5 10 15 20 25 30 (minutes) Selectable value Occurs Occurs & Fixed Occurs Default 5 Default Occurs 5 Default Occurs 124 4.
User Guide
Page 145
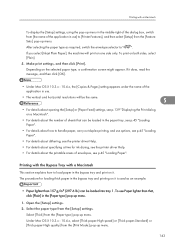
... explains how to " ". If you select [Inkjet Plain Paper], the machine will be loaded into tray 1. To print on one side only. The procedure for ink drying, see p.139 "Displaying the Print dialog on it. Select [Thick] from the [Paper type:] pop-up menu. 143 Make print settings, and then click...
... explains how to " ". If you select [Inkjet Plain Paper], the machine will be loaded into tray 1. To print on one side only. The procedure for ink drying, see p.139 "Displaying the Print dialog on it. Select [Thick] from the [Paper type:] pop-up menu. 143 Make print settings, and then click...


