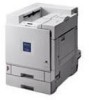
Maintenance Guide
Page 1
Operating Instructions Maintenance Guide For safety, please read this manual carefully before you use this product and keep it handy for future reference.
Operating Instructions Maintenance Guide For safety, please read this manual carefully before you use this product and keep it handy for future reference.

Maintenance Guide
Page 2
Please keep this manual carefully and follow the instructions. To get maximum versatility from this machine all operators are requested to read this manual in a handy place near the machine. Introduction This manual describes detailed instructions on the operation and notes about the use of this machine.
Please keep this manual carefully and follow the instructions. To get maximum versatility from this machine all operators are requested to read this manual in a handy place near the machine. Introduction This manual describes detailed instructions on the operation and notes about the use of this machine.

Maintenance Guide
Page 3
... the United States and/or other countries. Notes: Some illustrations in this manual might be available in some countries. Certain options might be trademarks of their respective companies. Note The proper names of Microsoft Corporation in those marks. IPS-PRINT Printer Language Emulation Copyright© 1999-2000 Oak Technology, Inc., All rights...
... the United States and/or other countries. Notes: Some illustrations in this manual might be available in some countries. Certain options might be trademarks of their respective companies. Note The proper names of Microsoft Corporation in those marks. IPS-PRINT Printer Language Emulation Copyright© 1999-2000 Oak Technology, Inc., All rights...
Maintenance Guide
Page 4
... R WARNING: Indicates a potentially hazardous situation which , if instructions are not followed, may result in this manual, the following safety precautions should always be followed. R WARNING: • Disconnect the power plug (by ...power cable or plug becomes frayed or otherwise damaged. • To avoid hazardous electric shock or laser radiation exposure, do not remove any of the used toner cartridge in accordance with the local regulation.... • You suspect that your printer, the following important symbols are not followed, could result in death or serious injury. ii
... R WARNING: Indicates a potentially hazardous situation which , if instructions are not followed, may result in this manual, the following safety precautions should always be followed. R WARNING: • Disconnect the power plug (by ...power cable or plug becomes frayed or otherwise damaged. • To avoid hazardous electric shock or laser radiation exposure, do not remove any of the used toner cartridge in accordance with the local regulation.... • You suspect that your printer, the following important symbols are not followed, could result in death or serious injury. ii

Maintenance Guide
Page 7
... the machine's panel display. How to read this. v Preparation This symbol indicates the prior knowledge or preparations required before operating. Be sure to Read This Manual Symbols In this manual, the following symbols are not followed, could result in which , if instructions are used together, or conditions in death or serious injury.
... the machine's panel display. How to read this. v Preparation This symbol indicates the prior knowledge or preparations required before operating. Be sure to Read This Manual Symbols In this manual, the following symbols are not followed, could result in which , if instructions are used together, or conditions in death or serious injury.
Maintenance Guide
Page 8
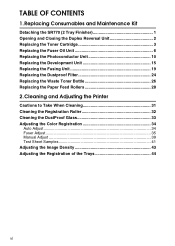
TABLE OF CONTENTS 1. Cleaning and Adjusting the Printer Cautions to Take When Cleaning 31 Cleaning the Registration Roller 32 Cleaning the DustProof Glass 33 Adjusting the Color Registration 34 Auto Adjust 34 Fuser Adjust 35 Manual Adjust 39 Test Sheet Samples 41 Adjusting the Image Density 43 Adjusting the Registration of the Trays 44...
TABLE OF CONTENTS 1. Cleaning and Adjusting the Printer Cautions to Take When Cleaning 31 Cleaning the Registration Roller 32 Cleaning the DustProof Glass 33 Adjusting the Color Registration 34 Auto Adjust 34 Fuser Adjust 35 Manual Adjust 39 Test Sheet Samples 41 Adjusting the Image Density 43 Adjusting the Registration of the Trays 44...
Maintenance Guide
Page 33
...square do not overlap sharply and you select "0" for A - ter} to move to start printing. ter}, and the printer returns to the ready condition, and perform the "Fuser Adjust" manually. Invalid Value Press # ❒ When "Toner is in the Bypass Tray, and then press {Enter}. V Check ...Test Sheet Samples". The printer prints 8 Test Sheet (A H). Press {En- U Confirm that the A3 paper which comes with the Fusing Unit is Almost Empty" appears on the panel display, replace the toner cartridge and perform the "Auto Adjust", and then perform "Fuser Adjust" manually. See p.35 "When ...
...square do not overlap sharply and you select "0" for A - ter} to move to start printing. ter}, and the printer returns to the ready condition, and perform the "Fuser Adjust" manually. Invalid Value Press # ❒ When "Toner is in the Bypass Tray, and then press {Enter}. V Check ...Test Sheet Samples". The printer prints 8 Test Sheet (A H). Press {En- U Confirm that the A3 paper which comes with the Fusing Unit is Almost Empty" appears on the panel display, replace the toner cartridge and perform the "Auto Adjust", and then perform "Fuser Adjust" manually. See p.35 "When ...
Maintenance Guide
Page 41
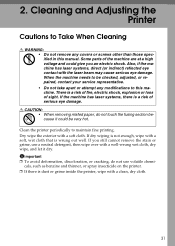
...deformation, discoloration, or cracking, do not touch the fusing section because it dry. Cleaning and Adjusting the Printer Cautions to Take When Cleaning R WARNING: • Do not remove any modifications to this manual. There is a risk of fire, electric shock, explosion or loss of serious eye damage. R CAUTION:... eye contact with a soft, wet cloth that is a risk of sight. If the machine has laser systems, there is wrung out well. If dry wiping is dust or grime inside the printer, wipe with a clean, dry cloth. 31 cals, such as benzine and thinner, or spray insecticide...
...deformation, discoloration, or cracking, do not touch the fusing section because it dry. Cleaning and Adjusting the Printer Cautions to Take When Cleaning R WARNING: • Do not remove any modifications to this manual. There is a risk of fire, electric shock, explosion or loss of serious eye damage. R CAUTION:... eye contact with a soft, wet cloth that is a risk of sight. If the machine has laser systems, there is wrung out well. If dry wiping is dust or grime inside the printer, wipe with a clean, dry cloth. 31 cals, such as benzine and thinner, or spray insecticide...
Maintenance Guide
Page 44
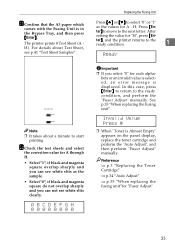
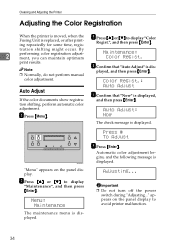
... can maintain optimum Maintenance: Color Regist. Note ❒ Normally, do not perform manual D Confirm that "Now" is dis- Press # To Adjust F Press {Enter}. Important ❒ Do not turn off the power switch during "Adjusting..." Now The check message is displayed. ZDJS001J "Menu" appears on the panel display to avoid printer malfunction. 34 played...
... can maintain optimum Maintenance: Color Regist. Note ❒ Normally, do not perform manual D Confirm that "Now" is dis- Press # To Adjust F Press {Enter}. Important ❒ Do not turn off the power switch during "Adjusting..." Now The check message is displayed. ZDJS001J "Menu" appears on the panel display to avoid printer malfunction. 34 played...

Maintenance Guide
Page 49
...- Menu: Maintenance The maintenance menu is printed. ual Adjust", and then press {Enter}. Adjusting the Color Registration Manual Adjust E Confirm that "Print" is displayed in or- A Press {Menu}. Test Sheet: Print The Test Sheet is displayed. Maintenance: Color Regist. F Enter the corrective values for A through "L". 39 es or decreases the value in the...
...- Menu: Maintenance The maintenance menu is printed. ual Adjust", and then press {Enter}. Adjusting the Color Registration Manual Adjust E Confirm that "Print" is displayed in or- A Press {Menu}. Test Sheet: Print The Test Sheet is displayed. Maintenance: Color Regist. F Enter the corrective values for A through "L". 39 es or decreases the value in the...

Maintenance Guide
Page 50
..., redo the procedure from step D. Color Regist.: Manual Adjust G When you finish the settings up to "L", press {Enter} in the same manner, using steps A and B. Note ❒ If a square other than "0" is returned to "L" in the next menu. 2 Manual Adjust: Print Result The Test Sheet... is the whitest within A through L on the panel display. Ready 40 "Ready " appears on the printed Test Sheet. Cleaning and Adjusting the Printer B Press {Enter}. E Confirm that square "0" is printed. D ...
..., redo the procedure from step D. Color Regist.: Manual Adjust G When you finish the settings up to "L", press {Enter} in the same manner, using steps A and B. Note ❒ If a square other than "0" is returned to "L" in the next menu. 2 Manual Adjust: Print Result The Test Sheet... is the whitest within A through L on the panel display. Ready 40 "Ready " appears on the printed Test Sheet. Cleaning and Adjusting the Printer B Press {Enter}. E Confirm that square "0" is printed. D ...

Maintenance Guide
Page 57
Note ❒ The following symbols and terminology are used to represent the feed direction. The direction is determined for each paper tray in this manual L ← (Feed direction) K ← (Feed direction) On the panel display A4 (210 × 297) 8 1/2 × 11 A4 (297 × 210) 11 × 8 1/2 Paper ...L 148 × 210 K 210 × 148 L 128 × 182 L 105 × 148 47 3. Paper and Other Media Paper and Other Media Supported by This Printer Paper Sizes This section describes the type, size, feed direction, and maximum amount of the paper feed direction. In this...
Note ❒ The following symbols and terminology are used to represent the feed direction. The direction is determined for each paper tray in this manual L ← (Feed direction) K ← (Feed direction) On the panel display A4 (210 × 297) 8 1/2 × 11 A4 (297 × 210) 11 × 8 1/2 Paper ...L 148 × 210 K 210 × 148 L 128 × 182 L 105 × 148 47 3. Paper and Other Media Paper and Other Media Supported by This Printer Paper Sizes This section describes the type, size, feed direction, and maximum amount of the paper feed direction. In this...

Maintenance Guide
Page 119
...Color Registration, 34 Auto Adjust, 34 Manual Adjust, 39 Adjusting the Image Density, 43 Adjusting the Registration of the Trays, 44 Appendix, 103 B Bypass Tray Custom Size, 66 Paper Type, 67 C Caution, ii Cleaning the DustProof Glass, 33 Cleaning the Registration Roller, 32 Clearing and Adjusting the Printer, 31 Color... 1, 58 Tray 2, 59 Loading paper Bypass Tray, 64 Paper Bank PS470, 60 paper size, 61 paper type, 63 M messages, 69 Moving the Printer, 105 O OHP transparencies, 54 Online indicator, 81 Online key, 81 Opening and Closing the Duplex Reversal Unit, 2, 89 Other Printing Problems, 84 P...
...Color Registration, 34 Auto Adjust, 34 Manual Adjust, 39 Adjusting the Image Density, 43 Adjusting the Registration of the Trays, 44 Appendix, 103 B Bypass Tray Custom Size, 66 Paper Type, 67 C Caution, ii Cleaning the DustProof Glass, 33 Cleaning the Registration Roller, 32 Clearing and Adjusting the Printer, 31 Color... 1, 58 Tray 2, 59 Loading paper Bypass Tray, 64 Paper Bank PS470, 60 paper size, 61 paper type, 63 M messages, 69 Moving the Printer, 105 O OHP transparencies, 54 Online indicator, 81 Online key, 81 Opening and Closing the Duplex Reversal Unit, 2, 89 Other Printing Problems, 84 P...


