Hardware Guide
Page 9
... "Remove Misfeed B,C,D:Inter.Path" Appears 121 When "Remove Misfeed R:Finisher" Appears 124 When "Remove Misfeed U:LCT" Appears 127 When "Remove Misfeed Z:Duplex Unit" Appears 129 viii Replacing Consumables Replacing the Toner Cartridge 87 Adding Staples...92 7. 5. Paper and Other Media Paper and Other Media Supported by This... Paper Recommendations 67 Loading Paper...67 Storing Paper ...67 Types of Paper and Other Media 68 Paper not supported by this printer 69 Print Area ...70 Loading Paper ...71 Loading Paper in Tray 1, Tray 2, and the Optional Paper Feed Unit 71 Loading Paper...
... "Remove Misfeed B,C,D:Inter.Path" Appears 121 When "Remove Misfeed R:Finisher" Appears 124 When "Remove Misfeed U:LCT" Appears 127 When "Remove Misfeed Z:Duplex Unit" Appears 129 viii Replacing Consumables Replacing the Toner Cartridge 87 Adding Staples...92 7. 5. Paper and Other Media Paper and Other Media Supported by This... Paper Recommendations 67 Loading Paper...67 Storing Paper ...67 Types of Paper and Other Media 68 Paper not supported by this printer 69 Print Area ...70 Loading Paper ...71 Loading Paper in Tray 1, Tray 2, and the Optional Paper Feed Unit 71 Loading Paper...
Hardware Guide
Page 13
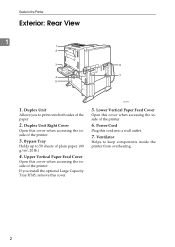
... this cover when accessing the inside of the printer. 6. Guide to keep components inside of the printer. 3. Bypass Tray Holds up to print onto both sides of plain paper. (80 g/m2, 20 lb.) 4. Duplex Unit Right Cover Open this cover when accessing the inside the printer from overheating. 2 Power Cord Plug this cord into...
... this cover when accessing the inside of the printer. 6. Guide to keep components inside of the printer. 3. Bypass Tray Holds up to print onto both sides of plain paper. (80 g/m2, 20 lb.) 4. Duplex Unit Right Cover Open this cover when accessing the inside the printer from overheating. 2 Power Cord Plug this cord into...
Hardware Guide
Page 74
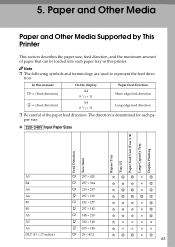
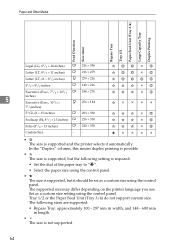
... can be loaded into each paper size. ❖ Input Paper Sizes Feed Direction Size (mm) Bypass Tray Tray 1/2 Paper Feed Unit (Tray 3 /4) Large Capacity Tray Duplex Printing A3 L 297 × 420 B4 L 257 × 364 A4 L 210 × 297 A4 K 297 × 210 B5 L 182 × 257 B5 K 257 × 182...; 148 A6 K 105 × 148 DLT (11 × 17 inches) L 28 × 43.2 63 Paper and Other Media Paper and Other Media Supported by This Printer This section describes the paper size, feed direction, and the maximum amount of the paper feed direction. In this...
... can be loaded into each paper size. ❖ Input Paper Sizes Feed Direction Size (mm) Bypass Tray Tray 1/2 Paper Feed Unit (Tray 3 /4) Large Capacity Tray Duplex Printing A3 L 297 × 420 B4 L 257 × 364 A4 L 210 × 297 A4 K 297 × 210 B5 L 182 × 257 B5 K 257 × 182...; 148 A6 K 105 × 148 DLT (11 × 17 inches) L 28 × 43.2 63 Paper and Other Media Paper and Other Media Supported by This Printer This section describes the paper size, feed direction, and the maximum amount of the paper feed direction. In this...
Hardware Guide
Page 75
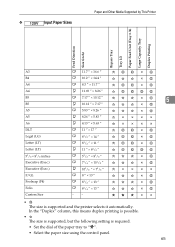
... is supported, but it automatically. Set as a custom size using the control panel. The supported size may differ depending on the printer language you use. In the "Duplex" column, this means duplex printing is possible. • The size is supported, but the following sizes are supported: • Bypass Tray: approximately 100 - 297 mm...
... is supported, but it automatically. Set as a custom size using the control panel. The supported size may differ depending on the printer language you use. In the "Duplex" column, this means duplex printing is possible. • The size is supported, but the following sizes are supported: • Bypass Tray: approximately 100 - 297 mm...
Hardware Guide
Page 76
... size is supported, but the following setting is supported and the printer selects it automatically. ❖ Input Paper Sizes Paper and Other Media Supported by This Printer Feed Direction Size (inch) Bypass Tray Tray 1/2 Paper Feed Unit (Tray 3 /4) Large Capacity Tray Duplex Printing A3 B4 A4 A4 B5 B5 A5 A5 A6 DLT...
... size is supported, but the following setting is supported and the printer selects it automatically. ❖ Input Paper Sizes Paper and Other Media Supported by This Printer Feed Direction Size (inch) Bypass Tray Tray 1/2 Paper Feed Unit (Tray 3 /4) Large Capacity Tray Duplex Printing A3 B4 A4 A4 B5 B5 A5 A5 A6 DLT...
Hardware Guide
Page 79
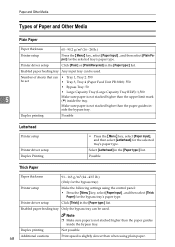
... {Menu} key, select [Paper Input] , and then select [Thick Paper] for the bypass tray) Printer setup Make the following settings using plain paper. Select [Letterhead] in the [Paper type:] list. Duplex printing Possible Letterhead Printer setup Printer driver setup Duplex Printing • Press the {Menu} key, select [Paper Input], and then select [Letterhead] for the...
... {Menu} key, select [Paper Input] , and then select [Thick Paper] for the bypass tray) Printer setup Make the following settings using plain paper. Select [Letterhead] in the [Paper type:] list. Duplex printing Possible Letterhead Printer setup Printer driver setup Duplex Printing • Press the {Menu} key, select [Paper Input], and then select [Letterhead] for the...
Hardware Guide
Page 80
... paper • Damp paper • Paper that is dry enough to emit static electricity 69 Duplex printing Not possible Additional cautions Print speed is slightly slower compared to project OHP transparencies. Paper not supported by this printer Avoid using the following settings using the control panel: • Press the {Menu} key, select...
... paper • Damp paper • Paper that is dry enough to emit static electricity 69 Duplex printing Not possible Additional cautions Print speed is slightly slower compared to project OHP transparencies. Paper not supported by this printer Avoid using the following settings using the control panel: • Press the {Menu} key, select...

Hardware Guide
Page 90
AQV132S 79 Otherwise, the paper may jam or the print quality may be printed on the control panel or with the Bypass Tray: • Duplex print • Limitless paper feed • Output from the Finisher (staple, punch) A Open the Bypass Tray. F Press the {Menu} key to return to the initial ... Paper in the Bypass Tray Important ❒ Shuffle the paper before loading the stack onto the tray, so multiple sheets are not available with the printer driver. E Select the paper type using {T} or {U}, and then press the {q Enter} key.
AQV132S 79 Otherwise, the paper may jam or the print quality may be printed on the control panel or with the Bypass Tray: • Duplex print • Limitless paper feed • Output from the Finisher (staple, punch) A Open the Bypass Tray. F Press the {Menu} key to return to the initial ... Paper in the Bypass Tray Important ❒ Shuffle the paper before loading the stack onto the tray, so multiple sheets are not available with the printer driver. E Select the paper type using {T} or {U}, and then press the {q Enter} key.
Hardware Guide
Page 107
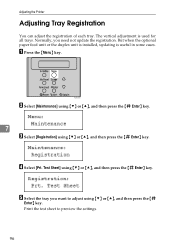
Adjusting the Printer Adjusting Tray Registration You can adjust the registration of each tray. Print the test sheet to adjust using {T} or {U}, and then press the {q Enter} key. ...] using {T} or {U}, and then press the {q Enter} key. The vertical adjustment is useful in some cases. But when the optional paper feed unit or the duplex unit is installed, updating is used for all trays.
Adjusting the Printer Adjusting Tray Registration You can adjust the registration of each tray. Print the test sheet to adjust using {T} or {U}, and then press the {q Enter} key. ...] using {T} or {U}, and then press the {q Enter} key. The vertical adjustment is useful in some cases. But when the optional paper feed unit or the duplex unit is installed, updating is used for all trays.
Hardware Guide
Page 129
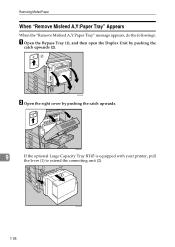
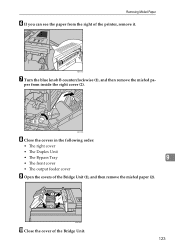
AQV224S 9 If the optional Large Capacity Tray RT45 is equipped with your printer, pull the lever (1) to extend the connecting unit (2). 2 1 AQV053S 118 Removing Misfed Paper When "Remove Misfeed A,Y:Paper Tray" Appears When the "Remove Misfeed A,Y:Paper Tray" message appears, do the followings: A Open the Bypass Tray (1), and then open the Duplex Unit by pushing the catch upwards. AQV223S B Open the right cover by pushing the catch upwards (2).
AQV224S 9 If the optional Large Capacity Tray RT45 is equipped with your printer, pull the lever (1) to extend the connecting unit (2). 2 1 AQV053S 118 Removing Misfed Paper When "Remove Misfeed A,Y:Paper Tray" Appears When the "Remove Misfeed A,Y:Paper Tray" message appears, do the followings: A Open the Bypass Tray (1), and then open the Duplex Unit by pushing the catch upwards. AQV223S B Open the right cover by pushing the catch upwards (2).
Hardware Guide
Page 131
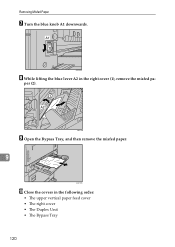
Removing Misfed Paper G Turn the blue knob A1 downwards. per (2). 1 A2 2 AQV119S I Open the Bypass Tray, and then remove the misfed paper. 9 AQV135S J Close the covers in the right cover (1), remove the misfed pa- A1 AQV064S H While lifting the blue lever A2 in the following order: • The upper vertical paper feed cover • The right cover • The Duplex Unit • The Bypass Tray 120
Removing Misfed Paper G Turn the blue knob A1 downwards. per (2). 1 A2 2 AQV119S I Open the Bypass Tray, and then remove the misfed paper. 9 AQV135S J Close the covers in the right cover (1), remove the misfed pa- A1 AQV064S H While lifting the blue lever A2 in the following order: • The upper vertical paper feed cover • The right cover • The Duplex Unit • The Bypass Tray 120
Hardware Guide
Page 132
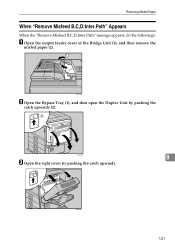
AQV223S 9 C Open the right cover by pushing the catch upwards (2). AQV224S 121 Removing Misfed Paper When "Remove Misfeed B,C,D:Inter.Path" Appears When the "Remove Misfeed B,C,D:Inter.Path" message appears, do the followings: A Open the output feeder cover of the Bridge Unit (1), and then remove the misfed paper (2). 1 2 AQV123S B Open the Bypass Tray (1), and then open the Duplex Unit by pushing the catch upwards.
AQV223S 9 C Open the right cover by pushing the catch upwards (2). AQV224S 121 Removing Misfed Paper When "Remove Misfeed B,C,D:Inter.Path" Appears When the "Remove Misfeed B,C,D:Inter.Path" message appears, do the followings: A Open the output feeder cover of the Bridge Unit (1), and then remove the misfed paper (2). 1 2 AQV123S B Open the Bypass Tray (1), and then open the Duplex Unit by pushing the catch upwards.
Hardware Guide
Page 134
AQV121S G Turn the blue knob B counterclockwise (1), and then remove the misfed pa- per from the right of the Bridge Unit. 123 B AQV120S H Close the covers in the following order: • The right cover • The Duplex Unit • The Bypass Tray 9 • The front cover • The output feeder cover I Open the covers of the Bridge Unit (1), and then remove the misfed paper (2). 1 2 AQV124S J Close the cover of the printer, remove it. Removing Misfed Paper F If you can see the paper from inside the right cover (2).
AQV121S G Turn the blue knob B counterclockwise (1), and then remove the misfed pa- per from the right of the Bridge Unit. 123 B AQV120S H Close the covers in the following order: • The right cover • The Duplex Unit • The Bypass Tray 9 • The front cover • The output feeder cover I Open the covers of the Bridge Unit (1), and then remove the misfed paper (2). 1 2 AQV124S J Close the cover of the printer, remove it. Removing Misfed Paper F If you can see the paper from inside the right cover (2).
Hardware Guide
Page 140
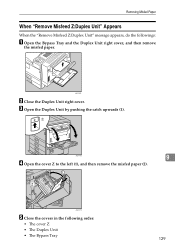
AQV146S 9 D Open the cover Z to the left (1), and then remove the misfed paper (2). 1 2 Z AQV157S E Close the covers in the following order: • The cover Z • The Duplex Unit • The Bypass Tray 129 Removing Misfed Paper When "Remove Misfeed Z:Duplex Unit" Appears When the "Remove Misfeed Z:Duplex Unit" message appears, do the followings: A Open the Bypass Tray and the Duplex Unit right cover, and then remove the misfed paper. AQV122S B Close the Duplex Unit right cover. C Open the Duplex Unit by pushing the catch upwards (1).
AQV146S 9 D Open the cover Z to the left (1), and then remove the misfed paper (2). 1 2 Z AQV157S E Close the covers in the following order: • The cover Z • The Duplex Unit • The Bypass Tray 129 Removing Misfed Paper When "Remove Misfeed Z:Duplex Unit" Appears When the "Remove Misfeed Z:Duplex Unit" message appears, do the followings: A Open the Bypass Tray and the Duplex Unit right cover, and then remove the misfed paper. AQV122S B Close the Duplex Unit right cover. C Open the Duplex Unit by pushing the catch upwards (1).

Hardware Guide
Page 145
Appendix Specifications Mainframe ❖ Configuration: Desktop ❖ Print Process: Laser beam scanning & Electrophotographic printing Dualcomponent development ❖ First Print Speed: 6 sec or less (A4L/8 1/2 × 11L) Note ❒ If the printer has not been used for a while, there may be a short delay before ...the first page starts printing. ❖ Printing Speed: • Maximum 45 pages per minute (A4L/8 1/2 × 11L), one-sided/duplex Printing speed may vary depending on...
Appendix Specifications Mainframe ❖ Configuration: Desktop ❖ Print Process: Laser beam scanning & Electrophotographic printing Dualcomponent development ❖ First Print Speed: 6 sec or less (A4L/8 1/2 × 11L) Note ❒ If the printer has not been used for a while, there may be a short delay before ...the first page starts printing. ❖ Printing Speed: • Maximum 45 pages per minute (A4L/8 1/2 × 11L), one-sided/duplex Printing speed may vary depending on...
Hardware Guide
Page 155
...PB 3020, 5, 10, 137 Paper not supported, 69 Paper Recommendations, 67 Plain Paper, 68 Power Indicator, 4 Print Area, 70 Printer Does Not Print, 101 Printer Hard Disk Drive Type 8100, 140 R Remove Misfed Paper Remove misfeed A,Y paper tray, 118 Remove misfeed B,C,D Inter Path, 121 Remove... misfeed R, Finisher, 124 Remove misfeed U, LCT, 127 Remove misfeed Z, Duplex Unit, 129 Removing Misfed Paper, 117 Replacing Consumables, 87 Replacing the ...
...PB 3020, 5, 10, 137 Paper not supported, 69 Paper Recommendations, 67 Plain Paper, 68 Power Indicator, 4 Print Area, 70 Printer Does Not Print, 101 Printer Hard Disk Drive Type 8100, 140 R Remove Misfed Paper Remove misfeed A,Y paper tray, 118 Remove misfeed B,C,D Inter Path, 121 Remove... misfeed R, Finisher, 124 Remove misfeed U, LCT, 127 Remove misfeed Z, Duplex Unit, 129 Removing Misfed Paper, 117 Replacing Consumables, 87 Replacing the ...
Software Guide
Page 11
...319 Using Adobe PageMaker Version 6.0, 6.5, or 7.0 320 When Using Windows Terminal Service/MetaFrame 321 Operating Environment 321 Supported Printer Drivers 321 Limitations ...322 ix Appendix Software and Utilities Included on the optional hard disk 311 Cautions to Take When ... ...286 Orientation Override 286 Duplex Printing...287 Gradation ...287 Toner Saving...288 Collate ...288 Paper Type...289 Image Smoothing 289 Dithering ...290 Printer Utility for Mac 291 Installing Printer Utility for Mac 291 Starting Printer Utility for Mac 292 Printer Utility for Admin 301 DeskTopBinder...
...319 Using Adobe PageMaker Version 6.0, 6.5, or 7.0 320 When Using Windows Terminal Service/MetaFrame 321 Operating Environment 321 Supported Printer Drivers 321 Limitations ...322 ix Appendix Software and Utilities Included on the optional hard disk 311 Cautions to Take When ... ...286 Orientation Override 286 Duplex Printing...287 Gradation ...287 Toner Saving...288 Collate ...288 Paper Type...289 Image Smoothing 289 Dithering ...290 Printer Utility for Mac 291 Installing Printer Utility for Mac 291 Starting Printer Utility for Mac 292 Printer Utility for Admin 301 DeskTopBinder...

Software Guide
Page 92
... of copies to DeskTopBinder Lite and this printer, enter the group password in this field. Group password: If a group password is assigned to print. 11. Staple Staple together output sheets. 8. Orientation: Specify the .... 14. Change Icon... Number of copies Specify the number of RPCS drivers that support PDF direct printing. 4. PDF password: If the PDF file is selected. 9. Duplex Print on each page. 13. Range: Specify the print area on both sides of sheets. 5. Display this dialog box before printing Appears in output sheets...
... of copies to DeskTopBinder Lite and this printer, enter the group password in this field. Group password: If a group password is assigned to print. 11. Staple Staple together output sheets. 8. Orientation: Specify the .... 14. Change Icon... Number of copies Specify the number of RPCS drivers that support PDF direct printing. 4. PDF password: If the PDF file is selected. 9. Duplex Print on each page. 13. Range: Specify the print area on both sides of sheets. 5. Display this dialog box before printing Appears in output sheets...
Software Guide
Page 95
... copying] Unauthorized Copy Control ypngCoiypngCoiypNngoiypNnogiypNnogiCyNnogiCyNonogiCNonopgCNoopgCNooypCNoioypnCNoioypngCoioypngCoiypNngCoiypNngoiypNnogiypNnogC 3 AJL030S 1. The pattern and text you have set with this printer. The document is installed. 3. ers/multifunction machines which the supplier's optional Copy Data Security unit is...70% whiteness. ❒ Duplex printing may interfere with [Data security for the supplier's copiers/multifunction machines. ❖ Printing a document using [Data security for copying], see the printer driver Help. 83 The ...
... copying] Unauthorized Copy Control ypngCoiypngCoiypNngoiypNnogiypNnogiCyNnogiCyNonogiCNonopgCNoopgCNooypCNoioypnCNoioypngCoioypngCoiypNngCoiypNngoiypNnogiypNnogC 3 AJL030S 1. The pattern and text you have set with this printer. The document is installed. 3. ers/multifunction machines which the supplier's optional Copy Data Security unit is...70% whiteness. ❒ Duplex printing may interfere with [Data security for the supplier's copiers/multifunction machines. ❖ Printing a document using [Data security for copying], see the printer driver Help. 83 The ...
Software Guide
Page 115
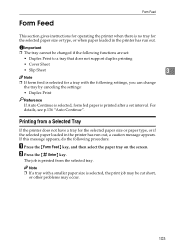
... the following settings, you can change the tray by canceling the settings: • Duplex Print Reference If Auto Continue is selected, form fed paper is printed after a set : • Duplex Print to a tray that does not support duplex printing • Cover Sheet • Slip Sheet 3 Note ❒ If form ...paper tray on the screen. Form Feed Form Feed This section gives instructions for operating the printer when there is no tray for the selected paper size or type, or when paper loaded in the printer has run out. For details, see p.136 "Auto Continue". The job is printed ...
... the following settings, you can change the tray by canceling the settings: • Duplex Print Reference If Auto Continue is selected, form fed paper is printed after a set : • Duplex Print to a tray that does not support duplex printing • Cover Sheet • Slip Sheet 3 Note ❒ If form ...paper tray on the screen. Form Feed Form Feed This section gives instructions for operating the printer when there is no tray for the selected paper size or type, or when paper loaded in the printer has run out. For details, see p.136 "Auto Continue". The job is printed ...


