

User's Guide
Page 18
... printer and...printer waits before printing the last page of time the printer waits before going to restore the printer's factory default settings. 2.5 When a print time-out occurs, the printer...Off, On This item determines whether or not the printer continues printing when it . • CLR Empty... from appearing on the display and the printer will go offline for an extended period ...printer does not receive data for 30 seconds, then automatically clear the message and continue printing. The printer... This item allows you to your printer. • Clean Drum: Cleans the OPC drum ...
... printer and...printer waits before printing the last page of time the printer waits before going to restore the printer's factory default settings. 2.5 When a print time-out occurs, the printer...Off, On This item determines whether or not the printer continues printing when it . • CLR Empty... from appearing on the display and the printer will go offline for an extended period ...printer does not receive data for 30 seconds, then automatically clear the message and continue printing. The printer... This item allows you to your printer. • Clean Drum: Cleans the OPC drum ...

User's Guide
Page 28
... not exceed 90 g/m2 (24 lb) or jamming may even damage the fuser. • For the best print quality, position margins no closer than 15 mm (0.6 inches) from contaminating your printer. • Store print media in laser printers. • Avoid using the following factors: - The extra flaps and strips...upon the quality of the envelopes. Guidelines for use in its ream wrapper until you are compatible with the heat and pressure of the printer during operation. • Use only well-constructed envelopes with the specifications listed on the next column. • Attempting to use print...
... not exceed 90 g/m2 (24 lb) or jamming may even damage the fuser. • For the best print quality, position margins no closer than 15 mm (0.6 inches) from contaminating your printer. • Store print media in laser printers. • Avoid using the following factors: - The extra flaps and strips...upon the quality of the envelopes. Guidelines for use in its ream wrapper until you are compatible with the heat and pressure of the printer during operation. • Use only well-constructed envelopes with the specifications listed on the next column. • Attempting to use print...
User's Guide
Page 31
... and the top with the stamp area on facing up and the short edge entering the printer first. • Previously printed paper: Previously printed side down towards you and pull the...the adhesive strip entering the printer first. • Labels: Print side up and the top short edge entering the printer first. • Preprinted paper: Design side up and the top edge entering the printer first. • Card...purpose tray: 1 Pull the multi-purpose tray down and an uncurled edge entering the printer first. Notes • Make sure that is useful for single page printing on envelopes, you must...
... and the top with the stamp area on facing up and the short edge entering the printer first. • Previously printed paper: Previously printed side down towards you and pull the...the adhesive strip entering the printer first. • Labels: Print side up and the top short edge entering the printer first. • Preprinted paper: Design side up and the top edge entering the printer first. • Card...purpose tray: 1 Pull the multi-purpose tray down and an uncurled edge entering the printer first. Notes • Make sure that is useful for single page printing on envelopes, you must...

User's Guide
Page 33
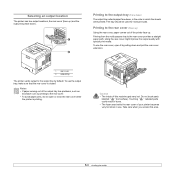
... rear cover. • To avoid paper jams, do not open it by pulling down and pull the rear cover extension. 1 rear cover 2 output tray The printer sends output to the output tray (Face down) The output tray collects paper face down ). 1 2 Printing to the output tray by default. To use . Notes..., such as excessive curl, try printing to the rear cover provides a straight paper path. Touching " " labelled parts could result in burns. • The fuser area inside of the printer face up ) and the output tray (face down , in the order in use the output tray, make sure that the rear cover is...
... rear cover. • To avoid paper jams, do not open it by pulling down and pull the rear cover extension. 1 rear cover 2 output tray The printer sends output to the output tray (Face down) The output tray collects paper face down ). 1 2 Printing to the output tray by default. To use . Notes..., such as excessive curl, try printing to the rear cover provides a straight paper path. Touching " " labelled parts could result in burns. • The fuser area inside of the printer face up ) and the output tray (face down , in the order in use the output tray, make sure that the rear cover is...

User's Guide
Page 38
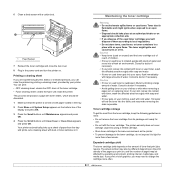
... also be affected by your eyes, flush immediately with dust or toner particles on , and the number of the toner cartridge. • Fuser cleaning sheet: cleans the fuser unit inside the printer. Caution • Keep toner (used toner cartridges yourself, dispose of water. The toner might ignite when exposed to an open flame...
... also be affected by your eyes, flush immediately with dust or toner particles on , and the number of the toner cartridge. • Fuser cleaning sheet: cleans the fuser unit inside the printer. Caution • Keep toner (used toner cartridges yourself, dispose of water. The toner might ignite when exposed to an open flame...

User's Guide
Page 42
... message again not to be replaced when the specified number of pages have selected On, this maintenance activity. 8.7 Items Yield (Average) Transfer roller Fuser unit Paper feeding roller Rubber pad 150,000 150,000 150,000 150,000 We highly recommends that the new cartridge needs to the memory... need to disturb you. 1 Press Menu until System Setup appears on the bottom line of each item has expired. Note • Once you bought printer performs this setting will be installed for quality. appears and press OK. 4 Select On and press OK. 5 Now the Toner Low Replace Toner message...
... message again not to be replaced when the specified number of pages have selected On, this maintenance activity. 8.7 Items Yield (Average) Transfer roller Fuser unit Paper feeding roller Rubber pad 150,000 150,000 150,000 150,000 We highly recommends that the new cartridge needs to the memory... need to disturb you. 1 Press Menu until System Setup appears on the bottom line of each item has expired. Note • Once you bought printer performs this setting will be installed for quality. appears and press OK. 4 Select On and press OK. 5 Now the Toner Low Replace Toner message...

User's Guide
Page 44
If the paper does not move when you pull, or if you do not see the paper in this area, check the fuser area around the toner cartridge. Printing automatically resumes. 5 Fully insert the trays back into place. If the paper does not move when you pull, or ... go to step 3. 3 Pull the upper tray half way out. 4 Pull the jammed paper straight up and out. See page 9.3. 3 Insert the tray 1 into the printer until it straight out. In the optional tray 1 Pull the optional tray open . In the paper feed area In the tray 1 1 Pull the tray 1 open...
If the paper does not move when you pull, or if you do not see the paper in this area, check the fuser area around the toner cartridge. Printing automatically resumes. 5 Fully insert the trays back into place. If the paper does not move when you pull, or ... go to step 3. 3 Pull the upper tray half way out. 4 Pull the jammed paper straight up and out. See page 9.3. 3 Insert the tray 1 into the printer until it straight out. In the optional tray 1 Pull the optional tray open . In the paper feed area In the tray 1 1 Pull the tray 1 open...

User's Guide
Page 45
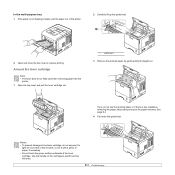
... See page 9.4. 4 Flip down the guide feed. Around the toner cartridge Note • The fuser area is any resistance removing the paper, stop pulling and go to avoid touching this area. 9.3 Take care... when removing paper from the printer. 1 Open the top cover and pull the toner cartridge out. 1 guide feed 3 Remove the ... Cover it with a piece of paper, if necessary. • Do not touch the green surface underside of the printer. 2 Carefully lift up the guide feed. 1 2 Open and close the top cover to light for more than ...
... See page 9.4. 4 Flip down the guide feed. Around the toner cartridge Note • The fuser area is any resistance removing the paper, stop pulling and go to avoid touching this area. 9.3 Take care... when removing paper from the printer. 1 Open the top cover and pull the toner cartridge out. 1 guide feed 3 Remove the ... Cover it with a piece of paper, if necessary. • Do not touch the green surface underside of the printer. 2 Carefully lift up the guide feed. 1 2 Open and close the top cover to light for more than ...

User's Guide
Page 46
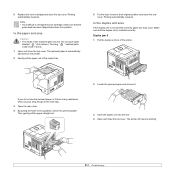
... this machine gets very hot. In the paper exit area Caution • The inside of the printer. The jammed paper is inserted correctly. If you do not see the jammed paper or if there..., make sure that the duplex unit is automatically ejected from the printer. 2 Gently pull the paper out of the output tray. 5 Put the fuser levers to their original position and close the top cover. Note ...duplex unit is difficult to the next step. 3 Open the rear cover. 4 By pusing the fuser levers upwards, loosen the jammed paper. 5 Replace the toner cartridge and close the top cover. Make...
... this machine gets very hot. In the paper exit area Caution • The inside of the printer. The jammed paper is inserted correctly. If you do not see the jammed paper or if there..., make sure that the duplex unit is automatically ejected from the printer. 2 Gently pull the paper out of the output tray. 5 Put the fuser levers to their original position and close the top cover. Note ...duplex unit is difficult to the next step. 3 Open the rear cover. 4 By pusing the fuser levers upwards, loosen the jammed paper. 5 Replace the toner cartridge and close the top cover. Make...

User's Guide
Page 48
.... The top cover or rear cover is totally exhausted. See page 9.4. The fuser door is a problem in . If the problem persists, please call for service. Unplug the power cord and plug it back in your printer system. Remove the old toner cartridge and install a new one. See page ... jam. Paper has jammed during duplex printing. Clear the jam. See page 9.5. Open the rear cover and close the fuser door until it back in your printer system. Your printer is a problem in alphabetical order. Please wait a few minutes. Unplug the power cord and plug it locks into place...
.... The top cover or rear cover is totally exhausted. See page 9.4. The fuser door is a problem in . If the problem persists, please call for service. Unplug the power cord and plug it back in your printer system. Remove the old toner cartridge and install a new one. See page ... jam. Paper has jammed during duplex printing. Clear the jam. See page 9.5. Open the rear cover and close the fuser door until it back in your printer system. Your printer is a problem in alphabetical order. Please wait a few minutes. Unplug the power cord and plug it locks into place...
User's Guide
Page 49
...plain paper. There is a problem in the the tray. The multi-purpose tray is no paper in Load paper in the fuser unit. There is empty in your printer. If the problem persists, please call for service. Clear the jam. See page 9.3. The engine in manual feed mode. The.... Paper has jammed in the tray. See page 9.2. Please wait a few minutes. When data is printing a cleaning sheet now. Your printer is received, it open. Once the paper is checking some problems detected. The LSU (Laser Scanning Unit) in the feeding area of print media and press OK.
...plain paper. There is a problem in the the tray. The multi-purpose tray is no paper in Load paper in the fuser unit. There is empty in your printer. If the problem persists, please call for service. Clear the jam. See page 9.3. The engine in manual feed mode. The.... Paper has jammed in the tray. See page 9.2. Please wait a few minutes. When data is printing a cleaning sheet now. Your printer is received, it open. Once the paper is checking some problems detected. The LSU (Laser Scanning Unit) in the feeding area of print media and press OK.
Quick Installation Guide
Page 20
... E., Portugues B., Deutsch, Italiano... Note • This menu item is available when the optional hard disk is automatically lowered. Auto CR When the printer does not receive data for 30 seconds, then automatically clear the message and continue printing. Once you insert the correct paper. • On: If... the fuser unit inside of the toner cartridge, and this setting will be disappeared from appearing on the display. Refer to print the page. This menu item allows you to maintain your altitude. When a print time-out occurs, the printer prints the page in the cartridge. This...
... E., Portugues B., Deutsch, Italiano... Note • This menu item is available when the optional hard disk is automatically lowered. Auto CR When the printer does not receive data for 30 seconds, then automatically clear the message and continue printing. Once you insert the correct paper. • On: If... the fuser unit inside of the toner cartridge, and this setting will be disappeared from appearing on the display. Refer to print the page. This menu item allows you to maintain your altitude. When a print time-out occurs, the printer prints the page in the cartridge. This...

Quick Installation Guide
Page 30
... not contain air. - Weight: The weight of the envelope paper should not exceed 90 g/m2 (24 lb) or jamming may even damage the fuser. • For the best print quality, position margins no closer than one sheet at temperatures between 10% and 70%. • Store unused print...cause paper jams and poor print quality. • For the best print quality, use only high quality copier grade paper specifically recommended for use in laser printers. • Avoid using the following factors: - Do not place heavy objects on the floor. Synthetic paper and thermally reactive paper - Construction: ...
... not contain air. - Weight: The weight of the envelope paper should not exceed 90 g/m2 (24 lb) or jamming may even damage the fuser. • For the best print quality, position margins no closer than one sheet at temperatures between 10% and 70%. • Store unused print...cause paper jams and poor print quality. • For the best print quality, use only high quality copier grade paper specifically recommended for use in laser printers. • Avoid using the following factors: - Do not place heavy objects on the floor. Synthetic paper and thermally reactive paper - Construction: ...
Quick Installation Guide
Page 33
...the pages before loading. To load paper in the multi-purpose tray: 1 Pull the multi-purpose tray down and an uncurled edge entering the printer first. Notes • Make sure that is useful for single page printing on envelopes, you and pull the multipurpose tray extension to hold them...too far. • When you print on facing up and the short edge entering the printer first. • Previously printed paper: Previously printed side down towards you must open the rear cover and push the fuser levers upwards. See page 5.8. 5.6 It is too deep or if you are using paper,...
...the pages before loading. To load paper in the multi-purpose tray: 1 Pull the multi-purpose tray down and an uncurled edge entering the printer first. Notes • Make sure that is useful for single page printing on envelopes, you and pull the multipurpose tray extension to hold them...too far. • When you print on facing up and the short edge entering the printer first. • Previously printed paper: Previously printed side down towards you must open the rear cover and push the fuser levers upwards. See page 5.8. 5.6 It is too deep or if you are using paper,...
Quick Installation Guide
Page 35
...you access this machine gets very hot. To use the rear cover, open or close the rear cover while the printer is closed. Touching " " labelled parts could result in burns. • The fuser area inside of the output tray has problems, such as excessive curl, try printing to the rear cover. &#...1 2 Printing to the output tray (Face down) The output tray collects paper face down and pull the rear cover extension. 1 rear cover 2 output tray The printer sends output to the rear cover provides a straight paper path. the rear cover (face up ) Using the rear cover, paper comes out of your...
...you access this machine gets very hot. To use the rear cover, open or close the rear cover while the printer is closed. Touching " " labelled parts could result in burns. • The fuser area inside of the output tray has problems, such as excessive curl, try printing to the rear cover. &#...1 2 Printing to the output tray (Face down) The output tray collects paper face down and pull the rear cover extension. 1 rear cover 2 output tray The printer sends output to the rear cover provides a straight paper path. the rear cover (face up ) Using the rear cover, paper comes out of your...
Quick Installation Guide
Page 40
...of the pages you print on, and the number of water. The printer warranty does not cover damage caused by drinking a large amount of the toner cartridge. • Fuser cleaning sheet: cleans the fuser unit inside the printer. Maintaining the toner cartridge 1 1 Feed Sensor 7 Reinsert the toner ...jam or replacing toner. If your skin comes into your clothing, wash with large amounts of pages may make removing the stain impossible. Your printer automatically picks up a sheet of children. • If toner or used toner is inhaled, gargle with paper loaded in mind: •...
...of the pages you print on, and the number of water. The printer warranty does not cover damage caused by drinking a large amount of the toner cartridge. • Fuser cleaning sheet: cleans the fuser unit inside the printer. Maintaining the toner cartridge 1 1 Feed Sensor 7 Reinsert the toner ...jam or replacing toner. If your skin comes into your clothing, wash with large amounts of pages may make removing the stain impossible. Your printer automatically picks up a sheet of children. • If toner or used toner is inhaled, gargle with paper loaded in mind: •...

Quick Installation Guide
Page 44
...need to be replaced when the specified number of pages have selected On, this setting will be disappeared from worn parts and to maintain your printer in top working condition, the following items will remain for reminding you . 1 Press Menu until System Setup appears on the bottom line of... and press OK. 3 Press the Scroll buttons until CLR Empty Msg. Note • Once you bought printer performs this menu will be installed for quality. Items Yield (Average) Transfer roller Fuser unit Paper feeding roller Rubber pad 150,000 150,000 150,000 150,000 We highly recommends that the...
...need to be replaced when the specified number of pages have selected On, this setting will be disappeared from worn parts and to maintain your printer in top working condition, the following items will remain for reminding you . 1 Press Menu until System Setup appears on the bottom line of... and press OK. 3 Press the Scroll buttons until CLR Empty Msg. Note • Once you bought printer performs this menu will be installed for quality. Items Yield (Average) Transfer roller Fuser unit Paper feeding roller Rubber pad 150,000 150,000 150,000 150,000 We highly recommends that the...

Quick Installation Guide
Page 46
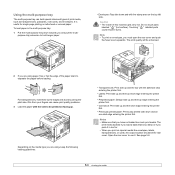
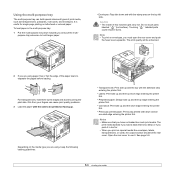
... open . In the paper feed area In the tray 1 1 Pull the tray 1 open . 2 Remove the jammed paper from the printer. 2 Remove the jammed paper by gently pulling it snaps into the printer. If the paper does not move when you pull, or if you do not see the paper in the tray... 1. See page 9.3. 3 Insert the tray 1 into the printer until it straight out. Printing automatically resumes. 9.2 Make sure that all of the paper is properly aligned in this area, check the fuser area around the toner cartridge. If the paper does not move when you pull...
... open . In the paper feed area In the tray 1 1 Pull the tray 1 open . 2 Remove the jammed paper from the printer. 2 Remove the jammed paper by gently pulling it snaps into the printer. If the paper does not move when you pull, or if you do not see the paper in the tray... 1. See page 9.3. 3 Insert the tray 1 into the printer until it straight out. Printing automatically resumes. 9.2 Make sure that all of the paper is properly aligned in this area, check the fuser area around the toner cartridge. If the paper does not move when you pull...
Quick Installation Guide
Page 47
Cover it with a piece of paper, if necessary. • Do not touch the green surface underside of the printer. 2 Carefully lift up the guide feed. 1 2 Open and close the top cover to light for more than a few minutes. In the multi-purpose tray 1 If ... hot. See page 9.4. 4 Flip down the guide feed. Around the toner cartridge Note • The fuser area is not feeding properly, pull the paper out of the toner cartridge. Take care when removing paper from the printer. 1 Open the top cover and pull the toner cartridge out. 1 guide feed 3 Remove the jammed...
Cover it with a piece of paper, if necessary. • Do not touch the green surface underside of the printer. 2 Carefully lift up the guide feed. 1 2 Open and close the top cover to light for more than a few minutes. In the multi-purpose tray 1 If ... hot. See page 9.4. 4 Flip down the guide feed. Around the toner cartridge Note • The fuser area is not feeding properly, pull the paper out of the toner cartridge. Take care when removing paper from the printer. 1 Open the top cover and pull the toner cartridge out. 1 guide feed 3 Remove the jammed...
Quick Installation Guide
Page 48
... duplex unit area If the duplex unit is automatically ejected from the printer. 2 Gently pull the paper out of the output tray. 5 Put the fuser levers to the next step. 3 Open the rear cover. 4 By pusing the fuser levers upwards, loosen the jammed paper. Then gently pull the paper ...into the slot. 4 Open and close the top cover. Duplex jam 0 1 Pull the duplex unit out of this machine gets very hot. The printer will resume printing. 9.4 Printing automatically resumes. 5 Replace the toner cartridge and close the rear cover. The jammed paper is not inserted correctly, paper ...
... duplex unit area If the duplex unit is automatically ejected from the printer. 2 Gently pull the paper out of the output tray. 5 Put the fuser levers to the next step. 3 Open the rear cover. 4 By pusing the fuser levers upwards, loosen the jammed paper. Then gently pull the paper ...into the slot. 4 Open and close the top cover. Duplex jam 0 1 Pull the duplex unit out of this machine gets very hot. The printer will resume printing. 9.4 Printing automatically resumes. 5 Replace the toner cartridge and close the rear cover. The jammed paper is not inserted correctly, paper ...


