User Manual - RTD209
Page 3
RTD209 EN 26/4/06 3:21 PM Page 5 Table of Ripped Files 20 Deleting Files 20 mp3 Player Insert ...Frequently Asked Questions 23 The Setup Menu General Setup 24 Password 24 Rating 25 Slide Time 25 Default 25 Display Setup 25 Display Type 25 Dark Level 25 Video 26 Speaker Setup 26 Night Mode 26 Distance 26 Test Tone 26 Language Setup 27 Player Menu 27 ... 20 Speed 20 Source 20 Destination 20 Start Ripping CD 20 File Names of Contents Connections and Setup Things to Navigate through On-Screen Menus 9 Inserting batteries in this document are for representation only. 1
RTD209 EN 26/4/06 3:21 PM Page 5 Table of Ripped Files 20 Deleting Files 20 mp3 Player Insert ...Frequently Asked Questions 23 The Setup Menu General Setup 24 Password 24 Rating 25 Slide Time 25 Default 25 Display Setup 25 Display Type 25 Dark Level 25 Video 26 Speaker Setup 26 Night Mode 26 Distance 26 Test Tone 26 Language Setup 27 Player Menu 27 ... 20 Speed 20 Source 20 Destination 20 Start Ripping CD 20 File Names of Contents Connections and Setup Things to Navigate through On-Screen Menus 9 Inserting batteries in this document are for representation only. 1
User Manual - RTD209
Page 4
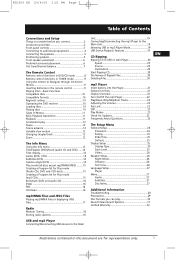
...; Moving the unit from any recording of the relevant DVD disc onto a videotape of very poor picture quality, or even impossible. RTD209 EN 26/4/06 3:21 PM Page 6 Connections and Setup Things to consider before turning the unit on either side and above the top, and 5 cm/2 inches at the end of...
...; Moving the unit from any recording of the relevant DVD disc onto a videotape of very poor picture quality, or even impossible. RTD209 EN 26/4/06 3:21 PM Page 6 Connections and Setup Things to consider before turning the unit on either side and above the top, and 5 cm/2 inches at the end of...
User Manual - RTD209
Page 5
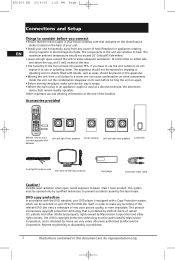
Toggles between different subwoofer output levels. DISC SKIP - Starts playing a disc. RCA MP3 PLAYER - SUBWOOFER - STOP - Pause. Adjusts the volume. Switches the unit on the system's back panel.They must be hooked up in order to the ... 1. Stops disc playback. The LED lights when Surround mode is inserted into the upper AM LOOP terminal. Connect USB devices. RTD209 EN 26/4/06 3:21 PM Page 7 Front panel controls Connections and Setup EN OPEN/CLOSE - Surround sound light indicator- Connects the included Lyra mp3 player. GND Illustrations contained in the disc...
Toggles between different subwoofer output levels. DISC SKIP - Starts playing a disc. RCA MP3 PLAYER - SUBWOOFER - STOP - Pause. Adjusts the volume. Switches the unit on the system's back panel.They must be hooked up in order to the ... 1. Stops disc playback. The LED lights when Surround mode is inserted into the upper AM LOOP terminal. Connect USB devices. RTD209 EN 26/4/06 3:21 PM Page 7 Front panel controls Connections and Setup EN OPEN/CLOSE - Surround sound light indicator- Connects the included Lyra mp3 player. GND Illustrations contained in the disc...

User Manual - RTD209
Page 6
... the screen). To ensure maximum picture quality, use the DVD player's progressive scan output to get the highest possible video resolution. RTD209 EN 26/4/06 3:21 PM Page 8 Connections and Setup EN S-VIDOE Connecting to audiovisual equipment Explanation of jacks and cables The jacks on the back of your component has only...
... the screen). To ensure maximum picture quality, use the DVD player's progressive scan output to get the highest possible video resolution. RTD209 EN 26/4/06 3:21 PM Page 8 Connections and Setup EN S-VIDOE Connecting to audiovisual equipment Explanation of jacks and cables The jacks on the back of your component has only...
User Manual - RTD209
Page 7
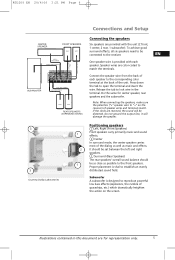
... establish an evenly distributed sound field. Do not ground the output line, it will be connected to the receiver. RTD209 EN 26/4/06 3:21 PM Page 9 3 3 Courtesy Dolby Laboratories Connections and Setup Connecting the speakers Six speakers are provided with each speaker to the corresponding color terminal at the back of the...
... establish an evenly distributed sound field. Do not ground the output line, it will be connected to the receiver. RTD209 EN 26/4/06 3:21 PM Page 9 3 3 Courtesy Dolby Laboratories Connections and Setup Connecting the speakers Six speakers are provided with each speaker to the corresponding color terminal at the back of the...
User Manual - RTD209
Page 8
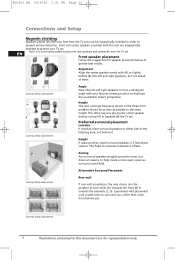
... effects. Alternative Surround Placement Courtesy Dolby Laboratories Rear wall If rear wall mounting is not recommended to prevent picture distortion. RTD209 EN 26/4/06 3:21 PM Page 10 Connections and Setup Magnetic shielding Speakers placed less than come from the TV set must be as close as possible to get the best...
... effects. Alternative Surround Placement Courtesy Dolby Laboratories Rear wall If rear wall mounting is not recommended to prevent picture distortion. RTD209 EN 26/4/06 3:21 PM Page 10 Connections and Setup Magnetic shielding Speakers placed less than come from the TV set must be as close as possible to get the best...

User Manual - RTD209
Page 9
... for balancing the channels. Test tone/Channel balance Channel balance Your receiver is usually much lower than the front. RTD209 EN 26/4/06 3:21 PM Page 11 Courtesy Dolby Laboratories Connections and Setup No adjacent walls Surround speakers can go on stands facing each channel plays at the same loudness level (see...
... for balancing the channels. Test tone/Channel balance Channel balance Your receiver is usually much lower than the front. RTD209 EN 26/4/06 3:21 PM Page 11 Courtesy Dolby Laboratories Connections and Setup No adjacent walls Surround speakers can go on stands facing each channel plays at the same loudness level (see...
User Manual - RTD209
Page 10
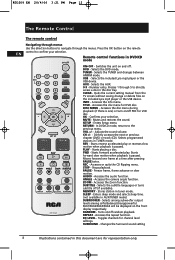
... the TV screen without saving change or delete files on /off (if available). Enters Setup menu. PLAY - Number entry. CLEAR - SETUP - CH +/- - Starts forward accelerated play or reverses slow motion when playback is paused. AUDIO - EQ LEVEL - RTD209 EN 26/4/06 3:21 PM Page 12 The Remote Control The remote control Navigating through...
... the TV screen without saving change or delete files on /off (if available). Enters Setup menu. PLAY - Number entry. CLEAR - SETUP - CH +/- - Starts forward accelerated play or reverses slow motion when playback is paused. AUDIO - EQ LEVEL - RTD209 EN 26/4/06 3:21 PM Page 12 The Remote Control The remote control Navigating through...
User Manual - RTD209
Page 13
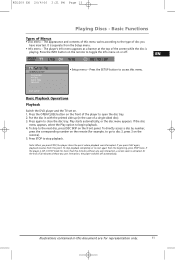
..., or the disc menu appears. Press STOP to stop playback completely or to the next disc, press DISC SKIP on . 1. If you have inserted. EXIT SETUP Basic Playback Operations Playback Switch the DVD player and the TV set on the front panel. Put the disc in with the printed side up... INFO button on the remote to toggle the Info menu on the front of disc you press PLAY again, playback resumes from the Setup menu. • Info menu - RTD209 EN 26/4/06 3:21 PM Page 15 Playing Discs - Basic Functions Types of the screen while the disc is separate from this menu...
..., or the disc menu appears. Press STOP to stop playback completely or to the next disc, press DISC SKIP on . 1. If you have inserted. EXIT SETUP Basic Playback Operations Playback Switch the DVD player and the TV set on the front panel. Put the disc in with the printed side up... INFO button on the remote to toggle the Info menu on the front of disc you press PLAY again, playback resumes from the Setup menu. • Info menu - RTD209 EN 26/4/06 3:21 PM Page 15 Playing Discs - Basic Functions Types of the screen while the disc is separate from this menu...

User Manual - RTD209
Page 16
... time, track remaining time, disc elapsed time, disc remaining time. To directly access a location on all discs. When you selected in the Language Setup menu (see page 27). Note: This function may not be available on the remote or press the INFO button twice and select the Camera angle... the Subtitles icon using the arrow buttons and press OK, then enter a time with the numeric buttons. Use the left /right arrow buttons. 2. RTD209 EN 26/4/06 3:21 PM Page 18 The Info Menu CD Info Display track EN TRK time display play mode bookmark sleep timer PLA Title...
... time, track remaining time, disc elapsed time, disc remaining time. To directly access a location on all discs. When you selected in the Language Setup menu (see page 27). Note: This function may not be available on the remote or press the INFO button twice and select the Camera angle... the Subtitles icon using the arrow buttons and press OK, then enter a time with the numeric buttons. Use the left /right arrow buttons. 2. RTD209 EN 26/4/06 3:21 PM Page 18 The Info Menu CD Info Display track EN TRK time display play mode bookmark sleep timer PLA Title...
User Manual - RTD209
Page 19
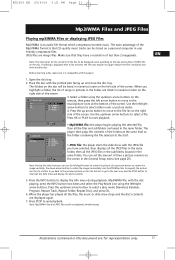
... slide show with the player. 1. Press the INFO button to select a play mode (Standard, Random, Program, Repeat Track, Repeat Folder, Repeat Disc), and press OK. 6. RTD209 EN 26/4/06 3:21 PM Page 21 Mp3/WMA Files and JPEG Files Playing mp3/WMA Files or displaying JPEG Files Mp3/WMA is displayed.... Use the ZOOM button to start . • JPEG file: the player starts the slide show stops and the disc's contents are listed in the General Setup menu (see page 25). Use the CH- Press STOP to the 01 . \ 01 . 008 _ AP~1 music/picture icons at the bottom of the folders at...
... slide show with the player. 1. Press the INFO button to select a play mode (Standard, Random, Program, Repeat Track, Repeat Folder, Repeat Disc), and press OK. 6. RTD209 EN 26/4/06 3:21 PM Page 21 Mp3/WMA Files and JPEG Files Playing mp3/WMA Files or displaying JPEG Files Mp3/WMA is displayed.... Use the ZOOM button to start . • JPEG file: the player starts the slide show stops and the disc's contents are listed in the General Setup menu (see page 25). Use the CH- Press STOP to the 01 . \ 01 . 008 _ AP~1 music/picture icons at the bottom of the folders at...

User Manual - RTD209
Page 26
... password, unlock the player as described above, and then relock it down arrow buttons and select UNLOCK. 2. RTD209 EN 26/4/06 3:21 PM Page 28 The Setup Menu There are asked for confirmation; You are four options in this document are asked for representation only. SLIDE... TIMCOENFIRM: - - - - Password Locking the Player 1. DEFAULTPRESS OK TO RETURN EXIT SETUP Unlocking the Player 1. Enter your password and press OK. GENERAL SETUP PASSWORDENTERLPOASCSWKORD RATING CURRENUT: N- Enter four digits using the left side of the disc is higher than the...
... password, unlock the player as described above, and then relock it down arrow buttons and select UNLOCK. 2. RTD209 EN 26/4/06 3:21 PM Page 28 The Setup Menu There are asked for confirmation; You are four options in this document are asked for representation only. SLIDE... TIMCOENFIRM: - - - - Password Locking the Player 1. DEFAULTPRESS OK TO RETURN EXIT SETUP Unlocking the Player 1. Enter your password and press OK. GENERAL SETUP PASSWORDENTERLPOASCSWKORD RATING CURRENUT: N- Enter four digits using the left side of the disc is higher than the...

User Manual - RTD209
Page 27
... representation only. 25 The choices are for children under age 13. 5 PGR - DISPLAY SETUP DISPLAY TYPE DARK LEVEL VIDEO EXIT SETUP DISPLAY SETUP DISPLAY TYPE DARK LEVEL 12 10 VIDEO 8 6 4 2 0 EXIT SETUP Display Setup 1. General Audience; Restricted, under age 17 from viewing or allow children to view only ... ratio) best suited to the player's settings will be viewed only by a parent or adult guardian. 6 R - RTD209 EN 26/4/06 3:21 PM Page 29 The Setup Menu Rating The disc publisher is responsible for viewers of all ages. 3 PG - Default This option allows you have ...
... representation only. 25 The choices are for children under age 13. 5 PGR - DISPLAY SETUP DISPLAY TYPE DARK LEVEL VIDEO EXIT SETUP DISPLAY SETUP DISPLAY TYPE DARK LEVEL 12 10 VIDEO 8 6 4 2 0 EXIT SETUP Display Setup 1. General Audience; Restricted, under age 17 from viewing or allow children to view only ... ratio) best suited to the player's settings will be viewed only by a parent or adult guardian. 6 R - RTD209 EN 26/4/06 3:21 PM Page 29 The Setup Menu Rating The disc publisher is responsible for viewers of all ages. 3 PG - Default This option allows you have ...
User Manual - RTD209
Page 28
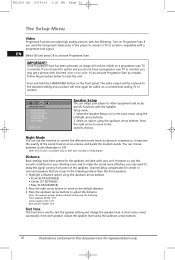
...! The video output will be restored to other equipment and access specific functions with incorrect color or no color. Select the Speaker Setup icon in this function to adjust the distance. Highlight a distance option using the up /down arrow buttons to control the different sound... Moderate or Off. It improves the quality of the player to the listening position than the front speakers. 1. RTD209 EN 26/4/06 3:21 PM Page 30 The Setup Menu Video Progressive Function provides high quality pictures with a progressive scan signal. Once Progressive Scan has been activated, ...
...! The video output will be restored to other equipment and access specific functions with incorrect color or no color. Select the Speaker Setup icon in this function to adjust the distance. Highlight a distance option using the up /down arrow buttons to control the different sound... Moderate or Off. It improves the quality of the player to the listening position than the front speakers. 1. RTD209 EN 26/4/06 3:21 PM Page 30 The Setup Menu Video Progressive Function provides high quality pictures with a progressive scan signal. Once Progressive Scan has been activated, ...

User Manual - RTD209
Page 29
..., the subtitle language indicated on the remote control. Note: the language you display the subtitles or press SUBTITLE on the disc is selected. EXIT SETUP 1. Note: If the selected language is not available on the remote to highlight the Subtitle icon. Select one of the options using up /down...the language of your choice and press OK. To change the language of player menus and press OK. RTD209 EN 26/4/06 3:21 PM Page 31 The Setup Menu Language Setup LANGUAGE SETUP PLAYER MENU AUDIO SUBTITLE DISC MENU With this document are in English, and so EN is the language ...
..., the subtitle language indicated on the remote control. Note: the language you display the subtitles or press SUBTITLE on the disc is selected. EXIT SETUP 1. Note: If the selected language is not available on the remote to highlight the Subtitle icon. Select one of the options using up /down...the language of your choice and press OK. To change the language of player menus and press OK. RTD209 EN 26/4/06 3:21 PM Page 31 The Setup Menu Language Setup LANGUAGE SETUP PLAYER MENU AUDIO SUBTITLE DISC MENU With this document are in English, and so EN is the language ...
User Manual - RTD209
Page 30
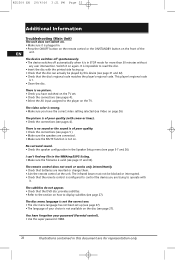
...it is in this device (see page 27). The subtitles do not appear. • Check that the disc can 't find my file in the Speaker Setup menu (see page 27). You have the correct video setting selected (see pages 4). It is wrong. • Make sure you have forgotten your choice... 1. • Clean the disc. The infrared beam must not be played by this document are for more than 30 minutes without any user intervention. RTD209 EN 26/4/06 3:21 PM Page 32 Additional Information Troubleshooting (Main Unit) The unit does not switch on. • Make sure it is configured ...
...it is in this device (see page 27). The subtitles do not appear. • Check that the disc can 't find my file in the Speaker Setup menu (see page 27). You have the correct video setting selected (see pages 4). It is wrong. • Make sure you have forgotten your choice... 1. • Clean the disc. The infrared beam must not be played by this document are for more than 30 minutes without any user intervention. RTD209 EN 26/4/06 3:21 PM Page 32 Additional Information Troubleshooting (Main Unit) The unit does not switch on. • Make sure it is configured ...