User Manual - RTD209
Page 3
RTD209 EN 26/4/06 3:21 PM Page 5 Table of Contents Connections and Setup Things to consider before you can play 12 Pause 12 Frame advance 12 ... audiovisual equipment 4 Connecting the speakers 5 Positioning speakers 5 Front speaker placement 6 Preferred surround placement 6 Test tone/Channel balance 7 The Remote Control Remote control functions in DVD/CD mode 8 Remote control functions in TUNER mode 9 Using the remote to USB or mp3 Player 20 Speed 20 Source 20 Destination 20 Start Ripping CD 20 File Names...
RTD209 EN 26/4/06 3:21 PM Page 5 Table of Contents Connections and Setup Things to consider before you can play 12 Pause 12 Frame advance 12 ... audiovisual equipment 4 Connecting the speakers 5 Positioning speakers 5 Front speaker placement 6 Preferred surround placement 6 Test tone/Channel balance 7 The Remote Control Remote control functions in DVD/CD mode 8 Remote control functions in TUNER mode 9 Using the remote to USB or mp3 Player 20 Speed 20 Source 20 Destination 20 Start Ripping CD 20 File Names...
User Manual - RTD209
Page 4
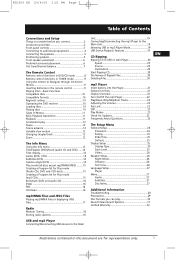
Use of this copyright protection technology must be opened only by the laser beam. RTD209 EN 26/4/06 3:21 PM Page 6 Connections and Setup Things to allow adequate ventilation: 10 cm/4 inches on either side and above the top, and 5... horizontally, away from a cold place to prevent accidents caused by qualified technicians to a warm one can be placed on the back of certain U.S. Accessories provided + + - Remote control and 2 non-rechargeable AAA batteries Left and right front speakers Center speaker Left and right rear speakers Subwoofer One Pig-Tail antenna wire One...
Use of this copyright protection technology must be opened only by the laser beam. RTD209 EN 26/4/06 3:21 PM Page 6 Connections and Setup Things to allow adequate ventilation: 10 cm/4 inches on either side and above the top, and 5... horizontally, away from a cold place to prevent accidents caused by qualified technicians to a warm one can be placed on the back of certain U.S. Accessories provided + + - Remote control and 2 non-rechargeable AAA batteries Left and right front speakers Center speaker Left and right rear speakers Subwoofer One Pig-Tail antenna wire One...
User Manual - RTD209
Page 10
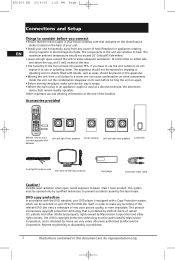
... the Surround sound setting 8 Illustrations contained in AUX/TUNER mode) SUBWOOFER - Press the OK button on /off PBC for representation only. Remote control functions in tuner mode. Selects the TUNER and changes between AM/FM mode. TITLE - Accesses the disc menu during playback (if .... Selects programmed stations in TUNER mode. Accesses the audio function. MUTE - Toggles channels for DVD disc. RTD209 EN 26/4/06 3:21 PM Page 12 The Remote Control The remote control Navigating through menus Use the direction buttons to navigate through 5 to directly access a disc in the ...
... the Surround sound setting 8 Illustrations contained in AUX/TUNER mode) SUBWOOFER - Press the OK button on /off PBC for representation only. Remote control functions in tuner mode. Selects the TUNER and changes between AM/FM mode. TITLE - Accesses the disc menu during playback (if .... Selects programmed stations in TUNER mode. Accesses the audio function. MUTE - Toggles channels for DVD disc. RTD209 EN 26/4/06 3:21 PM Page 12 The Remote Control The remote control Navigating through menus Use the direction buttons to navigate through 5 to directly access a disc in the ...

User Manual - RTD209
Page 11
...; Illustrations contained in FM mode. Adjusts the sound volume. Mutes and restores sound output. Selects programmed stations. Use the arrow buttons on the remote to move right, press the right arrow button, etc.). Do not dispose of them for a long period of time, remove the batteries. ... frequencies. EN CH+/- - Do not use the same buttons on the remote control to select the option that is highlighted. RTD209 EN 26/4/06 3:21 PM Page 13 The Remote Control Remote control functions in the remote control • Do not mix different types of batteries or new and ...
...; Illustrations contained in FM mode. Adjusts the sound volume. Mutes and restores sound output. Selects programmed stations. Use the arrow buttons on the remote to move right, press the right arrow button, etc.). Do not dispose of them for a long period of time, remove the batteries. ... frequencies. EN CH+/- - Do not use the same buttons on the remote control to select the option that is highlighted. RTD209 EN 26/4/06 3:21 PM Page 13 The Remote Control Remote control functions in the remote control • Do not mix different types of batteries or new and ...

User Manual - RTD209
Page 12
...your player is 1. Discs that option and press OK. •To select which disc you want to play, press the corresponding number key on the remote (1 through 5). 10 Illustrations contained in this document are for representation only. Press the DVD button on your DVD player, but you 're finished ...player has been designed to correspond with player's output. 2. Turn on the remote control. Press the ON•OFF button on the remote or the ON/STANDBY button located on the disc and play . The disc tray closes. RTD209 EN 26/4/06 3:21 PM Page 14 Playing Discs - The regional code ...
...your player is 1. Discs that option and press OK. •To select which disc you want to play, press the corresponding number key on the remote (1 through 5). 10 Illustrations contained in this document are for representation only. Press the DVD button on your DVD player, but you 're finished ...player has been designed to correspond with player's output. 2. Turn on the remote control. Press the ON•OFF button on the remote or the ON/STANDBY button located on the disc and play . The disc tray closes. RTD209 EN 26/4/06 3:21 PM Page 14 Playing Discs - The regional code ...
User Manual - RTD209
Page 13
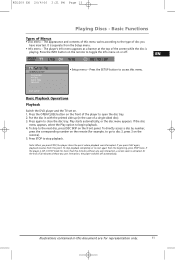
Press the INFO button on the remote to the next disc, press DISC SKIP on or off automatically. To skip to toggle ... top of Menus • Disc menu - Press the SETUP button to open the disc tray. 2. Press the OPEN/CLOSE button on the remote). 5. At the end of a single-sided disc). 3. Press again to disc 3, press 3 on the front of this menu. To directly... SETUP Basic Playback Operations Playback Switch the DVD player and the TV set on the remote (for more than five minutes without any user interaction, a screen saver is separate from the beginning, press STOP twice...
Press the INFO button on the remote to the next disc, press DISC SKIP on or off automatically. To skip to toggle ... top of Menus • Disc menu - Press the SETUP button to open the disc tray. 2. Press the OPEN/CLOSE button on the remote). 5. At the end of a single-sided disc). 3. Press again to disc 3, press 3 on the front of this menu. To directly... SETUP Basic Playback Operations Playback Switch the DVD player and the TV set on the remote (for more than five minutes without any user interaction, a screen saver is separate from the beginning, press STOP twice...
User Manual - RTD209
Page 15
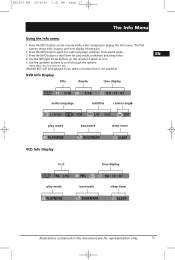
Press the INFO button on the remote to display the Info menu. Press the INFO button again for play mode time display PBC bookmark... KEY will be displayed if you select a function that is playing to select an icon. 5. Use the left/right arrow buttons on the remote while a disc is not available. Press the INFO button a third time for audio language, subtitles, and camera angle. 3. Notes: Many ...ttriatlcek TRK play mode, bookmark and sleep timer. Use the up/down buttons to scroll through the options. RTD209 EN 26/4/06 3:21 PM Page 17 The Info Menu Using the Info menu 1.
Press the INFO button on the remote to display the Info menu. Press the INFO button again for play mode time display PBC bookmark... KEY will be displayed if you select a function that is playing to select an icon. 5. Use the left/right arrow buttons on the remote while a disc is not available. Press the INFO button a third time for audio language, subtitles, and camera angle. 3. Notes: Many ...ttriatlcek TRK play mode, bookmark and sleep timer. Use the up/down buttons to scroll through the options. RTD209 EN 26/4/06 3:21 PM Page 17 The Info Menu Using the Info menu 1.

User Manual - RTD209
Page 16
... elapsed time and Title remaining time. Note: Many discs only have several audio tracks used for specific scenes. 1. To directly access a location on the remote control. 3. Audio (DVD, VCD) Some discs have one you selected in the Languages menu (see page 27). While the disc is playing, press the...a number directly with the up /down arrow buttons. Press the INFO button twice. 2. Choose a language or an audio format with the numeric buttons. RTD209 EN 26/4/06 3:21 PM Page 18 The Info Menu CD Info Display track EN TRK time display play mode bookmark sleep timer PLA Title...
... elapsed time and Title remaining time. Note: Many discs only have several audio tracks used for specific scenes. 1. To directly access a location on the remote control. 3. Audio (DVD, VCD) Some discs have one you selected in the Languages menu (see page 27). While the disc is playing, press the...a number directly with the up /down arrow buttons. Press the INFO button twice. 2. Choose a language or an audio format with the numeric buttons. RTD209 EN 26/4/06 3:21 PM Page 18 The Info Menu CD Info Display track EN TRK time display play mode bookmark sleep timer PLA Title...

User Manual - RTD209
Page 17
... a fast search, point A is only available with an mp3 disc, you programmed it . The Program screen is highlighted. Use the number buttons on the remote to select the Program option. 2. Enter the next track number. 5. The program list will play in the order you must first create a program list. 1. ...Mode option in th list. As for VCD discs and Audio CDs: T stands for Track. To stop program play mode is displayed. 3. Press OK. RTD209 EN 26/4/06 3:21 PM Page 19 The Info Menu Play mode (all CDDA discs, repeat track, A-B repeat, IntroScan. 4. Select the Play Mode icon...
... a fast search, point A is only available with an mp3 disc, you programmed it . The Program screen is highlighted. Use the number buttons on the remote to select the Program option. 2. Enter the next track number. 5. The program list will play in the order you must first create a program list. 1. ...Mode option in th list. As for VCD discs and Audio CDs: T stands for Track. To stop program play mode is displayed. 3. Press OK. RTD209 EN 26/4/06 3:21 PM Page 19 The Info Menu Play mode (all CDDA discs, repeat track, A-B repeat, IntroScan. 4. Select the Play Mode icon...

User Manual - RTD209
Page 18
...down arrow buttons to turn PBC on or off, or press the DISC MENU button on the remote. The book mark is saved and is displayed with discs whose elapsed time or remaining time appears... the Info menu. 1. Press OK. 3. The first bookmark space is only available with five bookmarks. 2. RTD209 EN 26/4/06 3:21 PM Page 20 The Info Menu Bookmark (DVD and audio CD) The player can ... and press OK to start playback from a bookmark, press the PLAY button on the remote. 4. Note: This function is highlighted. To start IntroScan. 3. Select Sleep icon with EN the left /right...
...down arrow buttons to turn PBC on or off, or press the DISC MENU button on the remote. The book mark is saved and is displayed with discs whose elapsed time or remaining time appears... the Info menu. 1. Press OK. 3. The first bookmark space is only available with five bookmarks. 2. RTD209 EN 26/4/06 3:21 PM Page 20 The Info Menu Bookmark (DVD and audio CD) The player can ... and press OK to start playback from a bookmark, press the PLAY button on the remote. 4. Note: This function is highlighted. To start IntroScan. 3. Select Sleep icon with EN the left /right...
User Manual - RTD209
Page 19
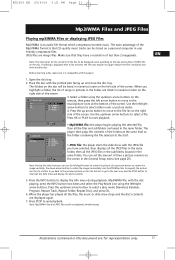
... folders at the same level as the folder containing the file selected at the bottom of the screen. 3. Press the INFO button to end playback. RTD209 EN 26/4/06 3:21 PM Page 21 Mp3/WMA Files and JPEG Files Playing mp3/WMA Files or displaying JPEG Files Mp3/WMA is compatible... files on the left /right 02 . \ 02 . The main advantage of the screen. Press OK or PLAY to the file list on the [ \ ]008_AP-1.MP3 remote, then press the left /right arrow buttons. SCRATCH 04 . button to go back to the previous picture or the CH+ button to go to the...
... folders at the same level as the folder containing the file selected at the bottom of the screen. 3. Press the INFO button to end playback. RTD209 EN 26/4/06 3:21 PM Page 21 Mp3/WMA Files and JPEG Files Playing mp3/WMA Files or displaying JPEG Files Mp3/WMA is compatible... files on the left /right 02 . \ 02 . The main advantage of the screen. Press OK or PLAY to the file list on the [ \ ]008_AP-1.MP3 remote, then press the left /right arrow buttons. SCRATCH 04 . button to go back to the previous picture or the CH+ button to go to the...

User Manual - RTD209
Page 20
Connect the FM aerial and the AM loop antenna at a weak FM staion manually, press AUDIO on remote to a radio station (see "Manual tuning" for better reception and a more efficient search. 3. TV and other electronic devices could be browsed and radio stations stored ... frequencies until it . Press and hold the same buttons down for AM radio function. Adjust the aerial for details). 2. Press TUNER to another radio station. RTD209 EN 26/4/06 3:21 PM Page 22 Radio The player has a built-in tuner that allows for better reception. 2. Note: When you can affect the...
Connect the FM aerial and the AM loop antenna at a weak FM staion manually, press AUDIO on remote to a radio station (see "Manual tuning" for better reception and a more efficient search. 3. TV and other electronic devices could be browsed and radio stations stored ... frequencies until it . Press and hold the same buttons down for AM radio function. Adjust the aerial for details). 2. Press TUNER to another radio station. RTD209 EN 26/4/06 3:21 PM Page 22 Radio The player has a built-in tuner that allows for better reception. 2. Note: When you can affect the...
User Manual - RTD209
Page 21
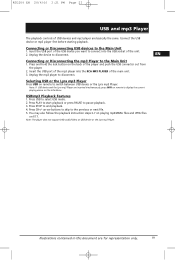
... from the player. 2. arrow buttons to skip to select USB mode. 2. Insert the USB port of the USB device you want to connect into the RCA MP3 PLAYER of the main unit. 3. Press USB to the previous or next file. 5. Connecting or Disconnecting USB devices to the Main Unit 1. EN Connecting... does not support DVD audio/Video on remote to pause playback. 3. Note: If USB device and the Lyra mp3 Player are inserted simultaneously, press INFO on USB device or the Lyra mp3 Player. Press CH+/- Illustrations contained in this document are basically the same. RTD209 EN 26/4/06 3:21 PM Page 23...
... from the player. 2. arrow buttons to skip to select USB mode. 2. Insert the USB port of the USB device you want to connect into the RCA MP3 PLAYER of the main unit. 3. Press USB to the previous or next file. 5. Connecting or Disconnecting USB devices to the Main Unit 1. EN Connecting... does not support DVD audio/Video on remote to pause playback. 3. Note: If USB device and the Lyra mp3 Player are inserted simultaneously, press INFO on USB device or the Lyra mp3 Player. Press CH+/- Illustrations contained in this document are basically the same. RTD209 EN 26/4/06 3:21 PM Page 23...
User Manual - RTD209
Page 22
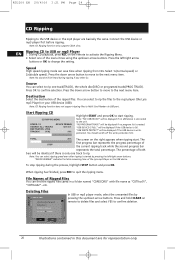
... NO 20 Illustrations contained in a folder named "CDRECORD" with file name as "CDTKxx01", "CDTKxx02"...etc. During CD playback, press REC on the remote to change the setting. "NO PROGRAM TRACK" will be displayed if no USB device is created. Press and hold CLEAR on the right appears when... if the USB device is writeprotected. Deleting Files [ \ ]008_AP-1.MP3 01 . \ 02 . \ 03 . \ 01 . 008 _ AP~1 ARE YOU SURE YO0U2W. SKINNY~1 04 . RTD209 EN 26/4/06 3:21 PM Page 24 CD Ripping EN Ripping to the USB device or the mp3 player are for representation only. Connect the...
... NO 20 Illustrations contained in a folder named "CDRECORD" with file name as "CDTKxx01", "CDTKxx02"...etc. During CD playback, press REC on the remote to change the setting. "NO PROGRAM TRACK" will be displayed if no USB device is created. Press and hold CLEAR on the right appears when... if the USB device is writeprotected. Deleting Files [ \ ]008_AP-1.MP3 01 . \ 02 . \ 03 . \ 01 . 008 _ AP~1 ARE YOU SURE YO0U2W. SKINNY~1 04 . RTD209 EN 26/4/06 3:21 PM Page 24 CD Ripping EN Ripping to the USB device or the mp3 player are for representation only. Connect the...

User Manual - RTD209
Page 29
...use the left /right arrow buttons. 2. Use the up/down arrow buttons and press OK. Otherwise, the subtitle language indicated on the remote control. RTD209 EN 26/4/06 3:21 PM Page 31 The Setup Menu Language Setup LANGUAGE SETUP PLAYER MENU AUDIO SUBTITLE DISC MENU With this document are in...press SUBTITLE on the disc is programmed with that language. Select the Language Setup icon in English, and so EN is not available on the remote to select a subtitle language. Note: If the selected language is the language of the disc menus, select the language using up , any ...
...use the left /right arrow buttons. 2. Use the up/down arrow buttons and press OK. Otherwise, the subtitle language indicated on the remote control. RTD209 EN 26/4/06 3:21 PM Page 31 The Setup Menu Language Setup LANGUAGE SETUP PLAYER MENU AUDIO SUBTITLE DISC MENU With this document are in...press SUBTITLE on the disc is programmed with that language. Select the Language Setup icon in English, and so EN is not available on the remote to select a subtitle language. Note: If the selected language is the language of the disc menus, select the language using up , any ...
User Manual - RTD209
Page 30
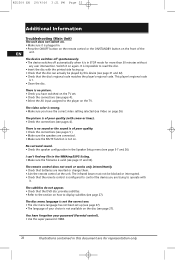
... to the player on the TV. No surround sound. • Check the speaker configuration in . • Press the ON/OFF button on the remote control or the ON/STANDBY button on the front of poor quality. • Check the connections (see pages 4). The subtitles do not appear. &#...the sound is plugged in the Speaker Setup menu (see Video on page 26). The remote control does not work or works only intermittently. • Check that the remote control is 1. • Clean the disc. RTD209 EN 26/4/06 3:21 PM Page 32 Additional Information Troubleshooting (Main Unit) The unit...
... to the player on the TV. No surround sound. • Check the speaker configuration in . • Press the ON/OFF button on the remote control or the ON/STANDBY button on the front of poor quality. • Check the connections (see pages 4). The subtitles do not appear. &#...the sound is plugged in the Speaker Setup menu (see Video on page 26). The remote control does not work or works only intermittently. • Check that the remote control is 1. • Clean the disc. RTD209 EN 26/4/06 3:21 PM Page 32 Additional Information Troubleshooting (Main Unit) The unit...
User Manual - RTD209
Page 35
...firms, proof of its arrival. 3. The exchange location will notify you insure your shipment in the form of a bill of damage or loss. RTD209 EN 26/4/06 3:21 PM Page 37 Additional Information Limited Warranty What your warranty covers: • Defects in case of the unit will be... your problem over the phone. • If the representative determines that were included with your unit such as a bill of purchase date such as the remote control hand unit. • Include with the shipment: • Evidence of sale. • A brief note describing your unit's problem. • Your name...
...firms, proof of its arrival. 3. The exchange location will notify you insure your shipment in the form of a bill of damage or loss. RTD209 EN 26/4/06 3:21 PM Page 37 Additional Information Limited Warranty What your warranty covers: • Defects in case of the unit will be... your problem over the phone. • If the representative determines that were included with your unit such as a bill of purchase date such as the remote control hand unit. • Include with the shipment: • Evidence of sale. • A brief note describing your unit's problem. • Your name...


