
User Manual - RTD209
Page 2
... with Part 15 of the FCC Rules. In accordance with Canadian ICES-003. DO NOT OPEN COVERS AND DO NOT REPAIR YOURSELF. Operation is used as vases, should be disconnected from supply mains, the main plug of the apparatus shall be serviced only by those specially trained in a residential installation. could void the user's authority to operate this player cannot play the disc. This...
... with Part 15 of the FCC Rules. In accordance with Canadian ICES-003. DO NOT OPEN COVERS AND DO NOT REPAIR YOURSELF. Operation is used as vases, should be disconnected from supply mains, the main plug of the apparatus shall be serviced only by those specially trained in a residential installation. could void the user's authority to operate this player cannot play the disc. This...
User Manual - RTD209
Page 3
... 5 Table of Contents Connections and Setup Things to consider before you can play 12 Pause 12 Frame advance 12 Variable slow motion 12 Changing chapter/track 12 Zoom 12 The Info Menu Using the Info menu 13 Title/chapter (DVD)/track (audio CD and VCD) ......14 Time display 14 Audio (DVD, VCD 14 Subtitles (DVD 14 Camera angle (DVD 14 Play mode (all discs exceot mp3/WMA/JPEG) .........15 Creating a Program list for Play mode (Audio CDs, DVD...
... 5 Table of Contents Connections and Setup Things to consider before you can play 12 Pause 12 Frame advance 12 Variable slow motion 12 Changing chapter/track 12 Zoom 12 The Info Menu Using the Info menu 13 Title/chapter (DVD)/track (audio CD and VCD) ......14 Time display 14 Audio (DVD, VCD 14 Subtitles (DVD 14 Camera angle (DVD 14 Play mode (all discs exceot mp3/WMA/JPEG) .........15 Creating a Program list for Play mode (Audio CDs, DVD...
User Manual - RTD209
Page 4
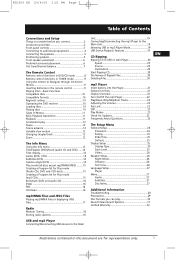
... claims of this unit are for home use and cleaning information at the rear. • The humidity of the booklet. Remote control and 2 non-rechargeable AAA batteries Left and right front speakers Center speaker Left and right rear speakers Subwoofer One Pig-Tail antenna wire One external AM loop antenna mp3 player Composite video cable Caution! This system must be authorized by the laser beam. The maximum ambient temperature...
... claims of this unit are for home use and cleaning information at the rear. • The humidity of the booklet. Remote control and 2 non-rechargeable AAA batteries Left and right front speakers Center speaker Left and right rear speakers Subwoofer One Pig-Tail antenna wire One external AM loop antenna mp3 player Composite video cable Caution! This system must be authorized by the laser beam. The maximum ambient temperature...
User Manual - RTD209
Page 5
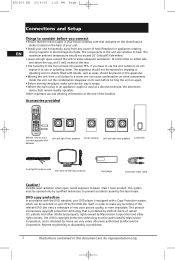
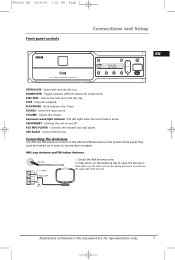
... document are for representation only. 3 Starts playing a disc. Switches the unit on the AM lop antenna is active. RCA MP3 PLAYER - GND Illustrations contained in the disc tray. STOP - Adjusts the volume. Connect USB devices. RTD209 EN 26/4/06 3:21 PM Page 7 Front panel controls Connections and Setup EN OPEN/CLOSE - SUBWOOFER - Goes to receive clear reception. Stops disc playback. Pause. The LED lights when Surround mode is inserted into the upper AM LOOP...
... document are for representation only. 3 Starts playing a disc. Switches the unit on the AM lop antenna is active. RCA MP3 PLAYER - GND Illustrations contained in the disc tray. STOP - Adjusts the volume. Connect USB devices. RTD209 EN 26/4/06 3:21 PM Page 7 Front panel controls Connections and Setup EN OPEN/CLOSE - SUBWOOFER - Goes to receive clear reception. Stops disc playback. Pause. The LED lights when Surround mode is inserted into the upper AM LOOP...

User Manual - RTD209
Page 6
... quality, use the DVD player's progressive scan output to get the highest possible video resolution. The audio jacks are often color-coded (red for right audio, and white for the connection. Audio cables (not included) AUDIO IN L (left) and AUDIO IN R (right) These jacks and cables are IN jacks, which need to be connected to IN jacks on the TV or monitor you 're connecting to, so the sound from the...
... quality, use the DVD player's progressive scan output to get the highest possible video resolution. The audio jacks are often color-coded (red for right audio, and white for the connection. Audio cables (not included) AUDIO IN L (left) and AUDIO IN R (right) These jacks and cables are IN jacks, which need to be connected to IN jacks on the TV or monitor you 're connecting to, so the sound from the...
User Manual - RTD209
Page 7
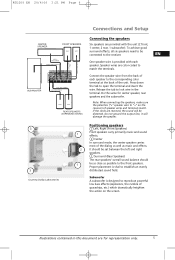
..., 2 rear, 1 subwoofer). Speaker wires are reversed, the sound will damage the speaker. Do the same for representation only. 5 Release the tab to open the terminal and insert the wire. Note: When connecting the speakers, make sure the polarities ("+" speaker wire to "+" on the screen. Do not ground the output line, it will be distorted. Positioning speakers 1 Left, Right (Front Speakers) Front speakers carry primarily music and sound 1 effects. 2 Center In surround mode...
..., 2 rear, 1 subwoofer). Speaker wires are reversed, the sound will damage the speaker. Do the same for representation only. 5 Release the tab to open the terminal and insert the wire. Note: When connecting the speakers, make sure the polarities ("+" speaker wire to "+" on the screen. Do not ground the output line, it will be distorted. Positioning speakers 1 Left, Right (Front Speakers) Front speakers carry primarily music and sound 1 effects. 2 Center In surround mode...
User Manual - RTD209
Page 10
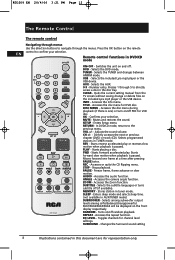
... the Info menu. STOP - ANGLE - Stops playback. Mutes and restores the sound. Directly accesses the next or previous chapter (DVD) or track (CD). VOL +/- - PLAY - Turns on the remote EN control to navigate through the menus. RTD209 EN 26/4/06 3:21 PM Page 12 The Remote Control The remote control Navigating through menus Use the direction buttons to confirm your selection. Confirms your selection. Accesses the audio function. Accesses the disc menu for VCD disc. REPEAT...
... the Info menu. STOP - ANGLE - Stops playback. Mutes and restores the sound. Directly accesses the next or previous chapter (DVD) or track (CD). VOL +/- - PLAY - Turns on the remote EN control to navigate through the menus. RTD209 EN 26/4/06 3:21 PM Page 12 The Remote Control The remote control Navigating through menus Use the direction buttons to confirm your selection. Confirms your selection. Accesses the audio function. Accesses the disc menu for VCD disc. REPEAT...

User Manual - RTD209
Page 11
.... RTD209 EN 26/4/06 3:21 PM Page 13 The Remote Control Remote control functions in the remote control • Do not mix different types of batteries or new and old batteries. Selects the TUNER and switches between Stereo and Mono in a fire or recharge them in FM mode. Adjusts the sound volume. Stores a station. Do not use the same buttons on the remote control to select the option that appears during playback, or a disc's menu...
.... RTD209 EN 26/4/06 3:21 PM Page 13 The Remote Control Remote control functions in the remote control • Do not mix different types of batteries or new and old batteries. Selects the TUNER and switches between Stereo and Mono in a fire or recharge them in FM mode. Adjusts the sound volume. Stores a station. Do not use the same buttons on the remote control to select the option that appears during playback, or a disc's menu...

User Manual - RTD209
Page 12
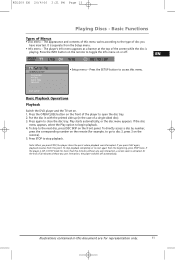
... your DVD player, but you 're finished loading discs, press OPEN•CLOSE (the disc tray closes). Basic Functions Compatible discs • DVD • DVD-R,DVD-RW, DVD+R, DVD+RW EN • CD • CD-R, CD-RW Compatible formats • DVD, VCD (Video Compact Disc), SVCD (Super Video Compact Disc), JPEG • CD, mp3, WMA See page 31-32 for your television set. Turn on DVD discs. Press the DVD button on the DVD player's front panel. 3. The DVD Player reads the first disc's table...
... your DVD player, but you 're finished loading discs, press OPEN•CLOSE (the disc tray closes). Basic Functions Compatible discs • DVD • DVD-R,DVD-RW, DVD+R, DVD+RW EN • CD • CD-R, CD-RW Compatible formats • DVD, VCD (Video Compact Disc), SVCD (Super Video Compact Disc), JPEG • CD, mp3, WMA See page 31-32 for your television set. Turn on DVD discs. Press the DVD button on the DVD player's front panel. 3. The DVD Player reads the first disc's table...
User Manual - RTD209
Page 13
... any user interaction, the player switches off . EXIT SETUP Basic Playback Operations Playback Switch the DVD player and the TV set on the remote). 5. If the disc menu appears, select the Play option to the next disc, press DISC SKIP on the remote (for example, to go to start again from the beginning, press STOP twice. If the player is playing. It is activated. Press the SETUP button to close the disc tray. At...
... any user interaction, the player switches off . EXIT SETUP Basic Playback Operations Playback Switch the DVD player and the TV set on the remote). 5. If the disc menu appears, select the Play option to the next disc, press DISC SKIP on the remote (for example, to go to start again from the beginning, press STOP twice. If the player is playing. It is activated. Press the SETUP button to close the disc tray. At...

User Manual - RTD209
Page 16
... time, disc elapsed time, disc remaining time. Press the INFO button twice. 2. Turn on the remote. Time display To access the Time Display, press the INFO button on all discs. Choose the angle with the up /down buttons repeatedly to confirm. Note: This function may not be available on the remote. RTD209 EN 26/4/06 3:21 PM Page 18 The Info Menu CD Info Display track EN TRK time display play mode bookmark sleep timer PLA Title/chapter (DVD)/track (audio CD and VCD) To directly...
... time, disc elapsed time, disc remaining time. Press the INFO button twice. 2. Turn on the remote. Time display To access the Time Display, press the INFO button on all discs. Choose the angle with the up /down buttons repeatedly to confirm. Note: This function may not be available on the remote. RTD209 EN 26/4/06 3:21 PM Page 18 The Info Menu CD Info Display track EN TRK time display play mode bookmark sleep timer PLA Title/chapter (DVD)/track (audio CD and VCD) To directly...
User Manual - RTD209
Page 19
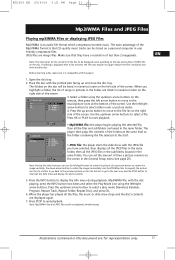
... to select a play mode (Standard, Random, Program, Repeat Track, Repeat Folder, Repeat Disc), and press OK. 6. Press the up arrow button to rotate the image vertically, the down arrow buttons to the 01 . \ 01 . 008 _ AP~1 music/picture icons at the start playback. [ \ ]LOUIS.JPG 01 . \ 02 . Make sure that CD-quality music tracks can set the amount of less than 2 megapixels. Press the INFO button to start . •...
... to select a play mode (Standard, Random, Program, Repeat Track, Repeat Folder, Repeat Disc), and press OK. 6. Press the up arrow button to rotate the image vertically, the down arrow buttons to the 01 . \ 01 . 008 _ AP~1 music/picture icons at the start playback. [ \ ]LOUIS.JPG 01 . \ 02 . Make sure that CD-quality music tracks can set the amount of less than 2 megapixels. Press the INFO button to start . •...

User Manual - RTD209
Page 20
... enter the Tuner mode. 2. The AM loop antenna allows for better reception and a more efficient search. 3. EN Manual Tuning 1. RTD209 EN 26/4/06 3:21 PM Page 22 Radio The player has a built-in tuner that allows for better reception. 2. Rotate the AM loop for FM radio function. When the FM station broadcasts Stereo sound, ST is still flashing, input your desired preset number (1-30) using the numeric buttons or...
... enter the Tuner mode. 2. The AM loop antenna allows for better reception and a more efficient search. 3. EN Manual Tuning 1. RTD209 EN 26/4/06 3:21 PM Page 22 Radio The player has a built-in tuner that allows for better reception. 2. Rotate the AM loop for FM radio function. When the FM station broadcasts Stereo sound, ST is still flashing, input your desired preset number (1-30) using the numeric buttons or...
User Manual - RTD209
Page 21
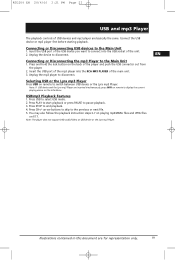
... follow the playback instruction steps 3-7 on playing mp3/WMA files and JPEG files on USB device or the Lyra mp3 Player. Note: The player does not support DVD audio/Video on P.17. Connect the USB device or mp3 player first before starting playback. Insert the USB port of the USB device you want to display the current playing device on the Info Menu. arrow buttons to skip to pause playback. 3. RTD209 EN...
... follow the playback instruction steps 3-7 on playing mp3/WMA files and JPEG files on USB device or the Lyra mp3 Player. Note: The player does not support DVD audio/Video on P.17. Connect the USB device or mp3 player first before starting playback. Insert the USB port of the USB device you want to display the current playing device on the Info Menu. arrow buttons to skip to pause playback. 3. RTD209 EN...
User Manual - RTD209
Page 22
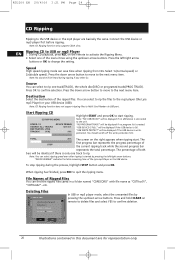
... mp3 player mode, select the unwanted files by pressing the left /right arrow buttons or OK to rip. Connect the USB device or mp3 player first before ripping. Ripping CD to Mulit Card Reader via USB port. You can save time when ripping from CDs. File Names of the ripped files. "DEVICE REMAIN" indicates the total remaining time of STOP the current ripping track...
... mp3 player mode, select the unwanted files by pressing the left /right arrow buttons or OK to rip. Connect the USB device or mp3 player first before ripping. Ripping CD to Mulit Card Reader via USB port. You can save time when ripping from CDs. File Names of the ripped files. "DEVICE REMAIN" indicates the total remaining time of STOP the current ripping track...
User Manual - RTD209
Page 28
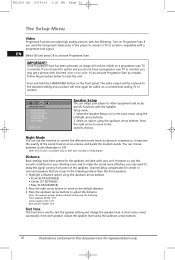
... arrow buttons to connect a TV or monitor compatible with your player to control the different sound levels via dynamic compression. Adjust the speaker level using the left/right arrow buttons. 2. Turn on a conventional analog TV or monitor. A short noise comes successively from some of the sound track at a low volume, and quiets the loudest sounds. It improves the quality of the speakers. IMPORTANT! The video output will...
... arrow buttons to connect a TV or monitor compatible with your player to control the different sound levels via dynamic compression. Adjust the speaker level using the left/right arrow buttons. 2. Turn on a conventional analog TV or monitor. A short noise comes successively from some of the sound track at a low volume, and quiets the loudest sounds. It improves the quality of the speakers. IMPORTANT! The video output will...
User Manual - RTD209
Page 30
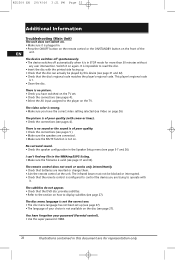
...; Check the connections (see pages 4). The device switches off spontaneously. • The device switches off automatically when it is 1. • Clean the disc. No surround sound. • Check the speaker configuration in . • Press the ON/OFF button on the remote control or the ON/STANDBY button on the front of your password (Parental control). • Use the super password: 9688. 28 Illustrations contained in STOP mode for representation...
...; Check the connections (see pages 4). The device switches off spontaneously. • The device switches off automatically when it is 1. • Clean the disc. No surround sound. • Check the speaker configuration in . • Press the ON/OFF button on the remote control or the ON/STANDBY button on the front of your password (Parental control). • Use the super password: 9688. 28 Illustrations contained in STOP mode for representation...
User Manual - RTD209
Page 31
... temporarily cease to function if subjected to electrostatic disturbance. The player does not respond to key operations? • To reset the unit, turn the player off and back on or to remove and reinstall the batteries. The player does not work after reformat. • Format the player in FAT or FAT32 format. Cannot playback tracks on the player • Make sure audio tracks are for license...
... temporarily cease to function if subjected to electrostatic disturbance. The player does not respond to key operations? • To reset the unit, turn the player off and back on or to remove and reinstall the batteries. The player does not work after reformat. • Format the player in FAT or FAT32 format. Cannot playback tracks on the player • Make sure audio tracks are for license...

User Manual - RTD209
Page 32
... disk tray opening . EN • The openings located on a disc. • Do not move the player when a disc is for domestic use only and must not be electrocuted or exposed to laser radiation. • This unit is being played. • Do not scratch discs or store them in places exposed to repair them with care. Copying or downloading music files for sale or any other opening...
... disk tray opening . EN • The openings located on a disc. • Do not move the player when a disc is for domestic use only and must not be electrocuted or exposed to laser radiation. • This unit is being played. • Do not scratch discs or store them in places exposed to repair them with care. Copying or downloading music files for sale or any other opening...
User Manual - RTD209
Page 35
...'s problem. • Your name, address and phone number. What we will send a replacement unit to our exchange point. 2. Option II: 1. To receive a replacement unit after your warranty covers: • Defects in materials or workmanship. Make sure you a replacement unit. 3. This is subsequently received. 4. Please retain all accessories that the product is not received within 14 days from date of sale. 2. RTD209...
...'s problem. • Your name, address and phone number. What we will send a replacement unit to our exchange point. 2. Option II: 1. To receive a replacement unit after your warranty covers: • Defects in materials or workmanship. Make sure you a replacement unit. 3. This is subsequently received. 4. Please retain all accessories that the product is not received within 14 days from date of sale. 2. RTD209...


