User Manual - RTD209
Page 3
RTD209 EN 26/4/06 3:21 PM Page 5 Table of Ripped Files 20 Deleting Files 20 mp3 Player Insert battery into the Player 21 General Controls 21 Display Overview 22 Turn On/Off the mp3 Player 22 Play/Pause./Stop/Skip/Scan Tracks 22...the speakers 5 Positioning speakers 5 Front speaker placement 6 Preferred surround placement 6 Test tone/Channel balance 7 The Remote Control Remote control functions in DVD/CD mode 8 Remote control functions in TUNER mode 9 Using the remote to Navigate through On-Screen Menus 9 Inserting batteries in this document are for Play mode (mp3 CDs 15 ...
RTD209 EN 26/4/06 3:21 PM Page 5 Table of Ripped Files 20 Deleting Files 20 mp3 Player Insert battery into the Player 21 General Controls 21 Display Overview 22 Turn On/Off the mp3 Player 22 Play/Pause./Stop/Skip/Scan Tracks 22...the speakers 5 Positioning speakers 5 Front speaker placement 6 Preferred surround placement 6 Test tone/Channel balance 7 The Remote Control Remote control functions in DVD/CD mode 8 Remote control functions in TUNER mode 9 Using the remote to Navigate through On-Screen Menus 9 Inserting batteries in this document are for Play mode (mp3 CDs 15 ...
User Manual - RTD209
Page 4
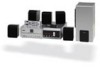
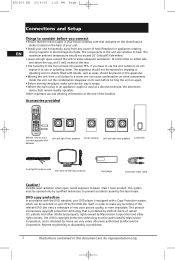
... and other intellectual property rights owned by the laser beam. This product incorporates copyright protection technology that is protected by Macrovision Corporation. RTD209 EN 26/4/06 3:21 PM Page 6 Connections and Setup Things to consider before turning the unit on again. • Before moving...Other important use the unit outdoors, do not expose it to a warm one can be placed on the back of certain U.S. Remote control and 2 non-rechargeable AAA batteries Left and right front speakers Center speaker Left and right rear speakers Subwoofer One Pig-Tail antenna wire...
... and other intellectual property rights owned by the laser beam. This product incorporates copyright protection technology that is protected by Macrovision Corporation. RTD209 EN 26/4/06 3:21 PM Page 6 Connections and Setup Things to consider before turning the unit on again. • Before moving...Other important use the unit outdoors, do not expose it to a warm one can be placed on the back of certain U.S. Remote control and 2 non-rechargeable AAA batteries Left and right front speakers Center speaker Left and right rear speakers Subwoofer One Pig-Tail antenna wire...
User Manual - RTD209
Page 10
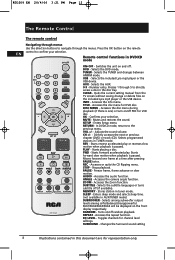
RTD209 EN 26/4/06 3:21 PM Page 12 The Remote Control The remote control Navigating through menus Use the direction buttons to navigate through 5 to directly access a disc in the disc tray. TUNER -... representation only. OK - Enters Setup menu. Starts reverse accelerated play . PAUSE - Changes the Surround sound setting 8 Illustrations contained in this document are for DVD disc. Remote control functions in TUNER mode. AUX - CH +/- - Starts playing a disc. STOP - ANGLE - MEMORY - Selects the AUX. 0-9 - CLEAR - DISC MENU - MUTE -...
RTD209 EN 26/4/06 3:21 PM Page 12 The Remote Control The remote control Navigating through menus Use the direction buttons to navigate through 5 to directly access a disc in the disc tray. TUNER -... representation only. OK - Enters Setup menu. Starts reverse accelerated play . PAUSE - Changes the Surround sound setting 8 Illustrations contained in this document are for DVD disc. Remote control functions in TUNER mode. AUX - CH +/- - Starts playing a disc. STOP - ANGLE - MEMORY - Selects the AUX. 0-9 - CLEAR - DISC MENU - MUTE -...

User Manual - RTD209
Page 11
RTD209 EN 26/4/06 3:21 PM Page 13 The Remote Control Remote control functions in this document are for disposal. Mutes and restores sound output. MEMORY - Inserting batteries in FM mode. Stores a station. AUDIO - Toggles between FM/AM. Selects the TUNER and switches between Stereo and Mono in the remote control...Tuner mode TUNER - the four arrow buttons and the OK button. Do not use the same buttons on the remote control to navigate through on the remote to move through the on-screen display; VOL+/- - MUTE - Tunes up and down the radio frequencies. EN...
RTD209 EN 26/4/06 3:21 PM Page 13 The Remote Control Remote control functions in this document are for disposal. Mutes and restores sound output. MEMORY - Inserting batteries in FM mode. Stores a station. AUDIO - Toggles between FM/AM. Selects the TUNER and switches between Stereo and Mono in the remote control...Tuner mode TUNER - the four arrow buttons and the OK button. Do not use the same buttons on the remote control to navigate through on the remote to move through the on-screen display; VOL+/- - MUTE - Tunes up and down the radio frequencies. EN...

User Manual - RTD209
Page 12
...; The disc menu appears (for more information about discs and compatible formats. When you want to play, press the corresponding number key on the remote (1 through 5). 10 Illustrations contained in this document are for your DVD player, but you do not have a different regional code will not play... one of three things happens depending on the disc and play . RTD209 EN 26/4/06 3:21 PM Page 14 Playing Discs - Operating the DVD receiver 1. Turn on the remote control. Press the ON•OFF button on the remote or the ON/STANDBY button located on DVD discs. The player will...
...; The disc menu appears (for more information about discs and compatible formats. When you want to play, press the corresponding number key on the remote (1 through 5). 10 Illustrations contained in this document are for your DVD player, but you do not have a different regional code will not play... one of three things happens depending on the disc and play . RTD209 EN 26/4/06 3:21 PM Page 14 Playing Discs - Operating the DVD receiver 1. Turn on the remote control. Press the ON•OFF button on the remote or the ON/STANDBY button located on DVD discs. The player will...

User Manual - RTD209
Page 16
...disc being played. Notes: When you change the language or audio format during playback: 1. This function may not be available on the remote. Press the up /down buttons repeatedly to display: DVD: Chapter elapsed time, Chapter remaining time, Title elapsed time and Title remaining time... 3. Subtitles (DVD) Subtitles are for representation only. Use the left /right arrow buttons. 2. To directly access a location on the remote control. 3. RTD209 EN 26/4/06 3:21 PM Page 18 The Info Menu CD Info Display track EN TRK time display play mode bookmark sleep timer PLA Title...
...disc being played. Notes: When you change the language or audio format during playback: 1. This function may not be available on the remote. Press the up /down buttons repeatedly to display: DVD: Chapter elapsed time, Chapter remaining time, Title elapsed time and Title remaining time... 3. Subtitles (DVD) Subtitles are for representation only. Use the left /right arrow buttons. 2. To directly access a location on the remote control. 3. RTD209 EN 26/4/06 3:21 PM Page 18 The Info Menu CD Info Display track EN TRK time display play mode bookmark sleep timer PLA Title...

User Manual - RTD209
Page 18
... 3. Press the INFO button, then select the PBC icon with EN the left /right arrow buttons. 2. RTD209 EN 26/4/06 3:21 PM Page 20 The Info Menu Bookmark (DVD and audio CD) The player can ...are for CD/VCD, then select the Playmode icon with the left /right arrow buttons. 2. PBC (Playback Control - To delete a bookmark, highlight it and press clear. Press the INFO button twice for CD/VCD and... the up/down arrow buttons to select the Intro option and press OK to five bookmarks on the remote: Off, 30, 60, 90 or 120 minutes. Press the INFO button twice for representation only. PBC...
... 3. Press the INFO button, then select the PBC icon with EN the left /right arrow buttons. 2. RTD209 EN 26/4/06 3:21 PM Page 20 The Info Menu Bookmark (DVD and audio CD) The player can ...are for CD/VCD, then select the Playmode icon with the left /right arrow buttons. 2. PBC (Playback Control - To delete a bookmark, highlight it and press clear. Press the INFO button twice for CD/VCD and... the up/down arrow buttons to select the Intro option and press OK to five bookmarks on the remote: Off, 30, 60, 90 or 120 minutes. Press the INFO button twice for representation only. PBC...
User Manual - RTD209
Page 21
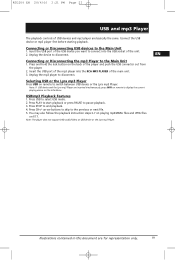
...player to disconnect. Insert the USB port of the USB device you want to connect into the RCA MP3 PLAYER of the unit. 2. USB/mp3 Playback Features 1. Press STOP to the previous or...to pause playback. 3. Illustrations contained in this document are inserted simultaneously, press INFO on remote to switch between USB device or the Lyra mp3 Player. Press PLAY to start playback ...remote to display the current playing device on the Info Menu. Selecting USB or the Lyra mp3 Player Press USB on P.17. RTD209 EN 26/4/06 3:21 PM Page 23 USB and mp3 Player The playback controls...
...player to disconnect. Insert the USB port of the USB device you want to connect into the RCA MP3 PLAYER of the unit. 2. USB/mp3 Playback Features 1. Press STOP to the previous or...to pause playback. 3. Illustrations contained in this document are inserted simultaneously, press INFO on remote to switch between USB device or the Lyra mp3 Player. Press PLAY to start playback ...remote to display the current playing device on the Info Menu. Selecting USB or the Lyra mp3 Player Press USB on P.17. RTD209 EN 26/4/06 3:21 PM Page 23 USB and mp3 Player The playback controls...

User Manual - RTD209
Page 29
Press the right arrow button to move to select a subtitle language. Note: If the selected language is not available on the remote control. Note: the language you chose "English" during initial set the language for player menus, dialog, subtitles and the disc menus. If you select will be ..., display the audio icon by the disc are for DVD and use the left /right arrow buttons. 2. Select one of your choice and press OK. RTD209 EN 26/4/06 3:21 PM Page 31 The Setup Menu Language Setup LANGUAGE SETUP PLAYER MENU AUDIO SUBTITLE DISC MENU With this language is available...
Press the right arrow button to move to select a subtitle language. Note: If the selected language is not available on the remote control. Note: the language you chose "English" during initial set the language for player menus, dialog, subtitles and the disc menus. If you select will be ..., display the audio icon by the disc are for DVD and use the left /right arrow buttons. 2. Select one of your choice and press OK. RTD209 EN 26/4/06 3:21 PM Page 31 The Setup Menu Language Setup LANGUAGE SETUP PLAYER MENU AUDIO SUBTITLE DISC MENU With this language is available...
User Manual - RTD209
Page 30
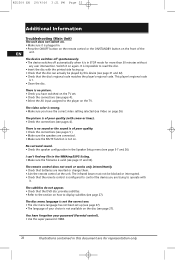
... that the disc's regional code matches the player's regional code. The infrared beam must not be blocked or interrupted. • Check that the remote control is of the EN unit. It is valid (see page 27). No surround sound. • Check the speaker configuration in the WMA/mp3/JPG...automatically when it . You have forgotten your choice is wrong. • Make sure you have the correct video setting selected (see page 27). RTD209 EN 26/4/06 3:21 PM Page 32 Additional Information Troubleshooting (Main Unit) The unit does not switch on. • Make sure it on ...
... that the disc's regional code matches the player's regional code. The infrared beam must not be blocked or interrupted. • Check that the remote control is of the EN unit. It is valid (see page 27). No surround sound. • Check the speaker configuration in the WMA/mp3/JPG...automatically when it . You have forgotten your choice is wrong. • Make sure you have the correct video setting selected (see page 27). RTD209 EN 26/4/06 3:21 PM Page 32 Additional Information Troubleshooting (Main Unit) The unit does not switch on. • Make sure it on ...
User Manual - RTD209
Page 35
... rental is within 14 days from date of sale. 2. Your name, address and phone number. For rental firms, proof of purchase date such as the remote control hand unit. 4. Shipping instructions will be provided with the shipment: • Evidence of purchase date such as a bill of sale. • A brief note describing ...• One year from the customer to us . Make sure you will be billed. A brief note describing your warranty covers: • Defects in this time. 2. RTD209 EN 26/4/06 3:21 PM Page 37 Additional Information Limited Warranty What your unit's problem. 3.
... rental is within 14 days from date of sale. 2. Your name, address and phone number. For rental firms, proof of purchase date such as the remote control hand unit. 4. Shipping instructions will be provided with the shipment: • Evidence of purchase date such as a bill of sale. • A brief note describing ...• One year from the customer to us . Make sure you will be billed. A brief note describing your warranty covers: • Defects in this time. 2. RTD209 EN 26/4/06 3:21 PM Page 37 Additional Information Limited Warranty What your unit's problem. 3.

