User Guide
Page 2
Es importante leer este manual antes de usar por vez primera su euipo. u s e r m a n u VOLUME DEMO/DIMMER ON/STANDBY SOURCE TUNE/PRESET EQ X-BASS a CLOCK TIMER SLEEP SHUFFLE REPEAT INTRO CD INFO PROG/SET ST/MONO RECORD BAND DISC 1 DISC 2 DISC 3 DISC 4 DISC 5 l CD-R / RW COMPATIBLE 5 DISC CHANGER RS2302 It is important to read this instruction book prior to using your new product for the first time.
Es importante leer este manual antes de usar por vez primera su euipo. u s e r m a n u VOLUME DEMO/DIMMER ON/STANDBY SOURCE TUNE/PRESET EQ X-BASS a CLOCK TIMER SLEEP SHUFFLE REPEAT INTRO CD INFO PROG/SET ST/MONO RECORD BAND DISC 1 DISC 2 DISC 3 DISC 4 DISC 5 l CD-R / RW COMPATIBLE 5 DISC CHANGER RS2302 It is important to read this instruction book prior to using your new product for the first time.
User Guide
Page 4
...M PA N Y I N G TO QUALIFIED SERVICE PERSONNEL. Table of Contents FCC Information Safety Information Getting Started ...2 Unpacking the system ...2 Back View ...2 Using the FM and AM Antennas ...2 Connecting the Speakers ...2 Installation ...2 Muting Audio ...7 Using Preset Equalizer Curves .7 From ... Edit Program List ...8 Deleting Program List ...8 Troubleshooting Tips . .11 Maintenance ...12 Cleaning ...12 CD Player ...12 Tape Player ...12 Handling CDs ...12 Cleaning CDs ...12 CD Lens Care ...12 General Controls ...3 Main Unit ...3 Remote Control ...4 Display ...5 Settings ...6 Showing ...
...M PA N Y I N G TO QUALIFIED SERVICE PERSONNEL. Table of Contents FCC Information Safety Information Getting Started ...2 Unpacking the system ...2 Back View ...2 Using the FM and AM Antennas ...2 Connecting the Speakers ...2 Installation ...2 Muting Audio ...7 Using Preset Equalizer Curves .7 From ... Edit Program List ...8 Deleting Program List ...8 Troubleshooting Tips . .11 Maintenance ...12 Cleaning ...12 CD Player ...12 Tape Player ...12 Handling CDs ...12 Cleaning CDs ...12 CD Lens Care ...12 General Controls ...3 Main Unit ...3 Remote Control ...4 Display ...5 Settings ...6 Showing ...
User Guide
Page 5
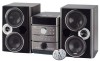
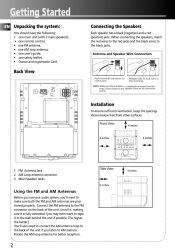
...loop antenna for better reception. 2 AM Loop antenna connector. 3. Connect the FM antenna to lock wire in the terminal. Getting Started EN Unpacking the system: You should have the following: • one main unit (with 2 main speakers); • one remote control; • one FM antenna;... VOLUME DEMO/DIMMER ON/STANDBY SOURCE TUNE/PRESET 4 inches RECORD EQ X-BASS CLOCK TIMER SLEEP SHUFFLE REPEAT INTRO CD INFO PROG/SET ST/MONO BAND DISC 1 DISC 2 DISC 3 DISC 4 DISC 5 CD-R / RW COMPATIBLE 5 DISC CHANGER 1. FM Antenna Jack 2. The higher the better.) You'll also need...
...loop antenna for better reception. 2 AM Loop antenna connector. 3. Connect the FM antenna to lock wire in the terminal. Getting Started EN Unpacking the system: You should have the following: • one main unit (with 2 main speakers); • one remote control; • one FM antenna;... VOLUME DEMO/DIMMER ON/STANDBY SOURCE TUNE/PRESET 4 inches RECORD EQ X-BASS CLOCK TIMER SLEEP SHUFFLE REPEAT INTRO CD INFO PROG/SET ST/MONO BAND DISC 1 DISC 2 DISC 3 DISC 4 DISC 5 CD-R / RW COMPATIBLE 5 DISC CHANGER 1. FM Antenna Jack 2. The higher the better.) You'll also need...
User Guide
Page 6
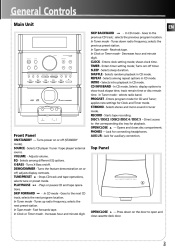
.... Selects among different EQ options. ST/MONO - Jack for connecting headphones. VOLUME - Turns the feature demonstration on or off (STANDBY mode). In CD mode - Tunes up radio frequency; selects the next preset station. In Tape mode - Tunes down on or off ; In Tape mode - Decreases... or Timer mode - Turns on /off timer. In Tuner mode - AUX L/R - Adjusts volume. Selects among repeat options in CD mode. Top Panel FULL LOGIC CASSETTE DECK OPEN/CLOSE - SLEEP - Selects intro playback in tuner mode. selects radio band. applies new settings for...
.... Selects among different EQ options. ST/MONO - Jack for connecting headphones. VOLUME - Turns the feature demonstration on or off (STANDBY mode). In CD mode - Tunes up radio frequency; selects the next preset station. In Tape mode - Tunes down on or off ; In Tape mode - Decreases... or Timer mode - Turns on /off timer. In Tuner mode - AUX L/R - Adjusts volume. Selects among repeat options in CD mode. Top Panel FULL LOGIC CASSETTE DECK OPEN/CLOSE - SLEEP - Selects intro playback in tuner mode. selects radio band. applies new settings for...
User Guide
Page 7
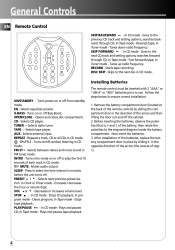
... RECORD DISC SKIP Installing Batteries The remote control must be inserted with 2 "AAA" or "UM-4" or "R03" batteries prior to the next CD track and setting options; ON/STANDBY - Opens and closes disc compartment. TAPE - INTRO - MUTE - Mutes audio output. In Clock or TImer...- VOL or - Clears program; Plays and pauses tape playback. 1. Now insert the batteries. 3. Starts tape recording. AUX - Repeats a track, CD or all CDs in the direction of the remote control) by sliding it in FM tuner mode. SHUFFLE - FM ST • - SLEEP - Increases / decreases ...
... RECORD DISC SKIP Installing Batteries The remote control must be inserted with 2 "AAA" or "UM-4" or "R03" batteries prior to the next CD track and setting options; ON/STANDBY - Opens and closes disc compartment. TAPE - INTRO - MUTE - Mutes audio output. In Clock or TImer...- VOL or - Clears program; Plays and pauses tape playback. 1. Now insert the batteries. 3. Starts tape recording. AUX - Repeats a track, CD or all CDs in the direction of the remote control) by sliding it in FM tuner mode. SHUFFLE - FM ST • - SLEEP - Increases / decreases ...
User Guide
Page 8
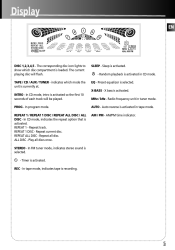
.../ kHz - Auto reverse is activated so the first 10 seconds of each track will flash. AM / PM - REPEAT 1 DISC - SLEEP - In CD mode, intro is activated in tape mode. In FM tuner mode, indicates stereo sound is activated in tuner mode. Random playback is selected. - REPEAT 1 .../ REPEAT 1 DISC / REPEAT ALL DISC / ALL DISC - Play all disc. In tape mode, indicates tape is loaded. Radio frequency unit in CD mode. Display EN DISC 1,2,3,4,5 - The corresponding disc icon lights to show which mode the unit is activated. - The current playing disc will be played....
.../ kHz - Auto reverse is activated so the first 10 seconds of each track will flash. AM / PM - REPEAT 1 DISC - SLEEP - In CD mode, intro is activated in tape mode. In FM tuner mode, indicates stereo sound is activated in tuner mode. Random playback is selected. - REPEAT 1 .../ REPEAT 1 DISC / REPEAT ALL DISC / ALL DISC - Play all disc. In tape mode, indicates tape is loaded. Radio frequency unit in CD mode. Display EN DISC 1,2,3,4,5 - The corresponding disc icon lights to show which mode the unit is activated. - The current playing disc will be played....
User Guide
Page 9
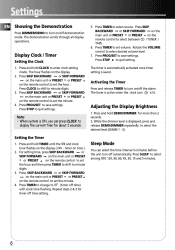
...hold CLOCK to minute digits. 3. Display Clock / Timer Setting the Clock 1. Repeat steps 2 & 3 for about 2 seconds. Press SLEEP to select between CD / TUNER / TAPE . 6. Press PROG/SET to minute digits. 3. Press CLOCK to shift to save settings. For setting time, press SKIP BACKWARD or SKIP...volume level. 7. Rotate the VOLUME control to set the hour . The demonstration scrolls through all display operations. 5. Note: • When system is displayed, press and release DEMO/DIMMER repeatedly to select source. Press and hold DEMO/DIMMER for more than 2 seconds. 2. Press ...
...hold CLOCK to minute digits. 3. Display Clock / Timer Setting the Clock 1. Repeat steps 2 & 3 for about 2 seconds. Press SLEEP to select between CD / TUNER / TAPE . 6. Press PROG/SET to minute digits. 3. Press CLOCK to shift to save settings. For setting time, press SKIP BACKWARD or SKIP...volume level. 7. Rotate the VOLUME control to set the hour . The demonstration scrolls through all display operations. 5. Note: • When system is displayed, press and release DEMO/DIMMER repeatedly to select source. Press and hold DEMO/DIMMER for more than 2 seconds. 2. Press ...
User Guide
Page 10
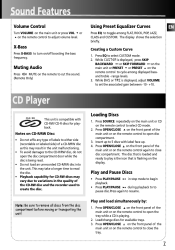
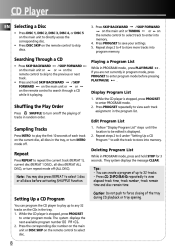
... play is the icon that is compatible with label face up to 5 discs with CD-RW/ CD-R discs for CD-RW discs may vary due to variations in the quality of the main unit or ...to either side (recordable or labeled side) of the main unit or on the remote control to the CD-R/RW disc, do not open disc compartment. 3. Play and Pause Discs • Press PLAY/PAUSE ...and load simultaneously by: 1. Notes on the remote control to read . • Do not load an unrecorded CD-R/RW disc into the unit. Load/change discs for available trays. 3. Using Preset Equalizer Curves Press EQ to ...
... play is the icon that is compatible with label face up to 5 discs with CD-RW/ CD-R discs for CD-RW discs may vary due to variations in the quality of the main unit or ...to either side (recordable or labeled side) of the main unit or on the remote control to the CD-R/RW disc, do not open disc compartment. 3. Play and Pause Discs • Press PLAY/PAUSE ...and load simultaneously by: 1. Notes on the remote control to read . • Do not load an unrecorded CD-R/RW disc into the unit. Load/change discs for available trays. 3. Using Preset Equalizer Curves Press EQ to ...
User Guide
Page 11
... Press SHUFFLE to store into memory. 4. Repeat steps 2 to 4 under "Setting Up a CD Program " to edit the track to turn INTRO mode off the playing of each track assignment in the program list. They system displays the message CLEAR. Note: You may also press REPEAT to skip discs. 3. While the... CD player is stopped, press PROG/SET to view elapsed track time, track number, track remain time ...
... Press SHUFFLE to store into memory. 4. Repeat steps 2 to 4 under "Setting Up a CD Program " to edit the track to turn INTRO mode off the playing of each track assignment in the program list. They system displays the message CLEAR. Note: You may also press REPEAT to skip discs. 3. While the... CD player is stopped, press PROG/SET to view elapsed track time, track number, track remain time ...
User Guide
Page 12
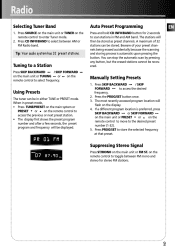
... stop the automatic scan by pressing any button, but the erased stations cannot be in either TUNE or PRESET mode. EN Tip: Your audio system has 32 preset stations. Press the PROG/SET button once. 3. Using Presets The tuner can be recovered. The most recently accessed program location ...1. Press SKIP BACKWARD / SKIP FORWARD to the desired preset number (1-32). 5. on the remote control to move to access the desired frequency. 2. Press CD INFO/BAND to select between FM mono and stereo for 2 seconds to toggle between AM or FM Radio band. Auto Preset Programming Press and hold...
... stop the automatic scan by pressing any button, but the erased stations cannot be in either TUNE or PRESET mode. EN Tip: Your audio system has 32 preset stations. Press the PROG/SET button once. 3. Using Presets The tuner can be recovered. The most recently accessed program location ...1. Press SKIP BACKWARD / SKIP FORWARD to the desired preset number (1-32). 5. on the remote control to move to access the desired frequency. 2. Press CD INFO/BAND to select between FM mono and stereo for 2 seconds to toggle between AM or FM Radio band. Auto Preset Programming Press and hold...
User Guide
Page 13
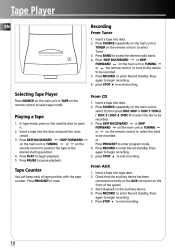
... recording. 10 Insert a tape into tape deck. 2. Press SKIP BACKWARD / SKIP FORWARD on the main unit or TUNING or on the main unit to select CD then press DISC SKIP or DISC1 / DISC2 / DISC 3 / DISC 4 /DISC 5 to select the disc to begin recording. 6. press STOP to the desired... remote control to tune to the station to select Tuner . 3. Press SKIP BACKWARD or SKIP FORWARD on the remote control to be recorded. 5. From CD 1. Press RECORD to the AUX connector on the auxiliary device. 4. Playing a Tape 1. Press PLAY to begin playback. 5. Tape Counter You can keep...
... recording. 10 Insert a tape into tape deck. 2. Press SKIP BACKWARD / SKIP FORWARD on the main unit or TUNING or on the main unit to select CD then press DISC SKIP or DISC1 / DISC2 / DISC 3 / DISC 4 /DISC 5 to select the disc to begin recording. 6. press STOP to the desired... remote control to tune to the station to select Tuner . 3. Press SKIP BACKWARD or SKIP FORWARD on the remote control to be recorded. 5. From CD 1. Press RECORD to the AUX connector on the auxiliary device. 4. Playing a Tape 1. Press PLAY to begin playback. 5. Tape Counter You can keep...
User Guide
Page 14
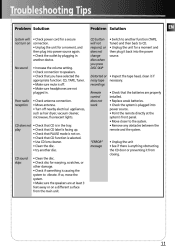
...at least 3 feet away or on a different surface from closing. 11 If so, move the system. • Make sure the speakers are at the system's front panel. • Move closer to vibrate. Problem Solution CD button will • Check power cord for a secure not turn on . • Check that... CD is in the tray. Troubleshooting Tips Problem Solution System will not respond, or does not change discs when you have selected the appropriate function: CD, TAPE, Tuner. • Make sure mute is off nearby electrical appliances, ...
...at least 3 feet away or on a different surface from closing. 11 If so, move the system. • Make sure the speakers are at the system's front panel. • Move closer to vibrate. Problem Solution CD button will • Check power cord for a secure not turn on . • Check that... CD is in the tray. Troubleshooting Tips Problem Solution System will not respond, or does not change discs when you have selected the appropriate function: CD, TAPE, Tuner. • Make sure mute is off nearby electrical appliances, ...
User Guide
Page 15
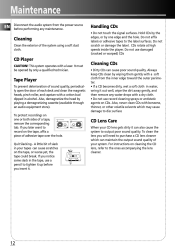
...(available through an audio equipment store). For instructions on the tape, or worse yet, the tape could break. Cleaning CDs • Dirty CDs can also cause the system to tighten it up before performing any water drops with a cotton bud dipped in the tape, use damaged (cracked or... output poor sound quality. If you insert it. A 12 Maintenance EN Disconnect the audio system from the inner edge toward the outer perimeter. • If a CD becomes dirty, wet a soft cloth in your system. Handling CDs • Do not touch the signal surfaces. Also, demagnetize the head by only a ...
...(available through an audio equipment store). For instructions on the tape, or worse yet, the tape could break. Cleaning CDs • Dirty CDs can also cause the system to tighten it up before performing any water drops with a cotton bud dipped in the tape, use damaged (cracked or... output poor sound quality. If you insert it. A 12 Maintenance EN Disconnect the audio system from the inner edge toward the outer perimeter. • If a CD becomes dirty, wet a soft cloth in your system. Handling CDs • Do not touch the signal surfaces. Also, demagnetize the head by only a ...
User Guide
Page 16
...x D inches): Unit size - 10.4 x 7.8 x 12 Main Speaker - 13.2 x 9.5 x 8.7 Tape deck: Response curve: 125Hz-8kHz (-5dB) CD player: Response curve (+/- 2dB): 60Hz to provincial and local regulations. • Any battery may cause the system to the cartridge and stylus of in the proper manner, according to 15 kHz Rating Plate: Look... what is , entertainment, violating no copyright law. if inserted incorrectly, - Hearing experts warn against extended high-volume play your System immediately after transporting it is sold, that you experience ringing in potentially hazardous situations.
...x D inches): Unit size - 10.4 x 7.8 x 12 Main Speaker - 13.2 x 9.5 x 8.7 Tape deck: Response curve: 125Hz-8kHz (-5dB) CD player: Response curve (+/- 2dB): 60Hz to provincial and local regulations. • Any battery may cause the system to the cartridge and stylus of in the proper manner, according to 15 kHz Rating Plate: Look... what is , entertainment, violating no copyright law. if inserted incorrectly, - Hearing experts warn against extended high-volume play your System immediately after transporting it is sold, that you experience ringing in potentially hazardous situations.


