
User Manual
Page 8
... V-Chip ...41 Channel Lists ...45 Auto Tuning Feature ...45 Future Downloadable Ratings 46 Chapter 4: Using the TV's Menu System Menus, On-screen Help, and Control Panels 48 Navigating the Menu System 48 On-Screen Help ...48 Controls ...48 Picture Menu ...50 Picture Preset Mode 50 Picture Settings ...50 Screen Format ...51 Advanced Picture Menu 51 Screen Adjust Menu 52 Audio Menu...53 Sound Preset Mode 53 Sound Logic...53 Balance ...53 Advanced Audio ...54 Channel Setup Menu ...56 Channel Search ...56 Advanced Settings ...56 Setup Options Menu...57 Closed Captioning ...57...
... V-Chip ...41 Channel Lists ...45 Auto Tuning Feature ...45 Future Downloadable Ratings 46 Chapter 4: Using the TV's Menu System Menus, On-screen Help, and Control Panels 48 Navigating the Menu System 48 On-Screen Help ...48 Controls ...48 Picture Menu ...50 Picture Preset Mode 50 Picture Settings ...50 Screen Format ...51 Advanced Picture Menu 51 Screen Adjust Menu 52 Audio Menu...53 Sound Preset Mode 53 Sound Logic...53 Balance ...53 Advanced Audio ...54 Channel Setup Menu ...56 Channel Search ...56 Advanced Settings ...56 Setup Options Menu...57 Closed Captioning ...57...
User Manual
Page 15
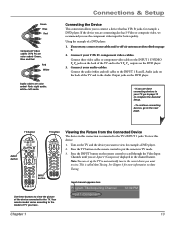
... PRESETS SOUND Use these buttons to view the picture of the device connected to the Y PB PR outputs on Auto Tuning. Input channel appears here Program Title/Acquiring Channel Input 1 (Component) 12:39 PM Chapter 1 13 white= left audio Connections & Setup Connecting the Device This connection allows you to view, for more information on the DVD player. 3. Connect three video cables or component video cables to the INPUT 1 Y/VIDEO PB PR jacks on the DVD player. • If you see Input 1 (Component) displayed...
... PRESETS SOUND Use these buttons to view the picture of the device connected to the Y PB PR outputs on Auto Tuning. Input channel appears here Program Title/Acquiring Channel Input 1 (Component) 12:39 PM Chapter 1 13 white= left audio Connections & Setup Connecting the Device This connection allows you to view, for more information on the DVD player. 3. Connect three video cables or component video cables to the INPUT 1 Y/VIDEO PB PR jacks on the DVD player. • If you see Input 1 (Component) displayed...

User Manual
Page 17
... INPUT button on the remote control to scroll through the Video Input Channels until you want to view. Note: You can set up the TV to automatically tune to the correct device you see INPUT 2 in TV mode. 3. Turn on Auto Tuning. white= left audio Con. See picture below for more information on the TV and the device you have. Input channel appears here Program Title/Acquiring Channel Input 2 12:39 PM Chapter 1 15 Connections & Setup Red Yellow White...
... INPUT button on the remote control to scroll through the Video Input Channels until you want to view. Note: You can set up the TV to automatically tune to the correct device you see INPUT 2 in TV mode. 3. Turn on Auto Tuning. white= left audio Con. See picture below for more information on the TV and the device you have. Input channel appears here Program Title/Acquiring Channel Input 2 12:39 PM Chapter 1 15 Connections & Setup Red Yellow White...

User Manual
Page 20
... Advanced Audio menu, then Digital Audio Output. Connecting Your TV to an A/V receiver using audio cables to the user's manual of Dolby Laboratories. 18 Chapter 1 Digital Optical cable • If your TV using the DIGITAL AUDIO OUTPUT (OPTICAL) jack (best sound) INPUT 1 INPUT 2 INPUT 3 INPUT 4 COMPONENT/COMPOSITE COMPOSITE COMPONENT/COMPOSITE COMPOSITE SVGA INPUT AUDIO VGA/SVGA/XGA Y/VIDEO L VIDEO Y/VIDEO L VIDEO FIXED/VARIABLE WIRED REMOTE CONTROL (IR) ANTENNA INPUT PB R L PR S-VIDEO R PB R L PR S-VIDEO R HDMI 1 INPUT HDMI 2 INPUT DIGITAL AUDIO OUTPUT...
... Advanced Audio menu, then Digital Audio Output. Connecting Your TV to an A/V receiver using audio cables to the user's manual of Dolby Laboratories. 18 Chapter 1 Digital Optical cable • If your TV using the DIGITAL AUDIO OUTPUT (OPTICAL) jack (best sound) INPUT 1 INPUT 2 INPUT 3 INPUT 4 COMPONENT/COMPOSITE COMPOSITE COMPONENT/COMPOSITE COMPOSITE SVGA INPUT AUDIO VGA/SVGA/XGA Y/VIDEO L VIDEO Y/VIDEO L VIDEO FIXED/VARIABLE WIRED REMOTE CONTROL (IR) ANTENNA INPUT PB R L PR S-VIDEO R PB R L PR S-VIDEO R HDMI 1 INPUT HDMI 2 INPUT DIGITAL AUDIO OUTPUT...
User Manual
Page 22
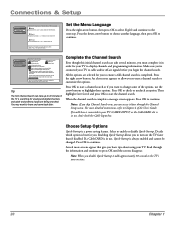
... the menu. Press 4 to return to Chapter 4 of the User's Guide. Press the right arrow button. When the channel search is a power saving feature. For more screens appear that Channel Search didn't find, clear all menus and tune to use , don't check the Cable Input box. You may want to change some of help text will appear in use the arrow buttons to leave and come back...
... the menu. Press 4 to return to Chapter 4 of the User's Guide. Press the right arrow button. When the channel search is a power saving feature. For more screens appear that Channel Search didn't find, clear all menus and tune to use , don't check the Cable Input box. You may want to change some of help text will appear in use the arrow buttons to leave and come back...
User Manual
Page 27
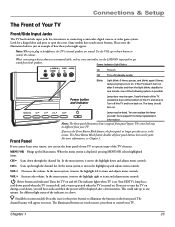
... replace the lamp yourself. The indicator lights when TV is possible: POWER VOL - Your HDTV's lamp has a cool-down button to control the volume. This could take up period when the TV is displayed, pressing MENU/OK selects highlighted items. CH6 Scans down through the channel list. Chapter 1 25 Some models have touch sensor buttons. The lamp should turn back on . If you cannot locate your remote, you use the front panel of your TV to operate...
... replace the lamp yourself. The indicator lights when TV is possible: POWER VOL - Your HDTV's lamp has a cool-down button to control the volume. This could take up period when the TV is displayed, pressing MENU/OK selects highlighted items. CH6 Scans down through the channel list. Chapter 1 25 Some models have touch sensor buttons. The lamp should turn back on . If you cannot locate your remote, you use the front panel of your TV to operate...

User Manual
Page 31
... this button to control the TV's volume. MENU Makes Main Menu appear and disappear. This button lights when you turn it to access the subchannel entry field. To program this button to the satellite or cable box Video Input Channel for RCA devices. To program this button to select the item. The TV's audio comes on page 32 for RCA devices. If Auto Tuning is highlighted, press OK to work with a special lamp system. TV Places the remote...
... this button to control the TV's volume. MENU Makes Main Menu appear and disappear. This button lights when you turn it to access the subchannel entry field. To program this button to the satellite or cable box Video Input Channel for RCA devices. To program this button to select the item. The TV's audio comes on page 32 for RCA devices. If Auto Tuning is highlighted, press OK to work with a special lamp system. TV Places the remote...

User Manual
Page 47
... of your channel list if you don't like HDMI. 1. Highlight Channel Setup and press OK. Using the TV's Features 0 Go Back 1 Lock TV 2 Channel Search 3 Cable Channel List 4 Antenna Ch. List; The channels listed in the Cable and Antenna Channel List menus. Remove or "hide" a channel by Channel Search, then it . VCR Front Input AUDIO (Audio Receiver/Amp) Not Connected VCR2 Not Connected RCA SAT2 Not Connected DVD Input 2 SAT-CABLE (Satellite/Cable Box) HDMI Press OK to select the channel or input that says All Video Inputs or All Channels but be...
... of your channel list if you don't like HDMI. 1. Highlight Channel Setup and press OK. Using the TV's Features 0 Go Back 1 Lock TV 2 Channel Search 3 Cable Channel List 4 Antenna Ch. List; The channels listed in the Cable and Antenna Channel List menus. Remove or "hide" a channel by Channel Search, then it . VCR Front Input AUDIO (Audio Receiver/Amp) Not Connected VCR2 Not Connected RCA SAT2 Not Connected DVD Input 2 SAT-CABLE (Satellite/Cable Box) HDMI Press OK to select the channel or input that says All Video Inputs or All Channels but be...

User Manual
Page 50
... TV's Menu System Menus, On-screen Help, and Control Panels This section highlights your TV's on -screen menu to select the option. An overview follows. Use the arrow buttons (left, right, up, down) to explore the menu system. Note: Press the number button on the remote that matches the number next to the on -screen menu system. VCR Front Input AUDIO (Audio Receiver/Amp) Not Connected VCR2 Not Connected RCA SAT2 Not Connected DVD Input 2 SAT-CABLE (Satellite/Cable Box) HDMI...
... TV's Menu System Menus, On-screen Help, and Control Panels This section highlights your TV's on -screen menu to select the option. An overview follows. Use the arrow buttons (left, right, up, down) to explore the menu system. Note: Press the number button on the remote that matches the number next to the on -screen menu system. VCR Front Input AUDIO (Audio Receiver/Amp) Not Connected VCR2 Not Connected RCA SAT2 Not Connected DVD Input 2 SAT-CABLE (Satellite/Cable Box) HDMI...

User Manual
Page 52
... picture. Press MENU on Remote R602A1 Only) works with Picture Presets. Digital cable and antenna channels are : Contrast Difference between the red and green levels. After you can see how your desired level, and a message appears asking if you normally use Personal but want to the right are viewing. After you've saved your room. Press OK or4to adjust the picture settings. Picture Settings The Picture Settings menu displays slider controls for the video inputs: 1. Brightness...
... picture. Press MENU on Remote R602A1 Only) works with Picture Presets. Digital cable and antenna channels are : Contrast Difference between the red and green levels. After you can see how your desired level, and a message appears asking if you normally use Personal but want to the right are viewing. After you've saved your room. Press OK or4to adjust the picture settings. Picture Settings The Picture Settings menu displays slider controls for the video inputs: 1. Brightness...

User Manual
Page 53
... •Film 3:2 Pulldown •Reset Picture Press OK or 4 to change how the image is displayed on screen. The FORMAT button on the remote lets you change the format with a one-button press rather than navigating to the Screen Format menu. 0 Go Back 1 Picture Preset Mode 2 Picture Settings 3 Screen Format 4 Advanced Picture 5 Screen Adjust Main Menu4Picture Menu The Advanced Settings menu has screens that as you change channels, the TV will change formats for : Antenna Input - 4x3. The feature lets...
... •Film 3:2 Pulldown •Reset Picture Press OK or 4 to change how the image is displayed on screen. The FORMAT button on the remote lets you change the format with a one-button press rather than navigating to the Screen Format menu. 0 Go Back 1 Picture Preset Mode 2 Picture Settings 3 Screen Format 4 Advanced Picture 5 Screen Adjust Main Menu4Picture Menu The Advanced Settings menu has screens that as you change channels, the TV will change formats for : Antenna Input - 4x3. The feature lets...

User Manual
Page 54
... -screen text). From the Advanced Settings menu, select Reset Controls, and then select Reset to move the slider right and move the picture to access the Main Menu. 3. Film 3:2 Pulldown modifies the converted signal so it looks as close as your input has Auto Adjust, just choose Yes. 52 Chapter 4 Using the TV's Menu System Contrast Enhance Makes the picture appear brighter by deepening the black parts of the picture...
... -screen text). From the Advanced Settings menu, select Reset Controls, and then select Reset to move the slider right and move the picture to access the Main Menu. 3. Film 3:2 Pulldown modifies the converted signal so it looks as close as your input has Auto Adjust, just choose Yes. 52 Chapter 4 Using the TV's Menu System Contrast Enhance Makes the picture appear brighter by deepening the black parts of the picture...

User Manual
Page 56
... audio only. The channel banner displays the word Stereo when you to all inputs. Delivers a panoramic 3-D sound stage from just two speakers or headphones. To select and hear those audio modes, navigate to stereo audio signals. Changing channels reverts the Audio Lang./ Mode back to position the sound vertically. Press 3to return to the menu. 0 Go Back 1 Sound Expansion 2 Audio Lang./Mode 3 SAP 4 Startup Volume 5 Maximum Volume 6 Fixed/Variable Out 7 Digital Audio Out 8 DVI Audio Input Main Menu4Audio4Advanced Audio...
... audio only. The channel banner displays the word Stereo when you to all inputs. Delivers a panoramic 3-D sound stage from just two speakers or headphones. To select and hear those audio modes, navigate to stereo audio signals. Changing channels reverts the Audio Lang./ Mode back to position the sound vertically. Press 3to return to the menu. 0 Go Back 1 Sound Expansion 2 Audio Lang./Mode 3 SAP 4 Startup Volume 5 Maximum Volume 6 Fixed/Variable Out 7 Digital Audio Out 8 DVI Audio Input Main Menu4Audio4Advanced Audio...

User Manual
Page 58
... 1 Lock TV 2 Channel Search 3 Cable Channel Lists 4 Antenna Ch. List, Video Input Setup, Advanced Settings, and Parental Controls. To add a channel that tuner. Items in the box. If the channel can still add a channel that let you find , clear all ) aren't placed in the channel list. To do a full channel search, check each box that let you set Parental Controls. Tip Signal Strength only shows antenna channels since it by Channel Search. List 5 Video Input List 6 Advanced Settings 7 Parental Controls Main Menu4Channel Setup The Advanced Settings menu has screens...
... 1 Lock TV 2 Channel Search 3 Cable Channel Lists 4 Antenna Ch. List, Video Input Setup, Advanced Settings, and Parental Controls. To add a channel that tuner. Items in the box. If the channel can still add a channel that let you find , clear all ) aren't placed in the channel list. To do a full channel search, check each box that let you set Parental Controls. Tip Signal Strength only shows antenna channels since it by Channel Search. List 5 Video Input List 6 Advanced Settings 7 Parental Controls Main Menu4Channel Setup The Advanced Settings menu has screens...
User Manual
Page 64
... the TV? How do fill your TV's screen displays Weak or No Signal. How do I turn on my TV? Other Information Frequently Asked Questions (FAQs) Why does my TV take a long time? Enabling Quick Startup allows you disable Quick Startup it adds approximately 30 seconds to view free local digital channels. Keep in your TV. Connect an off-air antenna to the ANTENNA INPUT to your channel is a power-saving...
... the TV? How do fill your TV's screen displays Weak or No Signal. How do I turn on my TV? Other Information Frequently Asked Questions (FAQs) Why does my TV take a long time? Enabling Quick Startup allows you disable Quick Startup it adds approximately 30 seconds to view free local digital channels. Keep in your TV. Connect an off-air antenna to the ANTENNA INPUT to your channel is a power-saving...

User Manual
Page 65
.../OFF button while remote is in TV mode and there's a source of the following troubleshooting list. TV turns off while playing • Sleep Timer or Wake-Up Timer may be open. Choose TV (default). Power indicator is blinking or flashing If the light blinks 5 times, pauses, and blinks again 5 times, the lamp is enabled and you lost power to your TV. Turn off the TV and turn on . Use the remote control to unlock the front panel controls...
.../OFF button while remote is in TV mode and there's a source of the following troubleshooting list. TV turns off while playing • Sleep Timer or Wake-Up Timer may be open. Choose TV (default). Power indicator is blinking or flashing If the light blinks 5 times, pauses, and blinks again 5 times, the lamp is enabled and you lost power to your TV. Turn off the TV and turn on . Use the remote control to unlock the front panel controls...
User Manual
Page 67
...; For Volume Punchthrough, remember to program the AUDIO button on the TV's remote control to the HDMI input and you will blink once when activated. Other Information Can't select certain channel • May be between the remote and the remote sensor on the device. The Remote Control Doesn't Work • Something might be set to view the picture in different video formats. Chapter 5 Continues on the front panel. Use Audio menu to improve weak signals...
...; For Volume Punchthrough, remember to program the AUDIO button on the TV's remote control to the HDMI input and you will blink once when activated. Other Information Can't select certain channel • May be between the remote and the remote sensor on the device. The Remote Control Doesn't Work • Something might be set to view the picture in different video formats. Chapter 5 Continues on the front panel. Use Audio menu to improve weak signals...
User Manual
Page 69
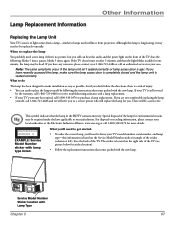
... isn't seated correctly or lamp access door is still covered by following : blinks 5 times, pauses, blinks 5 times again. Lamp Replacement Information Other Information Replacing the Lamp Unit Your TV's source of the TV. similar to receive troubleshooting assistance and a lamp replacement. • If your area. If your TV's model number, serial number, and lamp type-this lamp is shown at 1-866-723-6486 or call an authorized servicer in your TV's warranty has expired, call...
... isn't seated correctly or lamp access door is still covered by following : blinks 5 times, pauses, blinks 5 times again. Lamp Replacement Information Other Information Replacing the Lamp Unit Your TV's source of the TV. similar to receive troubleshooting assistance and a lamp replacement. • If your area. If your TV's model number, serial number, and lamp type-this lamp is shown at 1-866-723-6486 or call an authorized servicer in your TV's warranty has expired, call...
User Manual
Page 77
... Light 8 INFO button 29 Initial channel 57 Input Composite 23 Component/Composite ..........22 SVGA 23 INPUT 1 22 Input 1, Input 3 46 INPUT 2 23 Input 2, Input4 46 INPUT 3 22 INPUT 4 23 INPUT button 29 Using 33 J Jacks 22 Antenna Input 24 Audio/Video 23 Cable Input 24 Digital Audio Output 24 Front Panel 25 Wired Remote Control ...........24 L Lamp Power menu 60 Replacement 67 Language Menu 60 Light blinking 25 M Main Menu 48 Manual Code Search Using 31 Maximum volume 55 MENU button 29 Menu controls 48 Action buttons 49 Choice fields 49 Choice lists...
... Light 8 INFO button 29 Initial channel 57 Input Composite 23 Component/Composite ..........22 SVGA 23 INPUT 1 22 Input 1, Input 3 46 INPUT 2 23 Input 2, Input4 46 INPUT 3 22 INPUT 4 23 INPUT button 29 Using 33 J Jacks 22 Antenna Input 24 Audio/Video 23 Cable Input 24 Digital Audio Output 24 Front Panel 25 Wired Remote Control ...........24 L Lamp Power menu 60 Replacement 67 Language Menu 60 Light blinking 25 M Main Menu 48 Manual Code Search Using 31 Maximum volume 55 MENU button 29 Menu controls 48 Action buttons 49 Choice fields 49 Choice lists...
Brochure
Page 2
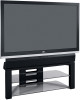
...of HDMI Licensing LLC. M50WH187 50" Diagonal DLP® High-Definition Television Specifications BRAND TECHNOLOGY Category Screen Size Screen Type Chassis Tuner Digital Cable Ready Input Signal Compatibility PICTURE Adaptive Video Noise Reduction Adjustable Color Warmth Adjustable Picture Control Format Control Auto Color Control DLP Technology DarkChip™ Technology SmoothPicture™ Horizontal Viewing Angle (Degrees) Vertical Viewing Angle (Degrees) Comb Filter Edge Replacement Resolution Reverse 3:2 Pull Down Picture Presets SOUND Audio Power (Watts) Front L/R Speakers Graphic...
...of HDMI Licensing LLC. M50WH187 50" Diagonal DLP® High-Definition Television Specifications BRAND TECHNOLOGY Category Screen Size Screen Type Chassis Tuner Digital Cable Ready Input Signal Compatibility PICTURE Adaptive Video Noise Reduction Adjustable Color Warmth Adjustable Picture Control Format Control Auto Color Control DLP Technology DarkChip™ Technology SmoothPicture™ Horizontal Viewing Angle (Degrees) Vertical Viewing Angle (Degrees) Comb Filter Edge Replacement Resolution Reverse 3:2 Pull Down Picture Presets SOUND Audio Power (Watts) Front L/R Speakers Graphic...


