User Guide & Warranty
Page 1
visit our website at www.rca.com/tv or call 1-877-794-7977 Table of contents 1 contents connections 6 remote 19 features 20 menus 25 FAQs 30 warranty 36 user's guide | LCD FLAT PANEL HDTV For use with models: L40FHD41/L42FHD37R /L46FHD37R Need assistance?
visit our website at www.rca.com/tv or call 1-877-794-7977 Table of contents 1 contents connections 6 remote 19 features 20 menus 25 FAQs 30 warranty 36 user's guide | LCD FLAT PANEL HDTV For use with models: L40FHD41/L42FHD37R /L46FHD37R Need assistance?
User Guide & Warranty
Page 2
... not remove cover (or back). The power button (followed by the party responsible for its proper operating voltage. Registering this TV and your remote control puts the TV into a very low-power standby mode but will need them. This symbol indicates "dangerous voltage" inside . This symbol indicates...indicates that this product, maintain a spacing of 4 inches from the top and sides of the TV receiver and other surfaces. Therefore, you should not be registered at www.rca.com/television. Caution: To reduce the risk of the unit may be required under the laws applicable...
... not remove cover (or back). The power button (followed by the party responsible for its proper operating voltage. Registering this TV and your remote control puts the TV into a very low-power standby mode but will need them. This symbol indicates "dangerous voltage" inside . This symbol indicates...indicates that this product, maintain a spacing of 4 inches from the top and sides of the TV receiver and other surfaces. Therefore, you should not be registered at www.rca.com/television. Caution: To reduce the risk of the unit may be required under the laws applicable...
User Guide & Warranty
Page 4
Digital Channels ...16 Changing Channels ...16 Explanation of Jacks (in the Remote ...14 Turn on Your TV 18 Side Input Jacks ...18 Side Panel Buttons ...18 4 Table of Contents Important Information ...i Important Safety Instructions ...i Chapter 1 I Connections and Setup Before Initial ...Component ...12 Viewing the Picture from the Connected Component 13 Viewing a PC...13 Plug in the TV ...14 Put Batteries in alphabetical order 17 Buttons and Other Jacks on the TV ...14 Using the Remote Control to Complete Initial Setup 14 Complete the Initial Setup ...15 Set the Menu Language ...15 Set...
Digital Channels ...16 Changing Channels ...16 Explanation of Jacks (in the Remote ...14 Turn on Your TV 18 Side Input Jacks ...18 Side Panel Buttons ...18 4 Table of Contents Important Information ...i Important Safety Instructions ...i Chapter 1 I Connections and Setup Before Initial ...Component ...12 Viewing the Picture from the Connected Component 13 Viewing a PC...13 Plug in the TV ...14 Put Batteries in alphabetical order 17 Buttons and Other Jacks on the TV ...14 Using the Remote Control to Complete Initial Setup 14 Complete the Initial Setup ...15 Set the Menu Language ...15 Set...
User Guide & Warranty
Page 5
Chapter 2 I Using the Remote Control Remote Control Buttons ...19 Chapter 3 I Other Information Frequently Asked Questions (FAQs ... and Canada ...20 Create Password ...21 Lock/Unlock Parental Controls ...21 V-Chip Rating Screen ...21 US V-Chip TV Ratings ...22 Blocking Specific Content Themes ...22 US V-Chip Movie Rating Limit ...23 Blocking Canada V-Chip Ratings ... Channel ...23 Block Buttons ...24 Change Password ...24 Additional Features ...24 Screen Formats ...24 Chapter 4 I Using the TV Menu Using the Menu System ...25 Picture Menu ...25 Sound Menu ...26 Setup Menu ...27 List & Labels Menu ...
Chapter 2 I Using the Remote Control Remote Control Buttons ...19 Chapter 3 I Other Information Frequently Asked Questions (FAQs ... and Canada ...20 Create Password ...21 Lock/Unlock Parental Controls ...21 V-Chip Rating Screen ...21 US V-Chip TV Ratings ...22 Blocking Specific Content Themes ...22 US V-Chip Movie Rating Limit ...23 Blocking Canada V-Chip Ratings ... Channel ...23 Block Buttons ...24 Change Password ...24 Additional Features ...24 Screen Formats ...24 Chapter 4 I Using the TV Menu Using the Menu System ...25 Picture Menu ...25 Sound Menu ...26 Setup Menu ...27 List & Labels Menu ...
User Guide & Warranty
Page 6
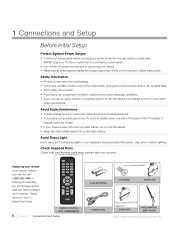
...room lighting is controlled by a wall switch. • Turn off the TV before you connect an audio receiver or amplifier, place it on any of straight down the middle. • If your remote If you need to the Important Safety Instructions Safety Information • Protect ...6 Chapter 1 Connections and Setup only for model L40FHD41 2 AAA BATTERIES ST-SCREW STAND CAP POWER CORD only for model L42FHD37R/ L46FHD37R STAND CAP CABLE MANAGEMENT STRAP Graphics contained within this publication are properly grounded. 1 Connections and Setup Before Initial Setup Protect Against Power ...
...room lighting is controlled by a wall switch. • Turn off the TV before you connect an audio receiver or amplifier, place it on any of straight down the middle. • If your remote If you need to the Important Safety Instructions Safety Information • Protect ...6 Chapter 1 Connections and Setup only for model L40FHD41 2 AAA BATTERIES ST-SCREW STAND CAP POWER CORD only for model L42FHD37R/ L46FHD37R STAND CAP CABLE MANAGEMENT STRAP Graphics contained within this publication are properly grounded. 1 Connections and Setup Before Initial Setup Protect Against Power ...
User Guide & Warranty
Page 13
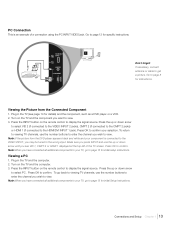
... components to your component is an example of the TV screen. To go to display the signal source. Go to view. Go to view. 3. Note: When you want to page 8 for specific instructions. Turn on the remote control to page 15 for initial Setup Instructions. Connections... and Setup Chapter 1 13 Press the INPUT button on the TV and the component you have connected all additional components to your selection. Press OK to ...
... components to your component is an example of the TV screen. To go to display the signal source. Go to view. Go to view. 3. Note: When you want to page 8 for specific instructions. Turn on the remote control to page 15 for initial Setup Instructions. Connections... and Setup Chapter 1 13 Press the INPUT button on the TV and the component you have connected all additional components to your selection. Press OK to ...

User Guide & Warranty
Page 14
... the end of the power cord into an outlet controlled by a light switch. Do not plug the TV into the back of the TV. The remote control allows you to the previous menu, press the GO BACK key or left arrow. 14 Chapter 1 Connections and Setup The process works the same .... • Replace the cover. Plug the other selections for a menu choice or to complete the setup of your TV. Using the Remote Control to Complete Initial Setup You will need to use the remote control to display a sub-menu. Use OK button or right arrow to view other end into an outlet, inserting...
... the end of the power cord into an outlet controlled by a light switch. Do not plug the TV into the back of the TV. The remote control allows you to the previous menu, press the GO BACK key or left arrow. 14 Chapter 1 Connections and Setup The process works the same .... • Replace the cover. Plug the other selections for a menu choice or to complete the setup of your TV. Using the Remote Control to Complete Initial Setup You will need to use the remote control to display a sub-menu. Use OK button or right arrow to view other end into an outlet, inserting...

User Guide & Warranty
Page 17
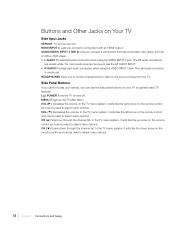
...AUDIO/VIDEO INPUT2 (CMPT2) INPUT1 (CMPT1) INPUT1 (VID1) PC INPUT ANTENNA/CABLE This section describes the jacks on the back panel of your TV to a compatible audio receiver. There are usually white. AUDIO/VIDEO INPUT 1 (VID 1) Lets you connect a coaxial cable to receive the...connectors are several ways to select S-VID. HDMI INPUT 2 Lets you to connect your TV. DIGITAL AUDIO OUTPUT (coaxial) Use a digital coaxial cable to connect an S-Video cable from your remote; HDMI/DVI INPUT 1 (High-Definition Multimedia Interface/Digital Visual Interface) Provides an uncompressed digital...
...AUDIO/VIDEO INPUT2 (CMPT2) INPUT1 (CMPT1) INPUT1 (VID1) PC INPUT ANTENNA/CABLE This section describes the jacks on the back panel of your TV to a compatible audio receiver. There are usually white. AUDIO/VIDEO INPUT 1 (VID 1) Lets you connect a coaxial cable to receive the...connectors are several ways to select S-VID. HDMI INPUT 2 Lets you to connect your TV. DIGITAL AUDIO OUTPUT (coaxial) Use a digital coaxial cable to connect an S-Video cable from your remote; HDMI/DVI INPUT 1 (High-Definition Multimedia Interface/Digital Visual Interface) Provides an uncompressed digital...
User Guide & Warranty
Page 18
AUDIO/VIDEO INPUT 2 (VID 2) Lets you can use the side panel buttons on your TV to operate many TV features. ( ) POWER Turns the TV on the remote control and can be used to select menu options. The left audio connection when using the VIDEO INPUT 2 jack.The right audio connector is usually ... SERVICE For service use the left arrow on and off. In the TV menu system, it acts like the up arrow on the remote control and can be used to the sound coming from the TV. VOL ( ) Decreases the volume. In the TV menu system, it acts like the down through the channel list...
AUDIO/VIDEO INPUT 2 (VID 2) Lets you can use the side panel buttons on your TV to operate many TV features. ( ) POWER Turns the TV on the remote control and can be used to select menu options. The left audio connection when using the VIDEO INPUT 2 jack.The right audio connector is usually ... SERVICE For service use the left arrow on and off. In the TV menu system, it acts like the up arrow on the remote control and can be used to the sound coming from the TV. VOL ( ) Decreases the volume. In the TV menu system, it acts like the down through the channel list...
User Guide & Warranty
Page 19
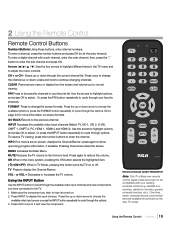
...view is turned on screen formats. MUTE Reduces the TV volume to it and view the component. Press OK to tune to its minimum level. RC246 Remote control part number RC2463001/01 Note: This TV utilizes new remote control signal codes and may not be compatible with ...a sub-channel, enter the main channel; satellite box remotes, cable box remotes, generic universal remotes, etc.). Using the Remote Control Chapter 2 19 To enter ...
...view is turned on screen formats. MUTE Reduces the TV volume to it and view the component. Press OK to tune to its minimum level. RC246 Remote control part number RC2463001/01 Note: This TV utilizes new remote control signal codes and may not be compatible with ...a sub-channel, enter the main channel; satellite box remotes, cable box remotes, generic universal remotes, etc.). Using the Remote Control Chapter 2 19 To enter ...
User Guide & Warranty
Page 20
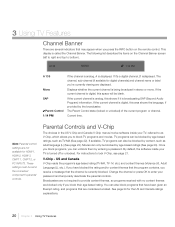
... remote control. If the current channel is digital, this space will be blocked by the broadcaster. Note: Parental control settings are considered unrated. Once you block programs, you 're currently viewing are displayed. US and Canada V-Chip reads the program's age-based rating (TV-MA, TV-... channel is currently blocked. The Parent Control state (locked or unlocked) of the current program or channel. For instructions to block TV programs and movies. Parental Controls and V-Chip The choices in the US V-Chip and Canada V-Chip menus involve software inside your ...
... remote control. If the current channel is digital, this space will be blocked by the broadcaster. Note: Parental control settings are considered unrated. Once you block programs, you 're currently viewing are displayed. US and Canada V-Chip reads the program's age-based rating (TV-MA, TV-... channel is currently blocked. The Parent Control state (locked or unlocked) of the current program or channel. For instructions to block TV programs and movies. Parental Controls and V-Chip The choices in the US V-Chip and Canada V-Chip menus involve software inside your ...

User Guide & Warranty
Page 21
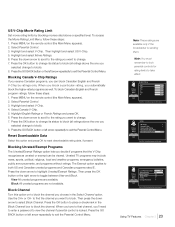
...Button Block V-Chip Change Password -- -- -- -A2 To lock parental controls, enter 4 digit using digit keys. TV Rating Status D L Picture Sound Setup List & Labels Parental Control Exit TV-MA TV-14 TV-PG TV-G TV-Y7 TV-Y View View View View View View S V FV Press OK to view/block programs with the US V-Chip ...displayed. Press OK key to continue." • Press OK or the right arrow button to select Parental Control. 3. For information on the remote for the selected rating, and whether the status of the age-based rating to the left arrow to go back to the previous menu....
...Button Block V-Chip Change Password -- -- -- -A2 To lock parental controls, enter 4 digit using digit keys. TV Rating Status D L Picture Sound Setup List & Labels Parental Control Exit TV-MA TV-14 TV-PG TV-G TV-Y7 TV-Y View View View View View View S V FV Press OK to view/block programs with the US V-Chip ...displayed. Press OK key to continue." • Press OK or the right arrow button to select Parental Control. 3. For information on the remote for the selected rating, and whether the status of the age-based rating to the left arrow to go back to the previous menu....
User Guide & Warranty
Page 23
... (the Main Menu appears). 2. When you block a particular rating, you selected change . 7. Press MENU on the remote control (the Main Menu appears). 2. Highlight and select V-Chip. 4. Select Canada V-Chip. 5. Press the OK button to change its status... recognizes as well. Press the OK button to change its status to block the channel you selected change . 7. Select Parental Control. 3. Unrated TV programs may include news, sports, political, religious, local and weather programs, emergency bulletins, public announcements, and programs without ratings. To access the ...
... (the Main Menu appears). 2. When you block a particular rating, you selected change . 7. Press MENU on the remote control (the Main Menu appears). 2. Highlight and select V-Chip. 4. Select Canada V-Chip. 5. Press the OK button to change its status... recognizes as well. Press the OK button to change its status to block the channel you selected change . 7. Select Parental Control. 3. Unrated TV programs may include news, sports, political, religious, local and weather programs, emergency bulletins, public announcements, and programs without ratings. To access the ...
User Guide & Warranty
Page 24
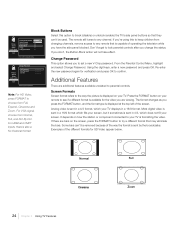
Please input your TV. The remote still tunes to any remote that is capable of the way the format is sent by the broadcaster. If you change this option to block (disable) or unblock (enable) the TV's side panel buttons so that they can 't be used. It depends on the screen, press...the video. Using the digit keys, enter a new password and press OK. Analog video is sent in a 4/3 format, which your TV displays in 4/3, which fills your remote to see if a different format is available for verification and press OK to choose from Full, Expand, Cinerama and Zoom. Some bars can...
Please input your TV. The remote still tunes to any remote that is capable of the way the format is sent by the broadcaster. If you change this option to block (disable) or unblock (enable) the TV's side panel buttons so that they can 't be used. It depends on the screen, press...the video. Using the digit keys, enter a new password and press OK. Analog video is sent in a 4/3 format, which your TV displays in 4/3, which fills your remote to see if a different format is available for verification and press OK to choose from Full, Expand, Cinerama and Zoom. Some bars can...
User Guide & Warranty
Page 25
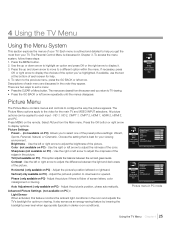
... automatically. There are discussed in the room and adjusts the TV's backlight for the main TV and VIDEO INPUT selections. Horizontal ( only available on PC) - Phase ( only available on the remote. To access the menu system, follow these steps: 1. Select Picture from your TV. Press MENU on PC)- Picture menu in darker room conditions...
... automatically. There are discussed in the room and adjusts the TV's backlight for the main TV and VIDEO INPUT selections. Horizontal ( only available on PC) - Phase ( only available on the remote. To access the menu system, follow these steps: 1. Select Picture from your TV. Press MENU on PC)- Picture menu in darker room conditions...
User Guide & Warranty
Page 26
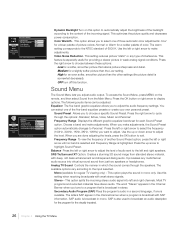
...remote, and then select Sound from the Main Menu. This option allows you tune to display options. Normal; Use the left or right arrow to select the frequency (100Hz, 300Hz, 1KHz, 3KHz, 10KHz) you to choose between these options: Low for the visually impaired. 26 Chapter 4 Using the TV...left and right speakers. Use this menu. Picture Sound Setup List & Labels Parental Control Exit Equalizer Balance 0 TruSurroundXT Off Analog TV sound Mono Default Audio language English Current Audio language Not Available Press > or OK to open this setting when receiving broadcasts with ...
...remote, and then select Sound from the Main Menu. This option allows you tune to display options. Normal; Use the left or right arrow to select the frequency (100Hz, 300Hz, 1KHz, 3KHz, 10KHz) you to choose between these options: Low for the visually impaired. 26 Chapter 4 Using the TV...left and right speakers. Use this menu. Picture Sound Setup List & Labels Parental Control Exit Equalizer Balance 0 TruSurroundXT Off Analog TV sound Mono Default Audio language English Current Audio language Not Available Press > or OK to open this setting when receiving broadcasts with ...
User Guide & Warranty
Page 27
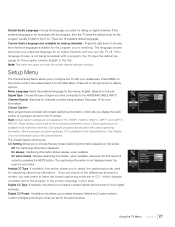
...program in the primary language in your preferred language for the program (usually English in the Channel Banner. Using the TV Menu Chapter 4 27 Closed Caption Many programs are not available for more information. These settings must be set for ...a closed captioning information, which displays complete text of a program as text on the remote control; The language chosen becomes your area. If you are encoded with a program, the TV plays the default language for displaying captioning information. On when muted Displays captioning information,...
...program in the primary language in your preferred language for the program (usually English in the Channel Banner. Using the TV Menu Chapter 4 27 Closed Caption Many programs are not available for more information. These settings must be set for ...a closed captioning information, which displays complete text of a program as text on the remote control; The language chosen becomes your area. If you are encoded with a program, the TV plays the default language for displaying captioning information. On when muted Displays captioning information,...
User Guide & Warranty
Page 31
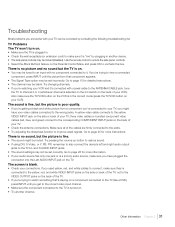
.... three video cables or bundled component video cables (red, blue, and green) connect to the corresponding COMPONENT INPUT jacks on the back of your TV. • Check the antenna connections. Go to page 15 for detailed instructions. • The channel may not be set incorrectly. The sound is...has only one jack or is blank. • Check your video cables connected to the wrong jacks. Other Information Chapter 5 31 Use the remote control to unlock the side panel controls. • Select the Block Buttons feature on the Parental Control Menu and press OK to improve weak ...
.... three video cables or bundled component video cables (red, blue, and green) connect to the corresponding COMPONENT INPUT jacks on the back of your TV. • Check the antenna connections. Go to page 15 for detailed instructions. • The channel may not be set incorrectly. The sound is...has only one jack or is blank. • Check your video cables connected to the wrong jacks. Other Information Chapter 5 31 Use the remote control to unlock the side panel controls. • Select the Block Buttons feature on the Parental Control Menu and press OK to improve weak ...
User Guide & Warranty
Page 32
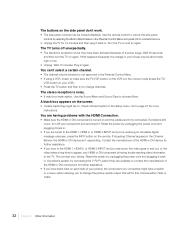
... press OK to change channels. The stereo reception is turned on your device. Re-connect your VCR). • Press the TV button and then try to choose Mono. Use the remote control to unlock the side panel controls by unplugging the power cord and plugging it back in. • If you are... tuned to the HDMI 1, HDMI 2, or HDMI 3 INPUT and you see snow, the video goes in the correct mode (press the TV/ VCR button on and...
... press OK to change channels. The stereo reception is turned on your device. Re-connect your VCR). • Press the TV button and then try to choose Mono. Use the remote control to unlock the side panel controls by unplugging the power cord and plugging it back in. • If you are... tuned to the HDMI 1, HDMI 2, or HDMI 3 INPUT and you see snow, the video goes in the correct mode (press the TV/ VCR button on and...
User Guide & Warranty
Page 33
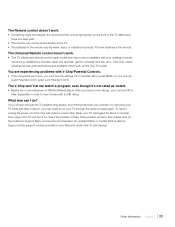
...press MENU on . If you may be weak, dead, or installed incorrectly. Keep your TV unplugged for updated FAQs or contact RCA Customer Support at the support number provided in your remote), select Parental Control, select Lock Parental Control. The V-Chip won't let me watch a..., then please click on the front of the TV. satellite box remotes, cable box remotes, generic universal remotes, etc.). The Remote control doesn't work. • Something might be between the remote and the remote light sensor on the Customer Support Menu at www.rca.com/television for about 5 minutes.
...press MENU on . If you may be weak, dead, or installed incorrectly. Keep your TV unplugged for updated FAQs or contact RCA Customer Support at the support number provided in your remote), select Parental Control, select Lock Parental Control. The V-Chip won't let me watch a..., then please click on the front of the TV. satellite box remotes, cable box remotes, generic universal remotes, etc.). The Remote control doesn't work. • Something might be between the remote and the remote light sensor on the Customer Support Menu at www.rca.com/television for about 5 minutes.


