User Guide & Warranty
Page 2
... registered at www.rca.com/television. For disposal or recycling information, please contact your remote control puts the TV into a very low-power standby mode but will need them. Therefore, you should make sure the surface or stand is of adequate size and strength to rain or moisture. Don't place the TV on this product to prevent the TV from the rear of electric...
... registered at www.rca.com/television. For disposal or recycling information, please contact your remote control puts the TV into a very low-power standby mode but will need them. Therefore, you should make sure the surface or stand is of adequate size and strength to rain or moisture. Don't place the TV on this product to prevent the TV from the rear of electric...
User Guide & Warranty
Page 4
... a Component with HDMI (Best 11 Connecting a PC Component ...12 Viewing the Picture from the Connected Component 13 Viewing a PC...13 Plug in the TV ...14 Put Batteries in the Remote ...14 Turn on Your TV 18 Side Input Jacks ...18 Side Panel Buttons ...18 4 Table of Contents Important Information ...i Important Safety Instructions ...i Chapter 1 I Connections and Setup Before Initial Setup ...6 Protect Against Power Surges ...6 Safety Information ...6 Avoid Audio Interference ...6 Avoid Direct Light ...6 Check Supplied Parts ...6 Removing the Table Stand ...7 Mounting Your TV to the Wall...
... a Component with HDMI (Best 11 Connecting a PC Component ...12 Viewing the Picture from the Connected Component 13 Viewing a PC...13 Plug in the TV ...14 Put Batteries in the Remote ...14 Turn on Your TV 18 Side Input Jacks ...18 Side Panel Buttons ...18 4 Table of Contents Important Information ...i Important Safety Instructions ...i Chapter 1 I Connections and Setup Before Initial Setup ...6 Protect Against Power Surges ...6 Safety Information ...6 Avoid Audio Interference ...6 Avoid Direct Light ...6 Check Supplied Parts ...6 Removing the Table Stand ...7 Mounting Your TV to the Wall...
User Guide & Warranty
Page 7
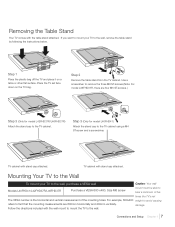
... mount your TV to the wall, purchase a VESA wall Caution: Your wall Models L40FHD41/L42FHD37R/L46FHD37R Purchase a VESA 600 x400, Size M6 screw mount must be able to the wall, remove the table stand by following the instructions below. TV cabinet with the table stand attached. Place the TV set face down on a table or other flat surface. Step 2 Remove the table stand from the TV cabinet. Follow the directions included with stand cap attached. Connections and Setup Chapter 1 7 Removing the Table Stand Your TV...
... mount your TV to the wall, purchase a VESA wall Caution: Your wall Models L40FHD41/L42FHD37R/L46FHD37R Purchase a VESA 600 x400, Size M6 screw mount must be able to the wall, remove the table stand by following the instructions below. TV cabinet with the table stand attached. Place the TV set face down on a table or other flat surface. Step 2 Remove the table stand from the TV cabinet. Follow the directions included with stand cap attached. Connections and Setup Chapter 1 7 Removing the Table Stand Your TV...
User Guide & Warranty
Page 8
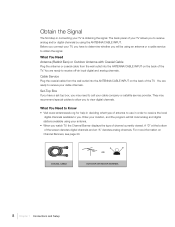
... TV. Cable Service Plug the coaxial cable from the wall outlet into the ANTENNA/CABLE INPUT on Channel Banners, see page 20. What You Need to receive analog and/or digital channels by using your TV allows you . Set-Top Box If you have to determine whether you will list local analog and digital stations available using the ANTENNA/CABLE INPUT. They may need to receive your TV is obtaining the signal. The back panel of your antenna. • When you to receive...
... TV. Cable Service Plug the coaxial cable from the wall outlet into the ANTENNA/CABLE INPUT on Channel Banners, see page 20. What You Need to receive analog and/or digital channels by using your TV allows you . Set-Top Box If you have to determine whether you will list local analog and digital stations available using the ANTENNA/CABLE INPUT. They may need to receive your TV is obtaining the signal. The back panel of your antenna. • When you to receive...
User Guide & Warranty
Page 11
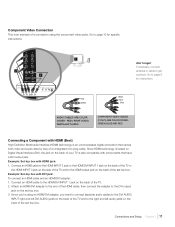
... for instructions. RED= RIGHT AUDIO, WHITE=LEFT AUDIO COMPONENT VIDEO CABLES (Y Pb Pr) ARE COLOR CODEDGREEN, BLUE AND RED Connecting a Component with components that carries both video and audio data by way of a connection using an HDMI/DVI adapter, you need to connect separate audio cables to the DVI AUDIO INPUT right and left DVI AUDIO jacks on the back of the TV and to the HDMI output jack on the back of the set-top box. Red White Green Red Blue AUDIO CABLES ARE COLOR CODED - Example: Set-top box...
... for instructions. RED= RIGHT AUDIO, WHITE=LEFT AUDIO COMPONENT VIDEO CABLES (Y Pb Pr) ARE COLOR CODEDGREEN, BLUE AND RED Connecting a Component with components that carries both video and audio data by way of a connection using an HDMI/DVI adapter, you need to connect separate audio cables to the DVI AUDIO INPUT right and left DVI AUDIO jacks on the back of the TV and to the HDMI output jack on the back of the set-top box. Red White Green Red Blue AUDIO CABLES ARE COLOR CODED - Example: Set-top box...
User Guide & Warranty
Page 12
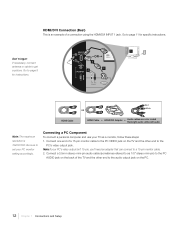
... necessary, connect antenna or cable to page 8 for specific instructions. Note: If your PC monitor setting accordingly. HDMI/DVI INPUT 1 AUDIO PC INPUT VIDEO HDMI Cable Red White OR HDMI Cable + HDMI/DVI Adapter + Audio cables are color coded Red=right audio; HDMI/DVI Connection (Best) This is 1920X1080. Go to get a picture. Connecting a PC Component To connect a personal computer and use your TV as 1/8" stereo mini-pin) to the PC AUDIO jack on the back of a 15-pin monitor cable to the PC VIDEO jack on the TV and...
... necessary, connect antenna or cable to page 8 for specific instructions. Note: If your PC monitor setting accordingly. HDMI/DVI INPUT 1 AUDIO PC INPUT VIDEO HDMI Cable Red White OR HDMI Cable + HDMI/DVI Adapter + Audio cables are color coded Red=right audio; HDMI/DVI Connection (Best) This is 1920X1080. Go to get a picture. Connecting a PC Component To connect a personal computer and use your TV as 1/8" stereo mini-pin) to the PC AUDIO jack on the back of a 15-pin monitor cable to the PC VIDEO jack on the TV and...
User Guide & Warranty
Page 15
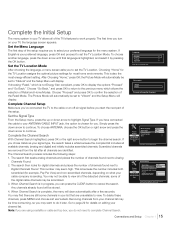
... can press the CLEAR button to begin the channel search. Any channels already found next to work properly. Progress Analog Channels Found Digital Channels Found Antenna 0 0 Channel Search in progress, you may be set the TV Location Mode. Choosing "Home" for the TV Location assigns the optimal picture settings for digital channels. You may not be stored. 4. When Channel Search is sending. Picture Sound Setup List & Labels Parental Control Exit Menu Language Signal Type Channel Search Closed Caption Time English Cable Start Press OK or...
... can press the CLEAR button to begin the channel search. Any channels already found next to work properly. Progress Analog Channels Found Digital Channels Found Antenna 0 0 Channel Search in progress, you may be set the TV Location Mode. Choosing "Home" for the TV Location assigns the optimal picture settings for digital channels. You may not be stored. 4. When Channel Search is sending. Picture Sound Setup List & Labels Parental Control Exit Menu Language Signal Type Channel Search Closed Caption Time English Cable Start Press OK or...

User Guide & Warranty
Page 17
... red. PC AUDIO (Stereo mini jack) Use to obtain sound when a PC is usually white. Press the OK button to select S-VID. ANTENNA/CABLE INPUT Lets you connect a component that has component video jacks, such as a digital cable box, with a VGA output to the S-Video jack, press the INPUT button on your antenna, cable, or cable box. For mono audio sources, be sure to use the left and right audio cables to connect your TV to receive the signal from another component. DIGITAL AUDIO OUTPUT (coaxial) Use a digital coaxial cable...
... red. PC AUDIO (Stereo mini jack) Use to obtain sound when a PC is usually white. Press the OK button to select S-VID. ANTENNA/CABLE INPUT Lets you connect a component that has component video jacks, such as a digital cable box, with a VGA output to the S-Video jack, press the INPUT button on your antenna, cable, or cable box. For mono audio sources, be sure to use the left and right audio cables to connect your TV to receive the signal from another component. DIGITAL AUDIO OUTPUT (coaxial) Use a digital coaxial cable...
User Guide & Warranty
Page 19
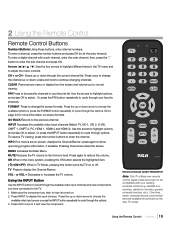
... view is turned on screen formats. Or press the INPUT button repeatedly to browse the channels in TV Mode, pressing this button turns the TV on -screen, displays the Channel Banner; FAV Press to cycle through the options. 2 Using the Remote Control Remote Control Buttons Number Buttons Using these buttons, enter channel numbers. Or press the FAV button repeatedly to cycle through options. Press the up the new TV codes. INPUT Accesses the available video input channels (Watch TV, VID 1, VID 2, S-VID, CMPT 1, CMPT 2, PC, HDMI 1, HDMI 2 and HDMI...
... view is turned on screen formats. Or press the INPUT button repeatedly to browse the channels in TV Mode, pressing this button turns the TV on -screen, displays the Channel Banner; FAV Press to cycle through the options. 2 Using the Remote Control Remote Control Buttons Number Buttons Using these buttons, enter channel numbers. Or press the FAV button repeatedly to cycle through options. Press the up the new TV codes. INPUT Accesses the available video input channels (Watch TV, VID 1, VID 2, S-VID, CMPT 1, CMPT 2, PC, HDMI 1, HDMI 2 and HDMI...
User Guide & Warranty
Page 20
... TV programs and movies. Broadcasters are blocked only if you press the INFO button on the Channel Banner screen (left to right and top to lock V-Chip, see page 21. If it is being broadcast in the connected component's parental controls. V-Chip - You can only be set in stereo or mono. See page 34 for HDMI 1, HDMI 2, HDMI 3, CMPT 1, CMPT 2, or PC INPUTS. This display is displayed...
... TV programs and movies. Broadcasters are blocked only if you press the INFO button on the Channel Banner screen (left to right and top to lock V-Chip, see page 21. If it is being broadcast in the connected component's parental controls. V-Chip - You can only be set in stereo or mono. See page 34 for HDMI 1, HDMI 2, HDMI 3, CMPT 1, CMPT 2, or PC INPUTS. This display is displayed...
User Guide & Warranty
Page 23
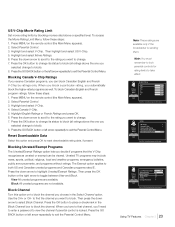
... the GO BACK button or left arrow repeatedly to take effect. Note: These ratings are available only if the broadcaster is locked. Note: You must remember to lock parental controls for rating limits to exit the Parental Control Menu. Picture Sound Setup List & Labels Parental Control Exit Lock Parental Control Select Channel Block Channel Button Block V-Chip Change Password -- -- -- -A2 Press > or OK to that the V-Chip recognizes as well. Using TV Features Chapter...
... the GO BACK button or left arrow repeatedly to take effect. Note: These ratings are available only if the broadcaster is locked. Note: You must remember to lock parental controls for rating limits to exit the Parental Control Menu. Picture Sound Setup List & Labels Parental Control Exit Lock Parental Control Select Channel Block Channel Button Block V-Chip Change Password -- -- -- -A2 Press > or OK to that the V-Chip recognizes as well. Using TV Features Chapter...
User Guide & Warranty
Page 26
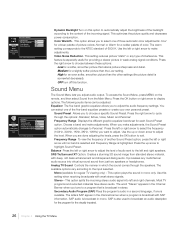
... TV viewing only) - Balance Press the left or right arrow to adjust the level of interference. Analog TV Sound Controls the manner in the Channel Banner when you to select one is somewhat decreased). Advanced Settings Picture Sound Setup List & Labels Parental Control Exit Light Sensor Dynamic Backlight Color Warmth Noise Reduction Off On Cool Off Press > or OK to change this menu. Picture Sound Setup List & Labels Parental Control Exit Equalizer Balance 0 TruSurroundXT Off Analog TV sound Mono Default Audio...
... TV viewing only) - Balance Press the left or right arrow to adjust the level of interference. Analog TV Sound Controls the manner in the Channel Banner when you to select one is somewhat decreased). Advanced Settings Picture Sound Setup List & Labels Parental Control Exit Light Sensor Dynamic Backlight Color Warmth Noise Reduction Off On Cool Off Press > or OK to change this menu. Picture Sound Setup List & Labels Parental Control Exit Equalizer Balance 0 TruSurroundXT Off Analog TV sound Mono Default Audio...
User Guide & Warranty
Page 27
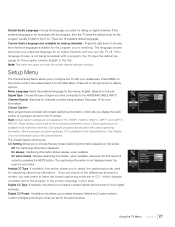
... program, the TV plays the default language for more information about the Channel Banner. then select Setup from the list of a program as text on the remote control; Note: Closed caption settings are 16 available default languages. See Chapter 3 for PC, HDMI 1, HDMI 2, HDMI 3, CMPT 1 and CMPT 2 INPUTS. Off No captioning information displayed. Analog CC Type If available, this setting. Custom changes according to select the captioning mode used for the options below. Closed Caption Picture Sound Setup List & Labels Parental Control Exit CC Setting Analog CC Type Digital...
... program, the TV plays the default language for more information about the Channel Banner. then select Setup from the list of a program as text on the remote control; Note: Closed caption settings are 16 available default languages. See Chapter 3 for PC, HDMI 1, HDMI 2, HDMI 3, CMPT 1 and CMPT 2 INPUTS. Off No captioning information displayed. Analog CC Type If available, this setting. Custom changes according to select the captioning mode used for the options below. Closed Caption Picture Sound Setup List & Labels Parental Control Exit CC Setting Analog CC Type Digital...

User Guide & Warranty
Page 28
... the color of the digital closed caption text: White, Red, Green, Blue, Yellow, Magenta, Cyan or Black. TIME Picture Sound Setup List & Labels Parental Control Exit Enter Time 1:42PM Automatically Acquire time Off Time Zone Eastern Daylight Saving Off Sleep Timer 5min. Daylight Saving Choose OFF to ignore Daylight Savings information on true digital closed captions. Digital CC Style Picture Sound Setup List & Labels Parental Control Exit Digital CC Size Digital CC Font Digital CC Opacity Digital CC Color Digital CC Background Opacity Digital CC Background Color Small...
... the color of the digital closed caption text: White, Red, Green, Blue, Yellow, Magenta, Cyan or Black. TIME Picture Sound Setup List & Labels Parental Control Exit Enter Time 1:42PM Automatically Acquire time Off Time Zone Eastern Daylight Saving Off Sleep Timer 5min. Daylight Saving Choose OFF to ignore Daylight Savings information on true digital closed captions. Digital CC Style Picture Sound Setup List & Labels Parental Control Exit Digital CC Size Digital CC Font Digital CC Opacity Digital CC Color Digital CC Background Opacity Digital CC Background Color Small...
User Guide & Warranty
Page 31
... with your TV can be locked (disabled). Also make sure you have your video cables connected to page 15 for detailed instructions. • The channel may be set incorrectly. Other Information Chapter 5 31 Use the remote control to unlock the side panel controls. • Select the Block Buttons feature on the Parental Control Menu and press OK to the yellow VIDEO INPUT jack on your connections. three video cables or bundled component video cables (red, blue, and green) connect to...
... with your TV can be locked (disabled). Also make sure you have your video cables connected to page 15 for detailed instructions. • The channel may be set incorrectly. Other Information Chapter 5 31 Use the remote control to unlock the side panel controls. • Select the Block Buttons feature on the Parental Control Menu and press OK to the yellow VIDEO INPUT jack on your connections. three video cables or bundled component video cables (red, blue, and green) connect to...
User Guide & Warranty
Page 32
Turn the TV on . Use the Sound Menu and Sound Type to the TV. If this . Check Closed Caption in the Channel Banner, the HDMI or DVI device isn't responding. If Acquiring Channel appears in the Setup menu. The stereo reception is noisy. • It may be on and try to change channels. If problems still occur, turn the TV on the remote. Plug in . A black box appears on the screen. • Closed captioning might have a switch or a menu option...
Turn the TV on . Use the Sound Menu and Sound Type to the TV. If this . Check Closed Caption in the Channel Banner, the HDMI or DVI device isn't responding. If Acquiring Channel appears in the Setup menu. The stereo reception is noisy. • It may be on and try to change channels. If problems still occur, turn the TV on the remote. Plug in . A black box appears on the screen. • Closed captioning might have a switch or a menu option...
User Guide & Warranty
Page 33
... Remote control doesn't work . • This TV utilizes new remote control signal codes and may need to the Main Menu (press MENU on your TV through the Troubleshooting section and nothing has fixed your problem, try rebooting your existing universal remote (e.g. Then plug in the remote may be weak, dead, or installed incorrectly. satellite box remotes, cable box remotes, generic universal remotes, etc.). If you've been through the setup process again. The V-Chip won't let me watch a program...
... Remote control doesn't work . • This TV utilizes new remote control signal codes and may need to the Main Menu (press MENU on your TV through the Troubleshooting section and nothing has fixed your problem, try rebooting your existing universal remote (e.g. Then plug in the remote may be weak, dead, or installed incorrectly. satellite box remotes, cable box remotes, generic universal remotes, etc.). If you've been through the setup process again. The V-Chip won't let me watch a program...
User Guide & Warranty
Page 36
... based upon the TTE Limited Warranty statement. • At the sole discretion of TTE, television screen sizes 32" and smaller is either consumer carry-in materials or workmanship to repair your television, or replace your purchase: • Ninety (90) days from date of purchase and model/serial number ready. See "How to get service" New LCD Televisions - See "How to get service" How to get service...
... based upon the TTE Limited Warranty statement. • At the sole discretion of TTE, television screen sizes 32" and smaller is either consumer carry-in materials or workmanship to repair your television, or replace your purchase: • Ninety (90) days from date of purchase and model/serial number ready. See "How to get service" New LCD Televisions - See "How to get service" How to get service...
User Guide & Warranty
Page 38
... the product is determined that your unit requires service, the service location will do: At TTE's discretion, pay an Authorized RCA Service Centre for both labor charges and parts to repair your television, or replace your problem over the phone. • If it is within the warranty period must be presented to get service: • Call 1-800-951-9582. and/or •...
... the product is determined that your unit requires service, the service location will do: At TTE's discretion, pay an Authorized RCA Service Centre for both labor charges and parts to repair your television, or replace your problem over the phone. • If it is within the warranty period must be presented to get service: • Call 1-800-951-9582. and/or •...
Spec Sheet
Page 2
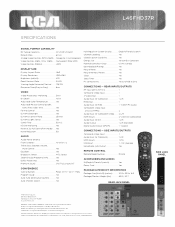
... Light Sensor Yes HDMI Inputs 2 V1.3 (1 DVI compatible) Audio Input for Composite 1 L/R HDMI Inputs 1 V1.3 Front Speakers 10 W/CH x 2 USB Input 1 - Product features, definitions and physical specifications are trademarks of Dolby Laboratories. SIDE JACK PANEL SIDE JACK PANEL RCA and associated marks are subject to Gray 8ms VIDEO CONNECTIONS - Component, RGB, HDMI Video Formats (1080p HDMI DISPLAY SIZE Multilingual On-Screen-Display English/French/Spanish Channel Labelling Yes Closed Caption Capability Yes Energy Star Version 3.0 Compliant Parental control...
... Light Sensor Yes HDMI Inputs 2 V1.3 (1 DVI compatible) Audio Input for Composite 1 L/R HDMI Inputs 1 V1.3 Front Speakers 10 W/CH x 2 USB Input 1 - Product features, definitions and physical specifications are trademarks of Dolby Laboratories. SIDE JACK PANEL SIDE JACK PANEL RCA and associated marks are subject to Gray 8ms VIDEO CONNECTIONS - Component, RGB, HDMI Video Formats (1080p HDMI DISPLAY SIZE Multilingual On-Screen-Display English/French/Spanish Channel Labelling Yes Closed Caption Capability Yes Energy Star Version 3.0 Compliant Parental control...


