
Brochure
Page 1
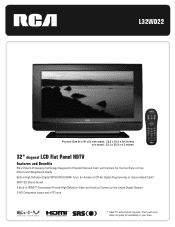
... to the Latest Digital Devices 2 HD Component Inputs and a PC Input * Cable TV subscription required. L32WD22 Product Size (H x W x D) with stand: 23.9 x 33.0 x 9.4 inches w/o stand: 22.2 x 33.0 x 4.2 inches 32" diagonal LCD Flat Panel HDTV Features and Benefits EN-V Picture Processing Technology Designed to Provide Enhanced Color and Contrast So You Can Enjoy a Crisp...
... to the Latest Digital Devices 2 HD Component Inputs and a PC Input * Cable TV subscription required. L32WD22 Product Size (H x W x D) with stand: 23.9 x 33.0 x 9.4 inches w/o stand: 22.2 x 33.0 x 4.2 inches 32" diagonal LCD Flat Panel HDTV Features and Benefits EN-V Picture Processing Technology Designed to Provide Enhanced Color and Contrast So You Can Enjoy a Crisp...
Brochure
Page 2
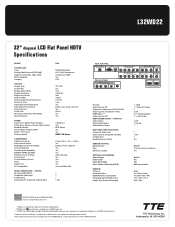
... VIDEO S-VIDEO INPUT COMPONENT VIDEO INPUT 2 COMPOSITE VIDEO OUTPUT DIGITAL AUDIO (1080i/720p/480p/480i) OUTPUT R -- L32WD22 32" diagonal LCD Flat Panel HDTV Specifications BRAND TECHNOLOGY Tuner Analog Video Formats (NTSC/480i) Video Formats (480p, 720p, 1080i... Labelling Closed Caption Capability ENERGY STAR® Qualified Parental Control (V-Chip) Picture Reset Picture Memory Presets Clock Sleep Timer PC Compatibility REAR CONNECTIONS - AUDIO -- AUDIO -- RCA and associated marks are trademarks or registered trademarks of THOMSON S.A. OUTPUTS Audio...
... VIDEO S-VIDEO INPUT COMPONENT VIDEO INPUT 2 COMPOSITE VIDEO OUTPUT DIGITAL AUDIO (1080i/720p/480p/480i) OUTPUT R -- L32WD22 32" diagonal LCD Flat Panel HDTV Specifications BRAND TECHNOLOGY Tuner Analog Video Formats (NTSC/480i) Video Formats (480p, 720p, 1080i... Labelling Closed Caption Capability ENERGY STAR® Qualified Parental Control (V-Chip) Picture Reset Picture Memory Presets Clock Sleep Timer PC Compatibility REAR CONNECTIONS - AUDIO -- AUDIO -- RCA and associated marks are trademarks or registered trademarks of THOMSON S.A. OUTPUTS Audio...
User Manual
Page 5
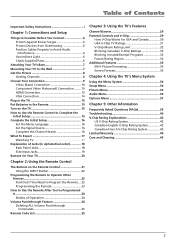
... Properly to Avoid Audio Interference 6 Use Indirect Light 6 Check Supplied Parts 6 Attaching Your TV's Base 7 Mounting Your TV to the Wall 7 Get the Picture 8 Getting Channels 8 Choose Your Connection 9 Video (Basic) Connection 10 Component Video (Advanced) Connection ........ 10 HDMI Connection 12 VGA Connection 14 Plug in the... Limit 32 Blocking Canadian V-Chip Ratings 32 Blocking Unrated/Exempt Programs 32 Future Rating Region 32 Additional Features 33 EN-V Picture Processing 33 Screen Formats 33 Chapter 4: Using the TV's Menu System Using the Menu System 34 Setup Menu 34...
... Properly to Avoid Audio Interference 6 Use Indirect Light 6 Check Supplied Parts 6 Attaching Your TV's Base 7 Mounting Your TV to the Wall 7 Get the Picture 8 Getting Channels 8 Choose Your Connection 9 Video (Basic) Connection 10 Component Video (Advanced) Connection ........ 10 HDMI Connection 12 VGA Connection 14 Plug in the... Limit 32 Blocking Canadian V-Chip Ratings 32 Blocking Unrated/Exempt Programs 32 Future Rating Region 32 Additional Features 33 EN-V Picture Processing 33 Screen Formats 33 Chapter 4: Using the TV's Menu System Using the Menu System 34 Setup Menu 34...

User Manual
Page 7
... Your TV to the Wall Caution: The wall mount must bear a minimum of screws are located relatively in the same place as the pictures to the wall. For models L32WD22 and L32WD23, purchase a VESA 200 x 200, M6 screw. Place the TV facedown on a surface that you need to purchase a VESA wall mount... is attached, you want to mount your TV either to its base or to remove the screws from the holes as shown above in the picture to the Wall instructions below. 1. The models with the screw holes inside the base. Follow the directions included with the wall mount to mount the...
... Your TV to the Wall Caution: The wall mount must bear a minimum of screws are located relatively in the same place as the pictures to the wall. For models L32WD22 and L32WD23, purchase a VESA 200 x 200, M6 screw. Place the TV facedown on a surface that you need to purchase a VESA wall mount... is attached, you want to mount your TV either to its base or to remove the screws from the holes as shown above in the picture to the Wall instructions below. 1. The models with the screw holes inside the base. Follow the directions included with the wall mount to mount the...

User Manual
Page 8
... your cable company or satellite service provider. What You Need To Know • Visit www.antennaweb.org to get the picture, also known as A Ch 9. Connections and Setup Get the Picture The first part of connecting your TV is to get help deciding what type of channel you're viewing. If...
... your cable company or satellite service provider. What You Need To Know • Visit www.antennaweb.org to get the picture, also known as A Ch 9. Connections and Setup Get the Picture The first part of connecting your TV is to get help deciding what type of channel you're viewing. If...
User Manual
Page 10
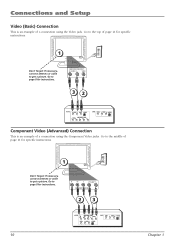
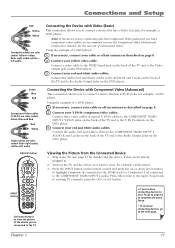
...Y R AUDIO L COMPONENT VIDEO INPUT 1 23 OUTPUT Pr COMPONENT VIDEO Pb Y R AUDIO L VIDEO L AUDIO R S-VIDEO INPUT VIDEO L AUDIO R S-VIDEO Chapter 1 Go to get a picture. Go to page 8 for specific instructions. 10 1 Don't forget: If necessary, connect antenna or cable to the middle of page 11 for instructions. Go... specific instructions. 1 Don't forget: If necessary, connect antenna or cable to the top of page 11 for instructions. Go to get a picture. Connections and Setup Video (Basic) Connection This is an example of a connection using the Video jack.
...Y R AUDIO L COMPONENT VIDEO INPUT 1 23 OUTPUT Pr COMPONENT VIDEO Pb Y R AUDIO L VIDEO L AUDIO R S-VIDEO INPUT VIDEO L AUDIO R S-VIDEO Chapter 1 Go to get a picture. Go to page 8 for specific instructions. 10 1 Don't forget: If necessary, connect antenna or cable to the middle of page 11 for instructions. Go... specific instructions. 1 Don't forget: If necessary, connect antenna or cable to the top of page 11 for instructions. Go to get a picture. Connections and Setup Video (Basic) Connection This is an example of a connection using the Video jack.
User Manual
Page 11
... GO BACK VOL CH GUIDE MUTE INFO MENU CLEAR INPUT button INPUT SOUND SUB CH FAVORITE PRESETS SLEEP CC Use these buttons to view the picture of the TV and to the TV. Using the example of a DVD player: 1. Connecting the Device with Video (Basic) This connection allows... 're done connecting devices to the COMPONENT VIDEO INPUT 1 jacks). If necessary, connect your yellow video cable. Red= right audio; Viewing the Picture from the Connected Device 1. Turn on the DVD player. Connections and Setup Red Yellow White Composite cables are color coded- Connect your cable or ...
... GO BACK VOL CH GUIDE MUTE INFO MENU CLEAR INPUT button INPUT SOUND SUB CH FAVORITE PRESETS SLEEP CC Use these buttons to view the picture of the TV and to the TV. Using the example of a DVD player: 1. Connecting the Device with Video (Basic) This connection allows... 're done connecting devices to the COMPONENT VIDEO INPUT 1 jacks). If necessary, connect your yellow video cable. Red= right audio; Viewing the Picture from the Connected Device 1. Turn on the DVD player. Connections and Setup Red Yellow White Composite cables are color coded- Connect your cable or ...
User Manual
Page 12
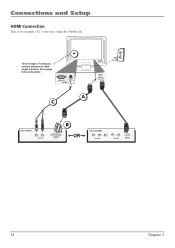
Go to get a picture. VGA INPUT AUDIO INPUT PC INPUT A C HDMI 1 INPUT Device with DVI L R Audio Out B OR DVI Out Device with HDMI Y Pb Pr Video Out R L Audio Out HDMI Out 12 Chapter 1 Connections and Setup HDMI Connection This is an example of a connection using the HDMI jack. * *Don't forget: If necessary, connect antenna or cable to page 8 for instructions.
Go to get a picture. VGA INPUT AUDIO INPUT PC INPUT A C HDMI 1 INPUT Device with DVI L R Audio Out B OR DVI Out Device with HDMI Y Pb Pr Video Out R L Audio Out HDMI Out 12 Chapter 1 Connections and Setup HDMI Connection This is an example of a connection using the HDMI jack. * *Don't forget: If necessary, connect antenna or cable to page 8 for instructions.
User Manual
Page 13
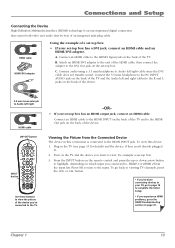
... GO BACK VOL CH GUIDE MUTE INFO MENU CLEAR INPUT button INPUT SOUND SUB CH FAVORITE PRESETS SLEEP CC Use these buttons to view the picture of the device you connected to, HDMI 1 or HDMI 2 from the Connected Device The device in . 2. Connect an HDMI cable to the HDMI1 Input jack... the TV and the Audio left and right cables to the DVI Out jack on the back of an integrated mini-plug cable. Viewing the Picture from the input list. Plug in the TV (see page 15 for example a set -top box has a DVI jack, connect an HDMI cable and an...
... GO BACK VOL CH GUIDE MUTE INFO MENU CLEAR INPUT button INPUT SOUND SUB CH FAVORITE PRESETS SLEEP CC Use these buttons to view the picture of the device you connected to, HDMI 1 or HDMI 2 from the Connected Device The device in . 2. Connect an HDMI cable to the HDMI1 Input jack... the TV and the Audio left and right cables to the DVI Out jack on the back of an integrated mini-plug cable. Viewing the Picture from the input list. Plug in the TV (see page 15 for example a set -top box has a DVI jack, connect an HDMI cable and an...
User Manual
Page 14
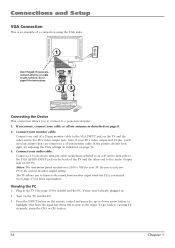
... PC 1. button. 14 Chapter 1 Connections and Setup VGA Connection This is connected. Note, if your PC to the sound from the input list. If the picture doesn't look right, try adjusting the VGA settings as explained on the TV and the PC. 3. Notes: The maximum panel resolution is 1360 x 768 for... or down arrow button to highlight VGA from another input while the PC is an example of the TV and the other end to get a picture. Turn on page 36. 3. Press the INPUT button on the back of a connection using the VGA jacks. 1 Don't forget: If necessary, connect antenna or cable...
... PC 1. button. 14 Chapter 1 Connections and Setup VGA Connection This is connected. Note, if your PC to the sound from the input list. If the picture doesn't look right, try adjusting the VGA settings as explained on the TV and the PC. 3. Notes: The maximum panel resolution is 1360 x 768 for... or down arrow button to highlight VGA from another input while the PC is an example of the TV and the other end to get a picture. Turn on page 36. 3. Press the INPUT button on the back of a connection using the VGA jacks. 1 Don't forget: If necessary, connect antenna or cable...
User Manual
Page 17
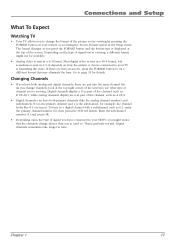
... 6.1 on screen. To tune to tune. Connections and Setup What To Expect Watching TV • Your TV allows you to change the format of the picture you're viewing by pressing the FORMAT button on how the station or device connected to your TV is formatting the video. The format changes...
... 6.1 on screen. To tune to tune. Connections and Setup What To Expect Watching TV • Your TV allows you to change the format of the picture you're viewing by pressing the FORMAT button on how the station or device connected to your TV is formatting the video. The format changes...

User Manual
Page 18
.... • VIDEO Receives video from another device such as a DVD player. The right audio connector is usually red. • COMPONENT VIDEO Y Pb Pr Provides optimum picture quality because the video is usually white. • COMPONENT R AUDIO Provides right audio connection when using Y Pb Pr, make sure you connect another device that...
.... • VIDEO Receives video from another device such as a DVD player. The right audio connector is usually red. • COMPONENT VIDEO Y Pb Pr Provides optimum picture quality because the video is usually white. • COMPONENT R AUDIO Provides right audio connection when using Y Pb Pr, make sure you connect another device that...

User Manual
Page 21
... for more details). To enter a digital channel with an audio system, follow the instructions for Volume Punchthrough Feature on or off . CC Toggles through the picture mode settings: Natural, Vibrant, Gaming, and Personal. CH + or CH - DVD•VCR Places the remote in DVD•VCR mode (see Modes of... the picture on or off . This button lights when you press a valid button in DVD or VCR mode. FAVORITE Press to change the channel up or down ;...
... for more details). To enter a digital channel with an audio system, follow the instructions for Volume Punchthrough Feature on or off . CC Toggles through the picture mode settings: Natural, Vibrant, Gaming, and Personal. CH + or CH - DVD•VCR Places the remote in DVD•VCR mode (see Modes of... the picture on or off . This button lights when you press a valid button in DVD or VCR mode. FAVORITE Press to change the channel up or down ;...

User Manual
Page 33
... 4/3 Normal 16/9 Zoom Stretch Center Chapter 3 33 These features can enjoy a bright, crisp picture. If there are bars on your TV. EN-V picture processing is available for digital video. Picture Processing With a focus on your remote to see if a different format is designed to your ... your TV is sent by the broadcaster. Screen Formats Screen format is the way the picture is sent in other menus. Analog video is displayed on exceptional picture performance, all RCA models feature Enhanced Natural Vision (EN-V). The different formats available and what they look like...
... 4/3 Normal 16/9 Zoom Stretch Center Chapter 3 33 These features can enjoy a bright, crisp picture. If there are bars on your TV. EN-V picture processing is available for digital video. Picture Processing With a focus on your remote to see if a different format is designed to your ... your TV is sent by the broadcaster. Screen Formats Screen format is the way the picture is sent in other menus. Analog video is displayed on exceptional picture performance, all RCA models feature Enhanced Natural Vision (EN-V). The different formats available and what they look like...
User Manual
Page 34
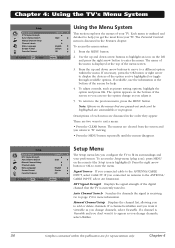
... is displayed at the bottom of your TV. Manual Channel Setup Displays the channel list, allowing you configure the TV to appear as picture setting options, highlight the option and press OK. The name of the menu is receiving. Press the MENU button. 2. If necessary, press the OK button...
... is displayed at the bottom of your TV. Manual Channel Setup Displays the channel list, allowing you configure the TV to appear as picture setting options, highlight the option and press OK. The name of the menu is receiving. Press the MENU button. 2. If necessary, press the OK button...

User Manual
Page 35
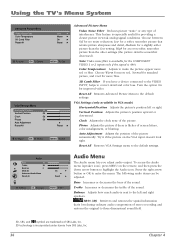
...dark areas of the menu system. Menu Language Allows you select one of the color. You can be applied to add another character. Picture options can have up and down arrow button to scroll through your viewing environment. Color (not available in VGA mode) Adjusts the ... Labels Allows you to add or change a seven character label to a channel, which is displayed on-screen when you turn the setting On. Picture Preset Mode Displays a choice list that may eliminate the bars. Brightness Adjusts the brightness of light, depending on -screen try a different format, if...
...dark areas of the menu system. Menu Language Allows you select one of the color. You can be applied to add another character. Picture options can have up and down arrow button to scroll through your viewing environment. Color (not available in VGA mode) Adjusts the ... Labels Allows you to add or change a seven character label to a channel, which is displayed on-screen when you turn the setting On. Picture Preset Mode Displays a choice list that may eliminate the bars. Brightness Adjusts the brightness of light, depending on -screen try a different format, if...
User Manual
Page 36
...;eld. 3D, SRS, and ( ) symbol are trademarks of stereo recording and restores the original to the left or right. Vertical Position Adjusts the picture's position upward or downward. Audio Bass 30 Treble 30 Balance 0 SRS 3D Advanced Audio Menu Reset All On u u Reset u To Move OK To...remote, and then press the down arrow button to correct detail and color loss. Treble Increases or decreases the treble of the picture. Reset All Restores Advanced Picture Menu to enter the menu. This feature is especially useful for the COMPONENT VIDEO 1 or 2 inputs only if the signal...
...;eld. 3D, SRS, and ( ) symbol are trademarks of stereo recording and restores the original to the left or right. Vertical Position Adjusts the picture's position upward or downward. Audio Bass 30 Treble 30 Balance 0 SRS 3D Advanced Audio Menu Reset All On u u Reset u To Move OK To...remote, and then press the down arrow button to correct detail and color loss. Treble Increases or decreases the treble of the picture. Reset All Restores Advanced Picture Menu to enter the menu. This feature is especially useful for the COMPONENT VIDEO 1 or 2 inputs only if the signal...
User Manual
Page 40
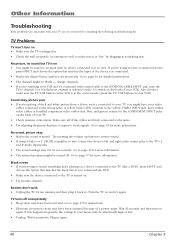
...DVD), press INPUT and choose the option that matches the input of your TV. • Check antenna connections. Sound okay, picture poor • If you're getting a black and white picture from a device you've connected to the wrong jacks. Buttons don't work • Unplug the TV for detailed instructions. ...is in the correct mode (press the TV/VCR button on • Make sure the TV is selected on the 3/4 switch on again. No sound, picture okay • Maybe the sound is "live" by consulting the following troubleshooting list. Go to channel 3 or 4 (whichever channel is plugged in. ...
...DVD), press INPUT and choose the option that matches the input of your TV. • Check antenna connections. Sound okay, picture poor • If you're getting a black and white picture from a device you've connected to the wrong jacks. Buttons don't work • Unplug the TV for detailed instructions. ...is in the correct mode (press the TV/VCR button on • Make sure the TV is selected on the 3/4 switch on again. No sound, picture okay • Maybe the sound is "live" by consulting the following troubleshooting list. Go to channel 3 or 4 (whichever channel is plugged in. ...
User Manual
Page 41
... Captions in the remote. Put new batteries in the Options menu. Re-connect your device. If the problem remains, then please visit www.rca.com/television for further assistance. • If you tune to the HDMI 1 or 2 input and you 've been through the setup process... again. Problems with V-Chip/Parental Controls I don't remember my password and I Do? Contact the manufacturer of your picture, the device you connected might be a weak station. If problems persist, try rebooting your password, select Set Password from the wall outlet, power ...
... Captions in the remote. Put new batteries in the Options menu. Re-connect your device. If the problem remains, then please visit www.rca.com/television for further assistance. • If you tune to the HDMI 1 or 2 input and you 've been through the setup process... again. Problems with V-Chip/Parental Controls I don't remember my password and I Do? Contact the manufacturer of your picture, the device you connected might be a weak station. If problems persist, try rebooting your password, select Set Password from the wall outlet, power ...


