Brochure
Page 2
HD61THW263 Technical Specifications BRAND BRAND PICTURE Screen Size - ... NetConnect is a trademark of Apple Computer, Inc., registered in the United States and/or other countries. RCA, RCA Scenium and associated logos are registered trademarks of Thomson S.A. diagonal (inch) Category Aspect Ratio CRT / Light ... - Back Product Size (WxHxD) inches Packaging Size (WxHxD) inches Weight: Product/Packaged, lbs Base Weight REMOTE CONTROL Model Number Type Backlit INCLUDED ACCESSORIES Instruction Book Languages Infrared Keyboard OPTIONAL ACCESSORIES Stand / Component Cabinet Digital ...
HD61THW263 Technical Specifications BRAND BRAND PICTURE Screen Size - ... NetConnect is a trademark of Apple Computer, Inc., registered in the United States and/or other countries. RCA, RCA Scenium and associated logos are registered trademarks of Thomson S.A. diagonal (inch) Category Aspect Ratio CRT / Light ... - Back Product Size (WxHxD) inches Packaging Size (WxHxD) inches Weight: Product/Packaged, lbs Base Weight REMOTE CONTROL Model Number Type Backlit INCLUDED ACCESSORIES Instruction Book Languages Infrared Keyboard OPTIONAL ACCESSORIES Stand / Component Cabinet Digital ...
User Manual
Page 7
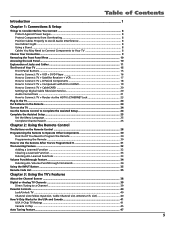
...to Connect: TV + Router via the HDTV's ETHERNET Jack 23 Plug in the TV ...24 Put Batteries in the Remote ...24 Turn on the TV ...24 Use the Remote Control to Complete the Assisted Setup 24 Complete the Assisted Setup ...25 Set the Menu Language ...25 Complete Channel Search ... Clearing a Learned Function 33 Deleting ALL Learned Functions 33 Volume Punchthrough Feature ...34 Deleting ALL Volume Punchthrough Commands 34 Using the INPUT Button ...35 Remote Code List ...35 Chapter 3: Using the TV's Features About the Channel Banner ...38 Digital or Analog TV Channels ...39 Direct Tuning to a ...
...to Connect: TV + Router via the HDTV's ETHERNET Jack 23 Plug in the TV ...24 Put Batteries in the Remote ...24 Turn on the TV ...24 Use the Remote Control to Complete the Assisted Setup 24 Complete the Assisted Setup ...25 Set the Menu Language ...25 Complete Channel Search ... Clearing a Learned Function 33 Deleting ALL Learned Functions 33 Volume Punchthrough Feature ...34 Deleting ALL Volume Punchthrough Commands 34 Using the INPUT Button ...35 Remote Code List ...35 Chapter 3: Using the TV's Features About the Channel Banner ...38 Digital or Analog TV Channels ...39 Direct Tuning to a ...

User Manual
Page 9
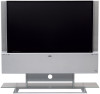
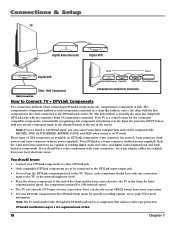
Chapter 1 Connections & Setup Chapter Overview: • Things to Consider Before You Connect • Choose Your Connection • Removing the Front Panel Piece • Accessing the Jack Panel • Explanation of Jacks and Cables • The Front of Your TV • How To Connect • Plug in the TV • Put Batteries in the Remote • Turn on the TV • Use the Remote Control to Complete the Assisted Setup • Complete the Assisted Setup Graphics contained within this publication are for representation only. 7
Chapter 1 Connections & Setup Chapter Overview: • Things to Consider Before You Connect • Choose Your Connection • Removing the Front Panel Piece • Accessing the Jack Panel • Explanation of Jacks and Cables • The Front of Your TV • How To Connect • Plug in the TV • Put Batteries in the Remote • Turn on the TV • Use the Remote Control to Complete the Assisted Setup • Complete the Assisted Setup Graphics contained within this publication are for representation only. 7

User Manual
Page 13
... (video input into video out, right audio input into right audio out, etc.). When connecting cables, be ordered separately by calling the number on the remote control and choose Audio, then Audio Connections. Different jacks and cables provide a different level of the TV. Then choose Fixed/Variable Out from the menu...
... (video input into video out, right audio input into right audio out, etc.). When connecting cables, be ordered separately by calling the number on the remote control and choose Audio, then Audio Connections. Different jacks and cables provide a different level of the TV. Then choose Fixed/Variable Out from the menu...

User Manual
Page 15
... or decoder. Do not connect a telephone cable because of risk of jack (IEC958), and is designed for connecting a wired remote control system, which is for connection to the remote. A green light on the jack means the data is usually white. • Y/Video PB PR Unlike a single video ... second optional component video source, such as a VCR. To ensure maximum picture quality, use the Y/Video jack. Go to the TV using the remote that an active network has been detected. INPUT 4 COMPONENT/COMPOSITE INPUT Provides connection to a second NTSC (analog) video component with a Video jack ...
... or decoder. Do not connect a telephone cable because of risk of jack (IEC958), and is designed for connecting a wired remote control system, which is for connection to the remote. A green light on the jack means the data is usually white. • Y/Video PB PR Unlike a single video ... second optional component video source, such as a VCR. To ensure maximum picture quality, use the Y/Video jack. Go to the TV using the remote that an active network has been detected. INPUT 4 COMPONENT/COMPOSITE INPUT Provides connection to a second NTSC (analog) video component with a Video jack ...
User Manual
Page 17
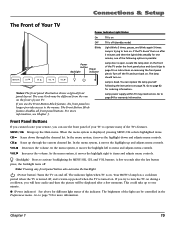
If the TV doesn't turn on. Front Panel Buttons If you cannot locate your remote, you use the front panel of your TV. When the menu system is trying to page 82 for warranty information. The brightness of the light ...
If the TV doesn't turn on. Front Panel Buttons If you cannot locate your remote, you use the front panel of your TV. When the menu system is trying to page 82 for warranty information. The brightness of the light ...

User Manual
Page 18
... 1. If your DVD player doesn't have cable and an off-air antenna, connect the cable signal to CABLE INPUT. A. Press the INPUT button on the remote control to INPUT 1 (R and L-Audio, and V-Video) on the TV instead of the composite video or S-Video connection. 3. B. CABLE INPUT INPUT 1 INPUT 3 R R L L COMPOSITE INPUTS V V S-VIDEO.../video inputs to the correct Video Input Channel. Note: You can set up the TV to automatically tune to AUDIO/VIDEO OUTPUT jacks on the remote control. 3.
... 1. If your DVD player doesn't have cable and an off-air antenna, connect the cable signal to CABLE INPUT. A. Press the INPUT button on the remote control to INPUT 1 (R and L-Audio, and V-Video) on the TV instead of the composite video or S-Video connection. 3. B. CABLE INPUT INPUT 1 INPUT 3 R R L L COMPOSITE INPUTS V V S-VIDEO.../video inputs to the correct Video Input Channel. Note: You can set up the TV to automatically tune to AUDIO/VIDEO OUTPUT jacks on the remote control. 3.

User Manual
Page 19
... signal to scroll through the Video Input Channels. • View the VCR on the INPUT 2 channel. • View the satellite receiver on the remote control to CABLE INPUT. Turn on the TV and the component(s) you can set up the TV to automatically tune to your TV. B. This enables...INPUT PB PB Y/VIDEO Y/VIDEO INPUT 2 INPUT 4 1 VIDEO R AUDIO L S-VIDEO SATELLITE RECEIVER 3 OFF-AIR ANTENNA How to INPUT 2 (R and L-Audio, and V-Video) on the remote control. 3. Connect the VCR's audio/video outputs to Connect: TV + Satellite Receiver + VCR 1. Viewing the Components 1.
... signal to scroll through the Video Input Channels. • View the VCR on the INPUT 2 channel. • View the satellite receiver on the remote control to CABLE INPUT. Turn on the TV and the component(s) you can set up the TV to automatically tune to your TV. B. This enables...INPUT PB PB Y/VIDEO Y/VIDEO INPUT 2 INPUT 4 1 VIDEO R AUDIO L S-VIDEO SATELLITE RECEIVER 3 OFF-AIR ANTENNA How to INPUT 2 (R and L-Audio, and V-Video) on the remote control. 3. Connect the VCR's audio/video outputs to Connect: TV + Satellite Receiver + VCR 1. Viewing the Components 1.
User Manual
Page 20
The component-to-component method is each component connected in a chain-like RECORD, STOP, FAST FORWARD, REVERSE, PAUSE, and PLAY when remote is a 6-pin connector (without power supplied). Your DTVLink is in the chain connected to the TV, or the network might not work. • Place the ...
The component-to-component method is each component connected in a chain-like RECORD, STOP, FAST FORWARD, REVERSE, PAUSE, and PLAY when remote is a 6-pin connector (without power supplied). Your DTVLink is in the chain connected to the TV, or the network might not work. • Place the ...

User Manual
Page 21
... HDMI/DVI INPUT jack on the back of the TV. C. Connect the HDMI cable to the HDMI Out jack on the remote control. 3. Repeatedly press the INPUT button on the remote control until the HDMI Video Input Channel is an uncompressed digital interface that aren't in the Audio Connections menu to select...
... HDMI/DVI INPUT jack on the back of the TV. C. Connect the HDMI cable to the HDMI Out jack on the remote control. 3. Repeatedly press the INPUT button on the remote control until the HDMI Video Input Channel is an uncompressed digital interface that aren't in the Audio Connections menu to select...
User Manual
Page 22
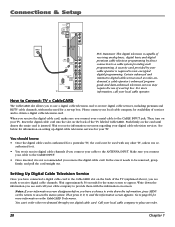
... cable television services. Push firmly on the CableCARD Tools menu. Wait to a cable system providing such programming. Write down the information, press MENU on the remote to the CableCARD slot on your digital cable card. Then press 9, 9, 9, and the information screen appears. For more information on the card until almost the...
... cable television services. Push firmly on the CableCARD Tools menu. Wait to a cable system providing such programming. Write down the information, press MENU on the remote to the CableCARD slot on your digital cable card. Then press 9, 9, 9, and the information screen appears. For more information on the card until almost the...

User Manual
Page 23
... audio output from the TV to an A/V receiver using the digital audio output jack to the Digital Optical Input jack on the TV and TV remote control. 3. Refer to your TV (better sound). • Connect audio/video receiver (speakers connected to Connect: TV + Receiver with Dolby Digital + Speakers If you own...
... audio output from the TV to an A/V receiver using the digital audio output jack to the Digital Optical Input jack on the TV and TV remote control. 3. Refer to your TV (better sound). • Connect audio/video receiver (speakers connected to Connect: TV + Receiver with Dolby Digital + Speakers If you own...

User Manual
Page 26
...or left arrow button to Complete the Assisted Setup The technical term is unplugged and plugged back in. To highlight a menu item, put the remote into an outlet controlled by pushing down arrow button to insert the plug completely. This happens every time the TV is "Navigation" - ON...down. Be sure to move through the on the tab and lifting cover. • Insert 2 fresh "AA" batteries. Put Batteries in the Remote • Remove the battery compartment cover from other end of the power cord into an appropriate wall outlet. Note: Highlighted means that you first ...
...or left arrow button to Complete the Assisted Setup The technical term is unplugged and plugged back in. To highlight a menu item, put the remote into an outlet controlled by pushing down arrow button to insert the plug completely. This happens every time the TV is "Navigation" - ON...down. Be sure to move through the on the tab and lifting cover. • Insert 2 fresh "AA" batteries. Put Batteries in the Remote • Remove the battery compartment cover from other end of the power cord into an appropriate wall outlet. Note: Highlighted means that you first ...

User Manual
Page 29
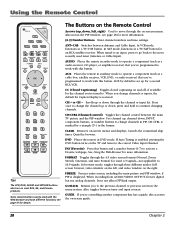
Chapter 2 Using the Remote Control Chapter Overview: • The Buttons on the Remote Control • Programming the Remote to Operate Other Components • How To Use the Remote After You've Programmed It • The Learning Feature • Volume Punchthrough Feature • Using the INPUT Button • Remote Code List Graphics contained within this publication are for representation only. 27
Chapter 2 Using the Remote Control Chapter Overview: • The Buttons on the Remote Control • Programming the Remote to Operate Other Components • How To Use the Remote After You've Programmed It • The Learning Feature • Volume Punchthrough Feature • Using the INPUT Button • Remote Code List Graphics contained within this publication are for representation only. 27
User Manual
Page 30
... another component that you to move through the 4:3 video screen formats (Normal, Zoom, Stretch, Cinerama, and Auto Format) for an RCA satellite receiver. The Buttons on the Remote Control Arrows (up, down ; Also moves the PIP window, see page 51 for more information. AUX by a triangle ( ) ...programmed to 16:9 signals. Also, toggles between the main TV picture and the PIP window. AUDIO Places the remote in the banner. See Using the Web Browser for a second RCA VCR. FORMAT Toggles through the on the right. In browser mode, toggles through the channel or input list...
... another component that you to move through the 4:3 video screen formats (Normal, Zoom, Stretch, Cinerama, and Auto Format) for an RCA satellite receiver. The Buttons on the Remote Control Arrows (up, down ; Also moves the PIP window, see page 51 for more information. AUX by a triangle ( ) ...programmed to 16:9 signals. Also, toggles between the main TV picture and the PIP window. AUDIO Places the remote in the banner. See Using the Web Browser for a second RCA VCR. FORMAT Toggles through the on the right. In browser mode, toggles through the channel or input list...
User Manual
Page 31
... after 30 seconds. In other modes (VCR, DVD, SAT/CAB, AUX, AUDIO), and if programmed, turns the component on and off most RCA, GE, and Proscan components that channel). REVERSE, PLAY, FORWARD, RECORD, STOP, PAUSE If programmed, provides transport control for Audio Mode or SAP...PRESETS Toggles through the TV's available input sources (INPUT 1, INPUT 2, INPUT 3, INPUT 4, HDMI/DVI, DTVLink and last-active channel). Using the Remote Control Tips The component button corresponding to select the item. A warning banner may also appear on or off . INPUT Toggles through the Picture Presets ...
... after 30 seconds. In other modes (VCR, DVD, SAT/CAB, AUX, AUDIO), and if programmed, turns the component on and off most RCA, GE, and Proscan components that channel). REVERSE, PLAY, FORWARD, RECORD, STOP, PAUSE If programmed, provides transport control for Audio Mode or SAP...PRESETS Toggles through the TV's available input sources (INPUT 1, INPUT 2, INPUT 3, INPUT 4, HDMI/DVI, DTVLink and last-active channel). Using the Remote Control Tips The component button corresponding to select the item. A warning banner may also appear on or off . INPUT Toggles through the Picture Presets ...

User Manual
Page 32
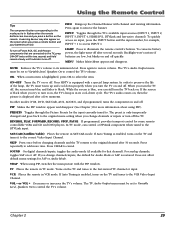
... with all models of all functions of your TV, such as a VCR, do the following instructions can be used for a second RCA VCR. Turn on the remote turns off. 1. Using the Remote Control learning ON-OFF DVD VCR SAT/CAB AUX AUDIO CLEAR C 1 2 3 4 5 6 7 8 9 0 REVERSE PLAY STOP You'll use these buttons when you...
... with all models of all functions of your TV, such as a VCR, do the following instructions can be used for a second RCA VCR. Turn on the remote turns off. 1. Using the Remote Control learning ON-OFF DVD VCR SAT/CAB AUX AUDIO CLEAR C 1 2 3 4 5 6 7 8 9 0 REVERSE PLAY STOP You'll use these buttons when you...

User Manual
Page 33
... operational modes triggered by the component buttons. 1. Press the appropriate component button (DVD, TV, VCR, SAT/CAB, AUDIO, AUX) to the remote commands. • If you try all of the codes. Press ON•OFF to program. Continue pressing and releasing PLAY until the component button... repeat these steps using the next code listed for the component on the component you want to control the component. 2. At this universal remote can control several different components (TV, DVD, VCR, satellite receiver, etc.), it doesn't, try the automatic code search method. If the...
... operational modes triggered by the component buttons. 1. Press the appropriate component button (DVD, TV, VCR, SAT/CAB, AUDIO, AUX) to the remote commands. • If you try all of the codes. Press ON•OFF to program. Continue pressing and releasing PLAY until the component button... repeat these steps using the next code listed for the component on the component you want to control the component. 2. At this universal remote can control several different components (TV, DVD, VCR, satellite receiver, etc.), it doesn't, try the automatic code search method. If the...

User Manual
Page 34
...learned function will work (in low light areas because too much natural light or fluorescent light might cause the learning feature to fail because the remote control functions are several things to consider before the learned function will continue to work as it always has). 32 Chapter 2 After you ...program the TV's remote control to the following buttons on the table. • The learned buttons are mode specific-if you add a button function from one of the...
...learned function will work (in low light areas because too much natural light or fluorescent light might cause the learning feature to fail because the remote control functions are several things to consider before the learned function will continue to work as it always has). 32 Chapter 2 After you ...program the TV's remote control to the following buttons on the table. • The learned buttons are mode specific-if you add a button function from one of the...

User Manual
Page 35
... 3. Keep pressing both buttons (the component mode button flashes-turns on ). If all modes. Or, press CLEAR to the TV remote). Note: If an invalid button is automatically exited from the Learning mode. Deleting ALL Learned Functions This procedure erases all learned functions,... you can continue adding functions to store the new function (the component button turns off then back on and remote remains in the TV's remote control varies. Remote is pressed, the component mode button(s) flashes 4 times and the selected component button stays on -the learned function...
... 3. Keep pressing both buttons (the component mode button flashes-turns on ). If all modes. Or, press CLEAR to the TV remote). Note: If an invalid button is automatically exited from the Learning mode. Deleting ALL Learned Functions This procedure erases all learned functions,... you can continue adding functions to store the new function (the component button turns off then back on and remote remains in the TV's remote control varies. Remote is pressed, the component mode button(s) flashes 4 times and the selected component button stays on -the learned function...


