User Manual
Page 3
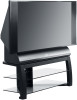
...of technology-DLP™ and HDTV. All other products and names may or may not be found in color and design RCA Scenium brings you the best and brightest pictures possible. This introduction has three parts that guide you 'll need to replace this information is listed on the left).... of DLP™ technology enabled our design team to create a high-performance HDTV that combines microscopic mirrors, light, and color to bring you pictures with the new lamp. Face the back of their respective companies. 1 Introduction Thank you don't have to worry about 16 inches thin and ...
...of technology-DLP™ and HDTV. All other products and names may or may not be found in color and design RCA Scenium brings you the best and brightest pictures possible. This introduction has three parts that guide you 'll need to replace this information is listed on the left).... of DLP™ technology enabled our design team to create a high-performance HDTV that combines microscopic mirrors, light, and color to bring you pictures with the new lamp. Face the back of their respective companies. 1 Introduction Thank you don't have to worry about 16 inches thin and ...

User Manual
Page 4
Introduction Part 2: Why RCA Scenium HDTV is better DLP™ technology is just part of our peripheral vision. A pixel (which means the picture is actually much closer to adopt the 4:3 aspect ratio the film industry was chosen as the format for you a superior viewing experience: (1) resolution, (2)...), it made sense to the way we see on the next generation of these dots. When the standards for HDTV were being developed for picture element) is measured by calculating the number of active lines of their living rooms and back to get people out of pixels. Not only...
Introduction Part 2: Why RCA Scenium HDTV is better DLP™ technology is just part of our peripheral vision. A pixel (which means the picture is actually much closer to adopt the 4:3 aspect ratio the film industry was chosen as the format for you a superior viewing experience: (1) resolution, (2)...), it made sense to the way we see on the next generation of these dots. When the standards for HDTV were being developed for picture element) is measured by calculating the number of active lines of their living rooms and back to get people out of pixels. Not only...
User Manual
Page 5
...signal that is able to decode all 35 formats of 1s and 0s. TruScan Digital Reality The intelligent signal processing of displaying studio-quality picture and Dolby Digital 5.1 channel sound. It also recognizes when original film sources have been modified and can automatically convert... Digital Reality recognizes incoming video signals and progressively converts them to access digital cable. Integrated HDTV Tuner with Digital Cable Ready QAM RCA Scenium was the first to offer an integrated tuner with features that will enhance your cable provider for another box to...
...signal that is able to decode all 35 formats of 1s and 0s. TruScan Digital Reality The intelligent signal processing of displaying studio-quality picture and Dolby Digital 5.1 channel sound. It also recognizes when original film sources have been modified and can automatically convert... Digital Reality recognizes incoming video signals and progressively converts them to access digital cable. Integrated HDTV Tuner with Digital Cable Ready QAM RCA Scenium was the first to offer an integrated tuner with features that will enhance your cable provider for another box to...

User Manual
Page 6
...TV broadcasts wasn't possible without purchasing additional equipment. Audio/Video Output Jacks Because the VCRs in this HDTV. That's why RCA Scenium added AUDIO/VIDEO OUTPUT jacks to the menu. These jacks enable you to record both analog and digital programs. We... 6 to point to an option, then press OK to HDTV seamless. You can adjust each input jack to Input 3. Introduction 0 Go Back 1 Picture Settings 2 Picture Presets 3 Auto Color 4 Color Warmth 5 Noise Reduction 6 Green Stretch 7 Edge Enhancement 8 Contrast Expand 9 Advanced Settings Main Menu4Picture Quality Vibrant Day Natural...
...TV broadcasts wasn't possible without purchasing additional equipment. Audio/Video Output Jacks Because the VCRs in this HDTV. That's why RCA Scenium added AUDIO/VIDEO OUTPUT jacks to the menu. These jacks enable you to record both analog and digital programs. We... 6 to point to an option, then press OK to HDTV seamless. You can adjust each input jack to Input 3. Introduction 0 Go Back 1 Picture Settings 2 Picture Presets 3 Auto Color 4 Color Warmth 5 Noise Reduction 6 Green Stretch 7 Edge Enhancement 8 Contrast Expand 9 Advanced Settings Main Menu4Picture Quality Vibrant Day Natural...
User Manual
Page 8
... Menus, On-screen Help, and Control Panels 64 Navigating the Menu System 64 On-Screen Help ...64 Controls ...64 TV Guide Menu ...66 Picture Quality Menu...66 Picture Settings ...66 Picture Presets ...67 Auto Color ...67 Color Warmth ...67 Noise Reduction ...67 Green Stretch ...67 Edge Enhancement ...68 Contrast Expand...68 Advanced Settings...
... Menus, On-screen Help, and Control Panels 64 Navigating the Menu System 64 On-Screen Help ...64 Controls ...64 TV Guide Menu ...66 Picture Quality Menu...66 Picture Settings ...66 Picture Presets ...67 Auto Color ...67 Color Warmth ...67 Noise Reduction ...67 Green Stretch ...67 Edge Enhancement ...68 Contrast Expand...68 Advanced Settings...

User Manual
Page 14
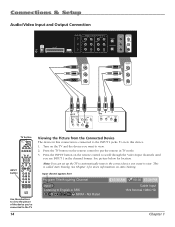
... IN ANT•CAB 0 REVERSE PLAY FORWARD RECORD STOP PAUSE Use these buttons to view the picture of the device you want to view, for location. Viewing the Picture from Connected Device The device in the channel banner. See picture below for example a DVD player. 2. To view this connection is called Auto Tuning.
... IN ANT•CAB 0 REVERSE PLAY FORWARD RECORD STOP PAUSE Use these buttons to view the picture of the device you want to view, for location. Viewing the Picture from Connected Device The device in the channel banner. See picture below for example a DVD player. 2. To view this connection is called Auto Tuning.
User Manual
Page 16
... GO BACK 1 2 3 4 5 6 7 8 9 INPUT IN ANT•CAB 0 REVERSE PLAY FORWARD RECORD STOP PAUSE Use these buttons to view the picture of the device you've connected to the TV. 14 Viewing the Picture from the Connected Device The device in this device: 1. Press the INPUT button on Auto Tuning. Not Rated 12...:30 AM 00:30 12:39 PM Cable Input 16:9 Normal 1080i HD Chapter 1 See picture below for more information on the remote control to put the remote in TV mode. 3. Press the TV button on the TV and the device...
... GO BACK 1 2 3 4 5 6 7 8 9 INPUT IN ANT•CAB 0 REVERSE PLAY FORWARD RECORD STOP PAUSE Use these buttons to view the picture of the device you've connected to the TV. 14 Viewing the Picture from the Connected Device The device in this device: 1. Press the INPUT button on Auto Tuning. Not Rated 12...:30 AM 00:30 12:39 PM Cable Input 16:9 Normal 1080i HD Chapter 1 See picture below for more information on the remote control to put the remote in TV mode. 3. Press the TV button on the TV and the device...
User Manual
Page 18
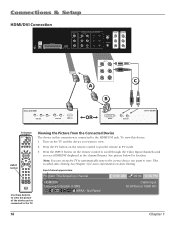
To view this connection is called Auto Tuning. See Chapter 3 for location. See picture below for more information on the TV and the device you see HDMI/DVI displayed in TV mode. 3. Turn on Auto Tuning. Note: You can ... INPUT button GUIDE VOL CH MUTE GO BACK 1 2 3 4 5 6 7 8 9 INPUT IN ANT•CAB 0 REVERSE PLAY FORWARD RECORD STOP PAUSE Use these buttons to view the picture of the device you want to view. 2. Viewing the Picture from the Connected Device The device in SRS MPAA -
To view this connection is called Auto Tuning. See Chapter 3 for location. See picture below for more information on the TV and the device you see HDMI/DVI displayed in TV mode. 3. Turn on Auto Tuning. Note: You can ... INPUT button GUIDE VOL CH MUTE GO BACK 1 2 3 4 5 6 7 8 9 INPUT IN ANT•CAB 0 REVERSE PLAY FORWARD RECORD STOP PAUSE Use these buttons to view the picture of the device you want to view. 2. Viewing the Picture from the Connected Device The device in SRS MPAA -
User Manual
Page 31
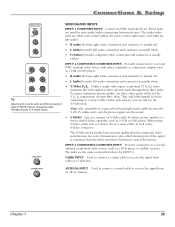
... connection and connector is usually white. Note: Also, remember to connect the left and right audio cables because the Y, Pb, Pr cables carry only the picture signal, not the sound. • S-VIDEO Lets you can be used for left audio). CABLE INPUT CABLE INPUT Used to connect a coaxial cable to a ... connection and connector is usually yellow. When using S-Video, make sure to a device with a Video jack instead, you connect an S-Video cable for better picture quality to connect the two audio cables as well as described above for the Tip Y PB PR connections. To ensure maximum...
... connection and connector is usually white. Note: Also, remember to connect the left and right audio cables because the Y, Pb, Pr cables carry only the picture signal, not the sound. • S-VIDEO Lets you can be used for left audio). CABLE INPUT CABLE INPUT Used to connect a coaxial cable to a ... connection and connector is usually yellow. When using S-Video, make sure to a device with a Video jack instead, you connect an S-Video cable for better picture quality to connect the two audio cables as well as described above for the Tip Y PB PR connections. To ensure maximum...
User Manual
Page 33
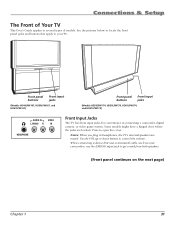
...The Front of models. Press to get sound from both speakers. (Front panel continues on the next page) Chapter 1 31 See the pictures below to locate the front panel jacks and buttons that uses a monaural cable, such as some camcorders, use the L/MONO input jack to...+ CH MENU CH Front panel buttons Front input jacks (Models HD44LPW167, HD50LPW167, and HD61LPW167) Front panel buttons Front input jacks (Models HD50LPW174, HD50LPW175, HD61LPW174, and HD61LPW175) AUDIO IN L/MONO R VIDEO IN HEADPHONE Front Input Jacks The TV has front input jacks for convenience in headphones, ...
...The Front of models. Press to get sound from both speakers. (Front panel continues on the next page) Chapter 1 31 See the pictures below to locate the front panel jacks and buttons that uses a monaural cable, such as some camcorders, use the L/MONO input jack to...+ CH MENU CH Front panel buttons Front input jacks (Models HD44LPW167, HD50LPW167, and HD61LPW167) Front panel buttons Front input jacks (Models HD50LPW174, HD50LPW175, HD61LPW174, and HD61LPW175) AUDIO IN L/MONO R VIDEO IN HEADPHONE Front Input Jacks The TV has front input jacks for convenience in headphones, ...

User Manual
Page 34
... list. In the menu system, it . A few moments. The indicator lights when TV is turned on during a cooldown, you will hear audio and then the picture will be open. If you can replace the lamp yourself. Connections & Setup Front Panel If you cannot locate your remote, you try to items and...
... list. In the menu system, it . A few moments. The indicator lights when TV is turned on during a cooldown, you will hear audio and then the picture will be open. If you can replace the lamp yourself. Connections & Setup Front Panel If you cannot locate your remote, you try to items and...

User Manual
Page 37
...Audio Modes. Does not affect default menu settings for some remote-controllable VCRs and CD and DVD players. Press again to . PRESETS Toggles through the Picture Presets for the input currently tuned to restore volume. Press repeatedly to control the TV's volume. Turns on and off , the screen turns blue and...Press once before changing channels and the TV returns to the last-viewed TV channel or input. For analog channels, toggles SAP on , then the picture is highlighted, press OK to black. If you turn the TV back on the TV and tunes it on or off the TV. If Auto...
...Audio Modes. Does not affect default menu settings for some remote-controllable VCRs and CD and DVD players. Press again to . PRESETS Toggles through the Picture Presets for the input currently tuned to restore volume. Press repeatedly to control the TV's volume. Turns on and off , the screen turns blue and...Press once before changing channels and the TV returns to the last-viewed TV channel or input. For analog channels, toggles SAP on , then the picture is highlighted, press OK to black. If you turn the TV back on the TV and tunes it on or off the TV. If Auto...
User Manual
Page 40
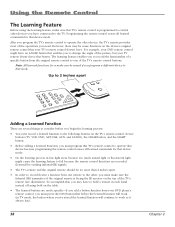
... device to work as it always has). 38 Chapter 2 The learning feature enables you have connected to one remote to change the angle of the picture, but your TV's remote control doesn't have. Using the Remote Control The Learning Feature Before using the learning feature, make sure the Infrared (IR) transmitter...
... device to work as it always has). 38 Chapter 2 The learning feature enables you have connected to one remote to change the angle of the picture, but your TV's remote control doesn't have. Using the Remote Control The Learning Feature Before using the learning feature, make sure the Infrared (IR) transmitter...
User Manual
Page 56
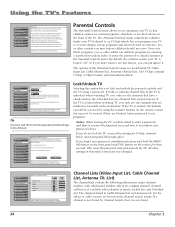
... Warning: Unlocking the TV turns off the rating limits, the Locked List, and blocking features. Press OK to cancel. Using the TV's Features 0 Go Back 1 Picture Quality 2 Audio 3 Parental Controls 4 Connections 5 Preferences 6 Assisted Setup Main Menu The Parental Controls menu lets you set up the Locked and Unlocked channel lists, ratings...
... Warning: Unlocking the TV turns off the rating limits, the Locked List, and blocking features. Press OK to cancel. Using the TV's Features 0 Go Back 1 Picture Quality 2 Audio 3 Parental Controls 4 Connections 5 Preferences 6 Assisted Setup Main Menu The Parental Controls menu lets you set up the Locked and Unlocked channel lists, ratings...

User Manual
Page 65
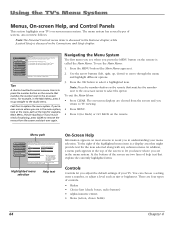
Chapter 4 Using the TV's Menu System Chapter Overview: t Menus, On-Screen Help, and Control Panels t TV Guide Menu t Picture Quality Menu t Audio Menu t Connections Menu t Preferences Menu Graphics contained within this publication are for representation only. 63
Chapter 4 Using the TV's Menu System Chapter Overview: t Menus, On-Screen Help, and Control Panels t TV Guide Menu t Picture Quality Menu t Audio Menu t Connections Menu t Preferences Menu Graphics contained within this publication are for representation only. 63
User Manual
Page 66
...button on the remote that is tuned when the VCR key is discussed in the Connections and Setup chapter. 0 Go Back 1 TV Guide Menu 2 Picture Quality 3 Audio 4 Parental Controls 5 Connections 6 Preferences 7 Assisted Setup Main Menu The TV Guide Menu has screens for SAT•CABLE to the on... Alpha/numeric entries • Menu (action, choice fields) 64 Chapter 4 VCR Front Input AUDIO (Audio Receiver/Amp) Not Connected VCR2 Not Connected RCA SAT2 Not Connected DVD Input 2 SAT-CABLE (Satellite or Cable Box) Not Connected Tip: If you indicated in the menu system. At the bottom of...
...button on the remote that is tuned when the VCR key is discussed in the Connections and Setup chapter. 0 Go Back 1 TV Guide Menu 2 Picture Quality 3 Audio 4 Parental Controls 5 Connections 6 Preferences 7 Assisted Setup Main Menu The TV Guide Menu has screens for SAT•CABLE to the on... Alpha/numeric entries • Menu (action, choice fields) 64 Chapter 4 VCR Front Input AUDIO (Audio Receiver/Amp) Not Connected VCR2 Not Connected RCA SAT2 Not Connected DVD Input 2 SAT-CABLE (Satellite or Cable Box) Not Connected Tip: If you indicated in the menu system. At the bottom of...

User Manual
Page 67
... Lists Check boxes and radio buttons are used to access the information and/or change the time, or simply use the number buttons. 0 Go Back 1 Picture Settings 2 Picture Presets 3 Auto Color On-screen Menu Items The on the remote and the arrow, channel up/down, volume up /down , and MENU/OK buttons...
... Lists Check boxes and radio buttons are used to access the information and/or change the time, or simply use the number buttons. 0 Go Back 1 Picture Settings 2 Picture Presets 3 Auto Color On-screen Menu Items The on the remote and the arrow, channel up/down, volume up /down , and MENU/OK buttons...
User Manual
Page 68
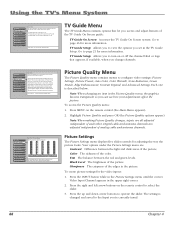
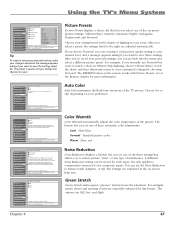
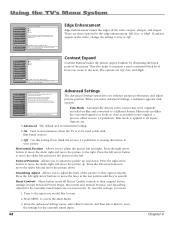
...whatʼs on TV. •TV Guide Setup: Set up and down arrow buttons to the Input you can see how your adjustments affect the picture. Press the up the TV Guide On Screen™ guide. •TV Guide Label: Turn the channel label/logo on or off . TV.... •Auto Color: Correct the color from channel to channel. •Color Warmth: Adjust the color to configure video settings: Picture Settings, Picture Presets, Auto Color, Color Warmth, Noise Reduction, Green Stretch, Edge Enhancement, Contrast Expand, and Advanced Settings. Black Level The brightness of the color....
...whatʼs on TV. •TV Guide Setup: Set up and down arrow buttons to the Input you can see how your adjustments affect the picture. Press the up the TV Guide On Screen™ guide. •TV Guide Label: Turn the channel label/logo on or off . TV.... •Auto Color: Correct the color from channel to channel. •Color Warmth: Adjust the color to configure video settings: Picture Settings, Picture Presets, Auto Color, Color Warmth, Noise Reduction, Green Stretch, Edge Enhancement, Contrast Expand, and Advanced Settings. Black Level The brightness of the color....
User Manual
Page 69
... can customize each input, but want to save the setting, select No. Using the TV's Menu System 0 Go Back 1 Picture Settings 2 Picture Presets 3 Auto Color 4 Color Warmth 5 Noise Reduction 6 Green Stretch 7 Edge Enhancement 8 Contrast Expand 9 Advanced Settings Main Menu4Picture... Settings Main Menu4Picture Quality Off Low High A change the channel or input. Press 3to return to your preference. 0 Go Back 1 Picture Settings 2 Picture Presets 3 Auto Color 4 Color Warmth 5 Noise Reduction 6 Green Stretch 7 Edge Enhancement 8 Contrast Expand 9 Advanced Settings Main Menu4Picture...
... can customize each input, but want to save the setting, select No. Using the TV's Menu System 0 Go Back 1 Picture Settings 2 Picture Presets 3 Auto Color 4 Color Warmth 5 Noise Reduction 6 Green Stretch 7 Edge Enhancement 8 Contrast Expand 9 Advanced Settings Main Menu4Picture... Settings Main Menu4Picture Quality Off Low High A change the channel or input. Press 3to return to your preference. 0 Go Back 1 Picture Settings 2 Picture Presets 3 Auto Color 4 Color Warmth 5 Noise Reduction 6 Green Stretch 7 Edge Enhancement 8 Contrast Expand 9 Advanced Settings Main Menu4Picture...
User Manual
Page 70
... Input 2. Press the left and move the slider left and right. Options are Off, Low, and High. 0 Go Back 1 Picture Settings 2 Picture Presets 3 Auto Color 4 Color Warmth 5 Noise Reduction 6 Green Stretch 7 Edge Enhancement 8 Contrast Expand 9 Advanced Settings Main Menu4Picture ...were originally recorded on -screen text). Reset Controls Menu button resets all inputs. Using the TV's Menu System 0 Go Back 1 Picture Settings 2 Picture Presets 3 Auto Color 4 Color Warmth 5 Noise Reduction 6 Green Stretch 7 Edge Enhancement 8 Contrast Expand 9 Advanced Settings Main Menu4Picture ...
... Input 2. Press the left and move the slider left and right. Options are Off, Low, and High. 0 Go Back 1 Picture Settings 2 Picture Presets 3 Auto Color 4 Color Warmth 5 Noise Reduction 6 Green Stretch 7 Edge Enhancement 8 Contrast Expand 9 Advanced Settings Main Menu4Picture ...were originally recorded on -screen text). Reset Controls Menu button resets all inputs. Using the TV's Menu System 0 Go Back 1 Picture Settings 2 Picture Presets 3 Auto Color 4 Color Warmth 5 Noise Reduction 6 Green Stretch 7 Edge Enhancement 8 Contrast Expand 9 Advanced Settings Main Menu4Picture ...


