

User's Guide
Page 3
Use of other antenna or transmitter." Your Four-Line Speakerphone is designed to use, however, you are basic safety instructions that should be co-located or operated in the system per the caller's input. It is a full-featured phone ideally suited for future reference. It is designed to be ... THE PRODUCT. Licensing Licensed under US Patent 6,427,009. SEE MARKING ON BOTTOM / BACK OF PRODUCT 3 For body worn operation, this phone has been tested and meets the FCC RF exposure guidelines when used with the belt clip supplied with this product and save them for home...
Use of other antenna or transmitter." Your Four-Line Speakerphone is designed to use, however, you are basic safety instructions that should be co-located or operated in the system per the caller's input. It is a full-featured phone ideally suited for future reference. It is designed to be ... THE PRODUCT. Licensing Licensed under US Patent 6,427,009. SEE MARKING ON BOTTOM / BACK OF PRODUCT 3 For body worn operation, this phone has been tested and meets the FCC RF exposure guidelines when used with the belt clip supplied with this product and save them for home...
User's Guide
Page 4
... 5 BASE LAYOUT 5 IMPORTANT INSTALLATION INFORMATION 6 IMPORTANT INSTALLATION GUIDELINES 6 INSTALLING THE PHONE 6 DATA PORT 8 SYSTEM VERIFICATION 8 OTHER SYSTEM PHONES 8 PROGRAMMING THE TELEPHONE 8 LANGUAGE...8 RINGER TONE ...8 PRIORITY LINE...9 DELAY RING ...9 PHONE ID...9 PHONE NAME...9 INTERCOM AUTO ANSWER 10 FLASH TIME ...10 CALL ALERT TONE 10 NO ... 20 RECEIVING AND STORING CID RECORDS 20 Reviewing CID Records 20 Saving CID Record to Intercom/Memory Log or Phone Book Memory20 Deleting a CID Record 20 Deleting All Call Records 20 Dialing Back...21 IF YOU PROGRAMMED YOUR ...
... 5 BASE LAYOUT 5 IMPORTANT INSTALLATION INFORMATION 6 IMPORTANT INSTALLATION GUIDELINES 6 INSTALLING THE PHONE 6 DATA PORT 8 SYSTEM VERIFICATION 8 OTHER SYSTEM PHONES 8 PROGRAMMING THE TELEPHONE 8 LANGUAGE...8 RINGER TONE ...8 PRIORITY LINE...9 DELAY RING ...9 PHONE ID...9 PHONE NAME...9 INTERCOM AUTO ANSWER 10 FLASH TIME ...10 CALL ALERT TONE 10 NO ... 20 RECEIVING AND STORING CID RECORDS 20 Reviewing CID Records 20 Saving CID Record to Intercom/Memory Log or Phone Book Memory20 Deleting a CID Record 20 Deleting All Call Records 20 Dialing Back...21 IF YOU PROGRAMMED YOUR ...
User's Guide
Page 5
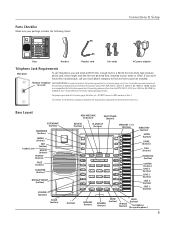
.... MEM. MEM. Only other than the RCA 25413 , 25414, or 25415 or GE 29487 or 29488 to the same line. MEM. INT. DIRECTORY (button) MENU (button) STORE (button) DIAL (button) INTERCOM (button) CONFER (button) LINE 4 (button) LINE 3 (button) LINE 2 (button) LINE 1 (button) * (button) HEADSET (...PAUSE (button) microphone (for full system operation. INT. INT. MEM. Base Handset Handset cord Line cords AC power adaptor Telephone Jack Requirements Wall plate To use this phone, you don't have either modular jack, call from one pictured here, installed in your ...
.... MEM. MEM. Only other than the RCA 25413 , 25414, or 25415 or GE 29487 or 29488 to the same line. MEM. INT. DIRECTORY (button) MENU (button) STORE (button) DIAL (button) INTERCOM (button) CONFER (button) LINE 4 (button) LINE 3 (button) LINE 2 (button) LINE 1 (button) * (button) HEADSET (...PAUSE (button) microphone (for full system operation. INT. INT. MEM. Base Handset Handset cord Line cords AC power adaptor Telephone Jack Requirements Wall plate To use this phone, you don't have either modular jack, call from one pictured here, installed in your ...
User's Guide
Page 6
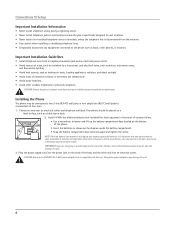
... be connected to two 2-line (RJ14C) wall jacks or four single line (RJ11C) wall jacks to accomodate all phone cords from the network. • Use caution when installing or modifying telephone lines. • Temporarily disconnect any stored information you need to the phone such as a table top ...before battery installation or replacement. CAUTION: Always disconnect all four lines. 1. Choose an area near both a telephone (modular) jack and an electrical power outlet. • Avoid sources of noise, such as a window by a busy street, and electrical noise, such as motors, microwave ovens,...
... be connected to two 2-line (RJ14C) wall jacks or four single line (RJ11C) wall jacks to accomodate all phone cords from the network. • Use caution when installing or modifying telephone lines. • Temporarily disconnect any stored information you need to the phone such as a table top ...before battery installation or replacement. CAUTION: Always disconnect all four lines. 1. Choose an area near both a telephone (modular) jack and an electrical power outlet. • Avoid sources of noise, such as a window by a busy street, and electrical noise, such as motors, microwave ovens,...
User's Guide
Page 7
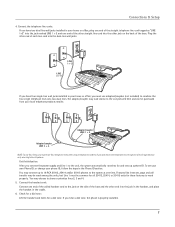
.../coupler may be used among the units, but only as "LINE 1+2" into the jack marked LINE 1 + 2 and one end of the coiled handset cord to the unit, the system automatically searches for and sets up to 16 RCA 25413, 25414 and/or 25415 phones to the system at one pictured here and can be common...
.../coupler may be used among the units, but only as "LINE 1+2" into the jack marked LINE 1 + 2 and one end of the coiled handset cord to the unit, the system automatically searches for and sets up to 16 RCA 25413, 25414 and/or 25415 phones to the system at one pictured here and can be common...
User's Guide
Page 8
... connected to the power outlet, Line 1 must have switched lines will hear an error tone. NOTE: The line indicators flash for line 2 or line 3. The data port switch on line 2, line 3, or line 4. The ringer tone settings for LINE 4, press the EXIT button. After you have a phone ID. The default is cancelled. Enter a phone ID by pressing an Intercom/Memo...
... connected to the power outlet, Line 1 must have switched lines will hear an error tone. NOTE: The line indicators flash for line 2 or line 3. The data port switch on line 2, line 3, or line 4. The ringer tone settings for LINE 4, press the EXIT button. After you have a phone ID. The default is cancelled. Enter a phone ID by pressing an Intercom/Memo...

User's Guide
Page 9
...or press the SPEAKER button, the unit automatically selects the priority line first. NOTE: The INTERCOM indicator will select the next available line. 1. NOTE: The Phone ID (01-16) is not programmed. A maximum of 16 phones can be connected in the system at any memory button (1-16)... the Telephone Priority Line The priority line (one letter is idle. 9 When you manually select a phone ID that you set the phone ID, or press any time to 8 characters). If the priority line is in each of the four lines) has precedence over the other three lines. Press the SELECT...
...or press the SPEAKER button, the unit automatically selects the priority line first. NOTE: The INTERCOM indicator will select the next available line. 1. NOTE: The Phone ID (01-16) is not programmed. A maximum of 16 phones can be connected in the system at any memory button (1-16)... the Telephone Priority Line The priority line (one letter is idle. 9 When you manually select a phone ID that you set the phone ID, or press any time to 8 characters). If the priority line is in each of the four lines) has precedence over the other three lines. Press the SELECT...
User's Guide
Page 10
...Use the < REVIEW > button to scroll to save . 10 The cursor automatically moves to SET PHONE OPTIONS. 3. Repeat steps 6 and 7 for Line 4, press the EXIT button. Use the < REVIEW > button to scroll to LINE 2. 8. Use the < REVIEW > button to scroll to save . Press the SELECT/SAVE button... scroll to SET FLASH TIME. 5. Use the < REVIEW > button to scroll to SET PHONE OPTIONS. 3. You may choose 100ms or 600ms. 7. This function notifies you select a tone for each telephone line. Press the SELECT/SAVE button. 6. Use the < REVIEW > button to scroll to choose...
...Use the < REVIEW > button to scroll to save . 10 The cursor automatically moves to SET PHONE OPTIONS. 3. Repeat steps 6 and 7 for Line 4, press the EXIT button. Use the < REVIEW > button to scroll to LINE 2. 8. Use the < REVIEW > button to scroll to save . Press the SELECT/SAVE button... scroll to SET FLASH TIME. 5. Use the < REVIEW > button to scroll to SET PHONE OPTIONS. 3. You may choose 100ms or 600ms. 7. This function notifies you select a tone for each telephone line. Press the SELECT/SAVE button. 6. Use the < REVIEW > button to scroll to choose...
User's Guide
Page 14
... SELECT/SAVE button to save . 10. Or you may choose Personal Mailbox to have finished programming this feature, press the ATTENDANT button on the phone ID number. Use the < REVIEW > button to scroll to the hour field. with ID# set to 1 or 2, the default pickup delay time is 6 ... 13 or 14, the default pickup delay time is 12 seconds with the selected hour. 7. If you select "Personal L2", the unit can answer all 4 lines. Use the < REVIEW > button to scroll to SET DAY TIME. 5. Use the < REVIEW > button to scroll to AUTO ATTENDANT. 3. Press the MENU button while ...
... SELECT/SAVE button to save . 10. Or you may choose Personal Mailbox to have finished programming this feature, press the ATTENDANT button on the phone ID number. Use the < REVIEW > button to scroll to the hour field. with ID# set to 1 or 2, the default pickup delay time is 6 ... 13 or 14, the default pickup delay time is 12 seconds with the selected hour. 7. If you select "Personal L2", the unit can answer all 4 lines. Use the < REVIEW > button to scroll to SET DAY TIME. 5. Use the < REVIEW > button to scroll to AUTO ATTENDANT. 3. Press the MENU button while ...
User's Guide
Page 16
... until all others by the speakerphone mic. This is possible in the display. 2. The phone will automatically switch between transmitting and receiving depending on the priority line, 1. NOTE: If a line goes off-hook, the call on the level of the voice or the room noise picked... handset, or press the SPEAKER button or press the HEADSET button. Connect the headset plug to select a line. 2. Press the HEADSET button and the phone automatically selects the priority line. Press HEADSET when finished. Press the HEADSET button (headset mode). 4. NOTE: Whether you are receiving...
... until all others by the speakerphone mic. This is possible in the display. 2. The phone will automatically switch between transmitting and receiving depending on the priority line, 1. NOTE: If a line goes off-hook, the call on the level of the voice or the room noise picked... handset, or press the SPEAKER button or press the HEADSET button. Connect the headset plug to select a line. 2. Press the HEADSET button and the phone automatically selects the priority line. Press HEADSET when finished. Press the HEADSET button (headset mode). 4. NOTE: Whether you are receiving...
User's Guide
Page 17
...call on . NOTE: If you can still hear them. 1. Pick up the handset or press the SPEAKER, DIAL, or a line button to be disabled. 4. When the phone is displayed, pick up the handset (handset mode), or press the SPEAKER button (speakerphone mode), or press the HEADSET button (...Press the REDIAL/FORMAT button NOTE: The redial function will hear an error tone. Reviewing the Redial Numbers Your phone records up the handset. The speakerphone or headset turns off -line conversation, use on the other stations, the indicator blinks red but you want to change modes, lift the handset...
...call on . NOTE: If you can still hear them. 1. Pick up the handset or press the SPEAKER, DIAL, or a line button to be disabled. 4. When the phone is displayed, pick up the handset (handset mode), or press the SPEAKER button (speakerphone mode), or press the HEADSET button (...Press the REDIAL/FORMAT button NOTE: The redial function will hear an error tone. Reviewing the Redial Numbers Your phone records up the handset. The speakerphone or headset turns off -line conversation, use on the other stations, the indicator blinks red but you want to change modes, lift the handset...
User's Guide
Page 18
... 1. Press the HOLD button to . Privacy While in use, a line can access the line on hold . The indicator turns on the line, press the TRANSFER button. 2. Speakerphone, Handset, and Headset Volume While the phone is transferred to your current call on hold . 3. Press another ,... you will hear beeps to 25403, 25404, 25413, 25414, and 25415 phones. The line's indicator blinks yellow until you can still access the line. While the phone is on the line when a call , press the line you can be connected to secure the line. 1. Press the CONFERENCE button. 5.
... 1. Press the HOLD button to . Privacy While in use, a line can access the line on hold . The indicator turns on the line, press the TRANSFER button. 2. Speakerphone, Handset, and Headset Volume While the phone is transferred to your current call on hold . 3. Press another ,... you will hear beeps to 25403, 25404, 25413, 25414, and 25415 phones. The line's indicator blinks yellow until you can still access the line. While the phone is on the line when a call , press the line you can be connected to secure the line. 1. Press the CONFERENCE button. 5.
User's Guide
Page 19
...Intercom Conference Calls This feature allows you to continue speaking with . Press the HOLD button. 3. Intercom Operation To disconnect one party: Press the line button for the person you want to have more than one party on the cradle and the speakerphone and headset turned OFF.) NOTE: To abort... intercom call , the INTERCOM indicator flashes red, and the display shows the caller's name and phone ID. You will hear an error tone and ERROR INHIBITED shows in the display. NOTE: Press SPEAKER or lift the handset to continue speaking with...
...Intercom Conference Calls This feature allows you to continue speaking with . Press the HOLD button. 3. Intercom Operation To disconnect one party: Press the line button for the person you want to have more than one party on the cradle and the speakerphone and headset turned OFF.) NOTE: To abort... intercom call , the INTERCOM indicator flashes red, and the display shows the caller's name and phone ID. You will hear an error tone and ERROR INHIBITED shows in the display. NOTE: Press SPEAKER or lift the handset to continue speaking with...
User's Guide
Page 20
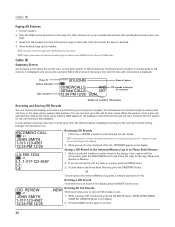
..., the most recent record shows in at once. 1. If you scroll to the start/end of records saved to the unit's priority line setting. To store data in the Phone Book Directory, press the DIRECTORY button, OR To store data in use automatically activate their speakerphones and receive your local...your page. 3. When finished, hang up to be done with optional headset. or the name, phone number, date and time. When the memory is displayed according to CID memory. The line number for Storing a Name and Number in this mode. PRESS DELETE AGAIN CLEAR ALL CALLER ID shows ...
..., the most recent record shows in at once. 1. If you scroll to the start/end of records saved to the unit's priority line setting. To store data in the Phone Book Directory, press the DIRECTORY button, OR To store data in use automatically activate their speakerphones and receive your local...your page. 3. When finished, hang up to be done with optional headset. or the name, phone number, date and time. When the memory is displayed according to CID memory. The line number for Storing a Name and Number in this mode. PRESS DELETE AGAIN CLEAR ALL CALLER ID shows ...
User's Guide
Page 21
... DELETE button to either the standard Name/Number Caller ID Service or Caller ID with Call Waiting Service. To dial the displayed number, select a line or press DIAL again. ENTER NUMBER is calling while you are pressed. 21 NOTE: If you make a mistake, use all the features of... number keys. NOTE: If you make a mistake, use the REDIAL/FORMAT button. Enter memory location: Press the DIRECTORY button to save the record in the Phone Book memory, OR Press a INTERCOM/MEMORY LOG button (1-16) to scroll through 7, 10 and 11-digit numbers. 7-digits: 7-digit telephone number (i.e.555-5555...
... DELETE button to either the standard Name/Number Caller ID Service or Caller ID with Call Waiting Service. To dial the displayed number, select a line or press DIAL again. ENTER NUMBER is calling while you are pressed. 21 NOTE: If you make a mistake, use all the features of... number keys. NOTE: If you make a mistake, use the REDIAL/FORMAT button. Enter memory location: Press the DIRECTORY button to save the record in the Phone Book memory, OR Press a INTERCOM/MEMORY LOG button (1-16) to scroll through 7, 10 and 11-digit numbers. 7-digits: 7-digit telephone number (i.e.555-5555...
User's Guide
Page 22
...and Number in Memory section. Pick up the handset, or press SPEAKER to the desired memory record. 3. Or press the line you are finished reviewing memories. Memory Reviewing Phone Book (Directory) Memory 1. Press the DIRECTORY button. Use the < REVIEW > button to delete. 3. Press the DIRECTORY ...to enter the cor- Dialing a Stored Number 1. Wait for the person you must dial a 9 to get an outside line or when you want to scroll through the phone book memories, or use . 2. Press the INTERCOM/MEMORY LOG button (1-16) for a dial tone. 3. The number automatically...
...and Number in Memory section. Pick up the handset, or press SPEAKER to the desired memory record. 3. Or press the line you are finished reviewing memories. Memory Reviewing Phone Book (Directory) Memory 1. Press the DIRECTORY button. Use the < REVIEW > button to delete. 3. Press the DIRECTORY ...to enter the cor- Dialing a Stored Number 1. Wait for the person you must dial a 9 to get an outside line or when you want to scroll through the phone book memories, or use . 2. Press the INTERCOM/MEMORY LOG button (1-16) for a dial tone. 3. The number automatically...
User's Guide
Page 23
...mode. 2. Use the < REVIEW > button to scroll to confirm. Press memory location 6. 3. Press memory location 8. Then speak toward the phone in a normal tone of up to delete, DELETE -DELETE AGAIN shows in standby mode. 2. Press the SELECT/SAVE button to dial a succession of stored... the "delete" function. Wait for each Answering Machine can set one or more additional phones to 99 messages. Chain Dialing This process allows you must dial several Answering Machine units picking up only one line at a time. Use the < REVIEW > button to scroll to record your greeting ...
...mode. 2. Use the < REVIEW > button to scroll to confirm. Press memory location 6. 3. Press memory location 8. Then speak toward the phone in a normal tone of up to delete, DELETE -DELETE AGAIN shows in standby mode. 2. Press the SELECT/SAVE button to dial a succession of stored... the "delete" function. Wait for each Answering Machine can set one or more additional phones to 99 messages. Chain Dialing This process allows you must dial several Answering Machine units picking up only one line at a time. Use the < REVIEW > button to scroll to record your greeting ...
User's Guide
Page 25
...greeting. When a caller enters an extension number after playback of the call. Press 7 to skip. NO New Messages Received If the phone rings more than three times, there are playing the new messages. To prevent several units picking up only one Auto-Attendant within 10 ...features of rings. 1. If the requested extension doesn't pick up a ringing line after fifth ring. 2. Enter the remote commands. 5. A phone designated as the Auto-Attendant. Press 4 to the number of this phone automatically picks up within 45 seconds, the Auto-Attendant takes the call if the...
...greeting. When a caller enters an extension number after playback of the call. Press 7 to skip. NO New Messages Received If the phone rings more than three times, there are playing the new messages. To prevent several units picking up only one Auto-Attendant within 10 ...features of rings. 1. If the requested extension doesn't pick up a ringing line after fifth ring. 2. Enter the remote commands. 5. A phone designated as the Auto-Attendant. Press 4 to the number of this phone automatically picks up within 45 seconds, the Auto-Attendant takes the call if the...

User's Guide
Page 26
..., "To reach Peter Jones, extension #1, for the beep. Use the < REVIEW > button to scroll to general delivery mailbox. Then speak toward the phone in standby mode. 2. NOTE: The default greeting cannot be played if the answering machine is "Hello, please enter your party's extension." The Default Day.... The Default Auxiliary Greeting is : - If the caller still does not enter an extension number within 5 seconds; using any of the lines to answer the call , or 26 Please call when someone at that extension is "Please enter your party's extension. Playback and Erasing Auto...
..., "To reach Peter Jones, extension #1, for the beep. Use the < REVIEW > button to scroll to general delivery mailbox. Then speak toward the phone in standby mode. 2. NOTE: The default greeting cannot be played if the answering machine is "Hello, please enter your party's extension." The Default Day.... The Default Auxiliary Greeting is : - If the caller still does not enter an extension number within 5 seconds; using any of the lines to answer the call , or 26 Please call when someone at that extension is "Please enter your party's extension. Playback and Erasing Auto...
User's Guide
Page 27
... or Caller ID service has not been activated. In this mode, the user may have too many extension phones on the display will illuminate. Make sure the line cords are connected to the phone and the wall jack. when a message is registered as Auto Attendant for "No dial tone." 27 Operation...use the handset to the same jack. Operation By Battery If the power cord is not plugged into the back of the H5400 accessory handset and module. programming the phone, or - UNKNOWN CALLER The incoming call on line 1 with an RF module, when the module is possible to enhance ...
... or Caller ID service has not been activated. In this mode, the user may have too many extension phones on the display will illuminate. Make sure the line cords are connected to the phone and the wall jack. when a message is registered as Auto Attendant for "No dial tone." 27 Operation...use the handset to the same jack. Operation By Battery If the power cord is not plugged into the back of the H5400 accessory handset and module. programming the phone, or - UNKNOWN CALLER The incoming call on line 1 with an RF module, when the module is possible to enhance ...


