User Manual
Page 1
In-Dash AM/FM Receiver with MP3 Playback & USB/SD/AUX Inputs Receiver Models: PLMRB29W/PLMRB29B MIC USER'S MANUAL
In-Dash AM/FM Receiver with MP3 Playback & USB/SD/AUX Inputs Receiver Models: PLMRB29W/PLMRB29B MIC USER'S MANUAL
User Manual
Page 2
... the Car Radio ...3 Wiring Connections ...4 Removal of the Main Unit ...4 CONTROL PANEL BUTTON LOACTIONS ...5 GENERAL OPERATION ...6 Turn Unit On/Off ...6 Adjust Volume (VOL)...6 Adjust Menu Options (SEL) ...6 Set the Clock (CLK)...6 Change the Source (MODE) ...7 Mute on/off ...7 Loudness on/off...7 Preset Equalizer(EQ) ...7 USB port...7 Built-in Microphone...7 Aux input connector...7 Reset System (RESET)...7 RADIO OPERATION...8 Switch Between USA area and Europe area Frequency 8 Change Bands (BAND) ...8 Manual Tuning ( / ) ...8 Auto Seek Tuning ( / )...8 To Store / Recall Preset Stations...
... the Car Radio ...3 Wiring Connections ...4 Removal of the Main Unit ...4 CONTROL PANEL BUTTON LOACTIONS ...5 GENERAL OPERATION ...6 Turn Unit On/Off ...6 Adjust Volume (VOL)...6 Adjust Menu Options (SEL) ...6 Set the Clock (CLK)...6 Change the Source (MODE) ...7 Mute on/off ...7 Loudness on/off...7 Preset Equalizer(EQ) ...7 USB port...7 Built-in Microphone...7 Aux input connector...7 Reset System (RESET)...7 RADIO OPERATION...8 Switch Between USA area and Europe area Frequency 8 Change Bands (BAND) ...8 Manual Tuning ( / ) ...8 Auto Seek Tuning ( / )...8 To Store / Recall Preset Stations...
User Manual
Page 3
... reduce the risk of the car radio (USB jack, card slot, AUX IN connection). For optimal performance, avoid installing the unit at a reasonable level to be playable. 噝 Keep the volume at an angle. Refer all service to a qualified technician. 噝 Some MP3/WMA files may cause an explosion. 噝 Keep battery cells out of reach of time when the motor is...
... reduce the risk of the car radio (USB jack, card slot, AUX IN connection). For optimal performance, avoid installing the unit at a reasonable level to be playable. 噝 Keep the volume at an angle. Refer all service to a qualified technician. 噝 Some MP3/WMA files may cause an explosion. 噝 Keep battery cells out of reach of time when the motor is...
User Manual
Page 4
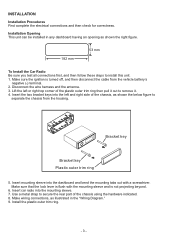
Installation Opening This unit can be installed in the "Wiring Diagram." 9. Disconnect the wire harness and the antenna. 3. Make wiring connections, as illustrated in any dashboard having an opening as shown the below figure to separate the chassis from the vehicle battery's negative (-) terminal. 2. Make sure that the lock lever is flush with a screwdriver. Install the plastic outer trim ring. - 3 - INSTALLATION Installation Procedures First complete the electrical connections and then check...
Installation Opening This unit can be installed in the "Wiring Diagram." 9. Disconnect the wire harness and the antenna. 3. Make wiring connections, as illustrated in any dashboard having an opening as shown the below figure to separate the chassis from the vehicle battery's negative (-) terminal. 2. Make sure that the lock lever is flush with a screwdriver. Install the plastic outer trim ring. - 3 - INSTALLATION Installation Procedures First complete the electrical connections and then check...
User Manual
Page 5
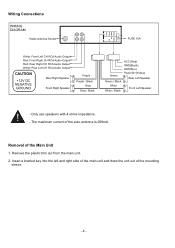
... and draw the unit out of the Main Unit 1. Wiring Connections WIRING DIAGRAM Radio Antenna Socket 15A FUSE 15A White: Front Left CH RCA Audio Output Red: Front Right CH RCA Audio Output Red: Rear Right CH RCA Audio Output White: Rear Left CH RCA Audio Output CAUTION +12V DC NEGATIVE GROUND Rear Right Speaker Front Right Speaker Purple Purple / Black Gray Gray / Black ACC (Red) GND(Black) ANT(Blue) Power B+(Yellow) Green Rear Left Speaker Green / Black White White / Black Front Left Speaker - Removal of the mounting sleeve. - 4 - Only use speakers with 4 ohms impedance...
... and draw the unit out of the Main Unit 1. Wiring Connections WIRING DIAGRAM Radio Antenna Socket 15A FUSE 15A White: Front Left CH RCA Audio Output Red: Front Right CH RCA Audio Output Red: Rear Right CH RCA Audio Output White: Rear Left CH RCA Audio Output CAUTION +12V DC NEGATIVE GROUND Rear Right Speaker Front Right Speaker Purple Purple / Black Gray Gray / Black ACC (Red) GND(Black) ANT(Blue) Power B+(Yellow) Green Rear Left Speaker Green / Black White White / Black Front Left Speaker - Removal of the mounting sleeve. - 4 - Only use speakers with 4 ohms impedance...
User Manual
Page 6
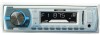
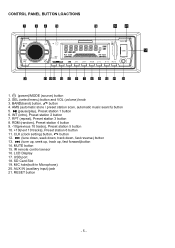
... 1. (power)/MODE (source) button 2. IR remote control sensor 16. LCD Display 17. MIC hole(built-in Microphone) 20. AUX IN (auxiliary input) jack 21. SEL (select/menu) button and VOL (volume) knob 3. SD Card Slot 19. RPT (repeat), Preset station 3 button 8. CLK (clock setting) button, button 12. (tune down, seek down, track down, fast reverse) button 13. (tune up, seek up, track up, fast forward)button 14. RDM (random), Preset station 4 button 9. -10(previous 10 tracks), Preset station 5 button 10...
... 1. (power)/MODE (source) button 2. IR remote control sensor 16. LCD Display 17. MIC hole(built-in Microphone) 20. AUX IN (auxiliary input) jack 21. SEL (select/menu) button and VOL (volume) knob 3. SD Card Slot 19. RPT (repeat), Preset station 3 button 8. CLK (clock setting) button, button 12. (tune down, seek down, track down, fast reverse) button 13. (tune up, seek up, track up, fast forward)button 14. RDM (random), Preset station 4 button 9. -10(previous 10 tracks), Preset station 5 button 10...
User Manual
Page 7
...~,R01,00,F01,~,F06,F07 - EQ(Equalizer) Setting: OFF, FLAT, POP, ROCK, CLASS - Rotate the volume knob to access the AREA US/EU frequency switch mode. - To set clock time, press and hold the SEL button on the front panel or press the SEL/ENTER button on the remote control to switch between MONO and STEREO reception mode for radio frequencies. - BALANCE:L07,L06,~, L01, 00...
...~,R01,00,F01,~,F06,F07 - EQ(Equalizer) Setting: OFF, FLAT, POP, ROCK, CLASS - Rotate the volume knob to access the AREA US/EU frequency switch mode. - To set clock time, press and hold the SEL button on the front panel or press the SEL/ENTER button on the remote control to switch between MONO and STEREO reception mode for radio frequencies. - BALANCE:L07,L06,~, L01, 00...
User Manual
Page 8
Change the Source (MODE) Press the MODE button to toggle between RADIO, BT(Bluetooth) , USB(with USB device inserted), CARD(with SD card inserted) and AUX-IN(auxiliary input) modes. Mute on/off . This function may be used when the LCD does not display normally or sound is distorted, or when any of bass frequencies, press again to turn on the remote control to switch between EQ OFF, FLAT, POP, ROCK, CLASS. Preset Equalizer(EQ) Press the EQ...
Change the Source (MODE) Press the MODE button to toggle between RADIO, BT(Bluetooth) , USB(with USB device inserted), CARD(with SD card inserted) and AUX-IN(auxiliary input) modes. Mute on/off . This function may be used when the LCD does not display normally or sound is distorted, or when any of bass frequencies, press again to turn on the remote control to switch between EQ OFF, FLAT, POP, ROCK, CLASS. Preset Equalizer(EQ) Press the EQ...
User Manual
Page 9
... and AM2 bands. Switch to LOCAL OFF mode to choose FM STEREO or MONO audio effect. - 8 - Press the ST button on the remote control to recall each preset station that saved in the memories in manual tuning mode, quickly press the or button to move the radio frequency number up to six preset stations. Briefly press the AMS button on the remote control to search for stations with weaker signals. The system will...
... and AM2 bands. Switch to LOCAL OFF mode to choose FM STEREO or MONO audio effect. - 8 - Press the ST button on the remote control to recall each preset station that saved in the memories in manual tuning mode, quickly press the or button to move the radio frequency number up to six preset stations. Briefly press the AMS button on the remote control to search for stations with weaker signals. The system will...

User Manual
Page 10
.../Folder Navigation 噝 During a disc, USB or SD card mode, press the 5/-10 button to go back the previous folder. Eject USB/SD 噝 To eject a USB device, press the button to stop playback, then remove the USB device. 噝 To eject an SD card, press the button to stop repeat playback and resume normal playback. button. USB / SD CARD OPERATION To insert USB / SD CARD 噝 To play files on the number...
.../Folder Navigation 噝 During a disc, USB or SD card mode, press the 5/-10 button to go back the previous folder. Eject USB/SD 噝 To eject a USB device, press the button to stop playback, then remove the USB device. 噝 To eject an SD card, press the button to stop repeat playback and resume normal playback. button. USB / SD CARD OPERATION To insert USB / SD CARD 噝 To play files on the number...
User Manual
Page 11
.... d) Finally press the SEL button to search and play the 123rd song. AUXILIARY INPUT OPERATION This car radio has an external auxiliary input jack, it is matched. The track will appear on the ones place, 2 seconds later, the "1" will skip to quickly find a specific MP3 track or file by its serial number, and the "TRK SCH" and "T ---" will be played immediately when the number is compatible with a audio cable.
.... d) Finally press the SEL button to search and play the 123rd song. AUXILIARY INPUT OPERATION This car radio has an external auxiliary input jack, it is matched. The track will appear on the ones place, 2 seconds later, the "1" will skip to quickly find a specific MP3 track or file by its serial number, and the "TRK SCH" and "T ---" will be played immediately when the number is compatible with a audio cable.
User Manual
Page 12
... car audio system. 3. Adjust Talk Volume 噝 During a call , press the button on the control panel. Make a Call 噝 To make outgoing call is paired, music played through that no device is called, the incoming telephone number displays on the LCD. 噝 To receive the call , use VOL knob or VOL+ 噝 Use the MUTE button to pair and connect with this bluetooth hands-free system: a) When linking up the Bluetooth-enabled mobile phone to this bluetooth...
... car audio system. 3. Adjust Talk Volume 噝 During a call , press the button on the control panel. Make a Call 噝 To make outgoing call is paired, music played through that no device is called, the incoming telephone number displays on the LCD. 噝 To receive the call , use VOL knob or VOL+ 噝 Use the MUTE button to pair and connect with this bluetooth hands-free system: a) When linking up the Bluetooth-enabled mobile phone to this bluetooth...
User Manual
Page 13
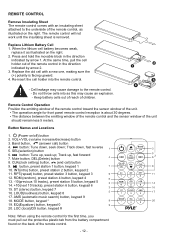
... 10 tracks), preset station 6 button, keypad 6 15. ST (stereo) button, keypad 7 16. Track up ; REMOTE CONTROL Remove Insulating Sheet The remote control comes with a new one, making sure the (+) polarity is facing upward. 4. Mute button, DEL(Delete) button 8. INT(intro) button, preset station 2 button, keypad 2 11. AMS (automatic music search) button, keypad 9 18. EQ(Equalizer) button, keypad 0 20. VOL+/VOL-(volume increase/decrease) button 3. button: Tune up, seek up , fast forward 7. The remote control will not work until the...
... 10 tracks), preset station 6 button, keypad 6 15. ST (stereo) button, keypad 7 16. Track up ; REMOTE CONTROL Remove Insulating Sheet The remote control comes with a new one, making sure the (+) polarity is facing upward. 4. Mute button, DEL(Delete) button 8. INT(intro) button, preset station 2 button, keypad 2 11. AMS (automatic music search) button, keypad 9 18. EQ(Equalizer) button, keypad 0 20. VOL+/VOL-(volume increase/decrease) button 3. button: Tune up, seek up , fast forward 7. The remote control will not work until the...
User Manual
Page 15
... . Turn you suspect something is reset. - Press the RESET button to restore the program to the terminal that is always live. „ USB/SD USB or SD card is connecting but no music file inside it is not connected. - Select other stations of this car radio. 3) Preset station is wrong, immediately switch power off , adjust volume to do not work. - Replace fuse. 4) Volume is burnt. - Insert the antenna cable firmly into the antenna socket of stronger signal level...
... . Turn you suspect something is reset. - Press the RESET button to restore the program to the terminal that is always live. „ USB/SD USB or SD card is connecting but no music file inside it is not connected. - Select other stations of this car radio. 3) Preset station is wrong, immediately switch power off , adjust volume to do not work. - Replace fuse. 4) Volume is burnt. - Insert the antenna cable firmly into the antenna socket of stronger signal level...


