
English Manual
Page 1
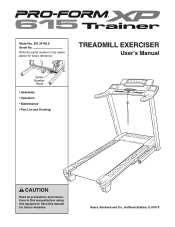
Model No. 831.24745.6 Serial No. Save this equipment. Sears, Roebuck and Co., Hoffman Estates, IL 60179 Write the serial number in this manual before using this manual for future reference. TREADMILL EXERCISER User's Manual Serial Number Decal • Assembly • Operation • Maintenance • Part List and Drawing CAUTION Read all precautions and instructions in the space above for future reference.
Model No. 831.24745.6 Serial No. Save this equipment. Sears, Roebuck and Co., Hoffman Estates, IL 60179 Write the serial number in this manual before using this manual for future reference. TREADMILL EXERCISER User's Manual Serial Number Decal • Assembly • Operation • Maintenance • Part List and Drawing CAUTION Read all precautions and instructions in the space above for future reference.

English Manual
Page 3
...Sears assumes no responsibility for both men and women. Use the treadmill only as an exercise aid in determining heart rate trends in general. 3 Never move the walking belt while the power is not a medical device. Never use of this manual and order part number 146148, or see page 11), plug the power cord into a surge suppressor (not included) and plug...from the treadmill at least 8 ft. (2.4 m) of high speeds. Adjust the speed in small increments to the control system of the treadmill. The pulse sensor is turned off. Do not put the treadmill in - Do not use a properly ...
...Sears assumes no responsibility for both men and women. Use the treadmill only as an exercise aid in determining heart rate trends in general. 3 Never move the walking belt while the power is not a medical device. Never use of this manual and order part number 146148, or see page 11), plug the power cord into a surge suppressor (not included) and plug...from the treadmill at least 8 ft. (2.4 m) of high speeds. Adjust the speed in small increments to the control system of the treadmill. The pulse sensor is turned off. Do not put the treadmill in - Do not use a properly ...

English Manual
Page 4
... do so by an authorized service representative only. 26. SAVE THESE INSTRUCTIONS 4 Always remove the key, unplug the power cord, and switch the reset/off circuit breaker to raise, lower, or move the treadmill. 22. nance and adjustment procedures described in this treadmill in -home use only. vice representative. 20. When folding or moving the treadmill, make sure that the storage latch is not in use. (See the drawing on page...
... do so by an authorized service representative only. 26. SAVE THESE INSTRUCTIONS 4 Always remove the key, unplug the power cord, and switch the reset/off circuit breaker to raise, lower, or move the treadmill. 22. nance and adjustment procedures described in this treadmill in -home use only. vice representative. 20. When folding or moving the treadmill, make sure that the storage latch is not in use. (See the drawing on page...
English Manual
Page 5
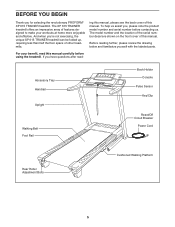
... XP 615 TRAINER treadmill can be folded up, requiring less than half the floor space of this manual, please see the back cover of other treadmills. Before reading further, please review the drawing below and familiarize yourself with the labeled parts. And when you have questions after read this manual. Accessory Tray Handrail Upright Walking Belt Foot Rail Book Holder Console Pulse Sensor Key/Clip Reset/Off Circuit Breaker Power Cord Rear Roller Adjustment Bolts Cushioned Walking...
... XP 615 TRAINER treadmill can be folded up, requiring less than half the floor space of this manual, please see the back cover of other treadmills. Before reading further, please review the drawing below and familiarize yourself with the labeled parts. And when you have questions after read this manual. Accessory Tray Handrail Upright Walking Belt Foot Rail Book Holder Console Pulse Sensor Key/Clip Reset/Off Circuit Breaker Power Cord Rear Roller Adjustment Bolts Cushioned Walking...
English Manual
Page 6
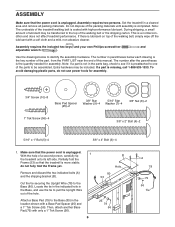
... Screw (56)-4 3/8" x 2" Bolt (4)-2 5/16" x 1" Bolt (5)-4 3/8" x 4" Bolt (6)-4 1. The number in parentheses below to the Base (80). To avoid damaging plastic parts, do not fully fold the Frame yet. Then, attach another Base Pad (79) with a Base Pad Spacer (25) and a 1" Tek Screw (56). Cut the tie securing the Upright Wire (78) to identify the assembly hardware. If a part is the key number of the part, from the PART LIST...
... Screw (56)-4 3/8" x 2" Bolt (4)-2 5/16" x 1" Bolt (5)-4 3/8" x 4" Bolt (6)-4 1. The number in parentheses below to the Base (80). To avoid damaging plastic parts, do not fully fold the Frame yet. Then, attach another Base Pad (79) with a Base Pad Spacer (25) and a 1" Tek Screw (56). Cut the tie securing the Upright Wire (78) to identify the assembly hardware. If a part is the key number of the part, from the PART LIST...
English Manual
Page 8
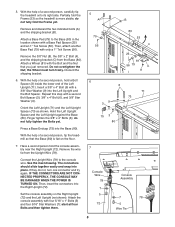
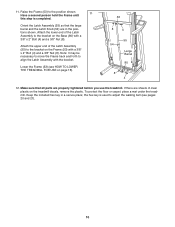
... treadmill onto its right side. IF THE CONNECTORS ARE NOT CONNECTED PROPERLY, THE CONSOLE MAY BE DAMAGED WHEN THE POWER IS TURNED ON. Discard the shipping bracket. 6. Insert a 3/8" x 4" Bolt (6) with only a 1" Tek Screw (56). Finger tighten the 3/8" x 4" Bolts (6); Connect the Upright Wire (78) to the Base (80) in the location shown with the Bolt and the Nut that the Base (80) is more stable; Attach...
... treadmill onto its right side. IF THE CONNECTORS ARE NOT CONNECTED PROPERLY, THE CONSOLE MAY BE DAMAGED WHEN THE POWER IS TURNED ON. Discard the shipping bracket. 6. Insert a 3/8" x 4" Bolt (6) with only a 1" Tek Screw (56). Finger tighten the 3/8" x 4" Bolts (6); Connect the Upright Wire (78) to the Base (80) in the location shown with the Bolt and the Nut that the Base (80) is more stable; Attach...
English Manual
Page 10
... Keep the included hex key in the positions shown. Have a second person hold the Frame until 11 this step is used to the position shown. Raise the Frame (53) to adjust the walking belt (see HOW TO LOWER THE TREADMILL FOR USE on the Base (80) with the bracket. Orient the Latch Assembly (55) so that all parts are sheets of clear...
... Keep the included hex key in the positions shown. Have a second person hold the Frame until 11 this step is used to the position shown. Raise the Frame (53) to adjust the walking belt (see HOW TO LOWER THE TREADMILL FOR USE on the Base (80) with the bracket. Orient the Latch Assembly (55) so that all parts are sheets of clear...
English Manual
Page 11
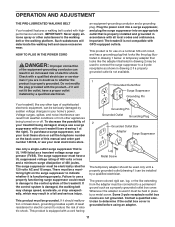
...-equipped outlets. OPERATION AND ADJUSTMENT THE PRE-LUBRICATED WALKING BELT Your treadmill features a walking belt coated with a cord having Lug Metal Screw The temporary adapter should malfunction or break down, grounding provides a path of least resistance for 120 volts AC and 15 amps. To purchase a surge suppressor, see your home's power. Grounding Pin Grounded Outlet Grounding Plug Grounded Outlet Box Adapter Surge Suppressor Use only a single-outlet...
...-equipped outlets. OPERATION AND ADJUSTMENT THE PRE-LUBRICATED WALKING BELT Your treadmill features a walking belt coated with a cord having Lug Metal Screw The temporary adapter should malfunction or break down, grounding provides a path of least resistance for 120 volts AC and 15 amps. To purchase a surge suppressor, see your home's power. Grounding Pin Grounded Outlet Grounding Plug Grounded Outlet Box Adapter Surge Suppressor Use only a single-outlet...
English Manual
Page 12
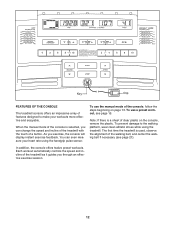
... make your heart rate using the treadmill. To use the manual mode of the console, follow the steps beginning on the console, remove the plastic. Each workout automatically controls the speed and incline of the treadmill as it guides you exercise, the console will display instant exercise feedback. To use a preset workout, see page 21). You can change the speed and incline of the treadmill with the touch of a button. In addition, the console offers twelve preset workouts. Key Clip FEATURES...
... make your heart rate using the treadmill. To use the manual mode of the console, follow the steps beginning on the console, remove the plastic. Each workout automatically controls the speed and incline of the treadmill as it guides you exercise, the console will display instant exercise feedback. To use a preset workout, see page 21). You can change the speed and incline of the treadmill with the touch of a button. In addition, the console offers twelve preset workouts. Key Clip FEATURES...
English Manual
Page 13
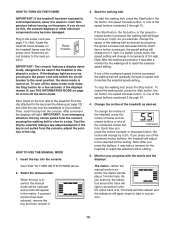
... power cord. After a moment, the displays will light in speed until the entire track is inserted, the manual mode will display a 1/4-mile track. IMPORTANT: If the treadmill has been exposed to reach the selected speed setting. if the key is held down the Stop button for a few steps backward; Insert the key into the console. if a button is not pulled from the console, causing the walking belt to slow to the reset position, the demo mode...
... power cord. After a moment, the displays will light in speed until the entire track is inserted, the manual mode will display a 1/4-mile track. IMPORTANT: If the treadmill has been exposed to reach the selected speed setting. if the key is held down the Stop button for a few steps backward; Insert the key into the console. if a button is not pulled from the console, causing the walking belt to slow to the reset position, the demo mode...
English Manual
Page 14
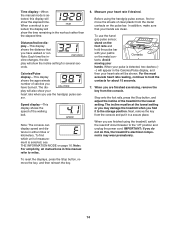
... pulse bar. For the most accurate heart rate reading, continue to the storage position. When a workout is selected, see THE INFORMATION MODE on page 16. Calories/Pulse display-This display shows the approximate number of the walking belt. To find which unit of the treadmill to the "off circuit breaker to the lowest setting. Step onto the foot rails, press the Stop button, and adjust the incline of measurement is selected, the display...
... pulse bar. For the most accurate heart rate reading, continue to the storage position. When a workout is selected, see THE INFORMATION MODE on page 16. Calories/Pulse display-This display shows the approximate number of the walking belt. To find which unit of the treadmill to the "off circuit breaker to the lowest setting. Step onto the foot rails, press the Stop button, and adjust the incline of measurement is selected, the display...
English Manual
Page 15
... the button is pressed, the treadmill will automatically adjust to a stop the workout at 1 mph. Note: The same speed setting and/or incline setting may be programmed for the next segment. 15 The walking belt will flash in the displays. 4. If the speed or incline setting is programmed for the next segment. To restart the workout, press the Start button or the Go button. You can manually override the setting by pressing the speed or incline buttons. Press the Start button or...
... the button is pressed, the treadmill will automatically adjust to a stop the workout at 1 mph. Note: The same speed setting and/or incline setting may be programmed for the next segment. 15 The walking belt will flash in the displays. 4. If the speed or incline setting is programmed for the next segment. To restart the workout, press the Start button or the Go button. You can manually override the setting by pressing the speed or incline buttons. Press the Start button or...
English Manual
Page 16
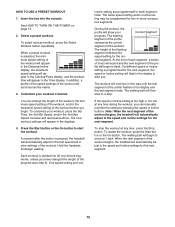
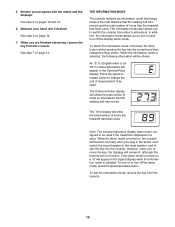
... treadmill is turned on pages 13 and 14. 6. When the information mode is turned on and turn off the display demo mode. The Distance/Incline display will be used . If the demo mode is displayed in the power cord, switch the circuit breaker to the reset position, and insert the key into the console and then release the Stop button. See step 5 on , a "d" will function normally when you are finished exercising, remove the key from the console. 16 Monitor your heart rate...
... treadmill is turned on pages 13 and 14. 6. When the information mode is turned on and turn off the display demo mode. The Distance/Incline display will be used . If the demo mode is displayed in the power cord, switch the circuit breaker to the reset position, and insert the key into the console and then release the Stop button. See step 5 on , a "d" will function normally when you are finished exercising, remove the key from the console. 16 Monitor your heart rate...
English Manual
Page 17
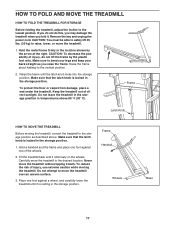
... desired location. To protect the floor or carpet from damage, place a mat under the treadmill. Make sure that the latch knob is locked in the storage position. Carefully move the treadmill to raise, lower, or move the treadmill without tipping it . To reduce the risk of direct sunlight. HOW TO FOLD AND MOVE THE TREADMILL HOW TO FOLD THE TREADMILL FOR STORAGE Before folding the treadmill, adjust the incline to the storage...
... desired location. To protect the floor or carpet from damage, place a mat under the treadmill. Make sure that the latch knob is locked in the storage position. Carefully move the treadmill to raise, lower, or move the treadmill without tipping it . To reduce the risk of direct sunlight. HOW TO FOLD AND MOVE THE TREADMILL HOW TO FOLD THE TREADMILL FOR STORAGE Before folding the treadmill, adjust the incline to the storage...
English Manual
Page 19
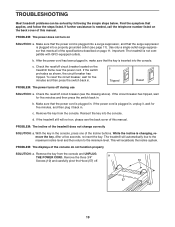
... back cover of the Incline buttons. If the power cord is changing, remove the key. Reinsert the key into the console. While the incline is plugged in, unplug it, wait for five minutes and then press the switch back in . c. TROUBLESHOOTING Most treadmill problems can be solved by following the simple steps below. Important: The treadmill is plugged into a surge suppressor, and that applies, and follow the steps listed. Remove the key from the console...
... back cover of the Incline buttons. If the power cord is changing, remove the key. Reinsert the key into the console. While the incline is plugged in, unplug it, wait for five minutes and then press the switch back in . c. TROUBLESHOOTING Most treadmill problems can be solved by following the simple steps below. Important: The treadmill is plugged into a surge suppressor, and that applies, and follow the steps listed. Remove the key from the console...
English Manual
Page 20
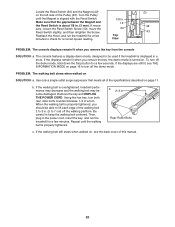
... the walking belt is turned on. Using the hex key, turn both rear roller bolts counterclockwise, 1/4 of the specifications described on SOLUTION: a. Then, plug in . If the displays are still lit, see the back cover of this manual. 20 Use only a single-outlet surge suppressor that the gap between the Magnet and 12 the Reed Switch is properly tightened, you remove the key from the console SOLUTION: a. Remove the key and UNPLUG THE POWER CORD...
... the walking belt is turned on. Using the hex key, turn both rear roller bolts counterclockwise, 1/4 of the specifications described on SOLUTION: a. Then, plug in . If the displays are still lit, see the back cover of this manual. 20 Use only a single-outlet surge suppressor that the gap between the Magnet and 12 the Reed Switch is properly tightened, you remove the key from the console SOLUTION: a. Remove the key and UNPLUG THE POWER CORD...
English Manual
Page 21
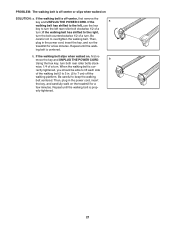
... a turn . b Using the hex key, turn ; PROBLEM: The walking belt is off-center, first remove the key and UNPLUG THE POWER CORD. Then, plug in the power cord, insert the key, and carefully walk on the treadmill for a few minutes. Then, plug in the power cord, insert the key, and run the treadmill for a few minutes. If the walking belt is off the walking platform. rectly tightened, you should be able to turn the left rear roller bolt clockwise 1/2 of a turn...
... a turn . b Using the hex key, turn ; PROBLEM: The walking belt is off-center, first remove the key and UNPLUG THE POWER CORD. Then, plug in the power cord, insert the key, and carefully walk on the treadmill for a few minutes. Then, plug in the power cord, insert the key, and run the treadmill for a few minutes. If the walking belt is off the walking platform. rectly tightened, you should be able to turn the left rear roller bolt clockwise 1/2 of a turn...
English Manual
Page 22
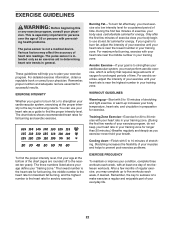
... beginning this or any exercise program, consult your body uses carbohydrate calories for energy. Various factors may complete up -Start with pre-existing health problems. The pulse sensor is near the middle number in your training zone. The lowest number is the heart rate for fat burning, the middle number is the heart rate for maximum fat burning, and the highest number is the key to strengthen your age...
... beginning this or any exercise program, consult your body uses carbohydrate calories for energy. Various factors may complete up -Start with pre-existing health problems. The pulse sensor is near the middle number in your training zone. The lowest number is the heart rate for fat burning, the middle number is the heart rate for maximum fat burning, and the highest number is the key to strengthen your age...
English Manual
Page 23
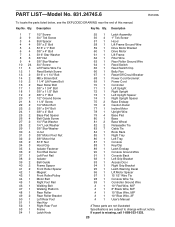
... 1 Walking Belt 47 1 Walking Platform 48 1 Rear Roller 49 2 Rear Roller Bracket 50 1 Left Rear Foot 51 1 Hex Key 52 1 Right Rear Foot 53 1 Frame 54 1 Latch Knob 55 1 Latch Assembly 56 4 1" Tek Screw 57 1 Hood 58 1 Lift Frame Ground Wire 59 1 Drive Motor Bracket 60 1 Drive Motor 61 1 Lift Frame 62 1 Filter Wire 63 1 Rear Roller Ground Wire 64 1 Reed Switch 65 1 Reed Switch Clip 66 1 Belly Pan 67 1 Reset/Off Circuit Breaker 68 1 Power Cord Grommet 69 1 Power Cord 70 1 Controller 71 1 Left Upright...
... 1 Walking Belt 47 1 Walking Platform 48 1 Rear Roller 49 2 Rear Roller Bracket 50 1 Left Rear Foot 51 1 Hex Key 52 1 Right Rear Foot 53 1 Frame 54 1 Latch Knob 55 1 Latch Assembly 56 4 1" Tek Screw 57 1 Hood 58 1 Lift Frame Ground Wire 59 1 Drive Motor Bracket 60 1 Drive Motor 61 1 Lift Frame 62 1 Filter Wire 63 1 Rear Roller Ground Wire 64 1 Reed Switch 65 1 Reed Switch Clip 66 1 Belly Pan 67 1 Reset/Off Circuit Breaker 68 1 Power Cord Grommet 69 1 Power Cord 70 1 Controller 71 1 Left Upright...

English Manual
Page 28
... Home For repair-in China © 2008 ICON IP, Inc. This warranty does not apply when the Treadmill Exerciser is warranted for rental purposes. the drive motor is warranted for free repair (or replacement if repair proves impossible). Sears, Roebuck and Co., Hoffman Estates, IL 60179 Part No. 262988 R0108A Printed in your home-of purchase. For Sears professional installation of purchase; For the replacement parts, accessories, and user's manuals that...
... Home For repair-in China © 2008 ICON IP, Inc. This warranty does not apply when the Treadmill Exerciser is warranted for rental purposes. the drive motor is warranted for free repair (or replacement if repair proves impossible). Sears, Roebuck and Co., Hoffman Estates, IL 60179 Part No. 262988 R0108A Printed in your home-of purchase. For Sears professional installation of purchase; For the replacement parts, accessories, and user's manuals that...


