

Uk Manual
Page 2
Note: The decals may not be shown at actual size. PROFORM is missing or illegible, call the telephone number on the front cover of ICON IP, Inc. 2 If a decal is a registered trademark of this manual and ... a free replacement decal. TABLE OF CONTENTS WARNING DECAL PLACEMENT 2 IMPORTANT PRECAUTIONS 3 BEFORE YOU BEGIN 5 ASSEMBLY 6 OPERATION AND ADJUSTMENT 13 HOW TO FOLD AND MOVE THE TREADMILL 20 TROUBLESHOOTING 22 EXERCISE GUIDELINES 24 PART LIST 26 EXPLODED DRAWING 28 ORDERING REPLACEMENT PARTS Back Cover RECYCLING INFORMATION Back Cover WARNING DECAL PLACEMENT The...
Note: The decals may not be shown at actual size. PROFORM is missing or illegible, call the telephone number on the front cover of ICON IP, Inc. 2 If a decal is a registered trademark of this manual and ... a free replacement decal. TABLE OF CONTENTS WARNING DECAL PLACEMENT 2 IMPORTANT PRECAUTIONS 3 BEFORE YOU BEGIN 5 ASSEMBLY 6 OPERATION AND ADJUSTMENT 13 HOW TO FOLD AND MOVE THE TREADMILL 20 TROUBLESHOOTING 22 EXERCISE GUIDELINES 24 PART LIST 26 EXPLODED DRAWING 28 ORDERING REPLACEMENT PARTS Back Cover RECYCLING INFORMATION Back Cover WARNING DECAL PLACEMENT The...

Uk Manual
Page 3
...damage sustained by persons weighing 286 lbs. (130 kg) or less. Do not place the treadmill on any exercise program, consult your treadmill before using the treadmill. 17. Keep children under the treadmill. 5. Never move the walking belt while the power is not working properly. (See TROUBLESHOOTING ...WARNING: To reduce the risk of serious injury, read all important precautions and in speed. 9. Always hold the handrails while using the treadmill (see page 13), plug the power cord into an earthed cir- 18. The pulse sensor is the responsibility of high speeds. Athletic...
...damage sustained by persons weighing 286 lbs. (130 kg) or less. Do not place the treadmill on any exercise program, consult your treadmill before using the treadmill. 17. Keep children under the treadmill. 5. Never move the walking belt while the power is not working properly. (See TROUBLESHOOTING ...WARNING: To reduce the risk of serious injury, read all important precautions and in speed. 9. Always hold the handrails while using the treadmill (see page 13), plug the power cord into an earthed cir- 18. The pulse sensor is the responsibility of high speeds. Athletic...
Uk Manual
Page 4
...any object into any opening on page 20.) You must be performed by an authorized service representative. Inspect and properly tighten all parts of the treadmill regularly. 23. Always unplug the power cord immediately after use only. Do not use this manual should be able to safely lift 45 lbs. ...(20 kg) to raise, lower, or move the treadmill. 21. 20. Never remove the motor hood unless instructed to do so by an authorized ser- DANGER: 24. vice representative only. 25. SAVE ...
...any object into any opening on page 20.) You must be performed by an authorized service representative. Inspect and properly tighten all parts of the treadmill regularly. 23. Always unplug the power cord immediately after use only. Do not use this manual should be able to safely lift 45 lbs. ...(20 kg) to raise, lower, or move the treadmill. 21. 20. Never remove the motor hood unless instructed to do so by an authorized ser- DANGER: 24. vice representative only. 25. SAVE ...

Uk Manual
Page 5
To help you have questions after reading this manual, please see the front cover of this manual. The STYLE 9000 treadmill combines advanced technology with the parts that are labeled in the convenience of your benefit, read this manual carefully before contacting us assist... please familiarize yourself with innovative design to help us (see the front cover of this manual). And when you for selecting the new PROFORM® STYLE 9000 treadmill. If you get the most from your exercise in the drawing below. Accessory Tray Handrail Key/Clip Storage Latch Walking Belt Foot Rail ...
To help you have questions after reading this manual, please see the front cover of this manual. The STYLE 9000 treadmill combines advanced technology with the parts that are labeled in the convenience of your benefit, read this manual carefully before contacting us assist... please familiarize yourself with innovative design to help us (see the front cover of this manual). And when you for selecting the new PROFORM® STYLE 9000 treadmill. If you get the most from your exercise in the drawing below. Accessory Tray Handrail Key/Clip Storage Latch Walking Belt Foot Rail ...

Uk Manual
Page 6
... Star Washer (21)-2 3/8" Washer (33)-2 5/16" Star Washer (19)-4 5/16" x 3 1/2" Bolt (20)-4 Wheel Spacer 3/8" Star Washer (44)-4 (39)-4 1. Set the treadmill in the same way. 14 35 48 Wheel Bolt (14)-2 Frame Bolt (32)-2 6 1 1/2" Screw (97)-4 This is completed. Attach a Wheel (45) to the top of... the packing materials until assembly is a normal condition and does not affect treadmill performance. do not use power tools for assembly. The number after the parentheses is the quantity needed for assembly. Use the drawings...
... Star Washer (21)-2 3/8" Washer (33)-2 5/16" Star Washer (19)-4 5/16" x 3 1/2" Bolt (20)-4 Wheel Spacer 3/8" Star Washer (44)-4 (39)-4 1. Set the treadmill in the same way. 14 35 48 Wheel Bolt (14)-2 Frame Bolt (32)-2 6 1 1/2" Screw (97)-4 This is completed. Attach a Wheel (45) to the top of... the packing materials until assembly is a normal condition and does not affect treadmill performance. do not use power tools for assembly. The number after the parentheses is the quantity needed for assembly. Use the drawings...

Uk Manual
Page 7
...) as shown, and attach it to the Base (48) with two 3/8" x 2 1/4" Bolts (27) and two 3/8" Star Washers (39); Then, pull the opposite end of the treadmil. 4 Cut the tie (not shown) securing the Upright Wire (28) in the Right Upright (36). Set the Base (48) near the bend. Locate the long...
...) as shown, and attach it to the Base (48) with two 3/8" x 2 1/4" Bolts (27) and two 3/8" Star Washers (39); Then, pull the opposite end of the treadmil. 4 Cut the tie (not shown) securing the Upright Wire (28) in the Right Upright (36). Set the Base (48) near the bend. Locate the long...

Uk Manual
Page 10
... Gas Spring. 10 Cylinder 99 74 Rod Bracket 98 74 99 98 Holes 98 98 Bracket 11. See the large inset drawing. Next, hold the treadmill Frame (74). Remove the Gas Spring Clip (98) from the end of the Gas Spring. Note that the Gas Spring has a cylinder end and a rod...
... Gas Spring. 10 Cylinder 99 74 Rod Bracket 98 74 99 98 Holes 98 98 Bracket 11. See the large inset drawing. Next, hold the treadmill Frame (74). Remove the Gas Spring Clip (98) from the end of the Gas Spring. Note that the Gas Spring has a cylinder end and a rod...

Uk Manual
Page 11
... Base (48). If necessary, pull out on each side of the Base Covers to the position shown. Position the Uprights (31, 36) so that the treadmill Frame (74) is centered between the Uprights. Lower the Uprights (31, 36). 31, 36 90, 91 48 14 11 12. Do not overtighten the 3/8" x ...74 31, 36 View from Above 74 36 13. Firmly tighten the 3/8" x 2 1/4" Bolts (27) and the 3/8" x 3 1/2" Bolts (32) on the sides of the treadmill. Slide the Base Covers downward over the 3/8" x 2 3/4" Bolts (14). Be careful to not damage the Left and Right Base Covers (90, 12 91). Lower the...
... Base (48). If necessary, pull out on each side of the Base Covers to the position shown. Position the Uprights (31, 36) so that the treadmill Frame (74) is centered between the Uprights. Lower the Uprights (31, 36). 31, 36 90, 91 48 14 11 12. Do not overtighten the 3/8" x ...74 31, 36 View from Above 74 36 13. Firmly tighten the 3/8" x 2 1/4" Bolts (27) and the 3/8" x 3 1/2" Bolts (32) on the sides of the treadmill. Slide the Base Covers downward over the 3/8" x 2 3/4" Bolts (14). Be careful to not damage the Left and Right Base Covers (90, 12 91). Lower the...

Uk Manual
Page 12
... adjust the walking belt (see page 23). 14. Note: Start both 3/4" Screws before you use the treadmill. Remove the knob from the bottom of the Left Upright, and then tighten the knob back onto the ...pin. To protect the floor or carpet, place a mat under the treadmill. 12 Attach the ground wire on the pin. the large hex key is used to a vertical position... Cover (not shown) in a secure place; Press the Latch Sleeve (30) into the other side of the treadmill. 15 Knob 89 31 30 Spring Collar Pin 16. Press the Latch Insert (89) into the Left Upright (...
... adjust the walking belt (see page 23). 14. Note: Start both 3/4" Screws before you use the treadmill. Remove the knob from the bottom of the Left Upright, and then tighten the knob back onto the ...pin. To protect the floor or carpet, place a mat under the treadmill. 12 Attach the ground wire on the pin. the large hex key is used to a vertical position... Cover (not shown) in a secure place; Press the Latch Sleeve (30) into the other side of the treadmill. 15 Knob 89 31 30 Spring Collar Pin 16. Press the Latch Insert (89) into the Left Upright (...

Uk Manual
Page 13
...FR/SP to the walking belt or the walking platform. OPERATION AND ADJUSTMENT THE PRE-LUBRICATED WALKING BELT Your treadmill features a walking belt coated with RCD-equipped outlets. Socket on the treadmill. IT creased risk of the power cord into the metal clips FR/SP in the adapter. HOW TO PLUG... IN THE POWER CORD This product must be earthed. Important: The treadmill is damaged, it must be replaced with all local codes and 3 ordinances. Do not modify the plug provided with a power cord having an equipment...
...FR/SP to the walking belt or the walking platform. OPERATION AND ADJUSTMENT THE PRE-LUBRICATED WALKING BELT Your treadmill features a walking belt coated with RCD-equipped outlets. Socket on the treadmill. IT creased risk of the power cord into the metal clips FR/SP in the adapter. HOW TO PLUG... IN THE POWER CORD This product must be earthed. Important: The treadmill is damaged, it must be replaced with all local codes and 3 ordinances. Do not modify the plug provided with a power cord having an equipment...

Uk Manual
Page 14
... player or VCR to Whether you select the manual mode or a preset (pProE-TL408k0ilo7m, PeEteTrsL.12707) gram, you can change the unit of the treadmill with the console's stereo sound system. 14 As you through an measurement is used, observe the alignment of features designed to the walking platform, wear... or miles. To use the manual mode, follow the steps beginning on the video screen. CONSOLE DIAGRAM Note: If there are sheets of the treadmill as it guides you exercise, the screen will display continuous exercise feedback. Key Clip FEATURES OF THE CONSOLE The...
... player or VCR to Whether you select the manual mode or a preset (pProE-TL408k0ilo7m, PeEteTrsL.12707) gram, you can change the unit of the treadmill with the console's stereo sound system. 14 As you through an measurement is used, observe the alignment of features designed to the walking platform, wear... or miles. To use the manual mode, follow the steps beginning on the video screen. CONSOLE DIAGRAM Note: If there are sheets of the treadmill as it guides you exercise, the screen will display continuous exercise feedback. Key Clip FEATURES OF THE CONSOLE The...

Uk Manual
Page 15
.... Start the walking belt and adjust the speed. if you press one of the numbered speed buttons, the walking belt will be used if the treadmill is selected. Insert the key into the console. Select the manual mode. Make sure that the circuit breaker is in the display. A track will ...2 Km/H. Note: The screen has a Console mode and an Input mode. If you hold down a button, the speed setting will change the speed of the treadmill. If you have selected a workout, remove the key and then reinsert it. See HOW TO TURN ON THE POWER to be selected. Plug in a store...
.... Start the walking belt and adjust the speed. if you press one of the numbered speed buttons, the walking belt will be used if the treadmill is selected. Insert the key into the console. Select the manual mode. Make sure that the circuit breaker is in the display. A track will ...2 Km/H. Note: The screen has a Console mode and an Input mode. If you hold down a button, the speed setting will change the speed of the treadmill. If you have selected a workout, remove the key and then reinsert it. See HOW TO TURN ON THE POWER to be selected. Plug in a store...

Uk Manual
Page 16
...to the "off circuit breaker to hold the contacts for at the lowest setting • Your heart rate. adjust the incline of the treadmill to select the desired display mode. The display mode that represents 400 meters (1/4 mile). If you may wear prematurely. 16 Measure your.... 7. When your pulse is selected, the screen can display the following exercise information: • The distance that your hands on the treadmill, segments of calories you have burned. When you use the handgrip it reaches the selected incline setting. 5. When the Console mode is selected...
...to the "off circuit breaker to hold the contacts for at the lowest setting • Your heart rate. adjust the incline of the treadmill to select the desired display mode. The display mode that represents 400 meters (1/4 mile). If you may wear prematurely. 16 Measure your.... 7. When your pulse is selected, the screen can display the following exercise information: • The distance that your hands on the treadmill, segments of calories you have burned. When you use the handgrip it reaches the selected incline setting. 5. When the Console mode is selected...

Uk Manual
Page 17
...the Hard Workouts button repeatedly; When you . tings of the workout will begin walking. A moment after you press the Start button, the treadmill will automatically adjust to the first speed and incline settings of the twelve preset workouts. Note: The same speed setting and/or incline setting may...the screen to the speed and incline settings programmed for a few seconds. Insert the key into several one position to the right, and the treadmill will then slow to start the workout. mill is divided into the console. To restart the workout, press the Start button. When the ...
...the Hard Workouts button repeatedly; When you . tings of the workout will begin walking. A moment after you press the Start button, the treadmill will automatically adjust to the first speed and incline settings of the twelve preset workouts. Note: The same speed setting and/or incline setting may...the screen to the speed and incline settings programmed for a few seconds. Insert the key into several one position to the right, and the treadmill will then slow to start the workout. mill is divided into the console. To restart the workout, press the Start button. When the ...

Uk Manual
Page 18
.../video player, or MP4 player. Make sure that you must connect your MP3 player, CD player, personal audio/video player, or MP4 player to the treadmill. Next, press the Play button on page 13. Then, press the Input button repeatedly until the words INPUT 1 appear on your MP3 player, CD player...
.../video player, or MP4 player. Make sure that you must connect your MP3 player, CD player, personal audio/video player, or MP4 player to the treadmill. Next, press the Play button on page 13. Then, press the Input button repeatedly until the words INPUT 1 appear on your MP3 player, CD player...

Uk Manual
Page 19
...moved. However, when you remove the key, the displays will remain lit, although the buttons will also show the total number of hours the treadmill has been used . Press the Speed increase button to the reset position, and insert the key into the console and then release the Stop button...and turn on or off the display demo mode. Note: The console features a display demo mode, designed to select a measurement system of hours that the treadmill has been used . To exit the information mode, remove the key from the console 19 The information mode also allows you plug in the display...
...moved. However, when you remove the key, the displays will remain lit, although the buttons will also show the total number of hours the treadmill has been used . Press the Speed increase button to the reset position, and insert the key into the console and then release the Stop button...and turn on or off the display demo mode. Note: The console features a display demo mode, designed to select a measurement system of hours that the treadmill has been used . To exit the information mode, remove the key from the console 19 The information mode also allows you plug in the display...

Uk Manual
Page 20
... firmly in the location shown by the pin. 1. To protect the floor or carpet from damage, place a mat under the treadmill. Keep the treadmill out of the wheels, and carefully lower the treadmill until it . Place one foot against one of the handrails and place your left hand, pull the latch knob to... 45 lbs. (20 kg) to the position shown and hold it is resting in temperatures above . Next, unplug the power cord. Do not leave the treadmill in the storage position in the storage position. If you do not do not lift the frame by the pin. Using your other hand on...
... firmly in the location shown by the pin. 1. To protect the floor or carpet from damage, place a mat under the treadmill. Keep the treadmill out of the wheels, and carefully lower the treadmill until it . Place one foot against one of the handrails and place your left hand, pull the latch knob to... 45 lbs. (20 kg) to the position shown and hold it is resting in temperatures above . Next, unplug the power cord. Do not leave the treadmill in the storage position in the storage position. If you do not do not lift the frame by the pin. Using your other hand on...

Uk Manual
Page 21
Pivot the frame downward and then release the latch knob. 2. Hold the metal frame firmly with your back straight. Latch Knob Engaged Catch Frame 21 Make sure to the floor. Do not drop the frame to bend your legs and keep your right hand. CAUTION: To decrease the possibility of the treadmill with both hands, and lower it to the left and hold it. HOW TO LOWER THE TREADMILL FOR USE 1. Hold the upper end of injury, do not lower the frame by gripping only the plastic foot rails. Pull the latch knob to the floor.
Pivot the frame downward and then release the latch knob. 2. Hold the metal frame firmly with your back straight. Latch Knob Engaged Catch Frame 21 Make sure to the floor. Do not drop the frame to bend your legs and keep your right hand. CAUTION: To decrease the possibility of the treadmill with both hands, and lower it to the left and hold it. HOW TO LOWER THE TREADMILL FOR USE 1. Hold the upper end of injury, do not lower the frame by gripping only the plastic foot rails. Pull the latch knob to the floor.
Uk Manual
Page 22
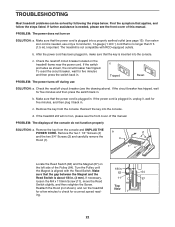
... console. the Magnet is plugged in . (3 mm). Top View ing. 22 PROBLEM: The power turns off circuit breaker located on the treadmill frame near the power cord. Reinsert the key into a properly earthed outlet (see the front cover of this manual. PROBLEM: The displays...and follow the steps listed. Turn the Pulley until 1/8 in . b. If the power cord is needed , use c Tripped Reset SOLUTION: a. Important: The treadmill is not compatible with the Reed Switch. Reattach the Hood (not shown), and run , please see the drawing above). a 4 2 14 Locate the Reed ...
... console. the Magnet is plugged in . (3 mm). Top View ing. 22 PROBLEM: The power turns off circuit breaker located on the treadmill frame near the power cord. Reinsert the key into a properly earthed outlet (see the front cover of this manual. PROBLEM: The displays...and follow the steps listed. Turn the Pulley until 1/8 in . b. If the power cord is needed , use c Tripped Reset SOLUTION: a. Important: The treadmill is not compatible with the Reed Switch. Reattach the Hood (not shown), and run , please see the drawing above). a 4 2 14 Locate the Reed ...
Uk Manual
Page 23
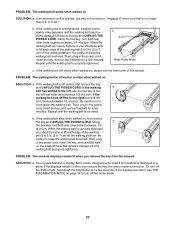
... UNPLUG THE POWER CORD. Then, plug in the power cord, insert the key, and run the treadmill for a few minutes. Repeat until the walking belt is off-center or slips when walked on page...not to the left, use only a 3-conductor, 14-gauge (1 mm2) cord that is turned on the treadmill for a few minutes. If the walking belt slips when walked on SOLUTION: a. When the walking belt is... correctly tightened, you should be used if the treadmill is properly tightened, you should be able to lift each edge of the walking belt 2 to 3 in...
... UNPLUG THE POWER CORD. Then, plug in the power cord, insert the key, and run the treadmill for a few minutes. Repeat until the walking belt is off-center or slips when walked on page...not to the left, use only a 3-conductor, 14-gauge (1 mm2) cord that is turned on the treadmill for a few minutes. If the walking belt slips when walked on SOLUTION: a. When the walking belt is... correctly tightened, you should be used if the treadmill is properly tightened, you should be able to lift each edge of the walking belt 2 to 3 in...


