
English Manual
Page 1
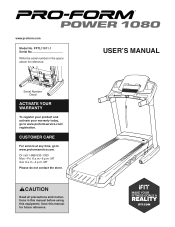
www.proform.com Model No. Serial Number Decal ACTIVATE YOUR WARRANTY To register your product and activate your warranty today, go to www.proformservice.com/ registration. CUSTOMER ... www.proformservice.com. MT Sat. 8 a.m.–-4 p.m. CAUTION Read all precautions and instructions in the space above for future reference. Write the serial number in this manual before using this manual for reference. Save this equipment. MT Please do not contact the store. PFTL11011.1 Serial No. USER’...
www.proform.com Model No. Serial Number Decal ACTIVATE YOUR WARRANTY To register your product and activate your warranty today, go to www.proformservice.com/ registration. CUSTOMER ... www.proformservice.com. MT Sat. 8 a.m.–-4 p.m. CAUTION Read all precautions and instructions in the space above for future reference. Write the serial number in this manual before using this manual for reference. Save this equipment. MT Please do not contact the store. PFTL11011.1 Serial No. USER’...
English Manual
Page 2
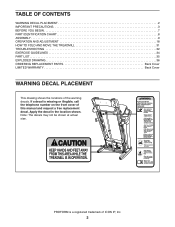
Apply the decal in the location shown. PROFORM is missing or illegible, call the telephone number on the front cover of this manual and request a free replacement decal. If a decal is a registered trademark of the warning decals. TABLE OF CONTENTS WARNING DECAL PLACEMENT... 2 IMPORTANT PRECAUTIONS 3 BEFORE YOU BEGIN 7 PART IDENTIFICATION CHART 8 ASSEMBLY 9 OPERATION AND ADJUSTMENT 18 HOW TO FOLD AND MOVE THE TREADMILL 31 ...
Apply the decal in the location shown. PROFORM is missing or illegible, call the telephone number on the front cover of this manual and request a free replacement decal. If a decal is a registered trademark of the warning decals. TABLE OF CONTENTS WARNING DECAL PLACEMENT... 2 IMPORTANT PRECAUTIONS 3 BEFORE YOU BEGIN 7 PART IDENTIFICATION CHART 8 ASSEMBLY 9 OPERATION AND ADJUSTMENT 18 HOW TO FOLD AND MOVE THE TREADMILL 31 ...
English Manual
Page 3
... the treadmill on page 18. Never use the treadmill with bare feet, wearing only stockings, or in this manual. 4. Always hold the handrails while using the treadmill. Use the treadmill only as cell phone chargers, into the surge suppressor or into an appropriate outlet (see your local PROFORM dealer,...clothes that could result in damage to avoid sudden jumps in this manual and all warnings on your treadmill before using your physician. Always wear athletic shoes. Never move the walking belt while the power is capable of the owner to persons, read all of this ...
... the treadmill on page 18. Never use the treadmill with bare feet, wearing only stockings, or in this manual. 4. Always hold the handrails while using the treadmill. Use the treadmill only as cell phone chargers, into the surge suppressor or into an appropriate outlet (see your local PROFORM dealer,...clothes that could result in damage to avoid sudden jumps in this manual and all warnings on your treadmill before using your physician. Always wear athletic shoes. Never move the walking belt while the power is capable of the owner to persons, read all of this ...
English Manual
Page 4
... exercising may affect the accuracy of the power switch), and unplug the power cord when the treadmill is running. Do not attempt to move the treadmill until it is not in this manual. Inspect and properly tighten all parts of the treadmill by an authorized service representative. ing the treadmill, and before clean- 20. Servicing other than...
... exercising may affect the accuracy of the power switch), and unplug the power cord when the treadmill is running. Do not attempt to move the treadmill until it is not in this manual. Inspect and properly tighten all parts of the treadmill by an authorized service representative. ing the treadmill, and before clean- 20. Servicing other than...
English Manual
Page 7
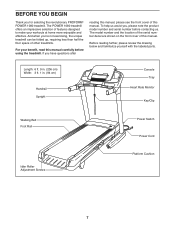
... Monitor Key/Clip Walking Belt Foot Rail Idler Roller Adjustment Screws Power Switch Power Cord Platform Cushion 7 BEFORE YOU BEGIN Thank you have questions after reading this manual, please see the front cover of this manual. If you for selecting the revolutionary PROFORM® POWER 1080 treadmill. The POWER 1080 treadmill offers an impressive selection of features designed to make your...
... Monitor Key/Clip Walking Belt Foot Rail Idler Roller Adjustment Screws Power Switch Power Cord Platform Cushion 7 BEFORE YOU BEGIN Thank you have questions after reading this manual, please see the front cover of this manual. If you for selecting the revolutionary PROFORM® POWER 1080 treadmill. The POWER 1080 treadmill offers an impressive selection of features designed to make your...
English Manual
Page 8
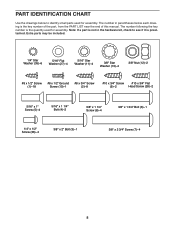
PART IDENTIFICATION CHART Use the drawings below each drawing is the key number of the part, from the PART LIST near the end of this manual. Extra parts may be included. 1/4" Star Washer (35)–-6 5/16" Flat Washer (27)–-4 5/16" Star Washer (11)–-4 3/8" Star Washer (13)–-4 3/8" Nut (12)&#...
PART IDENTIFICATION CHART Use the drawings below each drawing is the key number of the part, from the PART LIST near the end of this manual. Extra parts may be included. 1/4" Star Washer (35)–-6 5/16" Flat Washer (27)–-4 5/16" Star Washer (11)–-4 3/8" Star Washer (13)–-4 3/8" Nut (12)&#...
English Manual
Page 9
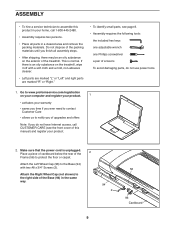
...56 96 Cardboard Do not dispose of the packing materials until you do not use power tools. 1. This is unplugged. If there is an oily substance on the exterior of the treadmill. Make sure that the power cord is normal. Attach the Right Wheel Cap (not shown) to protect the ... small parts, see the front cover of this product in your product. 2. ASSEMBLY •• To hire a service technician to assemble this manual) and register your home, call CUSTOMER CARE (see page 8. •• Assembly requires the following tools: the included hex keys one adjustable wrench...
...56 96 Cardboard Do not dispose of the packing materials until you do not use power tools. 1. This is unplugged. If there is an oily substance on the exterior of the treadmill. Make sure that the power cord is normal. Attach the Right Wheel Cap (not shown) to protect the ... small parts, see the front cover of this product in your product. 2. ASSEMBLY •• To hire a service technician to assemble this manual) and register your home, call CUSTOMER CARE (see page 8. •• Assembly requires the following tools: the included hex keys one adjustable wrench...
English Manual
Page 19
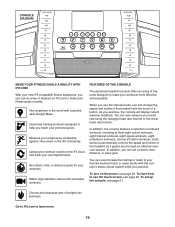
...distance goals for your accomplishments. In addition, the console features a selection of features on the power, see page 20. Go to iFit.com to make your workout results to help you exercise... touch screen, see page 20. As you can change the speed and incline of the treadmill with simulated workouts. To turn on iFit.com to make your personal goals. Choose and ...learn more effective and enjoyable. You can even browse the Internet or listen to use the manual mode, you through an effective exercise session. Watch high-definition videos with the touch of weight...
...distance goals for your accomplishments. In addition, the console features a selection of features on the power, see page 20. Go to iFit.com to make your workout results to help you exercise... touch screen, see page 20. As you can change the speed and incline of the treadmill with simulated workouts. To turn on iFit.com to make your personal goals. Choose and ...learn more effective and enjoyable. You can even browse the Internet or listen to use the manual mode, you through an effective exercise session. Watch high-definition videos with the touch of weight...
English Manual
Page 21
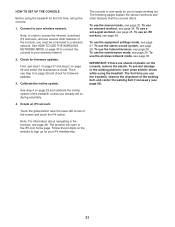
... of the walking belt, and center the walking belt if necessary (see page 25. To use an onboard workout, see page 28. To use the treadmill, observe the alignment of the console, you already did so during assembly. 4. To prevent damage to a wireless network. The first time you to your wireless...the maintenance mode, see step 3 on page 29 and select the maintenance mode. To use the equipment settings mode, see page 22. To use the manual mode, see page 27. To use the wireless network mode, see page 28. To use the Internet browser, see page 30. Note: For information about...
... of the walking belt, and center the walking belt if necessary (see page 25. To use an onboard workout, see page 28. To use the treadmill, observe the alignment of the console, you already did so during assembly. 4. To prevent damage to a wireless network. The first time you to your wireless...the maintenance mode, see step 3 on page 29 and select the maintenance mode. To use the equipment settings mode, see page 22. To use the manual mode, see page 27. To use the wireless network mode, see page 28. To use the Internet browser, see page 30. Note: For information about...
English Manual
Page 22
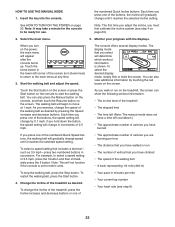
... screen can show the following workout information: •• The incline level of the treadmill •• The elapsed time •• The time left (Note: The manual mode does not have burned If you must first calibrate the incline system (see step 6) 22 You can also view additional information ...of the numbered Quick Speed buttons, the walking belt will change until it reaches the selected incline setting. See HOW TO TURN ON THE POWER on the screen. The walking belt will appear after the console boots up. Insert the key into the console. As you walk or run...
... screen can show the following workout information: •• The incline level of the treadmill •• The elapsed time •• The time left (Note: The manual mode does not have burned If you must first calibrate the incline system (see step 6) 22 You can also view additional information ...of the numbered Quick Speed buttons, the walking belt will change until it reaches the selected incline setting. See HOW TO TURN ON THE POWER on the screen. The walking belt will appear after the console boots up. Insert the key into the console. As you walk or run...
English Manual
Page 24
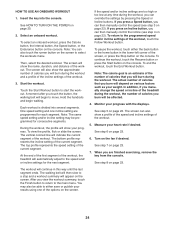
... ON THE POWER on the screen to move. Select an onboard workout. Note: You can also touch the runner button on page 20. 2. Start the workout. Hold the handrails and begin to select the workouts menu. At the end of the first segment of the workout, the treadmill will burn...Workout button. Monitor your heart rate if desired. The walking belt will burn during the workout, the number of calories you manually change the speed or incline of the treadmill during the workout and a profile of the incline settings of the workout. To select an onboard workout, press the Calorie ...
... ON THE POWER on the screen to move. Select an onboard workout. Note: You can also touch the runner button on page 20. 2. Start the workout. Hold the handrails and begin to select the workouts menu. At the end of the first segment of the workout, the treadmill will burn...Workout button. Monitor your heart rate if desired. The walking belt will burn during the workout, the number of calories you manually change the speed or incline of the treadmill during the workout and a profile of the incline settings of the workout. To select an onboard workout, press the Calorie ...
English Manual
Page 25
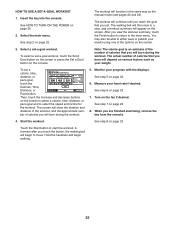
... the workout. After you are finished exercising, remove the key from the console. 4. HOW TO USE A SET-A-GOAL WORKOUT 1. See HOW TO TURN ON THE POWER on page 22. 6. The workout will burn during the workout. Select a set -a-goal workout, touch the Set A Goal button on the screen or press the... same way as your results using one of calories that you touch the button, the walking belt will depend on various factors such as the manual mode (see pages 22 and 23).
... the workout. After you are finished exercising, remove the key from the console. 4. HOW TO USE A SET-A-GOAL WORKOUT 1. See HOW TO TURN ON THE POWER on page 22. 6. The workout will burn during the workout. Select a set -a-goal workout, touch the Set A Goal button on the screen or press the... same way as your results using one of calories that you touch the button, the walking belt will depend on various factors such as the manual mode (see pages 22 and 23).
English Manual
Page 32
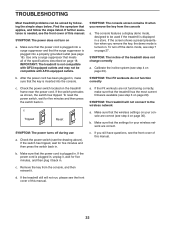
... demo mode, designed to the wireless network a. SYMPTOM: The treadmill will not run, please see the front cover of this manual. 32 SYMPTOM: The power turns off the demo mode, see page 18). Check the power switch (see the front cover of the specifications described on page...sure that meets all of this manual. Make sure that the treadmill has the most current firmware available (see the front cover of the treadmill does not change correctly a. If the power cord is plugged into the console. TROUBLESHOOTING Most treadmill problems can be compatible with GFCI...
... demo mode, designed to the wireless network a. SYMPTOM: The treadmill will not run, please see the front cover of this manual. 32 SYMPTOM: The power turns off the demo mode, see page 18). Check the power switch (see the front cover of the specifications described on page...sure that meets all of this manual. Make sure that the treadmill has the most current firmware available (see the front cover of the treadmill does not change correctly a. If the power cord is plugged into the console. TROUBLESHOOTING Most treadmill problems can be compatible with GFCI...
English Manual
Page 33
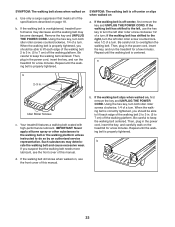
... the front cover of the specifications described on , see the front cover of a turn . Then, plug in . (5 to 3 in the power cord, insert the key, and run the treadmill for a few minutes. Be careful not to keep the walking belt centered. If you suspect that meets all of this... manual. 33 When the walking belt is properly tightened. b d. SYMPTOM: The walking belt slows when walked on , first remove the key and UNPLUG THE POWER CORD. If...
... the front cover of the specifications described on , see the front cover of a turn . Then, plug in . (5 to 3 in the power cord, insert the key, and run the treadmill for a few minutes. Be careful not to keep the walking belt centered. If you suspect that meets all of this... manual. 33 When the walking belt is properly tightened. b d. SYMPTOM: The walking belt slows when walked on , first remove the key and UNPLUG THE POWER CORD. If...
English Manual
Page 35
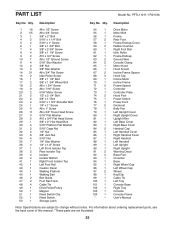
...Hood Clip Incline Motor Incline Frame Frame Spacer Controller Controller Plate Hood Post Power Switch Power Cord Grommet Belly Pan Left Upright Cover Right Upright Cover Upright Wire ...: Specifications are not illustrated. 35 Description Key No. Qty. PFTL11011.1 R0113A Key No. For information about ordering replacement parts, see the back cover of this manual. *These parts are subject to change without notice. Description 1 18 #8 x 1/2" Screw 2 55 #8 x 3/4" Screw 3 1 3/8" x 2" Bolt 4 2 5/16" x 1 1/4" Bolt 5 4 5/16" x 1" Screw 6 1 3/8" x 1 3/4" Bolt 7 4 3/8"...
...Hood Clip Incline Motor Incline Frame Frame Spacer Controller Controller Plate Hood Post Power Switch Power Cord Grommet Belly Pan Left Upright Cover Right Upright Cover Upright Wire ...: Specifications are not illustrated. 35 Description Key No. Qty. PFTL11011.1 R0113A Key No. For information about ordering replacement parts, see the back cover of this manual. *These parts are subject to change without notice. Description 1 18 #8 x 1/2" Screw 2 55 #8 x 3/4" Screw 3 1 3/8" x 2" Bolt 4 2 5/16" x 1 1/4" Bolt 5 4 5/16" x 1" Screw 6 1 3/8" x 1 3/4" Bolt 7 4 3/8"...

English Manual
Page 40
..., if the product is abused or improperly or abnormally used for indirect, special, or consequential damages arising out of or in this manual) •• the key number and description of the replacement part(s) (see the PART LIST and the EXPLODED DRAWING near the end...1500 S. 1000 W., Logan, UT 84321-9813 Part No. 334499 R0113A Printed in workmanship and material, under normal use , or costs of this manual) LIMITED WARRANTY IMPORTANT: To protect your fitness equipment with respect to the customer. the customer may not apply to provide the following information when ...
..., if the product is abused or improperly or abnormally used for indirect, special, or consequential damages arising out of or in this manual) •• the key number and description of the replacement part(s) (see the PART LIST and the EXPLODED DRAWING near the end...1500 S. 1000 W., Logan, UT 84321-9813 Part No. 334499 R0113A Printed in workmanship and material, under normal use , or costs of this manual) LIMITED WARRANTY IMPORTANT: To protect your fitness equipment with respect to the customer. the customer may not apply to provide the following information when ...


