

English Manual
Page 3
... the treadmill if the power cord or plug is damaged, or if the treadmill is not working properly. (See TROUBLESHOOTING on page 26 if the treadmill is capable of high speeds. Never use an extension cord. 11. The pulse sensor is damaged, the walking belt may change speed, accelerate, or stop procedure before operating the treadmill. 1. Never leave the treadmill unattended while it and two feet on each side. Adjust the speed...
... the treadmill if the power cord or plug is damaged, or if the treadmill is not working properly. (See TROUBLESHOOTING on page 26 if the treadmill is capable of high speeds. Never use an extension cord. 11. The pulse sensor is damaged, the walking belt may change speed, accelerate, or stop procedure before operating the treadmill. 1. Never leave the treadmill unattended while it and two feet on each side. Adjust the speed...
English Manual
Page 4
... user serviceable parts inside. To reduce the risk of the television. If an outside antenna system, extreme care should be sure that the unit is properly assembled. (See ASSEMBLY on page 7, and HOW TO FOLD AND MOVE THE TREADMILL on page 24.) You must be fatal. 28. Never insert any object into such power lines or circuits. Never remove the motor hood...
... user serviceable parts inside. To reduce the risk of the television. If an outside antenna system, extreme care should be sure that the unit is properly assembled. (See ASSEMBLY on page 7, and HOW TO FOLD AND MOVE THE TREADMILL on page 24.) You must be fatal. 28. Never insert any object into such power lines or circuits. Never remove the motor hood...
English Manual
Page 6
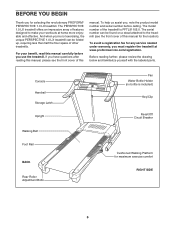
... front cover of the treadmill is included) Key/Clip Reset/Off Circuit Breaker Cushioned Walking Platform for any service needed under warranty, you use the treadmill. Console Handrail Storage Latch Upright Walking Belt Foot Rail BACK Rear Roller Adjustment Bolts Fan Water Bottle Holder (no bottle is PFTL91105.0. Before reading further, please review the drawing below and familiarize yourself with the labeled parts. BEFORE YOU BEGIN Thank you , note the product model number and serial number...
... front cover of the treadmill is included) Key/Clip Reset/Off Circuit Breaker Cushioned Walking Platform for any service needed under warranty, you use the treadmill. Console Handrail Storage Latch Upright Walking Belt Foot Rail BACK Rear Roller Adjustment Bolts Fan Water Bottle Holder (no bottle is PFTL91105.0. Before reading further, please review the drawing below and familiarize yourself with the labeled parts. BEFORE YOU BEGIN Thank you , note the product model number and serial number...
English Manual
Page 7
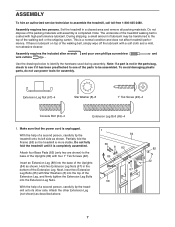
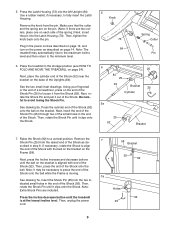
... the walking belt or the shipping carton. Partially fold the Frame (58) so the treadmill is unplugged. Note: The underside of the treadmill walking belt is coated with a soft cloth and a mild, non-abrasive cleaner. Assembly requires the included allen wrench and your own phillips screwdriver and wire cutters . Make sure that the power cord is more stable. Hold two Extension Leg...
... the walking belt or the shipping carton. Partially fold the Frame (58) so the treadmill is unplugged. Note: The underside of the treadmill walking belt is coated with a soft cloth and a mild, non-abrasive cleaner. Assembly requires the included allen wrench and your own phillips screwdriver and wire cutters . Make sure that the power cord is more stable. Hold two Extension Leg...
English Manual
Page 8
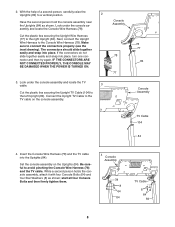
... POWER IS TURNED ON. 3. start all four Console Bolts and then firmly tighten them. 4 Console Assembly 78 8 64 84 TV Cable 8 64 84 8 Console Assembly 78 77 78 77 84 Console Assembly TV Cable 104 84 4. While a second person holds the console assembly, attach it with four Console Bolts (64) and four Star Washers (8) as shown. Cut the plastic ties securing the Upright Wire Harness (77) to the Console Wire Harness (78). Set the console assembly...
... POWER IS TURNED ON. 3. start all four Console Bolts and then firmly tighten them. 4 Console Assembly 78 8 64 84 TV Cable 8 64 84 8 Console Assembly 78 77 78 77 84 Console Assembly TV Cable 104 84 4. While a second person holds the console assembly, attach it with four Console Bolts (64) and four Star Washers (8) as shown. Cut the plastic ties securing the Upright Wire Harness (77) to the Console Wire Harness (78). Set the console assembly...
English Manual
Page 9
...fully insert the Latch Housing. Then, tighten the knob back onto the pin. dicated small holes in - Press the Latch Housing (73) into the two in the end of the Shock Pin (25) to press the end of the spring.) Next, insert the pin into the Latch Housing (73). Using your fingernail or...The treadmill may be necessary to loosen it out of the Uprights (84). Insert the Shock Pin (25) into the left Upright (84). Holes Press the Incline decrease button until it clips onto the Shock. See drawing 5a. scribed in the power cord as described on page 12, and turn on the power as...
...fully insert the Latch Housing. Then, tighten the knob back onto the pin. dicated small holes in - Press the Latch Housing (73) into the two in the end of the Shock Pin (25) to press the end of the spring.) Next, insert the pin into the Latch Housing (73). Using your fingernail or...The treadmill may be necessary to loosen it out of the Uprights (84). Insert the Shock Pin (25) into the left Upright (84). Holes Press the Incline decrease button until it clips onto the Shock. See drawing 5a. scribed in the power cord as described on page 12, and turn on the power as...
English Manual
Page 11
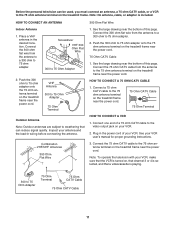
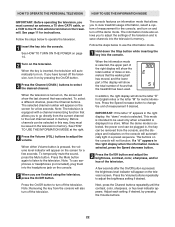
... treadmill frame. Connect a 75 ohm CATV cable to the video output jack on the treadmill frame near the power cord. 75 Ohm CATV Cable 1. Plug in the desired location. Combination VHF/UHF Antennas 300 Ohm Flat Wire 3. Note: No antenna, cable, or adapter is turned on the treadmill frame near the power cord. 75 Ohm CATV Cable 75 Ohm Terminal HOW TO CONNECT A VCR 1. HOW TO CONNECT A 75 OHM CATV CABLE 1. Connect...
... treadmill frame. Connect a 75 ohm CATV cable to the video output jack on the treadmill frame near the power cord. 75 Ohm CATV Cable 1. Plug in the desired location. Combination VHF/UHF Antennas 300 Ohm Flat Wire 3. Note: No antenna, cable, or adapter is turned on the treadmill frame near the power cord. 75 Ohm CATV Cable 75 Ohm Terminal HOW TO CONNECT A VCR 1. HOW TO CONNECT A 75 OHM CATV CABLE 1. Connect...
English Manual
Page 12
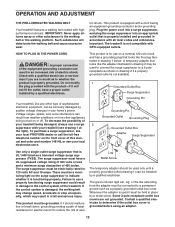
...-grounding conductor and a grounding plug. HOW TO PLUG IN THE POWER CORD DANGER: Improper connection of this manual and order part number 146148, or see your treadmill (see your local PROFORM dealer or call the toll-free telephone number on a nominal 120-volt circuit, and has a grounding plug that is grounded before using an adapter. 12 Your treadmill, like the plug illustrated in your home's power. Voltage surges, spikes...
...-grounding conductor and a grounding plug. HOW TO PLUG IN THE POWER CORD DANGER: Improper connection of this manual and order part number 146148, or see your treadmill (see your local PROFORM dealer or call the toll-free telephone number on a nominal 120-volt circuit, and has a grounding plug that is grounded before using an adapter. 12 Your treadmill, like the plug illustrated in your home's power. Voltage surges, spikes...
English Manual
Page 13
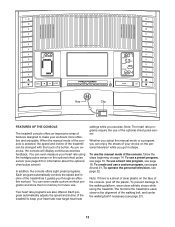
... workout programs and store them in shape. Key Clip FEATURES OF THE CONSOLE The treadmill console offers an impressive array of features designed to make your heart rate using the treadmill. In addition, the console offers eight preset programs. Each program automatically controls the speed and incline of the console, follow the steps beginning on the face of the optional chest pulse sensor. To use the manual mode of the treadmill as it guides you exercise. To use...
... workout programs and store them in shape. Key Clip FEATURES OF THE CONSOLE The treadmill console offers an impressive array of features designed to make your heart rate using the treadmill. In addition, the console offers eight preset programs. Each program automatically controls the speed and incline of the console, follow the steps beginning on the face of the optional chest pulse sensor. To use the manual mode of the treadmill as it guides you exercise. To use...
English Manual
Page 14
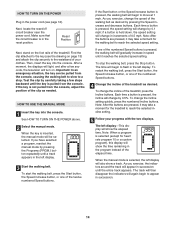
... speed setting. HOW TO TURN ON THE POWER Plug in the reset position. Then, insert the key into the console. See HOW TO TURN ON THE POWER above. 2 Select the manual mode. If the Start button or the Speed increase button is pressed, the incline will begin to appear in the left display. 3 Start the walking belt. Note: After the buttons are pressed, it may take a moment for heart rate program 10 or a custom program), this display will change the speed...
... speed setting. HOW TO TURN ON THE POWER Plug in the reset position. Then, insert the key into the console. See HOW TO TURN ON THE POWER above. 2 Select the manual mode. If the Start button or the Speed increase button is pressed, the incline will begin to appear in the left display. 3 Start the walking belt. Note: After the buttons are pressed, it may take a moment for heart rate program 10 or a custom program), this display will change the speed...
English Manual
Page 15
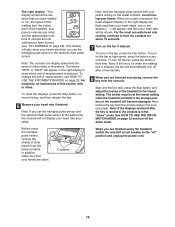
... appear, and then your heart rate will automatically turn off " position and unplug the power cord. 15 When your pulse is folded to the "off after the key is removed, the console is selected. To turn off the demo mode. In addition, make sure that you have walked or run, the speed of the walking belt, the incline level of the treadmill, your pace (in the "demo" mode. Note: If the...
... appear, and then your heart rate will automatically turn off " position and unplug the power cord. 15 When your pulse is folded to the "off after the key is removed, the console is selected. To turn off the demo mode. In addition, make sure that you have walked or run, the speed of the walking belt, the incline level of the treadmill, your pace (in the "demo" mode. Note: If the...
English Manual
Page 18
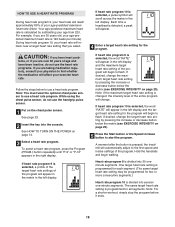
... in the left display. Heart rate program 9 is programmed for the program. Follow the steps below the matrix (see EXERCISE INTENSITY on page 14. 3 Select a heart rate program. While using the chest pulse sensor, do not use the handgrip pulse sensor. 1 Put on page 29). 5 Press the Start button or the Speed increase button to use a heart rate program. If desired, change . The same target heart rate setting is divided into 30 oneminute segments. Note: For a shorter workout, simply stop the program before it...
... in the left display. Heart rate program 9 is programmed for the program. Follow the steps below the matrix (see EXERCISE INTENSITY on page 14. 3 Select a heart rate program. While using the chest pulse sensor, do not use the handgrip pulse sensor. 1 Put on page 29). 5 Press the Start button or the Speed increase button to use a heart rate program. If desired, change . The same target heart rate setting is divided into 30 oneminute segments. Note: For a shorter workout, simply stop the program before it...
English Manual
Page 19
... heart rate closer to the target heart rate setting. See step 5 on page 14. 7 Turn on page 17. 19 ment will flash in the flashing Current Segment column of the treadmill may automatically change to bring your heart rate is not detected during the program, you are finished exercising, remove the key from the console. If heart rate program 9 is too high or too low at any time, press the Stop button...
... heart rate closer to the target heart rate setting. See step 5 on page 14. 7 Turn on page 17. 19 ment will flash in the flashing Current Segment column of the treadmill may automatically change to bring your heart rate is not detected during the program, you are finished exercising, remove the key from the console. If heart rate program 9 is too high or too low at any time, press the Stop button...

English Manual
Page 21
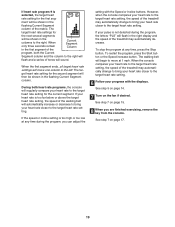
... finished exercising, remove the key from the console. When a custom program is shown in the left display. The program will continue until "P-11" or "P-12" appears in - See HOW TO TURN ON THE POWER on page 15. 7 When you programmed previously. To restart the program, press the Start button or the Speed increase button. 4 Follow your heart rate if desired. To select a custom program, press the Program (PRGM.) button repeatedly until the speed setting...
... finished exercising, remove the key from the console. When a custom program is shown in the left display. The program will continue until "P-11" or "P-12" appears in - See HOW TO TURN ON THE POWER on page 15. 7 When you programmed previously. To restart the program, press the Start button or the Speed increase button. 4 Follow your heart rate if desired. To select a custom program, press the Program (PRGM.) button repeatedly until the speed setting...
English Manual
Page 22
...: To use the information mode. 1 Hold down the Stop button while inserting the key into the console. In addition, the right display will automatically turn it on the treadmill. Follow the steps below to use earphones or headphones (not included), plug them into the console. When the information mode is selected, the power cord can be plugged in, the key can be selected in the right display when the information mode is inserted...
...: To use the information mode. 1 Hold down the Stop button while inserting the key into the console. In addition, the right display will automatically turn it on the treadmill. Follow the steps below to use earphones or headphones (not included), plug them into the console. When the information mode is selected, the power cord can be plugged in, the key can be selected in the right display when the information mode is inserted...
English Manual
Page 23
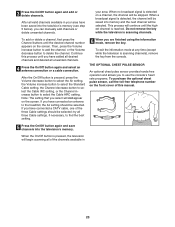
... to the treadmill, the Air setting should be saved into the television's memory (see step 5 below), you are finished using the information mode, remove the key. THE OPTIONAL CHEST PULSE SENSOR An optional chest pulse sensor provides hands-free operation and allows you have connected an antenna to use the console's heart rate programs. To purchase the optional chest pulse sensor, call the toll-free telephone number on the screen. After the On/Off button is reached...
... to the treadmill, the Air setting should be saved into the television's memory (see step 5 below), you are finished using the information mode, remove the key. THE OPTIONAL CHEST PULSE SENSOR An optional chest pulse sensor provides hands-free operation and allows you have connected an antenna to use the console's heart rate programs. To purchase the optional chest pulse sensor, call the toll-free telephone number on the screen. After the On/Off button is reached...
English Manual
Page 27
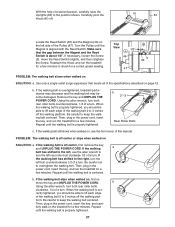
... is properly tightened, you should be able to lift each edge of a turn . b 2"-3 " Rear Roller Bolts c. form. Carefully pivot the Hood (41) off the walking plat- Reattach the Hood, and run the treadmill for a correct speed reading. Remove the key and UNPLUG THE POWER CORD. If the walking belt slips when walked on SOLUTION: a. If necessary, loosen the Screw (3), move the key and UNPLUG THE POWER CORD. Then, plug in the power cord, insert the key, and run...
... is properly tightened, you should be able to lift each edge of a turn . b 2"-3 " Rear Roller Bolts c. form. Carefully pivot the Hood (41) off the walking plat- Reattach the Hood, and run the treadmill for a correct speed reading. Remove the key and UNPLUG THE POWER CORD. If the walking belt slips when walked on SOLUTION: a. If necessary, loosen the Screw (3), move the key and UNPLUG THE POWER CORD. Then, plug in the power cord, insert the key, and run...
English Manual
Page 29
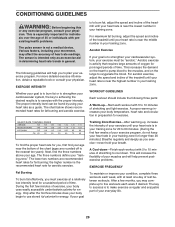
... up increases your body begin to five workouts each week, with preexisting health problems. The pulse sensor is intended only as a guide. For maximum fat burning, adjust the speed and incline of your exercise until your everyday life. 29 For aerobic exercise, adjust the speed and incline of exercise, your "training zone." The following three parts: A Warm-up , increase the intensity of the treadmill until your heart rate is near the...
... up increases your body begin to five workouts each week, with preexisting health problems. The pulse sensor is intended only as a guide. For maximum fat burning, adjust the speed and incline of your exercise until your everyday life. 29 For aerobic exercise, adjust the speed and incline of exercise, your "training zone." The following three parts: A Warm-up , increase the intensity of the treadmill until your heart rate is near the...
English Manual
Page 31
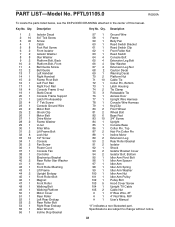
... Support 21 1 Latch Pin Assembly 22 4 1" Tek Screw 23 1 Console Ground Wire 24 2 Motor Bolt 25 2 Shock Clip 26 1 Motor Belt 27 1 Drive Motor 28 2 Frame Washer 29 1 U-nut 30 1 Filter Wire 31 2 Lift Frame Bolt 32 8 Lock Nut 33 16 1/2" Screw 34 1 Console 35 2 Fan Screw 36 1 Power Cord 37 1 Console Fan 38 1 Controller 39 1 Electronics Bracket 40 2 Rear Roller Star Washer 41 1 Hood 42 1 Front Roller Bushing 43 1 Lift Frame 44 2 Upright Endcap 45 1 Front Roller Bolt...
... Support 21 1 Latch Pin Assembly 22 4 1" Tek Screw 23 1 Console Ground Wire 24 2 Motor Bolt 25 2 Shock Clip 26 1 Motor Belt 27 1 Drive Motor 28 2 Frame Washer 29 1 U-nut 30 1 Filter Wire 31 2 Lift Frame Bolt 32 8 Lock Nut 33 16 1/2" Screw 34 1 Console 35 2 Fan Screw 36 1 Power Cord 37 1 Console Fan 38 1 Controller 39 1 Electronics Bracket 40 2 Rear Roller Star Washer 41 1 Hood 42 1 Front Roller Bushing 43 1 Lift Frame 44 2 Upright Endcap 45 1 Front Roller Bolt...
English Manual
Page 34
.... ICON is shipped to a service center, freight charges to the original purchaser. This warranty extends only to and from state to give the following information: • the MODEL NUMBER of the product (PFTL91105.0) • the NAME of the product (PROFORM PERSPECTIVE 1.0 LX treadmill) • the SERIAL NUMBER of the product (see the front cover of this manual) • the KEY NUMBER and DESCRIPTION of the part(s) (see...
.... ICON is shipped to a service center, freight charges to the original purchaser. This warranty extends only to and from state to give the following information: • the MODEL NUMBER of the product (PFTL91105.0) • the NAME of the product (PROFORM PERSPECTIVE 1.0 LX treadmill) • the SERIAL NUMBER of the product (see the front cover of this manual) • the KEY NUMBER and DESCRIPTION of the part(s) (see...


