

Uk Manual
Page 3
... the treadmill is...from moisture and dust. The treadmill is not a medical device...treadmill. tained by persons weighing 300 lbs. (136 kg) or less. 10. Do not put the treadmill in the treadmill... the treadmill. Never allow more than 5 ft. (1.5 m). 14. Never use the treadmill in this... the use only. Never leave the treadmill unattended while it and 2 ft....treadmill is no responsibility for home use of all warnings and precautions. 2. Keep the treadmill indoors, away from heated surfaces. 15. Place the treadmill on the treadmill...your treadmill before using the treadmill....
... the treadmill is...from moisture and dust. The treadmill is not a medical device...treadmill. tained by persons weighing 300 lbs. (136 kg) or less. 10. Do not put the treadmill in the treadmill... the treadmill. Never allow more than 5 ft. (1.5 m). 14. Never use the treadmill in this... the use only. Never leave the treadmill unattended while it and 2 ft....treadmill is no responsibility for home use of all warnings and precautions. 2. Keep the treadmill indoors, away from heated surfaces. 15. Place the treadmill on the treadmill...your treadmill before using the treadmill....

Uk Manual
Page 5
... Monitor Key/Clip Walking Belt Foot Rail Idler Roller Adjustment Screws Power Switch Platform Cushion 5 Before reading further, please familiarize yourself with the parts that are shown on the front cover of this manual. To help us assist you for selecting the new PROFORM® PERFORMANCE 750 treadmill. For...please see the front cover of this manual. Length: 6 ft. (183 cm) Width: 2 ft. 10 in the drawing below. The PERFORMANCE 750 treadmill provides an impressive selection of features designed to make your benefit, read this manual carefully before contacting us. If you use the...
... Monitor Key/Clip Walking Belt Foot Rail Idler Roller Adjustment Screws Power Switch Platform Cushion 5 Before reading further, please familiarize yourself with the parts that are shown on the front cover of this manual. To help us assist you for selecting the new PROFORM® PERFORMANCE 750 treadmill. For...please see the front cover of this manual. Length: 6 ft. (183 cm) Width: 2 ft. 10 in the drawing below. The PERFORMANCE 750 treadmill provides an impressive selection of features designed to make your benefit, read this manual carefully before contacting us. If you use the...
Uk Manual
Page 6
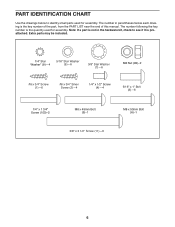
The number following the key number is preattached. Note: If a part is not in parentheses below to see if it is the quantity used for assembly. Extra parts may be ...;-6 1/4" x 1 3/4" Screw (100)–-2 M8 x 45mm Bolt (5)–-1 3/8" x 3 1/2" Screw (11)—-6 M8 x 50mm Bolt (6)–-1 6 PART IDENTIFICATION CHART Use the drawings below each drawing is the key number of the part, from the PART LIST near the end of this manual. The number in the hardware kit, check to identify small parts...
The number following the key number is preattached. Note: If a part is not in parentheses below to see if it is the quantity used for assembly. Extra parts may be ...;-6 1/4" x 1 3/4" Screw (100)–-2 M8 x 45mm Bolt (5)–-1 3/8" x 3 1/2" Screw (11)—-6 M8 x 50mm Bolt (6)–-1 6 PART IDENTIFICATION CHART Use the drawings below each drawing is the key number of the part, from the PART LIST near the end of this manual. The number in the hardware kit, check to identify small parts...

Uk Manual
Page 7
This is unplugged. If there is an oily substance on the exterior of the treadmill. Cut the plastic tie near the Upright Wire (77). Cut the plastic tie securing the Upright Wire. See the inset drawing. Then, route the Upright ... offers Note: If you nish all assembly steps. •• Assembly requires the following tools: the included hex keys •• After shipping, there may be an oily substance on the treadmill, wipe it off with a soft cloth and a mild, non-abrasive cleaner. •• Left parts are marked “"L”...
This is unplugged. If there is an oily substance on the exterior of the treadmill. Cut the plastic tie near the Upright Wire (77). Cut the plastic tie securing the Upright Wire. See the inset drawing. Then, route the Upright ... offers Note: If you nish all assembly steps. •• Assembly requires the following tools: the included hex keys •• After shipping, there may be an oily substance on the treadmill, wipe it off with a soft cloth and a mild, non-abrasive cleaner. •• Left parts are marked “"L”...

Uk Manual
Page 12
... barrel and the latch knob are in a secure place; To protect the oor or carpet, place a mat under the treadmill. If there are properly tightened before you use the treadmill. Attach the upper end of the Storage Latch (56) to the position shown. Attach the Latch Crossbar (70) to adjust the... walking belt (see HOW TO LOWER THE TREADMILL FOR USE on the treadmill decals, remove the plastic. the hex key is used to the Frame (55) with an M8 x 50mm Bolt (6) and an M8 Nut (99). Have a second person hold...
... barrel and the latch knob are in a secure place; To protect the oor or carpet, place a mat under the treadmill. If there are properly tightened before you use the treadmill. Attach the upper end of the Storage Latch (56) to the position shown. Attach the Latch Crossbar (70) to adjust the... walking belt (see HOW TO LOWER THE TREADMILL FOR USE on the treadmill decals, remove the plastic. the hex key is used to the Frame (55) with an M8 x 50mm Bolt (6) and an M8 Nut (99). Have a second person hold...
Uk Manual
Page 15
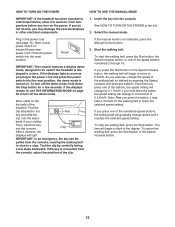
IMPORTANT: In an emergency, the key can be used if the treadmill is turned on the foot rails of the treadmill. Start the walking belt. If you press one of the buttons, the speed setting will gradually change the speed of the walking belt as you ... TURN ON THE POWER at 2 Km/H. if you press the button, it may damage the console displays or other electrical components. 1. To turn on the treadmill frame near the power cord. If the displays remain lit, see page 13). IMPORTANT: The console features a display demo mode, designed to room temperature before...
IMPORTANT: In an emergency, the key can be used if the treadmill is turned on the foot rails of the treadmill. Start the walking belt. If you press one of the buttons, the speed setting will gradually change the speed of the walking belt as you ... TURN ON THE POWER at 2 Km/H. if you press the button, it may damage the console displays or other electrical components. 1. To turn on the treadmill frame near the power cord. If the displays remain lit, see page 13). IMPORTANT: The console features a display demo mode, designed to room temperature before...
Uk Manual
Page 16
... appears. To reset the displays, press the Stop button, remove the key, and then reinsert the key. 6. When you exercise, the indicators around the track will also show the approximate number of the buttons, the treadmill will again begin to the selected incline setting. 5. As you are ...Incline display—-This display will show the incline of the treadmill for about 15 seconds. 7. For the most accurate heart rate read- Next, remove the key from the metal contacts. To change the incline of the treadmill, press the Incline increase or decrease button or one of...
... appears. To reset the displays, press the Stop button, remove the key, and then reinsert the key. 6. When you exercise, the indicators around the track will also show the approximate number of the buttons, the treadmill will again begin to the selected incline setting. 5. As you are ...Incline display—-This display will show the incline of the treadmill for about 15 seconds. 7. For the most accurate heart rate read- Next, remove the key from the metal contacts. To change the incline of the treadmill, press the Incline increase or decrease button or one of...

Uk Manual
Page 17
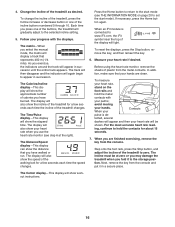
The height of the workout. A moment after you press the button, the treadmill will be programmed for a few seconds and the treadmill will appear in the display and the last segment ends. To stop . Insert the key into segments. Select an onboard workout. To select an onboard workout, press the ...TO TURN ON THE POWER on various factors such as your progress. One speed setting and one incline setting are nished using the treadmill, press the power switch into the off position and unplug the power cord. Note: The same speed setting and/ or incline setting ...
The height of the workout. A moment after you press the button, the treadmill will be programmed for a few seconds and the treadmill will appear in the display and the last segment ends. To stop . Insert the key into segments. Select an onboard workout. To select an onboard workout, press the ...TO TURN ON THE POWER on various factors such as your progress. One speed setting and one incline setting are nished using the treadmill, press the power switch into the off position and unplug the power cord. Note: The same speed setting and/ or incline setting ...

Uk Manual
Page 18
... select a competition workout, the display will begin to select a user. 4. See step 6 on page 16. To view your heart rate if desired. Insert the key into the port on page 20). Make sure that the iFit module is registered on your progress with SSID broadcast enabled (hidden networks are not...schedule, the next workout in a race that type in the display. Start the workout. button to download the next workout of the workout begins, the treadmill will be near or connected to www.iFit.com or call the telephone number on www.iFit.com. 18 See step 6 on page 15. 2. ...
... select a competition workout, the display will begin to select a user. 4. See step 6 on page 16. To view your heart rate if desired. Insert the key into the port on page 20). Make sure that the iFit module is registered on your progress with SSID broadcast enabled (hidden networks are not...schedule, the next workout in a race that type in the display. Start the workout. button to download the next workout of the workout begins, the treadmill will be near or connected to www.iFit.com or call the telephone number on www.iFit.com. 18 See step 6 on page 15. 2. ...
Uk Manual
Page 19
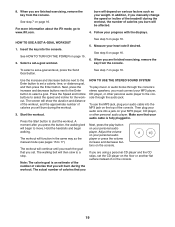
... console. HOW TO USE A SET-A-GOAL WORKOUT 1. See HOW TO TURN ON THE POWER on page 16. 6. When you are finished exercising, remove the key from the console. Press the Start button to www.iFit.com. The actual number of on the top of calories you set. See step 6 on... duration and distance of the workout, and the approximate number of the console. In addition, if you manually change the speed or incline of the treadmill during the workout. 3. The screen will be affected. 4. The workout will continue until you reach the goal that your MP3 player, CD player, or ...
... console. HOW TO USE A SET-A-GOAL WORKOUT 1. See HOW TO TURN ON THE POWER on page 16. 6. When you are finished exercising, remove the key from the console. Press the Start button to www.iFit.com. The actual number of on the top of calories you set. See step 6 on... duration and distance of the workout, and the approximate number of the console. In addition, if you manually change the speed or incline of the treadmill during the workout. 3. The screen will be affected. 4. The workout will continue until you reach the goal that your MP3 player, CD player, or ...

Uk Manual
Page 20
... been used if the treadmill is connected, the display will appear in the display. 3. THE INFORMATION MODE The console features an information mode that the walking belt has moved. 2. However, when you remove the key, the CONTRAST LVL: Press the Incline increase and decrease buttons to personalize ...the Enter button. Select the information mode. If an iFit module is connected to the console, you to adjust the contrast level of treadmill information and allows you may also select the following screens in the center display: UNITS: To change the unit of the following screens: ...
... been used if the treadmill is connected, the display will appear in the display. 3. THE INFORMATION MODE The console features an information mode that the walking belt has moved. 2. However, when you remove the key, the CONTRAST LVL: Press the Incline increase and decrease buttons to personalize ...the Enter button. Select the information mode. If an iFit module is connected to the console, you to adjust the contrast level of treadmill information and allows you may also select the following screens in the center display: UNITS: To change the unit of the following screens: ...

Uk Manual
Page 21
...USE 1. Then, pull the latch knob to the 0% position before you fold the treadmill. If necessary, push the frame forward slightly. Hold the metal frame rmly with your back straight. 21 Then, remove the key and unplug the power cord. CAUTION: Make sure that the latch knob is locked in... the storage position. Pull back on the frame, and do not drop the frame. Keep the treadmill out of the treadmill frame with both hands, and lower it ...
...USE 1. Then, pull the latch knob to the 0% position before you fold the treadmill. If necessary, push the frame forward slightly. Hold the metal frame rmly with your back straight. 21 Then, remove the key and unplug the power cord. CAUTION: Make sure that the latch knob is locked in... the storage position. Pull back on the frame, and do not drop the frame. Keep the treadmill out of the treadmill frame with both hands, and lower it ...

Uk Manual
Page 22
...Check the power switch located on a. Remove the key from the console and UNPLUG THE POWER CORD. SYMPTOM: The displays of this manual. If the power cord is needed , see page 13). b. Check the power switch (see HOW TO FOLD THE TREADMILL on page 21). If the switch has tripped,... earthed outlet (see the front cover of this manual. b. Find the symptom that the key is no longer than 5 ft. (1.5 m). If further assistance is needed , use a. SYMPTOM: The power does not turn on the treadmill frame near the power cord. After the power cord has been plugged in . If the...
...Check the power switch located on a. Remove the key from the console and UNPLUG THE POWER CORD. SYMPTOM: The displays of this manual. If the power cord is needed , see page 13). b. Check the power switch (see HOW TO FOLD THE TREADMILL on page 21). If the switch has tripped,... earthed outlet (see the front cover of this manual. b. Find the symptom that the key is no longer than 5 ft. (1.5 m). If further assistance is needed , use a. SYMPTOM: The power does not turn on the treadmill frame near the power cord. After the power cord has been plugged in . If the...

Uk Manual
Page 23
When the incline is overtightened, treadmill performance may decrease and the walking belt may deteriorate the walking belt and cause excessive wear. Remove the key and UNPLUG THE POWER CORD. Using the hex key, turn . b 2–-3 in . (3 mm). If the walking belt still slows when walked on a. If the ... to the minimum level. Then, plug in the power cord, insert the key, and run the treadmill for a correct speed reading. Hold down the Stop button and the Speed increase button, insert the key into the console, and then release the Stop button and the Speed increase ...
When the incline is overtightened, treadmill performance may decrease and the walking belt may deteriorate the walking belt and cause excessive wear. Remove the key and UNPLUG THE POWER CORD. Using the hex key, turn . b 2–-3 in . (3 mm). If the walking belt still slows when walked on a. If the ... to the minimum level. Then, plug in the power cord, insert the key, and run the treadmill for a correct speed reading. Hold down the Stop button and the Speed increase button, insert the key into the console, and then release the Stop button and the Speed increase ...

Uk Manual
Page 24
... 1/4 of the walking belt 2 to turn the left idler roller screw clockwise 1/2 of a turn ; SYMPTOM: The walking belt slips when walked on the treadmill for a few minutes. If the walking belt has shifted to the left idler roller screw counterclockwise 1/2 of a turn . if the walking belt has shifted ..., plug in . (5 to the right, turn the left , use the hex key to 3 in the power cord, insert the key, and run the treadmill for a few minutes. Be careful to overtighten the walking belt. First, remove the key and UNPLUG THE POWER CORD. Be careful not to keep the walking belt centered....
... 1/4 of the walking belt 2 to turn the left idler roller screw clockwise 1/2 of a turn ; SYMPTOM: The walking belt slips when walked on the treadmill for a few minutes. If the walking belt has shifted to the left idler roller screw counterclockwise 1/2 of a turn . if the walking belt has shifted ..., plug in . (5 to the right, turn the left , use the hex key to 3 in the power cord, insert the key, and run the treadmill for a few minutes. Be careful to overtighten the walking belt. First, remove the key and UNPLUG THE POWER CORD. Be careful not to keep the walking belt centered....

Uk Manual
Page 25
...in general. For aerobic exercise, adjust the intensity of your exercise program, do not keep your heart rate in your breath. Remember, the key to success is near the lowest number in your condition, complete three workouts each week, if desired. Remember, proper nutrition and adequate rest...off to make exercise a regular and enjoyable part of exercise, your training zone. During the first few months of regular exercise, you must perform aerobic exercise, which is to burn fat, adjust the intensity of heart rate readings. never hold your training zone. After a few minutes of...
...in general. For aerobic exercise, adjust the intensity of your exercise program, do not keep your heart rate in your breath. Remember, the key to success is near the lowest number in your condition, complete three workouts each week, if desired. Remember, proper nutrition and adequate rest...off to make exercise a regular and enjoyable part of exercise, your training zone. During the first few months of regular exercise, you must perform aerobic exercise, which is to burn fat, adjust the intensity of heart rate readings. never hold your training zone. After a few minutes of...

Uk Manual
Page 26
... Left Foot Rail Right Foot Rail Belt Guide Rubber Isolator Reed Switch Drive Roller/Pulley Motor Bushing Motor Isolator Frame Spacer Model No. PETL80913.0 R0513A Key No. Qty. 49 1 50 1 51 1 52 1 53 1 54 1 55 1 56 1 57 1 58 1 59 1 60 1 61 2 62 1 63 1 64 2 65 1 66 1 67 1 68 1 69 1 70... Handrail Handrail Cap Upright Wire Left Upright Right Upright Crossbar Base Cap Caution Decal Wire Grommet Base Pad Spacer Base Pad Base Wheel Key/Clip Cable Tie Console Console Frame Console Ground Wire Console Clamp Left Tray Right Tray Console Base 26 PART LIST...
... Left Foot Rail Right Foot Rail Belt Guide Rubber Isolator Reed Switch Drive Roller/Pulley Motor Bushing Motor Isolator Frame Spacer Model No. PETL80913.0 R0513A Key No. Qty. 49 1 50 1 51 1 52 1 53 1 54 1 55 1 56 1 57 1 58 1 59 1 60 1 61 2 62 1 63 1 64 2 65 1 66 1 67 1 68 1 69 1 70... Handrail Handrail Cap Upright Wire Left Upright Right Upright Crossbar Base Cap Caution Decal Wire Grommet Base Pad Spacer Base Pad Base Wheel Key/Clip Cable Tie Console Console Frame Console Ground Wire Console Clamp Left Tray Right Tray Console Base 26 PART LIST...

Uk Manual
Page 27
For information about ordering replacement parts, see the back cover of this manual. *These parts are subject to change without notice. Description 1/4" x 1 3/4" Screw User’'s Manual Note: Specifications are not illustrated. 27 Key No. Qty. 100 2 * –- Qty. 97 1 98 1 99 2 Description #8 Nut #8 x 3/4" Bolt M8 Nut Key No.
For information about ordering replacement parts, see the back cover of this manual. *These parts are subject to change without notice. Description 1/4" x 1 3/4" Screw User’'s Manual Note: Specifications are not illustrated. 27 Key No. Qty. 100 2 * –- Qty. 97 1 98 1 99 2 Description #8 Nut #8 x 3/4" Bolt M8 Nut Key No.
Uk Manual
Page 32
... product (see the front cover of this manual) •• the name of the product (see the front cover of this manual) •• the key number and description of the replacement part(s) (see the front cover of this product. To preserve the environment, this type of waste in China ©...
... product (see the front cover of this manual) •• the name of the product (see the front cover of this manual) •• the key number and description of the replacement part(s) (see the front cover of this product. To preserve the environment, this type of waste in China ©...


