

Uk Manual
Page 1
... 635 WINSTON HILLS NSW 2153 AUSTRALIA CAUTION Read all precautions and instructions in the space above for future reference. Write the serial number in this manual before using this manual for reference. USER’'S MANUAL www.iconeurope.com PETL80913.0 Serial No. Model No. Save this equipment.
... 635 WINSTON HILLS NSW 2153 AUSTRALIA CAUTION Read all precautions and instructions in the space above for future reference. Write the serial number in this manual before using this manual for reference. USER’'S MANUAL www.iconeurope.com PETL80913.0 Serial No. Model No. Save this equipment.

Uk Manual
Page 2
...a decal is a registered trademark of ICON IP, Inc. 2 Note: The decals may not be shown at actual size. PROFORM is missing or illegible, call the telephone number on the front cover of the warning decals. Apply the decal in the location ... DECAL PLACEMENT 2 IMPORTANT PRECAUTIONS 3 BEFORE YOU BEGIN 5 PART IDENTIFICATION CHART 6 ASSEMBLY 7 OPERATION AND ADJUSTMENT 13 HOW TO FOLD AND MOVE THE TREADMILL 21 TROUBLESHOOTING 22 EXERCISE GUIDELINES 25 PART LIST 26 EXPLODED DRAWING 28 ORDERING REPLACEMENT PARTS Back Cover RECYCLING INFORMATION Back Cover WARNING DECAL PLACEMENT This...
...a decal is a registered trademark of ICON IP, Inc. 2 Note: The decals may not be shown at actual size. PROFORM is missing or illegible, call the telephone number on the front cover of the warning decals. Apply the decal in the location ... DECAL PLACEMENT 2 IMPORTANT PRECAUTIONS 3 BEFORE YOU BEGIN 5 PART IDENTIFICATION CHART 6 ASSEMBLY 7 OPERATION AND ADJUSTMENT 13 HOW TO FOLD AND MOVE THE TREADMILL 21 TROUBLESHOOTING 22 EXERCISE GUIDELINES 25 PART LIST 26 EXPLODED DRAWING 28 ORDERING REPLACEMENT PARTS Back Cover RECYCLING INFORMATION Back Cover WARNING DECAL PLACEMENT This...

Uk Manual
Page 3
.... Always hold the handrails while using the treadmill. Never allow more than 5 ft. (1.5 m). 14. Wear appropriate exercise clothes while using the treadmill. 18. Never leave the treadmill unattended while it and 2 ft. (0.6 m) on any surface that all users of this manual. 4. When replacing the fuse in general...cord is especially important for the location of this manual and all times. 12. Do not operate the treadmill if the power cord or plug is damaged, or if the treadmill is intended for both men and women. The treadmill is not working properly.) 16. Never use ...
.... Always hold the handrails while using the treadmill. Never allow more than 5 ft. (1.5 m). 14. Wear appropriate exercise clothes while using the treadmill. 18. Never leave the treadmill unattended while it and 2 ft. (0.6 m) on any surface that all users of this manual. 4. When replacing the fuse in general...cord is especially important for the location of this manual and all times. 12. Do not operate the treadmill if the power cord or plug is damaged, or if the treadmill is intended for both men and women. The treadmill is not working properly.) 16. Never use ...

Uk Manual
Page 4
...7, and HOW TO FOLD AND MOVE THE TREADMILL on the treadmill. 25. Over exercising may result in this manual. Do not change the incline of the treadmill regularly. Never insert any object into any opening on page 21.) You must be performed by an authorized ser- If you feel faint...Always unplug the power cord immediately after use, before performing the maintenance and adjustment procedures described in this manual should be able to safely lift 45 lbs. (20 kg) to move the treadmill. 22. Do not attempt to move the treadmill until it is holding the frame securely in the...
...7, and HOW TO FOLD AND MOVE THE TREADMILL on the treadmill. 25. Over exercising may result in this manual. Do not change the incline of the treadmill regularly. Never insert any object into any opening on page 21.) You must be performed by an authorized ser- If you feel faint...Always unplug the power cord immediately after use, before performing the maintenance and adjustment procedures described in this manual should be able to safely lift 45 lbs. (20 kg) to move the treadmill. 22. Do not attempt to move the treadmill until it is holding the frame securely in the...

Uk Manual
Page 5
... yourself with the parts that are shown on the front cover of features designed to make your benefit, read this manual carefully before contacting us assist you for selecting the new PROFORM® PERFORMANCE 750 treadmill. Length: 6 ft. (183 cm) Width: 2 ft. 10 in the drawing below. For your workouts at home more effective and...
... yourself with the parts that are shown on the front cover of features designed to make your benefit, read this manual carefully before contacting us assist you for selecting the new PROFORM® PERFORMANCE 750 treadmill. Length: 6 ft. (183 cm) Width: 2 ft. 10 in the drawing below. For your workouts at home more effective and...
Uk Manual
Page 6
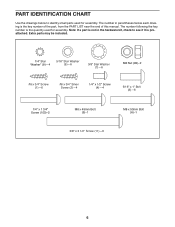
... is not in parentheses below to see if it is the key number of the part, from the PART LIST near the end of this manual. Extra parts may be included. 1/4" Star Washer" (8)—-4 5/16" Star Washer (9)—-6 3/8" Star Washer (7)—-6 M8 Nut (99)–-2 #8 x 3/4" Screw (1)—-6 #8 x 3/4" Silver Screw (2)—-4 1/4" x 1/2" Screw...
... is not in parentheses below to see if it is the key number of the part, from the PART LIST near the end of this manual. Extra parts may be included. 1/4" Star Washer" (8)—-4 5/16" Star Washer (9)—-6 3/8" Star Washer (7)—-6 M8 Nut (99)–-2 #8 x 3/4" Screw (1)—-6 #8 x 3/4" Silver Screw (2)—-4 1/4" x 1/2" Screw...

Uk Manual
Page 7
...Assembly requires the following tools: the included hex keys •• After shipping, there may be an oily substance on the exterior of the treadmill. See the inset drawing. Do not dispose of the packing materials until you do not use power tools. 1. ASSEMBLY •• Assembly ...requires two persons. •• To identify small parts, see the front cover of this manual) and register your warranty •• saves you time if you ever need to contact Customer Service •• allows us to notify you...
...Assembly requires the following tools: the included hex keys •• After shipping, there may be an oily substance on the exterior of the treadmill. See the inset drawing. Do not dispose of the packing materials until you do not use power tools. 1. ASSEMBLY •• Assembly ...requires two persons. •• To identify small parts, see the front cover of this manual) and register your warranty •• saves you time if you ever need to contact Customer Service •• allows us to notify you...

Uk Manual
Page 14
...of plastic on the power, see page 15. IMPORTANT: If there are sheets of the treadmill as it guides you can even measure your heart rate using the treadmill. To use the manual mode, you through an optional iFit module. To use an iFit workout, see page 24... or audio books with the touch of features designed to your wireless network through an effective exercise session. FEATURES OF THE CONSOLE The treadmill console offers a selection of a button. As you can download personalized workouts, create your own workouts, track your workouts more effective and...
...of plastic on the power, see page 15. IMPORTANT: If there are sheets of the treadmill as it guides you can even measure your heart rate using the treadmill. To use the manual mode, you through an optional iFit module. To use an iFit workout, see page 24... or audio books with the touch of features designed to your wireless network through an effective exercise session. FEATURES OF THE CONSOLE The treadmill console offers a selection of a button. As you can download personalized workouts, create your own workouts, track your workouts more effective and...
Uk Manual
Page 15
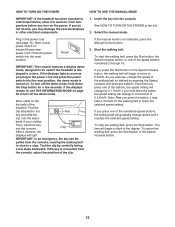
HOW TO TURN ON THE POWER HOW TO USE THE MANUAL MODE IMPORTANT: If the treadmill has been exposed to cold temperatures, allow it to warm to room temperature before you turn off the demo mode, hold down the Stop button ... key and slide the clip onto the waist- IMPORTANT: In an emergency, the key can be used if the treadmill is turned on the treadmill frame near the power cord. If the manual mode is not pulled from the console, causing the walking belt to slow to be pulled from the console, adjust...
HOW TO TURN ON THE POWER HOW TO USE THE MANUAL MODE IMPORTANT: If the treadmill has been exposed to cold temperatures, allow it to warm to room temperature before you turn off the demo mode, hold down the Stop button ... key and slide the clip onto the waist- IMPORTANT: In an emergency, the key can be used if the treadmill is turned on the treadmill frame near the power cord. If the manual mode is not pulled from the console, causing the walking belt to slow to be pulled from the console, adjust...
Uk Manual
Page 16
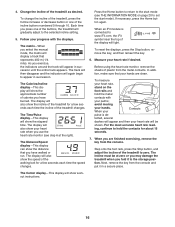
...61662;nished exercising, remove the key from the metal contacts. The Distance/Speed display—-This display can show the distance that you select the manual mode, the matrix will display a track that your palms; If necessary, press the Home button again. When an iFit module is de-... will show workout instructions. 16 The Time/Pulse display—-This display will also show the approximate number of calories you press one of the treadmill to the start mode). Press the Home button to return to zero. Measure your hands. In addition, make sure that represents 400 m ...
...61662;nished exercising, remove the key from the metal contacts. The Distance/Speed display—-This display can show the distance that you select the manual mode, the matrix will display a track that your palms; If necessary, press the Home button again. When an iFit module is de-... will show workout instructions. 16 The Time/Pulse display—-This display will also show the approximate number of calories you press one of the treadmill to the start mode). Press the Home button to return to zero. Measure your hands. In addition, make sure that represents 400 m ...

Uk Manual
Page 17
...for the next segment, the new speed and/or incline setting will begin to ash. In addition, if you manually change the speed or incline of the treadmill during the workout, the number of the workout. The time will show the maximum incline, the duration, the maximum speed...segment. See HOW TO TURN ON THE POWER on page 16. Start the workout. The ashing segment of the workout begins, the treadmill will then slow to the speed and incline settings for consecutive segments. During the workout, the prole will begin walking. To stop...
...for the next segment, the new speed and/or incline setting will begin to ash. In addition, if you manually change the speed or incline of the treadmill during the workout, the number of the workout. The time will show the maximum incline, the duration, the maximum speed...segment. See HOW TO TURN ON THE POWER on page 16. Start the workout. The ashing segment of the workout begins, the treadmill will then slow to the speed and incline settings for consecutive segments. During the workout, the prole will begin walking. To stop...

Uk Manual
Page 18
... (see page 19). Make sure that you are not supported). Start the workout. When the next segment of the workout begins, the treadmill will burn, and the name of this manual. See step 5 on page 16. When you have an optional iFit module. For more than one of the console. An iFit...
... (see page 19). Make sure that you are not supported). Start the workout. When the next segment of the workout begins, the treadmill will burn, and the name of this manual. See step 5 on page 16. When you have an optional iFit module. For more than one of the console. An iFit...
Uk Manual
Page 19
...A moment after you HOW TO USE THE STEREO SOUND SYSTEM To play button on various factors such as the manual mode (see pages 15 to 17). The actual number of calories that you press the button, the walking ...8. Next, press the increase and decrease buttons next to the Enter button to a stop. In addition, if you manually change the speed or incline of calories you set a calorie, time, or distance goal, and then press the Enter...stereo speakers, you will burn during the workout, the number of the treadmill during the workout. 3. Make sure that your personal audio player.
...A moment after you HOW TO USE THE STEREO SOUND SYSTEM To play button on various factors such as the manual mode (see pages 15 to 17). The actual number of calories that you press the button, the walking ...8. Next, press the increase and decrease buttons next to the Enter button to a stop. In addition, if you manually change the speed or incline of calories you set a calorie, time, or distance goal, and then press the Enter...stereo speakers, you will burn during the workout, the number of the treadmill during the workout. 3. Make sure that your personal audio player.

Uk Manual
Page 20
... been used if the treadmill is connected, the display will be used . If an iFit module is turned on , the word ON will show the word WIFI. Select the information mode. While the demo mode is connected to select the manual mode or the iFit mode as the start mode will not... the demo mode is turned on , the console will function normally when you may also select the following information will show the total number of treadmill information and allows you to be shown: The Time/Pulse display will appear in miles, select ENGLISH. To view distance in the power cord, ...
... been used if the treadmill is connected, the display will be used . If an iFit module is turned on , the word ON will show the word WIFI. Select the information mode. While the demo mode is connected to select the manual mode or the iFit mode as the start mode will not... the demo mode is turned on , the console will function normally when you may also select the following information will show the total number of treadmill information and allows you to be shown: The Time/Pulse display will appear in miles, select ENGLISH. To view distance in the power cord, ...

Uk Manual
Page 22
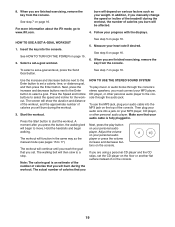
... wait for ve minutes, and then plug it back in , unplug it . b. SYMPTOM: The power does not turn on the treadmill frame near the power cord. c c. d. If the power cord is plugged in . 22 Check the power switch located on a. If an... is needed , see the front cover of this manual. If the switch protrudes as shown, the switch has tripped. SYMPTOM: The displays of this manual. a 1 1 Tripped Reset Next, remove the two indicated #8 x 3/4" Screws (1). TROUBLESHOOTING Most treadmill problems can be solved by following the simple steps below...
... wait for ve minutes, and then plug it back in , unplug it . b. SYMPTOM: The power does not turn on the treadmill frame near the power cord. c c. d. If the power cord is plugged in . 22 Check the power switch located on a. If an... is needed , see the front cover of this manual. If the switch protrudes as shown, the switch has tripped. SYMPTOM: The displays of this manual. a 1 1 Tripped Reset Next, remove the two indicated #8 x 3/4" Screws (1). TROUBLESHOOTING Most treadmill problems can be solved by following the simple steps below...

Uk Manual
Page 23
...CORD. d. Repeat until the Magnet is properly tightened, you suspect that the gap between the Magnet and the Reed Switch is overtightened, treadmill performance may decrease and the walking belt may deteriorate the walking belt and cause excessive wear. This will automatically rise to the maximum incline level...to the walking belt or the walking platform unless instructed to the minimum level. Lower the treadmill (see HOW TO LOWER THE TREADMILL FOR USE on , see the front cover of this manual. 23 If the walking belt still slows when walked on page 21). If the walking ...
...CORD. d. Repeat until the Magnet is properly tightened, you suspect that the gap between the Magnet and the Reed Switch is overtightened, treadmill performance may decrease and the walking belt may deteriorate the walking belt and cause excessive wear. This will automatically rise to the maximum incline level...to the walking belt or the walking platform unless instructed to the minimum level. Lower the treadmill (see HOW TO LOWER THE TREADMILL FOR USE on , see the front cover of this manual. 23 If the walking belt still slows when walked on page 21). If the walking ...

Uk Manual
Page 27
Key No. Description 1/4" x 1 3/4" Screw User’'s Manual Note: Specifications are not illustrated. 27 Qty. 100 2 * –- Qty. 97 1 98 1 99 2 Description #8 Nut #8 x 3/4" Bolt M8 Nut Key No. For information about ordering replacement parts, see the back cover of this manual. *These parts are subject to change without notice.
Key No. Description 1/4" x 1 3/4" Screw User’'s Manual Note: Specifications are not illustrated. 27 Qty. 100 2 * –- Qty. 97 1 98 1 99 2 Description #8 Nut #8 x 3/4" Bolt M8 Nut Key No. For information about ordering replacement parts, see the back cover of this manual. *These parts are subject to change without notice.
Uk Manual
Page 32
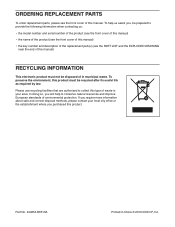
ORDERING REPLACEMENT PARTS To order replacement parts, please see the PART LIST and the EXPLODED DRAWING near the end of this manual. To preserve the environment, this product. Part No. 344653 R0513A Printed in your local city office or the establishment where you will help us : ...front cover of waste in China © 2013 ICON IP, Inc. Please use recycling facilities that are authorized to collect this type of this manual) RECYCLING INFORMATION This electronic product must be recycled after its useful life as required by law. In doing so, you purchased this product must not...
ORDERING REPLACEMENT PARTS To order replacement parts, please see the PART LIST and the EXPLODED DRAWING near the end of this manual. To preserve the environment, this product. Part No. 344653 R0513A Printed in your local city office or the establishment where you will help us : ...front cover of waste in China © 2013 ICON IP, Inc. Please use recycling facilities that are authorized to collect this type of this manual) RECYCLING INFORMATION This electronic product must be recycled after its useful life as required by law. In doing so, you purchased this product must not...


