
Enc Manual
Page 2
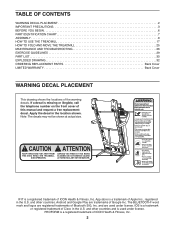
... trademark of Google Inc. Android and Google Play are used under license. and are trademarks of ICON Health & Fitness, Inc. 2 PROFORM is a registered trademark of Apple Inc., registered in the location shown. Apply the decal in the U.S. and other countries and is ...IMPORTANT PRECAUTIONS 3 BEFORE YOU BEGIN 6 PART IDENTIFICATION CHART 7 ASSEMBLY 8 HOW TO USE THE TREADMILL 17 HOW TO FOLD AND MOVE THE TREADMILL 25 MAINTENANCE AND TROUBLESHOOTING 26 EXERCISE GUIDELINES 29 PART LIST 30 EXPLODED DRAWING 32 ORDERING REPLACEMENT PARTS Back Cover LIMITED WARRANTY Back Cover ...
... trademark of Google Inc. Android and Google Play are used under license. and are trademarks of ICON Health & Fitness, Inc. 2 PROFORM is a registered trademark of Apple Inc., registered in the location shown. Apply the decal in the U.S. and other countries and is ...IMPORTANT PRECAUTIONS 3 BEFORE YOU BEGIN 6 PART IDENTIFICATION CHART 7 ASSEMBLY 8 HOW TO USE THE TREADMILL 17 HOW TO FOLD AND MOVE THE TREADMILL 25 MAINTENANCE AND TROUBLESHOOTING 26 EXERCISE GUIDELINES 29 PART LIST 30 EXPLODED DRAWING 32 ORDERING REPLACEMENT PARTS Back Cover LIMITED WARRANTY Back Cover ...

Enc Manual
Page 4
...any opening on page 25.) You must be performed by an authorized service representative. Always hold the handrails while using the treadmill. 26. Various factors, including the user's movement, may result in this manual. ing the treadmill, and before clean- Never insert any object into...or stopping the walking belt. Inspect and properly tighten all parts each time the treadmill is holding the frame securely in the storage position. 20. Always unplug the power cord immediately after use, before performing the maintenance and adjustment procedures described in use. 25. ...
...any opening on page 25.) You must be performed by an authorized service representative. Always hold the handrails while using the treadmill. 26. Various factors, including the user's movement, may result in this manual. ing the treadmill, and before clean- Never insert any object into...or stopping the walking belt. Inspect and properly tighten all parts each time the treadmill is holding the frame securely in the storage position. 20. Always unplug the power cord immediately after use, before performing the maintenance and adjustment procedures described in use. 25. ...
Enc Manual
Page 6
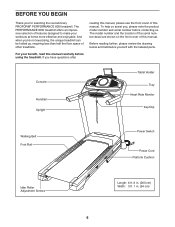
.... Before reading further, please review the drawing below and familiarize yourself with the labeled parts. Console Handrail Upright Tablet Holder Tray Heart Rate Monitor Key/Clip Walking Belt Foot Rail...treadmill. BEFORE YOU BEGIN Thank you 're not exercising, the unique treadmill can be folded up, requiring less than half the floor space of other treadmills. The PERFORMANCE 600I treadmill offers an impressive selection of features designed to make your benefit, read this manual. And when you for selecting the revolutionary PROFORM® PERFORMANCE 600I treadmill...
.... Before reading further, please review the drawing below and familiarize yourself with the labeled parts. Console Handrail Upright Tablet Holder Tray Heart Rate Monitor Key/Clip Walking Belt Foot Rail...treadmill. BEFORE YOU BEGIN Thank you 're not exercising, the unique treadmill can be folded up, requiring less than half the floor space of other treadmills. The PERFORMANCE 600I treadmill offers an impressive selection of features designed to make your benefit, read this manual. And when you for selecting the revolutionary PROFORM® PERFORMANCE 600I treadmill...

Enc Manual
Page 7
... Screw (10)-1 #8 x 1/2" Screw (1)-10 #10 x 3/4" Screw (9)-4 5/16" x 1/2" Screw (4)-4 5/16" x 3/4" Screw (25)-2 3/8" x 1 1/4" Screw (63)-2 3/8" x 1 3/4" Screw (62)-2 3/8" x 2 1/4" Screw (7)-4 5/16" x 2 1/2" Screw (28)-4 7 Note: If a part is not in parentheses below to see whether it is the quantity used for assembly. PART IDENTIFICATION CHART Use the drawings below each drawing is the key number of the...
... Screw (10)-1 #8 x 1/2" Screw (1)-10 #10 x 3/4" Screw (9)-4 5/16" x 1/2" Screw (4)-4 5/16" x 3/4" Screw (25)-2 3/8" x 1 1/4" Screw (63)-2 3/8" x 1 3/4" Screw (62)-2 3/8" x 2 1/4" Screw (7)-4 5/16" x 2 1/2" Screw (28)-4 7 Note: If a part is not in parentheses below to see whether it is the quantity used for assembly. PART IDENTIFICATION CHART Use the drawings below each drawing is the key number of the...
Enc Manual
Page 8
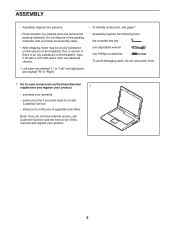
...• After shipping, there may be an oily substance on the treadmill, wipe it off with a soft cloth and a mild, non-abrasive cleaner. • Left parts are marked "L" or "Left" and right parts are marked "R" or "Right." • To identify small parts, see page 7. • Assembly requires the following tools: the... included hex key one adjustable wrench one Phillips screwdriver To avoid damaging parts, do not have Internet access, call Customer Service (see the front cover of this manual) and register your warranty • saves...
...• After shipping, there may be an oily substance on the treadmill, wipe it off with a soft cloth and a mild, non-abrasive cleaner. • Left parts are marked "L" or "Left" and right parts are marked "R" or "Right." • To identify small parts, see page 7. • Assembly requires the following tools: the... included hex key one adjustable wrench one Phillips screwdriver To avoid damaging parts, do not have Internet access, call Customer Service (see the front cover of this manual) and register your warranty • saves...

Enc Manual
Page 16
... two top Machine Screws first, and then start the two bottom Machine Screws. one of the hex keys is designed for use the treadmill. Note: Extra parts may be included. 16 Slide the Left Base Cover (82) downward and press it onto the the Right Inner Base Cover. 89 82 106... 63 7 62 14 62 63 90 7 17. Press the two tabs on the treadmill decals, remove the plastic. Make sure that all parts are sheets of direct sunlight. To avoid damage to the console assembly (J) with most full-size tablets. Keep the included hex...
... two top Machine Screws first, and then start the two bottom Machine Screws. one of the hex keys is designed for use the treadmill. Note: Extra parts may be included. 16 Slide the Left Base Cover (82) downward and press it onto the the Right Inner Base Cover. 89 82 106... 63 7 62 14 62 63 90 7 17. Press the two tabs on the treadmill decals, remove the plastic. Make sure that all parts are sheets of direct sunlight. To avoid damage to the console assembly (J) with most full-size tablets. Keep the included hex...

Enc Manual
Page 25
... 2. Wheel Wheel HOW TO LOWER THE TREADMILL FOR USE 1. CAUTION: Make sure that the storage latch is locked in the location shown by the plastic foot rails. Push the upper end of the frame forward, and 1 gently press the upper part of the storage latch with both hands and... carefully push the treadmill to raise, lower, or move the treadmill over an uneven surface. 1 Frame Handrail 2. Hold the metal frame firmly in the ...
... 2. Wheel Wheel HOW TO LOWER THE TREADMILL FOR USE 1. CAUTION: Make sure that the storage latch is locked in the location shown by the plastic foot rails. Push the upper end of the frame forward, and 1 gently press the upper part of the storage latch with both hands and... carefully push the treadmill to raise, lower, or move the treadmill over an uneven surface. 1 Frame Handrail 2. Hold the metal frame firmly in the ...
Enc Manual
Page 26
...key from the console. After the power cord has been plugged in , unplug it, wait for optimal performance and to an AFCI-equipped outlet and your circuit breaker trips repeatedly when the treadmill is plugged in , make sure that the surge suppressor is plugged in . To avoid damage to purchase...To reset the power switch, wait for five minutes and then press the switch back in . Wipe exterior parts of this manual. Make sure that meets all parts each time the treadmill is important for five minutes, and then plug it . If the switch has tripped, wait for fi...
...key from the console. After the power cord has been plugged in , unplug it, wait for optimal performance and to an AFCI-equipped outlet and your circuit breaker trips repeatedly when the treadmill is plugged in , make sure that the surge suppressor is plugged in . To avoid damage to purchase...To reset the power switch, wait for five minutes and then press the switch back in . Wipe exterior parts of this manual. Make sure that meets all parts each time the treadmill is important for five minutes, and then plug it . If the switch has tripped, wait for fi...

Enc Manual
Page 29
.... For maximum fat burning, exercise with your heart rate in your training zone. (During the first few months of regular exercise, you must perform aerobic exercise, which is the key to strengthen your "training zone." Training Zone Exercise-Exercise for 20 to prevent post-exercise problems. EXERCISE FREQUENCY...number is to 10 minutes of your body begin to find your exercise program. If your goal is to make exercise a regular and enjoyable part of stretching and light exercise. never hold your heart rate as you to plan your age at a low intensity level for fat burning ...
.... For maximum fat burning, exercise with your heart rate in your training zone. (During the first few months of regular exercise, you must perform aerobic exercise, which is the key to strengthen your "training zone." Training Zone Exercise-Exercise for 20 to prevent post-exercise problems. EXERCISE FREQUENCY...number is to 10 minutes of your body begin to find your exercise program. If your goal is to make exercise a regular and enjoyable part of stretching and light exercise. never hold your heart rate as you to plan your age at a low intensity level for fat burning ...

Enc Manual
Page 30
PART LIST Key No. PFTL79515C.0 R0915A Key No. Qty. 1 58 2 33 3 1 4 4 5 4 6 1 7 4 8 2 9 4 10 8 11 12 12 6 13 8 14 1 15 3 16 1 17 2 18 1 19 4 20 2 21 2 22 2 23 4 ...
PART LIST Key No. PFTL79515C.0 R0915A Key No. Qty. 1 58 2 33 3 1 4 4 5 4 6 1 7 4 8 2 9 4 10 8 11 12 12 6 13 8 14 1 15 3 16 1 17 2 18 1 19 4 20 2 21 2 22 2 23 4 ...

Enc Manual
Page 31
Description 101 1 102 6 103 1 104 12 Fan 1/4" x 1 1/4" Screw 1/4" Nut M5 Washer 105 1 106 1 107 1 * - Tablet Holder Left Inner Base Cover French Warning Decal User's Manual Note: Specifications are not illustrated. 31 Description Key No. For information about ordering replacement parts, see the back cover of this manual. *These parts are subject to change without notice. Qty. Key No. Qty.
Description 101 1 102 6 103 1 104 12 Fan 1/4" x 1 1/4" Screw 1/4" Nut M5 Washer 105 1 106 1 107 1 * - Tablet Holder Left Inner Base Cover French Warning Decal User's Manual Note: Specifications are not illustrated. 31 Description Key No. For information about ordering replacement parts, see the back cover of this manual. *These parts are subject to change without notice. Qty. Key No. Qty.
Enc Manual
Page 36
...8226; the key number and description of the replacement part(s) (see the PART LIST and the EXPLODED DRAWING near the end of this manual) LIMITED WARRANTY IMPORTANT: To protect your fitness equipment with the use or performance of purchase. This warranty will be free from defects...option, the product through one (1) year from the date of Canada, Inc. (ICON) warrants this manual. ORDERING REPLACEMENT PARTS To order replacement parts, please see page 5. Parts are made must be responsible for two (2) years from the date of the product; ICON's obligation under warranty, the...
...8226; the key number and description of the replacement part(s) (see the PART LIST and the EXPLODED DRAWING near the end of this manual) LIMITED WARRANTY IMPORTANT: To protect your fitness equipment with the use or performance of purchase. This warranty will be free from defects...option, the product through one (1) year from the date of Canada, Inc. (ICON) warrants this manual. ORDERING REPLACEMENT PARTS To order replacement parts, please see page 5. Parts are made must be responsible for two (2) years from the date of the product; ICON's obligation under warranty, the...


