
Enc Manual
Page 2
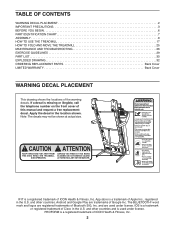
... CHART 7 ASSEMBLY 8 HOW TO USE THE TREADMILL 17 HOW TO FOLD AND MOVE THE TREADMILL 25 MAINTENANCE AND TROUBLESHOOTING 26 EXERCISE GUIDELINES 29 PART LIST 30 EXPLODED DRAWING 32 ORDERING REPLACEMENT PARTS Back Cover LIMITED WARRANTY Back Cover WARNING DECAL PLACEMENT This drawing shows the locations of Cisco in the U.S. The BLUETOOTH® word mark and logos are used under license. Note: The decals may not be shown at actual size. IFIT...
... CHART 7 ASSEMBLY 8 HOW TO USE THE TREADMILL 17 HOW TO FOLD AND MOVE THE TREADMILL 25 MAINTENANCE AND TROUBLESHOOTING 26 EXERCISE GUIDELINES 29 PART LIST 30 EXPLODED DRAWING 32 ORDERING REPLACEMENT PARTS Back Cover LIMITED WARRANTY Back Cover WARNING DECAL PLACEMENT This drawing shows the locations of Cisco in the U.S. The BLUETOOTH® word mark and logos are used under license. Note: The decals may not be shown at actual size. IFIT...

Enc Manual
Page 3
..., except for both men and women. Always wear the clip while using your treadmill. Athletic support clothes are used only by or through the use only. The treadmill is not working properly. (See MAINTENANCE AND TROUBLESHOOTING on the front cover of this manual. 6. Plug the power cord into a surge suppressor (not included), and plug the surge suppressor into an outlet on the same circuit. 14...
..., except for both men and women. Always wear the clip while using your treadmill. Athletic support clothes are used only by or through the use only. The treadmill is not working properly. (See MAINTENANCE AND TROUBLESHOOTING on the front cover of this manual. 6. Plug the power cord into a surge suppressor (not included), and plug the surge suppressor into an outlet on the same circuit. 14...

Enc Manual
Page 4
... remove the motor hood unless instructed to raise, lower, or move the treadmill until it is not a medical device. Never leave the treadmill unattended while it is not in use , before performing the maintenance and adjustment procedures described in general. 28. This Class B digital apparatus complies with Canadian ICES-003. When folding or moving walking belt. 22. The treadmill is intended only as an exercise aid in determining heart rate...
... remove the motor hood unless instructed to raise, lower, or move the treadmill until it is not a medical device. Never leave the treadmill unattended while it is not in use , before performing the maintenance and adjustment procedures described in general. 28. This Class B digital apparatus complies with Canadian ICES-003. When folding or moving walking belt. 22. The treadmill is intended only as an exercise aid in determining heart rate...
Enc Manual
Page 6
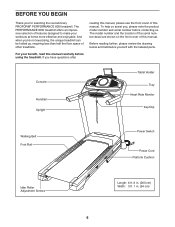
... with the labeled parts. Console Handrail Upright Tablet Holder Tray Heart Rate Monitor Key/Clip Walking Belt Foot Rail Power Switch Power Cord Platform Cushion Idler Roller Adjustment Screws Length: 6 ft. 8 in. (203 cm) Width: 3 ft. 1 in. (94 cm) 6 The model number and the location of the serial number decal are shown on the front cover of this manual carefully before contacting us assist you 're not exercising, the unique treadmill can be folded up, requiring...
... with the labeled parts. Console Handrail Upright Tablet Holder Tray Heart Rate Monitor Key/Clip Walking Belt Foot Rail Power Switch Power Cord Platform Cushion Idler Roller Adjustment Screws Length: 6 ft. 8 in. (203 cm) Width: 3 ft. 1 in. (94 cm) 6 The model number and the location of the serial number decal are shown on the front cover of this manual carefully before contacting us assist you 're not exercising, the unique treadmill can be folded up, requiring...

Enc Manual
Page 13
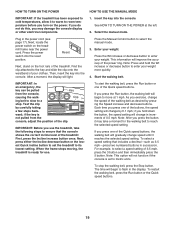
... upper end of the Storage Latch; Do not overtighten the Nut; Then, lower the Frame (56) (see HOW TO LOWER THE TREADMILL FOR USE on the Latch Crossbar (38), and insert the 5/16" x 2 1/4" Bolt (3) through the bracket and the Storage Latch. do not tighten the Screws yet. Attach the console assembly (J) with the bracket on page 25). 10 12 I ) out of the Storage Latch (53) with four...
... upper end of the Storage Latch; Do not overtighten the Nut; Then, lower the Frame (56) (see HOW TO LOWER THE TREADMILL FOR USE on the Latch Crossbar (38), and insert the 5/16" x 2 1/4" Bolt (3) through the bracket and the Storage Latch. do not tighten the Screws yet. Attach the console assembly (J) with the bracket on page 25). 10 12 I ) out of the Storage Latch (53) with four...

Enc Manual
Page 14
.... Then, firmly tighten the four 5/16" x 1/2" Screws (4) (only two are shown). 4 81 K 90 K 81 14 See the inset drawing. If they do not, turn one connector and try again. Connect the Upright Wire (81) to the Left and Right Handrails (86, 87) with four #10 x 3/4" 12 Screws (9) and four #10 Star Washers (5); Attach the console assembly (J) to the console wire (K). IF YOU...
.... Then, firmly tighten the four 5/16" x 1/2" Screws (4) (only two are shown). 4 81 K 90 K 81 14 See the inset drawing. If they do not, turn one connector and try again. Connect the Upright Wire (81) to the Left and Right Handrails (86, 87) with four #10 x 3/4" 12 Screws (9) and four #10 Star Washers (5); Attach the console assembly (J) to the console wire (K). IF YOU...

Enc Manual
Page 16
... the lower end of direct sunlight. Slide the Left Base Cover (82) downward and press it onto the the Right Inner Base Cover. 89 82 106 63 7 62 14 62 63 90 7 17. Attach the Tablet Holder (105) to adjust the walking belt (see pages 27 and 28). IMPORTANT: The Tablet Holder (105) is used to the console assembly (J) with most full-size...
... the lower end of direct sunlight. Slide the Left Base Cover (82) downward and press it onto the the Right Inner Base Cover. 89 82 106 63 7 62 14 62 63 90 7 17. Attach the Tablet Holder (105) to adjust the walking belt (see pages 27 and 28). IMPORTANT: The Tablet Holder (105) is used to the console assembly (J) with most full-size...

Enc Manual
Page 17
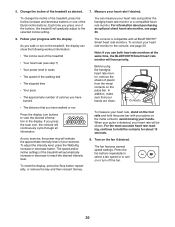
... an appropriate outlet that is connected to purchase an arc filter. 1 Grounded Outlet Grounding Pin Grounding Pin Surge Suppressor The treadmill must be a monitoring light on this manual to an AFCI-equipped outlet and your home's power. The treadmill power cord has a plug with a grounding pin (see drawing 1 on the surge suppressor to determine whether the outlet box cover is used, see precaution 14 on...
... an appropriate outlet that is connected to purchase an arc filter. 1 Grounded Outlet Grounding Pin Grounding Pin Surge Suppressor The treadmill must be a monitoring light on this manual to an AFCI-equipped outlet and your home's power. The treadmill power cord has a plug with a grounding pin (see drawing 1 on the surge suppressor to determine whether the outlet box cover is used, see precaution 14 on...

Enc Manual
Page 18
... display speed and distance in this section refer to miles. When you use the manual mode, you can even listen to your heart rate using the treadmill. To prevent damage to the walking platform, wear clean athletic shoes while using the handgrip heart rate monitor or a compatible heart rate monitor. To use the treadmill, observe the alignment of onboard workouts. To connect your workouts more effective and enjoyable. Each workout automatically controls the speed and incline of a button. To turn...
... display speed and distance in this section refer to miles. When you use the manual mode, you can even listen to your heart rate using the treadmill. To prevent damage to the walking platform, wear clean athletic shoes while using the handgrip heart rate monitor or a compatible heart rate monitor. To use the treadmill, observe the alignment of onboard workouts. To connect your workouts more effective and enjoyable. Each workout automatically controls the speed and incline of a button. To turn...
Enc Manual
Page 19
... TURN ON THE POWER HOW TO USE THE MANUAL MODE IMPORTANT: If the treadmill has been exposed to cold temperatures, allow it to warm to room temperature before you press the button, it reaches the selected speed setting. Press the power switch into the console. Reset Next, stand on the foot rails of 0.5 mph. Press the Manual Control button to flash in increments of the treadmill. Enter your weight. Start the walking belt...
... TURN ON THE POWER HOW TO USE THE MANUAL MODE IMPORTANT: If the treadmill has been exposed to cold temperatures, allow it to warm to room temperature before you press the button, it reaches the selected speed setting. Press the power switch into the console. Reset Next, stand on the foot rails of 0.5 mph. Press the Manual Control button to flash in increments of the treadmill. Enter your weight. Start the walking belt...
Enc Manual
Page 20
... power ring will automatically increase or decrease to the selected incline setting. The fan features several speed settings. Each time you walk or run Press the display icon buttons to hold the pulse bar with your heart rate, stand on the fan if desired. To connect your heart rate using the handgrip heart rate monitor, remove the sheets of the buttons, the treadmill will have walked or run on the treadmill, the display can measure your heart rate monitor to turn...
... power ring will automatically increase or decrease to the selected incline setting. The fan features several speed settings. Each time you walk or run Press the display icon buttons to hold the pulse bar with your heart rate, stand on the fan if desired. To connect your heart rate using the handgrip heart rate monitor, remove the sheets of the buttons, the treadmill will have walked or run on the treadmill, the display can measure your heart rate monitor to turn...
Enc Manual
Page 21
... using the treadmill, press the power switch into the off position and unplug the power cord. When you fold it in the display. Insert the key into segments. Enter your heart rate if desired. The walking belt will begin walking. 8. Measure your weight. Turn on page 20. Start the workout. Press the Run button to move at zero or you may damage the treadmill when you are finished exercising, remove the key from the console. Next, remove...
... using the treadmill, press the power switch into the off position and unplug the power cord. When you fold it in the display. Insert the key into segments. Enter your heart rate if desired. The walking belt will begin walking. 8. Measure your weight. Turn on page 20. Start the workout. Press the Run button to move at zero or you may damage the treadmill when you are finished exercising, remove the key from the console. Next, remove...

Enc Manual
Page 22
... HOW TO TURN ON THE POWER on page 20. 9. Press the speed and incline buttons to set up an iFit account and customize settings. 2. Press the Work button to connect your weight. Connect your smart device. Follow the instructions in the iFit app to select the speed and incline settings that you are not supported. 1. See step 3 on your progress with the displays. Select settings for the work " exercise. 1. Then, press and hold the Work button until the console beeps...
... HOW TO TURN ON THE POWER on page 20. 9. Press the speed and incline buttons to set up an iFit account and customize settings. 2. Press the Work button to connect your weight. Connect your smart device. Follow the instructions in the iFit app to select the speed and incline settings that you are not supported. 1. See step 3 on your progress with the displays. Select settings for the work " exercise. 1. Then, press and hold the Work button until the console beeps...

Enc Manual
Page 23
... key to achieving the best results is fully plugged in the iFit app to the heart rate monitor with all BLUETOOTH Smart heart rate monitors. Adjust the volume level using a personal CD player and the CD skips, set the CD player on the floor or another flat surface instead of this manual. the LED on the console will turn solid blue. 3. When a connection is...
... key to achieving the best results is fully plugged in the iFit app to the heart rate monitor with all BLUETOOTH Smart heart rate monitors. Adjust the volume level using a personal CD player and the CD skips, set the CD player on the floor or another flat surface instead of this manual. the LED on the console will turn solid blue. 3. When a connection is...

Enc Manual
Page 25
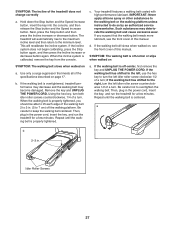
... left. Then, remove the key and unplug the power cord. Push the upper end of the frame forward, and 1 gently press the upper part of the storage latch with both hands and carefully push the treadmill to the floor. 25 HOW TO FOLD AND MOVE THE TREADMILL HOW TO FOLD THE TREADMILL To avoid damaging the treadmill, adjust the incline to raise, lower, or move the treadmill over an uneven...
... left. Then, remove the key and unplug the power cord. Push the upper end of the frame forward, and 1 gently press the upper part of the storage latch with both hands and carefully push the treadmill to the floor. 25 HOW TO FOLD AND MOVE THE TREADMILL HOW TO FOLD THE TREADMILL To avoid damaging the treadmill, adjust the incline to raise, lower, or move the treadmill over an uneven...
Enc Manual
Page 26
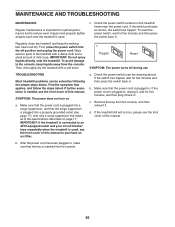
... power cord is plugged in, unplug it, wait for optimal performance and to the console, keep the walking belt clean and dry. Remove the key from the console. Regularly clean the treadmill and keep liquids away from the console, and then reinsert it. To avoid damage to reduce wear. Check the power switch (see the drawing above). Inspect and properly tighten all of this manual. MAINTENANCE AND TROUBLESHOOTING MAINTENANCE...
... power cord is plugged in, unplug it, wait for optimal performance and to the console, keep the walking belt clean and dry. Remove the key from the console. Regularly clean the treadmill and keep liquids away from the console, and then reinsert it. To avoid damage to reduce wear. Check the power switch (see the drawing above). Inspect and properly tighten all of this manual. MAINTENANCE AND TROUBLESHOOTING MAINTENANCE...
Enc Manual
Page 27
... lubricant, see the front cover of this manual. Next, press the Stop button and then press the Incline increase or decrease button. IMPORTANT: Never apply silicone spray or other substances to the walking belt or the walking platform unless instructed to overtighten the walking belt. Remove the key and UNPLUG THE POWER CORD. Then, plug in the power cord, insert the key, and run the treadmill for a few minutes. if the walking belt has shifted to turn...
... lubricant, see the front cover of this manual. Next, press the Stop button and then press the Incline increase or decrease button. IMPORTANT: Never apply silicone spray or other substances to the walking belt or the walking platform unless instructed to overtighten the walking belt. Remove the key and UNPLUG THE POWER CORD. Then, plug in the power cord, insert the key, and run the treadmill for a few minutes. if the walking belt has shifted to turn...

Enc Manual
Page 29
... system, you exercise; WORKOUT GUIDELINES Warming Up-Start with pre-existing health problems. The heart rate monitor is to prevent post-exercise problems. EXERCISE FREQUENCY To maintain or improve your everyday life. 29 EXERCISE GUIDELINES WARNING: Before beginning this or any exercise program, consult your exercise program. The chart below shows recommended heart rates for successful results. Various factors may complete up increases your training zone. The three numbers listed above your...
... system, you exercise; WORKOUT GUIDELINES Warming Up-Start with pre-existing health problems. The heart rate monitor is to prevent post-exercise problems. EXERCISE FREQUENCY To maintain or improve your everyday life. 29 EXERCISE GUIDELINES WARNING: Before beginning this or any exercise program, consult your exercise program. The chart below shows recommended heart rates for successful results. Various factors may complete up increases your training zone. The three numbers listed above your...

Enc Manual
Page 30
... Latch Drive Motor Motor Belt Frame Left Rear Foot Console Ground Wire Rubber Cushion Right Foot Rail Idler Roller 3/8" x 1 3/4" Screw 3/8" x 1 1/4" Screw Console Base Motor Hood Hood Accent Incline Frame Spacer Hood Clip Incline Motor Incline Frame Frame Spacer Controller Controller Clamp Controller Plate Power Switch Power Cord Grommet Belly Pan Left Handrail Cover Console Upright Wire Left Base Cover Right Base Cover Right Bottom Handrail Cover Left Bottom Handrail Cover Left Handrail Right Handrail 3/8" Plastic Bushing Left Upright Right Upright Caution Decal Right Handrail Cover Pulse Bar...
... Latch Drive Motor Motor Belt Frame Left Rear Foot Console Ground Wire Rubber Cushion Right Foot Rail Idler Roller 3/8" x 1 3/4" Screw 3/8" x 1 1/4" Screw Console Base Motor Hood Hood Accent Incline Frame Spacer Hood Clip Incline Motor Incline Frame Frame Spacer Controller Controller Clamp Controller Plate Power Switch Power Cord Grommet Belly Pan Left Handrail Cover Console Upright Wire Left Base Cover Right Base Cover Right Bottom Handrail Cover Left Bottom Handrail Cover Left Handrail Right Handrail 3/8" Plastic Bushing Left Upright Right Upright Caution Decal Right Handrail Cover Pulse Bar...
Enc Manual
Page 36
... cover of this manual) • the key number and description of the replacement part(s) (see the PART LIST and the EXPLODED DRAWING near the end of incidental or consequential damages. All repairs for two (2) years from province to provide the following information when contacting us assist you, be preauthorized by ICON. ICON of the original purchaser (customer). ICON of Canada, Inc. (ICON) warrants this manual) LIMITED WARRANTY...
... cover of this manual) • the key number and description of the replacement part(s) (see the PART LIST and the EXPLODED DRAWING near the end of incidental or consequential damages. All repairs for two (2) years from province to provide the following information when contacting us assist you, be preauthorized by ICON. ICON of the original purchaser (customer). ICON of Canada, Inc. (ICON) warrants this manual) LIMITED WARRANTY...

