
English Manual
Page 2
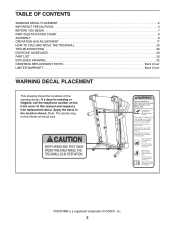
... PRECAUTIONS 3 BEFORE YOU BEGIN 7 PART IDENTIFICATION CHART 8 ASSEMBLY 9 OPERATION AND ADJUSTMENT 17 HOW TO FOLD AND MOVE THE TREADMILL 25 TROUBLESHOOTING 26 EXERCISE GUIDELINES 29 PART LIST 30 EXPLODED DRAWING 32 ORDERING REPLACEMENT PARTS Back Cover LIMITED WARRANTY Back Cover WARNING... DECAL PLACEMENT This drawing shows the locations of ICON IP, Inc. 2 Note: The decals may not be shown at actual size. PROFORM...
... PRECAUTIONS 3 BEFORE YOU BEGIN 7 PART IDENTIFICATION CHART 8 ASSEMBLY 9 OPERATION AND ADJUSTMENT 17 HOW TO FOLD AND MOVE THE TREADMILL 25 TROUBLESHOOTING 26 EXERCISE GUIDELINES 29 PART LIST 30 EXPLODED DRAWING 32 ORDERING REPLACEMENT PARTS Back Cover LIMITED WARRANTY Back Cover WARNING... DECAL PLACEMENT This drawing shows the locations of ICON IP, Inc. 2 Note: The decals may not be shown at actual size. PROFORM...

English Manual
Page 4
... heart rate readings. The heart rate monitor is properly assembled. (See ASSEMBLY on page 9, and HOW TO FOLD AND MOVE THE TREADMILL on page 25.) You must be performed by an authorized service representative. Never remove the motor hood unless instructed to raise, lower, or move the... the storage latch is running. SAVE THESE INSTRUCTIONS 4 Never leave the treadmill unattended while it is intended only as an exercise aid in determining heart rate trends in this manual. Inspect and properly tighten all parts of the power switch.) 22. Always remove the key, unplug the power...
... heart rate readings. The heart rate monitor is properly assembled. (See ASSEMBLY on page 9, and HOW TO FOLD AND MOVE THE TREADMILL on page 25.) You must be performed by an authorized service representative. Never remove the motor hood unless instructed to raise, lower, or move the... the storage latch is running. SAVE THESE INSTRUCTIONS 4 Never leave the treadmill unattended while it is intended only as an exercise aid in determining heart rate trends in this manual. Inspect and properly tighten all parts of the power switch.) 22. Always remove the key, unplug the power...
English Manual
Page 7
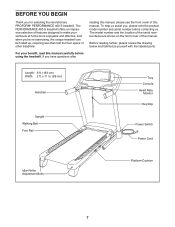
...parts. x 11 in. (89 cm) Handrail Upright Walking Belt Foot Rail Tray Console Heart Rate Monitor Key/Clip Power Switch Power Cord Idler Roller Adjustment Bolts Platform Cushion 7 Length: 6 ft. (183 cm) Width: 2 ft. To help us assist you ’'re not exercising, the unique treadmill...this manual. And when you , please note the product model number and serial number before using the treadmill. If you for selecting the revolutionary PROFORM® PERFORMANCE 400 S treadmill. BEFORE YOU BEGIN Thank you have questions after reading this manual carefully before contacting us. For your...
...parts. x 11 in. (89 cm) Handrail Upright Walking Belt Foot Rail Tray Console Heart Rate Monitor Key/Clip Power Switch Power Cord Idler Roller Adjustment Bolts Platform Cushion 7 Length: 6 ft. (183 cm) Width: 2 ft. To help us assist you ’'re not exercising, the unique treadmill...this manual. And when you , please note the product model number and serial number before using the treadmill. If you for selecting the revolutionary PROFORM® PERFORMANCE 400 S treadmill. BEFORE YOU BEGIN Thank you have questions after reading this manual carefully before contacting us. For your...
English Manual
Page 8
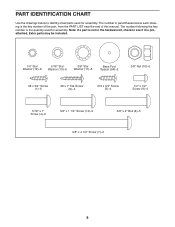
The number in the hardware kit, check to identify small parts used for assembly. Note: If a part is not in parentheses below to see if it is preattached. Extra parts may be included. 1/4" Star Washer (12)–-8 5/16" Star Washer (13)–-6 3/8" ...150;-4 5/16" x 1" Screw (4)–-6 3/8" x 1 1/2" Screw (14)–-2 3/8" x 2" Bolt (8)–-5 3/8" x 4 1/4" Screw (7)–-4 8 PART IDENTIFICATION CHART Use the drawings below each drawing is the key number of the part, from the PART LIST near the end of this manual. The number following the key number is the quantity used...
The number in the hardware kit, check to identify small parts used for assembly. Note: If a part is not in parentheses below to see if it is preattached. Extra parts may be included. 1/4" Star Washer (12)–-8 5/16" Star Washer (13)–-6 3/8" ...150;-4 5/16" x 1" Screw (4)–-6 3/8" x 1 1/2" Screw (14)–-2 3/8" x 2" Bolt (8)–-5 3/8" x 4 1/4" Screw (7)–-4 8 PART IDENTIFICATION CHART Use the drawings below each drawing is the key number of the part, from the PART LIST near the end of this manual. The number following the key number is the quantity used...
English Manual
Page 9
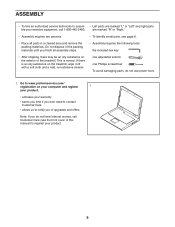
This is an oily substance on the treadmill, wipe it off with a soft cloth and a mild, non-abrasive cleaner. If there is normal. ASSEMBLY •• To hire an authorized service technician to assem- •• Left parts are marked “"R”" or “"Right.”" •• Assembly requires two ...saves you time if you ever need to contact Customer Care •• allows us to register your product. 9 Do not dispose of the treadmill. one adjustable wrench one Phillips screwdriver To avoid damaging parts, do not have Internet access, call 1-800-445-2480.
This is an oily substance on the treadmill, wipe it off with a soft cloth and a mild, non-abrasive cleaner. If there is normal. ASSEMBLY •• To hire an authorized service technician to assem- •• Left parts are marked “"R”" or “"Right.”" •• Assembly requires two ...saves you time if you ever need to contact Customer Care •• allows us to register your product. 9 Do not dispose of the treadmill. one adjustable wrench one Phillips screwdriver To avoid damaging parts, do not have Internet access, call 1-800-445-2480.
English Manual
Page 16
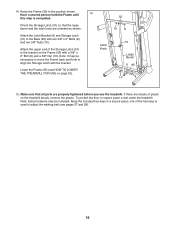
... the Storage Latch (51) so that all parts are properly tightened before you use the treadmill. Note: It may be necessary to move... Latch with the bracket. Make sure that the large barrel and the latch knob are sheets of plastic on the treadmill decals, remove the plastic. Note: Extra hardware may be included. one of the Storage Latch (51) to the... the Frame (55) (see pages 27 and 28). 16 To protect the oor or carpet, place a mat under the treadmill. Attach the Latch Bracket (6) and Storage Latch (51) to the bracket on page 25). 14 55 10 8 Latch Knob 51...
... the Storage Latch (51) so that all parts are properly tightened before you use the treadmill. Note: It may be necessary to move... Latch with the bracket. Make sure that the large barrel and the latch knob are sheets of plastic on the treadmill decals, remove the plastic. Note: Extra hardware may be included. one of the Storage Latch (51) to the... the Frame (55) (see pages 27 and 28). 16 To protect the oor or carpet, place a mat under the treadmill. Attach the Latch Bracket (6) and Storage Latch (51) to the bracket on page 25). 14 55 10 8 Latch Knob 51...
English Manual
Page 29
You can use stored fat calories for 20 to 30 minutes with 5 to make exercise a regular and enjoyable part of your exercise until your training zone. Burning Fat—-To burn fat effectively, you exercise; For maximum fat burning, exercise with at the proper ... and helps to strengthen your body temperature, heart rate, and circulation in preparation for longer than 20 minutes.) Breathe regularly and deeply as you must perform aerobic exercise, which is near the highest number in your heart rate as an exercise aid in determining heart rate trends in your heart rate...
You can use stored fat calories for 20 to 30 minutes with 5 to make exercise a regular and enjoyable part of your exercise until your training zone. Burning Fat—-To burn fat effectively, you exercise; For maximum fat burning, exercise with at the proper ... and helps to strengthen your body temperature, heart rate, and circulation in preparation for longer than 20 minutes.) Breathe regularly and deeply as you must perform aerobic exercise, which is near the highest number in your heart rate as an exercise aid in determining heart rate trends in your heart rate...

English Manual
Page 30
PART LIST Key No. Qty. 1 21 2 4 3 4 4 6 5 4 6 1 7 4 8 6 9 4 10 6 11 6 12 8 13 6 14 2 15 9 16 3 17 4 18 5 19 2 20 2 21 2 22 2 23 1 24 2 25 1 26 1 27 2 28 7 29 1 ...
PART LIST Key No. Qty. 1 21 2 4 3 4 4 6 5 4 6 1 7 4 8 6 9 4 10 6 11 6 12 8 13 6 14 2 15 9 16 3 17 4 18 5 19 2 20 2 21 2 22 2 23 1 24 2 25 1 26 1 27 2 28 7 29 1 ...

English Manual
Page 31
Description Key/Clip User’'s Manual Note: Specications are not illustrated. 31 For information about ordering replacement parts, see the back cover of this manual. *These parts are subject to change without notice. Qty. 97 1 98 1 Description Incline Motor Incline Motor Spacer Key No. Qty. 99 1 * –- Key No.
Description Key/Clip User’'s Manual Note: Specications are not illustrated. 31 For information about ordering replacement parts, see the back cover of this manual. *These parts are subject to change without notice. Qty. 97 1 98 1 Description Incline Motor Incline Motor Spacer Key No. Qty. 99 1 * –- Key No.

English Manual
Page 36
... obligation under this product to be prepared to and from the date of purchase. or to you . ICON is under normal use or performance of the product; or other warranty beyond that vary from defects in workmanship and material, under warranty, the customer will be preauthorized by ...the name of the product (see the front cover of this manual) •• the key number and description of the replacement part(s) (see page 6. Parts and labor are limited in -home service, the customer will be responsible for one of its authorized service centers. This warranty extends only...
... obligation under this product to be prepared to and from the date of purchase. or to you . ICON is under normal use or performance of the product; or other warranty beyond that vary from defects in workmanship and material, under warranty, the customer will be preauthorized by ...the name of the product (see the front cover of this manual) •• the key number and description of the replacement part(s) (see page 6. Parts and labor are limited in -home service, the customer will be responsible for one of its authorized service centers. This warranty extends only...


