

English Manual
Page 3
... use , before cleaning the treadmill, and before using the treadmill. 15. Servicing other than the procedures in the location shown. 3 Always hold the handrails while using . If a decal is missing, or if it is not in order to order a free replacement decal. Always remove the key, unplug the power cord, ...and move the treadmill until it is fully closed. 21. tenance and adjustment procedures de-
... use , before cleaning the treadmill, and before using the treadmill. 15. Servicing other than the procedures in the location shown. 3 Always hold the handrails while using . If a decal is missing, or if it is not in order to order a free replacement decal. Always remove the key, unplug the power cord, ...and move the treadmill until it is fully closed. 21. tenance and adjustment procedures de-

English Manual
Page 4
...not included) Storage Latch Book Holder Key/Clip Console Handrail LEFT SIDE RIGHT SIDE Walking Belt Foot Rails On/Off Switch Circuit Breaker Front Wheel Rear Roller Adjustment Bolts Cushioned Walking Platform Power Cord 4 For your home. The J6 treadmill combines advanced technology with the parts ...excluding holidays). And when youÕre not exercising, the unique J6 can be folded up, requiring less than half the floor space of your benefit, read this manual for selecting the new PROFORM¨ J6 treadmill. To help us assist you enjoy an excellent form of cardiovascular...
...not included) Storage Latch Book Holder Key/Clip Console Handrail LEFT SIDE RIGHT SIDE Walking Belt Foot Rails On/Off Switch Circuit Breaker Front Wheel Rear Roller Adjustment Bolts Cushioned Walking Platform Power Cord 4 For your home. The J6 treadmill combines advanced technology with the parts ...excluding holidays). And when youÕre not exercising, the unique J6 can be folded up, requiring less than half the floor space of your benefit, read this manual for selecting the new PROFORM¨ J6 treadmill. To help us assist you enjoy an excellent form of cardiovascular...
English Manual
Page 8
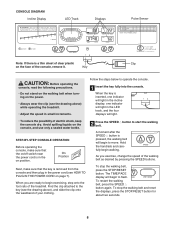
... button again. Find the clip attached to begin walking. Hold the handrails and carefully begin exercising, step onto the foot rails of the treadmill. Follow the steps below to flash. STEP-BY-STEP CONSOLE OPERATION Before operating the console, make sure that the on/off switch near...cord is removed from the console and then plug in the power cord (see the drawing above ) while operating the treadmill. ¥ Adjust the speed in small increments. Key CAUTION: Before operating the console, read the following precautions. ¥ Do not stand on the walking belt when ...
... button again. Find the clip attached to begin walking. Hold the handrails and carefully begin exercising, step onto the foot rails of the treadmill. Follow the steps below to flash. STEP-BY-STEP CONSOLE OPERATION Before operating the console, make sure that the on/off switch near...cord is removed from the console and then plug in the power cord (see the drawing above ) while operating the treadmill. ¥ Adjust the speed in small increments. Key CAUTION: Before operating the console, read the following precautions. ¥ Do not stand on the walking belt when ...
English Manual
Page 9
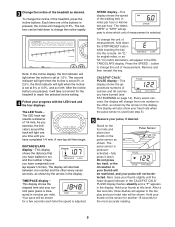
...is pressed, the incline will change the unit of calories and fat calories you have completed 1/4 mile. A new lap will be shown for the treadmill to show your pulse will also show which unit of 1/4 mile. Every seven seconds, the display will change the unit of laps you have ... shown. After the incline buttons are pressed, it down the STOP/RESET button while inserting the key into the console. The letters ÒMPHÓ or ÒKPHÓ will light one of the treadmill, press the incline buttons. Do not press too hard, or the circulation in the display....
...is pressed, the incline will change the unit of calories and fat calories you have completed 1/4 mile. A new lap will be shown for the treadmill to show your pulse will also show which unit of 1/4 mile. Every seven seconds, the display will change the unit of laps you have ... shown. After the incline buttons are pressed, it down the STOP/RESET button while inserting the key into the console. The letters ÒMPHÓ or ÒKPHÓ will light one of the treadmill, press the incline buttons. Do not press too hard, or the circulation in the display....

English Manual
Page 10
...;E,Ó for english miles, or an ÒM,Ó for metric kilometers, will show the total number of hours the treadmill has been used. Step onto the foot rails and remove the key from the console. 10 The SPEED display will appear in a secure place. Try the sensor several times until you are... MODE To access the information mode, hold down again on /off switch to the off the sensor and allow the display to reset. Keep the key in the DISTANCE/ LAPS display. Press the SPEED v button to change the unit of measurement. 6 When you are applying the proper amount of pressure to...
...;E,Ó for english miles, or an ÒM,Ó for metric kilometers, will show the total number of hours the treadmill has been used. Step onto the foot rails and remove the key from the console. 10 The SPEED display will appear in a secure place. Try the sensor several times until you are... MODE To access the information mode, hold down again on /off switch to the off the sensor and allow the display to reset. Keep the key in the DISTANCE/ LAPS display. Press the SPEED v button to change the unit of measurement. 6 When you are applying the proper amount of pressure to...
English Manual
Page 12
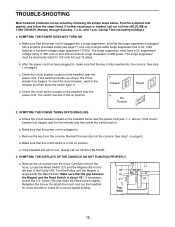
... Top View 12 SYMPTOM: THE POWER DOES NOT TURN ON a. c. b. Remove the key from the hood. Make sure that the key is plugged into the console. Locate the Reed Switch (21) and the Magnet (43) on the treadmill frame near the power cord (see page 7). If necessary, loosen the 1/2Ó Screw...that the gap between 76 42 the Magnet and the Reed Switch is needed, call our toll-free HELPLINE. 3. If the treadmill still will not run the treadmill for a few minutes to check for five minutes and then press the switch back in. If further assistance is about 1/8Ó....
... Top View 12 SYMPTOM: THE POWER DOES NOT TURN ON a. c. b. Remove the key from the hood. Make sure that the key is plugged into the console. Locate the Reed Switch (21) and the Magnet (43) on the treadmill frame near the power cord (see page 7). If necessary, loosen the 1/2Ó Screw...that the gap between 76 42 the Magnet and the Reed Switch is needed, call our toll-free HELPLINE. 3. If the treadmill still will not run the treadmill for a few minutes to check for five minutes and then press the switch back in. If further assistance is about 1/8Ó....
English Manual
Page 13
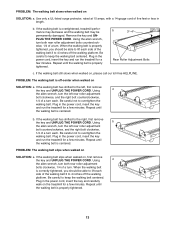
...roller adjustment bolts counterclockwise, 1/4 of a turn . Remove the key and UNPLUG THE POWER CORD. Plug in the power cord, insert the key and run the treadmill for a few minutes. Plug in the power cord, insert the key and run the treadmill for a few minutes. If the walking belt is centered. ...3 to overtighten the walking belt. Be careful not to the right, first remove the key and UNPLUG THE POWER CORD. Repeat until the walking belt is off-center when walked on the treadmill for a few minutes. If the walking belt has shifted to overtighten the walking belt....
...roller adjustment bolts counterclockwise, 1/4 of a turn . Remove the key and UNPLUG THE POWER CORD. Plug in the power cord, insert the key and run the treadmill for a few minutes. Plug in the power cord, insert the key and run the treadmill for a few minutes. If the walking belt is centered. ...3 to overtighten the walking belt. Be careful not to the right, first remove the key and UNPLUG THE POWER CORD. Repeat until the walking belt is off-center when walked on the treadmill for a few minutes. If the walking belt has shifted to overtighten the walking belt....

English Manual
Page 14
... book or consult your condition, complete three workouts each week if desired. For maximum fat burning, adjust the speed and incline of the treadmill until your heart rate is to 60 minutes. (During the first few months, you to oxygenate the blood. If your heart rate is... parts: A Warm-up to strengthen your cardiovascular system, your cardiovascular system, the key to achieving the desired results is activity that requires large amounts of oxygen for prolonged periods of the treadmill until your heart rate is the recommended heart rate for you exerciseÑnever hold...
... book or consult your condition, complete three workouts each week if desired. For maximum fat burning, adjust the speed and incline of the treadmill until your heart rate is to 60 minutes. (During the first few months, you to oxygenate the blood. If your heart rate is... parts: A Warm-up to strengthen your cardiovascular system, your cardiovascular system, the key to achieving the desired results is activity that requires large amounts of oxygen for prolonged periods of the treadmill until your heart rate is the recommended heart rate for you exerciseÑnever hold...

English Manual
Page 15
... Front Belly Pan Power Supply Cable Tie Clamp Cable Tie Walking Belt Roller Guard Rear Roller Rear Isolator Rear Foot Rear Foot Screw Ground Wire Key No. Description 62 1 63 1 64 1 65 2 66 1 67 1 68 2 69 1 70 1 71 1 72 5 73 4 74 1 75 2 76 13 77 1 78 4 79 2 80 4 81 10... Switch Inlet Bracket Incline Leg Frame Pivot Bolt Frame Pivot Spacer Upright Wire Harness Front Roller Adj. PART LISTÑModel No. 831.297693 R0199A Key No. Bolt Roller Adj. Bolt Motor Latch Decal Rear Platform Screw Motor Tension Nut Latch Catch Walking Platform 8Ó cable Tie 4Ó cable Tie...
... Front Belly Pan Power Supply Cable Tie Clamp Cable Tie Walking Belt Roller Guard Rear Roller Rear Isolator Rear Foot Rear Foot Screw Ground Wire Key No. Description 62 1 63 1 64 1 65 2 66 1 67 1 68 2 69 1 70 1 71 1 72 5 73 4 74 1 75 2 76 13 77 1 78 4 79 2 80 4 81 10... Switch Inlet Bracket Incline Leg Frame Pivot Bolt Frame Pivot Spacer Upright Wire Harness Front Roller Adj. PART LISTÑModel No. 831.297693 R0199A Key No. Bolt Roller Adj. Bolt Motor Latch Decal Rear Platform Screw Motor Tension Nut Latch Catch Walking Platform 8Ó cable Tie 4Ó cable Tie...

English Manual
Page 18
...parts, please be prepared to provide the following information: ¥ The NAME OF THE PRODUCT (PROFORM¨ J6 treadmill) ¥ The MODEL NUMBER OF THE PRODUCT (831.297693) ¥ The KEY NUMBER AND DESCRIPTION OF THE PART (see the EXPLODED DRAWING and PART LIST included in USA ...occurs due to state. This warranty gives you specific legal rights, and you visit your PROFORM¨ J6 treadmill are available for rental purposes. When requesting help assembling or operating the PROFORM J6 treadmill ¥ a part is used commercially or for immediate purchase or special order when you...
...parts, please be prepared to provide the following information: ¥ The NAME OF THE PRODUCT (PROFORM¨ J6 treadmill) ¥ The MODEL NUMBER OF THE PRODUCT (831.297693) ¥ The KEY NUMBER AND DESCRIPTION OF THE PART (see the EXPLODED DRAWING and PART LIST included in USA ...occurs due to state. This warranty gives you specific legal rights, and you visit your PROFORM¨ J6 treadmill are available for rental purposes. When requesting help assembling or operating the PROFORM J6 treadmill ¥ a part is used commercially or for immediate purchase or special order when you...


