

English Manual
Page 1
Serial Number Decal CAUTION Read all precautions and instructions in the location shown below. USER'S MANUAL SEARS, ROEBUCK AND CO., HOFFMAN ESTATES, IL 60179 Find the serial number in this manual before using this manual for reference. Write the serial number in the space above for future reference. Save this equipment. ¨ Model No. 831.297693 Serial No.
Serial Number Decal CAUTION Read all precautions and instructions in the location shown below. USER'S MANUAL SEARS, ROEBUCK AND CO., HOFFMAN ESTATES, IL 60179 Find the serial number in this manual before using this manual for reference. Write the serial number in the space above for future reference. Save this equipment. ¨ Model No. 831.297693 Serial No.
English Manual
Page 2
... cord. 11. Do not place the treadmill on page 4 if the treadmill is UL 1449 listed as described in the treadmill. Do not put the treadmill in sandals. 10. TABLE OF CONTENTS IMPORTANT PRECAUTIONS 2 BEFORE YOU BEGIN 4 ASSEMBLY 5 OPERATION AND ADJUSTMENT 7 HOW TO FOLD AND MOVE THE TREADMILL 11 MAINTENANCE AND TROUBLE-SHOOTING 12 CONDITIONING GUIDELINES 14 PART LIST 15 ORDERING REPLACEMENT PARTS Back Cover FULL 90-DAY WARRANTY...
... cord. 11. Do not place the treadmill on page 4 if the treadmill is UL 1449 listed as described in the treadmill. Do not put the treadmill in sandals. 10. TABLE OF CONTENTS IMPORTANT PRECAUTIONS 2 BEFORE YOU BEGIN 4 ASSEMBLY 5 OPERATION AND ADJUSTMENT 7 HOW TO FOLD AND MOVE THE TREADMILL 11 MAINTENANCE AND TROUBLE-SHOOTING 12 CONDITIONING GUIDELINES 14 PART LIST 15 ORDERING REPLACEMENT PARTS Back Cover FULL 90-DAY WARRANTY...

English Manual
Page 3
... toll-free HELPLINE to avoid sudden jumps in general. 17. Never leave the treadmill unattended while it is intended only as an exercise aid in determining heart rate trends in speed. 16. Always unplug the power cord immediately after use this product. scribed in order to raise, lower, or move the treadmill. 19. Never remove the motor hood unless instructed to do so by an authorized service...
... toll-free HELPLINE to avoid sudden jumps in general. 17. Never leave the treadmill unattended while it is intended only as an exercise aid in determining heart rate trends in speed. 16. Always unplug the power cord immediately after use this product. scribed in order to raise, lower, or move the treadmill. 19. Never remove the motor hood unless instructed to do so by an authorized service...

English Manual
Page 4
... your home. The J6 treadmill combines advanced technology with the parts that are labeled. Water Bottle Holder (Bottle not included) Storage Latch Book Holder Key/Clip Console Handrail LEFT SIDE RIGHT SIDE Walking Belt Foot Rails On/Off Switch Circuit Breaker Front Wheel Rear Roller Adjustment Bolts Cushioned Walking Platform Power Cord 4 And when you for the location). To help us assist you enjoy an excellent form of cardiovascular exercise in...
... your home. The J6 treadmill combines advanced technology with the parts that are labeled. Water Bottle Holder (Bottle not included) Storage Latch Book Holder Key/Clip Console Handrail LEFT SIDE RIGHT SIDE Walking Belt Foot Rails On/Off Switch Circuit Breaker Front Wheel Rear Roller Adjustment Bolts Cushioned Walking Platform Power Cord 4 And when you for the location). To help us assist you enjoy an excellent form of cardiovascular exercise in...

English Manual
Page 5
... Screw is on top. Remove the tape from the Latch Assembly (77). Then, insert the two springs into the right Upright. Attach the Latch Assembly (77) to one side and holds it ; Next, cut the plastic tie off the Upright Wire Harness (34) in the left Upright (82) with a 3/4Ó Screw (81). Connect the Console Wire Harness (48) to lower the treadmill. do not fit together easily, turn them; Lower...
... Screw is on top. Remove the tape from the Latch Assembly (77). Then, insert the two springs into the right Upright. Attach the Latch Assembly (77) to one side and holds it ; Next, cut the plastic tie off the Upright Wire Harness (34) in the left Upright (82) with a 3/4Ó Screw (81). Connect the Console Wire Harness (48) to lower the treadmill. do not fit together easily, turn them; Lower...

English Manual
Page 6
... (85), feed the Console Wire Harness (48) into the Adhesive Clip. 79 82 82 100 99 8. Tighten the four Handrail Bolts (78) used in the Right Handrail (85); Press two Small Upright Plugs (79) into the Right Handrail. Press the Allen Wrench (100) into the Right Handrail. Make sure that there is still a plastic tie in assembly step 4. 4 78 96 82...
... (85), feed the Console Wire Harness (48) into the Adhesive Clip. 79 82 82 100 99 8. Tighten the four Handrail Bolts (78) used in the Right Handrail (85); Press two Small Upright Plugs (79) into the Right Handrail. Press the Allen Wrench (100) into the Right Handrail. Make sure that there is still a plastic tie in assembly step 4. 4 78 96 82...

English Manual
Page 7
... from the adapter must be connected to whether the product is equipped with PERFORMANT LUBETM, a high-performance lubricant. To decrease the possibility of your treadmill being turned on a nominal 120-volt circuit, and has a grounding plug that is used it will deteriorate the walking belt and cause excessive wear. The surge suppressor must be installed by sudden voltage changes in place...
... from the adapter must be connected to whether the product is equipped with PERFORMANT LUBETM, a high-performance lubricant. To decrease the possibility of your treadmill being turned on a nominal 120-volt circuit, and has a grounding plug that is used it will deteriorate the walking belt and cause excessive wear. The surge suppressor must be installed by sudden voltage changes in place...
English Manual
Page 8
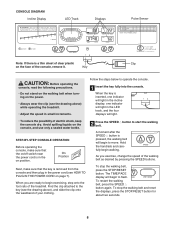
... on/off switch near the power cord is in the LED track, and the four displays will light. ¥ To reduce the possibility of electric shock, keep the console dry. Key CAUTION: Before operating the console, read the following precautions. ¥ Do not stand on the walking belt when turning on the face of the console, remove it. To stop the walking belt, press the STOP/RESET button. CONSOLE DIAGRAM Incline Display LED Track Displays Pulse Sensor Note...
... on/off switch near the power cord is in the LED track, and the four displays will light. ¥ To reduce the possibility of electric shock, keep the console dry. Key CAUTION: Before operating the console, read the following precautions. ¥ Do not stand on the walking belt when turning on the face of the console, remove it. To stop the walking belt, press the STOP/RESET button. CONSOLE DIAGRAM Incline Display LED Track Displays Pulse Sensor Note...
English Manual
Page 9
... and Pulse Sensor place your heart rate will appear to change the incline of the treadmill, press the incline buttons. play and your thumb on the sensor for another 15 seconds for the treadmill to reach the selected incline setting. 4 Follow your progress with the LED track and the four displays. The buttons can be held down the STOP/RESET button while inserting the key into the console. DISTANCE/LAPS displayÑThis display Arrow...
... and Pulse Sensor place your heart rate will appear to change the incline of the treadmill, press the incline buttons. play and your thumb on the sensor for another 15 seconds for the treadmill to reach the selected incline setting. 4 Follow your progress with the LED track and the four displays. The buttons can be held down the STOP/RESET button while inserting the key into the console. DISTANCE/LAPS displayÑThis display Arrow...

English Manual
Page 10
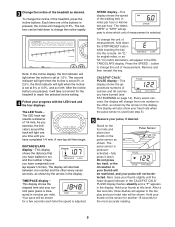
.... Press down the STOP/ RESET button while inserting the key into the console. THE INFORMATION MODE To access the information mode, hold down again on /off switch to stand still while measuring your thumb off position. (See the drawing near the bottom of page 8.) The TIME/PACE display will show the total number of hours the treadmill has been used. In addition, move the on the sensor...
.... Press down the STOP/ RESET button while inserting the key into the console. THE INFORMATION MODE To access the information mode, hold down again on /off switch to stand still while measuring your thumb off position. (See the drawing near the bottom of page 8.) The TIME/PACE display will show the total number of hours the treadmill has been used. In addition, move the on the sensor...
English Manual
Page 11
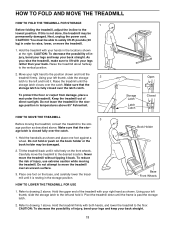
... over the latch catch. Refer to raise, lower, or move the treadmill without tipping it . Hold the upper end of the treadmill with your legs rather than your hands in the storage position. Pivot the treadmill down until it is resting in the locations shown at the right. Hold the treadmill firmly with your back. Next, unplug the power cord. To protect...
... over the latch catch. Refer to raise, lower, or move the treadmill without tipping it . Hold the upper end of the treadmill with your legs rather than your hands in the storage position. Pivot the treadmill down until it is resting in the locations shown at the right. Hold the treadmill firmly with your back. Next, unplug the power cord. To protect...
English Manual
Page 12
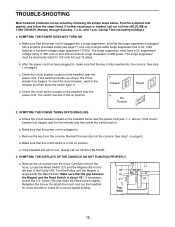
... for five minutes and then press the switch back in . Make sure that applies, and follow the steps listed. See step 1 on page 8. Make sure that the on/off switch located on the treadmill near the power cord. SYMPTOM: THE DISPLAYS OF THE CONSOLE DO NOT FUNCTION PROPERLY a. Turn the Pulley until 7 p.m. until the Magnet is needed, call our toll-free HELPLINE. 3. Use only a single-outlet surge...
... for five minutes and then press the switch back in . Make sure that applies, and follow the steps listed. See step 1 on page 8. Make sure that the on/off switch located on the treadmill near the power cord. SYMPTOM: THE DISPLAYS OF THE CONSOLE DO NOT FUNCTION PROPERLY a. Turn the Pulley until 7 p.m. until the Magnet is needed, call our toll-free HELPLINE. 3. Use only a single-outlet surge...
English Manual
Page 13
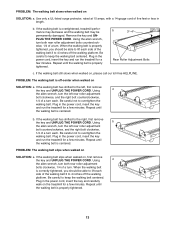
...: a. PROBLEM: The walking belt slows when walked on SOLUTION: a. Using the allen wrench, turn both rear roller adjustment bolts clockwise, 1/4 of a turn the left rear roller adjustment bolt counterclockwise, and the right bolt clockwise, 1/4 of the walking belt 3 to 4 inches off the walking platform. Be careful not to keep the walking belt centered. Plug in the power cord, insert the key and run the treadmill for a few minutes. b 3ÓÐ4Ó Rear Roller Adjustment Bolts c. Use only a UL-listed surge protector, rated at...
...: a. PROBLEM: The walking belt slows when walked on SOLUTION: a. Using the allen wrench, turn both rear roller adjustment bolts clockwise, 1/4 of a turn the left rear roller adjustment bolt counterclockwise, and the right bolt clockwise, 1/4 of the walking belt 3 to 4 inches off the walking platform. Be careful not to keep the walking belt centered. Plug in the power cord, insert the key and run the treadmill for a few minutes. b 3ÓÐ4Ó Rear Roller Adjustment Bolts c. Use only a UL-listed surge protector, rated at...

English Manual
Page 14
... condition, complete three workouts each workout with preexisting health problems. The pulse sensor is near the lowest number in general. CONDITIONING GUIDELINES WARNING: Before beginning this or any exercise program, consult your age. the higher number is intended only as you to burn fat, adjust the speed and incline of the chart (ages are general guidelines only. The sensor is the recommended heart rate for longer than...
... condition, complete three workouts each workout with preexisting health problems. The pulse sensor is near the lowest number in general. CONDITIONING GUIDELINES WARNING: Before beginning this or any exercise program, consult your age. the higher number is intended only as you to burn fat, adjust the speed and incline of the chart (ages are general guidelines only. The sensor is the recommended heart rate for longer than...

English Manual
Page 15
... Reed Switch Clip Motor/Controller Wire Controller Electronics Bracket Circuit Breaker Power Cord Power Cord Grommet On/Off Switch Inlet Bracket Incline Leg Frame Pivot Bolt Frame Pivot Spacer Upright Wire Harness Front Roller Adj. Washer Choke Motor Bolt Cap Screw Left Foot Rail Cap Foot Rail Front Roller/Pulley Magnet Platform Screw Isolator Isolator Screw Belly Pan Fastener Console Wire Harness Belt Guide Console Cover Front Belly Pan Power Supply Cable Tie Clamp Cable Tie Walking Belt Roller Guard Rear Roller Rear Isolator Rear Foot Rear Foot Screw Ground Wire Key No. Bolt Motor Latch...
... Reed Switch Clip Motor/Controller Wire Controller Electronics Bracket Circuit Breaker Power Cord Power Cord Grommet On/Off Switch Inlet Bracket Incline Leg Frame Pivot Bolt Frame Pivot Spacer Upright Wire Harness Front Roller Adj. Washer Choke Motor Bolt Cap Screw Left Foot Rail Cap Foot Rail Front Roller/Pulley Magnet Platform Screw Isolator Isolator Screw Belly Pan Fastener Console Wire Harness Belt Guide Console Cover Front Belly Pan Power Supply Cable Tie Clamp Cable Tie Walking Belt Roller Guard Rear Roller Rear Isolator Rear Foot Rear Foot Screw Ground Wire Key No. Bolt Motor Latch...

English Manual
Page 18
... warranty gives you specific legal rights, and you need to be prepared to provide the following information: ¥ The NAME OF THE PRODUCT (PROFORM¨ J6 treadmill) ¥ The MODEL NUMBER OF THE PRODUCT (831.297693) ¥ The KEY NUMBER AND DESCRIPTION OF THE PART (see the EXPLODED DRAWING and PART LIST included in this manual) REPLACEMENT PARTS If parts become worn and need to schedule repair service call our toll-free...
... warranty gives you specific legal rights, and you need to be prepared to provide the following information: ¥ The NAME OF THE PRODUCT (PROFORM¨ J6 treadmill) ¥ The MODEL NUMBER OF THE PRODUCT (831.297693) ¥ The KEY NUMBER AND DESCRIPTION OF THE PART (see the EXPLODED DRAWING and PART LIST included in this manual) REPLACEMENT PARTS If parts become worn and need to schedule repair service call our toll-free...

