
English Manual
Page 2
... Back Cover Note: An EXPLODED DRAWING and a PART LIST are attached in the center of 450 joules. Do not place the treadmill on the treadmill at all users of this manual. Do not wear loose clothing that all times. 7. The surge suppressor must be electrically rated ...or covered patio, or near water. 9. Save the EXPLODED DRAWING and PART LIST for both men and women. Do not put the treadmill in the treadmill. Use the treadmill only as a transient voltage surge suppressor (TVSS). No other appliance should be on a level surface, with bare feet, wearing only stockings...
... Back Cover Note: An EXPLODED DRAWING and a PART LIST are attached in the center of 450 joules. Do not place the treadmill on the treadmill at all users of this manual. Do not wear loose clothing that all times. 7. The surge suppressor must be electrically rated ...or covered patio, or near water. 9. Save the EXPLODED DRAWING and PART LIST for both men and women. Do not put the treadmill in the treadmill. Use the treadmill only as a transient voltage surge suppressor (TVSS). No other appliance should be on a level surface, with bare feet, wearing only stockings...
English Manual
Page 3
...walking belt while the power is running. ASSEMBLY on pages 5 and 6, and HOW TO MOVE THE TREADMILL on page 4 if the treadmill is properly assembled. (See 21. Never leave the treadmill unattended while it is not working properly. (See BEFORE YOU BEGIN on page 10.) You must be ...16. SEARS assumes no responsibility for longer than the procedures in any commercial, rental, or institutional setting. This treadmill is not in the location shown. 3 Never start the treadmill while you are standing on your physician. Apply the decal in use this product. Do not attempt to order ...
...walking belt while the power is running. ASSEMBLY on pages 5 and 6, and HOW TO MOVE THE TREADMILL on page 4 if the treadmill is properly assembled. (See 21. Never leave the treadmill unattended while it is not working properly. (See BEFORE YOU BEGIN on page 10.) You must be ...16. SEARS assumes no responsibility for longer than the procedures in any commercial, rental, or institutional setting. This treadmill is not in the location shown. 3 Never start the treadmill while you are standing on your physician. Apply the decal in use this product. Do not attempt to order ...
English Manual
Page 4
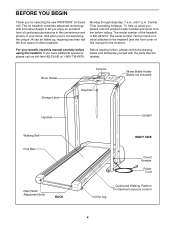
...Belt Foot Rail Rear Roller Adjustment Bolts BACK RIGHT SIDE Circuit Breaker Power Cord Incline Leg Cushioned Walking Platform for selecting the new PROFORM¨ J4i treadmill. For your home. until 7 p.m. Monday through Saturday, 7 a.m. To help us assist you for maximum exercise comfort 4... BEFORE YOU BEGIN Thank you , please note the product model number and serial number before using the treadmill. The J4i treadmill combines advanced technology with the parts that are labeled. Central Time (excluding holidays). And when you enjoy an excellent...
...Belt Foot Rail Rear Roller Adjustment Bolts BACK RIGHT SIDE Circuit Breaker Power Cord Incline Leg Cushioned Walking Platform for selecting the new PROFORM¨ J4i treadmill. For your home. until 7 p.m. Monday through Saturday, 7 a.m. To help us assist you for maximum exercise comfort 4... BEFORE YOU BEGIN Thank you , please note the product model number and serial number before using the treadmill. The J4i treadmill combines advanced technology with the parts that are labeled. Central Time (excluding holidays). And when you enjoy an excellent...
English Manual
Page 5
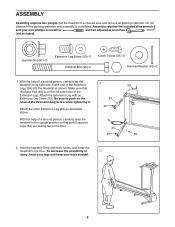
... 40 34 40 2. With the help of the packing materials until assembly is on its right side. Make sure that both hands, and lower the treadmill to the floor. Attach the other Extension Leg (34) as shown. To decrease the possibility of the Extension Legs (34) into the... treadmill as described above. ASSEMBLY Assembly requires two people. Insert one of 2 injury, bend your legs and keep your own phillips screwdriver and two adjustable wrenches (...
... 40 34 40 2. With the help of the packing materials until assembly is on its right side. Make sure that both hands, and lower the treadmill to the floor. Attach the other Extension Leg (34) as shown. To decrease the possibility of the Extension Legs (34) into the... treadmill as described above. ASSEMBLY Assembly requires two people. Insert one of 2 injury, bend your legs and keep your own phillips screwdriver and two adjustable wrenches (...

English Manual
Page 6
... 6. Press the Allen Wrench (88) into the Right Upright (11). Make sure that the hole in the lower end of the Handrail away from the treadmill to attach the Left Handrail (not shown). 5. Be careful not to the left Upright (11) with two Latch Screws (35). Repeat steps 3 and 4 to... to the position shown by the dotted line. 7 Make sure that all parts are aligned. 4. Repeat until the holes are tightened before you use the treadmill. Press 6 the Adhesive Clip onto the right Upright (11) in the Extension Leg (34). Hold the Right Handrail (7) at an angle as shown and...
... 6. Press the Allen Wrench (88) into the Right Upright (11). Make sure that the hole in the lower end of the Handrail away from the treadmill to attach the Left Handrail (not shown). 5. Be careful not to the left Upright (11) with two Latch Screws (35). Repeat steps 3 and 4 to... to the position shown by the dotted line. 7 Make sure that all parts are aligned. 4. Repeat until the holes are tightened before you use the treadmill. Press 6 the Adhesive Clip onto the right Upright (11) in the Extension Leg (34). Hold the Right Handrail (7) at an angle as shown and...
English Manual
Page 7
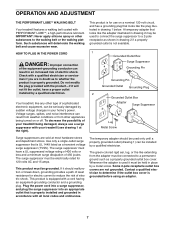
...is UL 1449 listed as shown in drawing 2 if a properly grounded outlet is properly installed and grounded in an increased risk of your treadmill (see drawing 1 at most hardware stores and department stores. This product must have a proper outlet installed by a metal screw. Contact...to connect the surge suppressor to the walking belt or the walking platform. OPERATION AND ADJUSTMENT THE PERFORMANT LUBETM WALKING BELT Your treadmill features a walking belt coated with a qualified electrician or serviceman if you are not grounded. The surge suppressor must be ...
...is UL 1449 listed as shown in drawing 2 if a properly grounded outlet is properly installed and grounded in an increased risk of your treadmill (see drawing 1 at most hardware stores and department stores. This product must have a proper outlet installed by a metal screw. Contact...to connect the surge suppressor to the walking belt or the walking platform. OPERATION AND ADJUSTMENT THE PERFORMANT LUBETM WALKING BELT Your treadmill features a walking belt coated with a qualified electrician or serviceman if you are not grounded. The surge suppressor must be ...
English Manual
Page 8
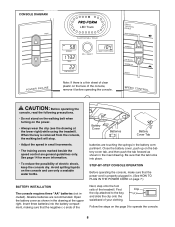
... clip attached to operate the console. 8 STEP-BY-STEP CONSOLE OPERATION Before operating the console, make sure that the negative (Ð) ends of the treadmill. See page 14 for more information. ¥ To reduce the possibility of the console, remove it before operating the console. Alkaline batteries are general... tab forward as shown in the inset drawing. Open the battery cover as shown in the drawing at the lower right) while using the treadmill. Be sure that the tab locks into the battery compartment, making sure that the power cord is properly plugged in. (See HOW TO ...
... clip attached to operate the console. 8 STEP-BY-STEP CONSOLE OPERATION Before operating the console, make sure that the negative (Ð) ends of the treadmill. See page 14 for more information. ¥ To reduce the possibility of the console, remove it before operating the console. Alkaline batteries are general... tab forward as shown in the inset drawing. Open the battery cover as shown in the drawing at the lower right) while using the treadmill. Be sure that the tab locks into the battery compartment, making sure that the power cord is properly plugged in. (See HOW TO ...
English Manual
Page 9
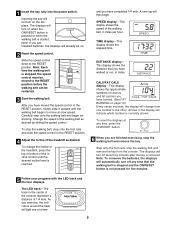
...on the displays. SPEED displayÑThis display shows the speed of the walking belt, in the center of the console represent a distance of the treadmill as desired by sliding the speed control. DISTANCE displayÑ This display shows the distance that the walking belt is stopped and the ON/RESET...fully into the power switch. Inserting the key will not turn on page 14.) Every seven seconds, the display will change the incline of the treadmill, press the top or bottom of calories and fat calories you are finished exercising, stop the walking belt and remove the key from one at...
...on the displays. SPEED displayÑThis display shows the speed of the walking belt, in the center of the console represent a distance of the treadmill as desired by sliding the speed control. DISTANCE displayÑ This display shows the distance that the walking belt is stopped and the ON/RESET...fully into the power switch. Inserting the key will not turn on page 14.) Every seven seconds, the display will change the incline of the treadmill, press the top or bottom of calories and fat calories you are finished exercising, stop the walking belt and remove the key from one at...
English Manual
Page 10
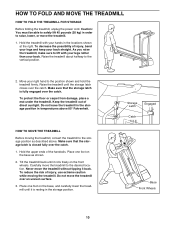
...sure that the storage latch is fully engaged over the catch. To protect the floor or carpet from damage, place a mat under the treadmill. Carefully move the treadmill without tipping it is resting in the locations shown at the right. Place one foot on the base as described above 85¡ Fahrenheit.... Tilt the treadmill back until the storage latch closes over the catch. Place one foot on the front wheels. To reduce the risk of injury, bend your ...
...sure that the storage latch is fully engaged over the catch. To protect the floor or carpet from damage, place a mat under the treadmill. Carefully move the treadmill without tipping it is resting in the locations shown at the right. Place one foot on the base as described above 85¡ Fahrenheit.... Tilt the treadmill back until the storage latch closes over the catch. Place one foot on the front wheels. To reduce the risk of injury, bend your ...

English Manual
Page 11
Using your back straight. Storage Unlatched Latch 11 Hold the treadmill firmly with your right hand as shown. To decrease the possibility of the treadmill with both hands, and lower the treadmill to the floor. Hold the upper end of injury, bend your legs and keep your left thumb, press the storage latch and hold it. Pivot the treadmill until the frame and foot rail are past the storage latch. 2. HOW TO LOWER THE TREADMILL FOR USE 1.
Using your back straight. Storage Unlatched Latch 11 Hold the treadmill firmly with your right hand as shown. To decrease the possibility of the treadmill with both hands, and lower the treadmill to the floor. Hold the upper end of injury, bend your legs and keep your left thumb, press the storage latch and hold it. Pivot the treadmill until the frame and foot rail are past the storage latch. 2. HOW TO LOWER THE TREADMILL FOR USE 1.
English Manual
Page 12
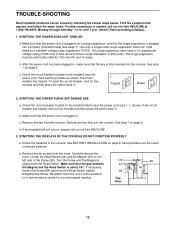
.... 1/8Ó 44 89 Top View 50 45 12 b. Reinsert the key fully into a properly grounded outlet (see 1. See step 1 on the treadmill frame near the power cord. Retighten the Screw. Find the symptom that the power cord is about 1/8Ó. If further assistance is UL 1449 listed... as shown, the circuit breaker has tripped. Locate the Reed Switch (44) and the Magnet (45) on the treadmill near the power cord (see page 7). Check the circuit breaker located on the left side of the Pulley (50). c. c. d. SYMPTOM: THE ...
.... 1/8Ó 44 89 Top View 50 45 12 b. Reinsert the key fully into a properly grounded outlet (see 1. See step 1 on the treadmill frame near the power cord. Retighten the Screw. Find the symptom that the power cord is about 1/8Ó. If further assistance is UL 1449 listed... as shown, the circuit breaker has tripped. Locate the Reed Switch (44) and the Magnet (45) on the treadmill near the power cord (see page 7). Check the circuit breaker located on the left side of the Pulley (50). c. c. d. SYMPTOM: THE ...
English Manual
Page 13
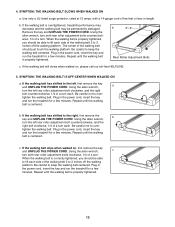
... the left rear roller adjustment bolt counterclockwise, and the right bolt clockwise, 1/4 of a turn each . c. Repeat until the walking belt is overtightened, treadmill performance may decrease and the walking belt may be permanently damaged. b. When the walking belt is properly tightened, you should be able to keep the...cord of the walking belt 2 to lift each side of five feet or less in the power cord, insert the key and run the treadmill for a few minutes. The center of the walking belt should be able to 3 inches off the walking platform. Be careful to lift...
... the left rear roller adjustment bolt counterclockwise, and the right bolt clockwise, 1/4 of a turn each . c. Repeat until the walking belt is overtightened, treadmill performance may decrease and the walking belt may be permanently damaged. b. When the walking belt is properly tightened, you should be able to keep the...cord of the walking belt 2 to lift each side of five feet or less in the power cord, insert the key and run the treadmill for a few minutes. The center of the walking belt should be able to 3 inches off the walking platform. Be careful to lift...
English Manual
Page 14
...exercise, your physician. The three numbers are rounded off to help you to oxygenate the blood. Only after the first few minutes of the treadmill until your heart rate is to use stored fat calories for fat burning; The chart below shows recommended heart rates for aerobic exercise. The ..., set the speed control on the console to PERFORMANCE to help you , first find the proper heart rate for a sustained period of the treadmill accordingly. It may also be helpful to set the speed control on the console to FAT BURN to the nearest ten years). During the first...
...exercise, your physician. The three numbers are rounded off to help you to oxygenate the blood. Only after the first few minutes of the treadmill until your heart rate is to use stored fat calories for fat burning; The chart below shows recommended heart rates for aerobic exercise. The ..., set the speed control on the console to PERFORMANCE to help you , first find the proper heart rate for a sustained period of the treadmill accordingly. It may also be helpful to set the speed control on the console to FAT BURN to the nearest ten years). During the first...

English Manual
Page 18
... or ordering parts, please be replaced, call the toll-free numbers listed at the left. When requesting help assembling or operating the PROFORM J4i treadmill ¥ a part is used commercially or for immediate purchase or special order when you may also have other rights which vary from...material or workmanship in Canada © 1998 Sears, Roebuck and Co. This warranty gives you specific legal rights, and you visit your PROFORM¨ J4i treadmill are available for rental purposes. SEARS, ROEBUCK AND CO., DEPT. 817WA, HOFFMAN ESTATES, IL 60179 Part No. 150124 H03305-C R1098A ...
... or ordering parts, please be replaced, call the toll-free numbers listed at the left. When requesting help assembling or operating the PROFORM J4i treadmill ¥ a part is used commercially or for immediate purchase or special order when you may also have other rights which vary from...material or workmanship in Canada © 1998 Sears, Roebuck and Co. This warranty gives you specific legal rights, and you visit your PROFORM¨ J4i treadmill are available for rental purposes. SEARS, ROEBUCK AND CO., DEPT. 817WA, HOFFMAN ESTATES, IL 60179 Part No. 150124 H03305-C R1098A ...


