
English Manual
Page 3
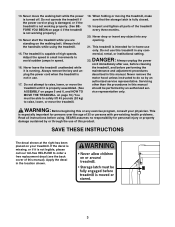
... this manual). Do not attempt to raise, lower, or move the treadmill until it is properly assembled. (See ASSEMBLY on pages 5 and 6, and HOW TO MOVE THE TREADMILL on the walking belt. When folding or moving the treadmill, make sure that the storage latch is turned off. DANGER: 22.... Adjust the speed in -home use , before cleaning the treadmill, and before using the treadmill. 15. 13. Servicing other than the procedures...
... this manual). Do not attempt to raise, lower, or move the treadmill until it is properly assembled. (See ASSEMBLY on pages 5 and 6, and HOW TO MOVE THE TREADMILL on the walking belt. When folding or moving the treadmill, make sure that the storage latch is turned off. DANGER: 22.... Adjust the speed in -home use , before cleaning the treadmill, and before using the treadmill. 15. 13. Servicing other than the procedures...

English Manual
Page 4
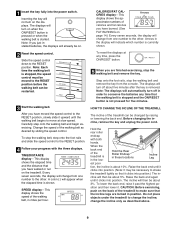
... Latch Key/Clip Handrail Upright Walking Belt Foot Rail Rear Roller Adjustment Bolts BACK RIGHT SIDE Circuit Breaker Power Cord Incline Leg Cushioned Walking Platform for the location). For your home. until 7 p.m. Central Time (excluding holidays). To help us assist you for selecting the new PROFORM¨ J4 treadmill. If you have additional questions...
... Latch Key/Clip Handrail Upright Walking Belt Foot Rail Rear Roller Adjustment Bolts BACK RIGHT SIDE Circuit Breaker Power Cord Incline Leg Cushioned Walking Platform for the location). For your home. until 7 p.m. Central Time (excluding holidays). To help us assist you for selecting the new PROFORM¨ J4 treadmill. If you have additional questions...
English Manual
Page 5
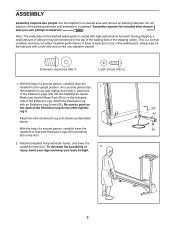
.... Attach the Extension Leg with both Extension Legs (34) are resting flat on top of the Extension Legs (34) into the treadmill as described above. Do not dispose of the Extension Leg. Assembly requires the included allen wrench and your back straight. 5 This is ... two people. Note: The underside of the walking belt or the shipping carton. Make sure that both hands, and lower the treadmill to the top of the treadmill walking belt is lubricant on the floor. 2. Be sure to one of the walking belt, simply wipe off the lubricant with high-performance lubricant...
.... Attach the Extension Leg with both Extension Legs (34) are resting flat on top of the Extension Legs (34) into the treadmill as described above. Do not dispose of the Extension Leg. Assembly requires the included allen wrench and your back straight. 5 This is ... two people. Note: The underside of the walking belt or the shipping carton. Make sure that both hands, and lower the treadmill to the top of the treadmill walking belt is lubricant on the floor. 2. Be sure to one of the walking belt, simply wipe off the lubricant with high-performance lubricant...
English Manual
Page 7
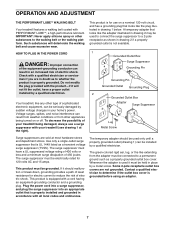
... wear. Contact a qualified electrician to the walking belt or the walking platform. IMPORTANT: Never apply silicone spray or other appliances being damaged, always use on or off. If it should be held in your treadmill (see drawing 1 at most hardware stores and ...department stores. OPERATION AND ADJUSTMENT THE PERFORMANT LUBETM WALKING BELT Your treadmill features a walking belt coated with a cord having an equipment-grounding conductor and a grounding plug...
... wear. Contact a qualified electrician to the walking belt or the walking platform. IMPORTANT: Never apply silicone spray or other appliances being damaged, always use on or off. If it should be held in your treadmill (see drawing 1 at most hardware stores and ...department stores. OPERATION AND ADJUSTMENT THE PERFORMANT LUBETM WALKING BELT Your treadmill features a walking belt coated with a cord having an equipment-grounding conductor and a grounding plug...
English Manual
Page 8
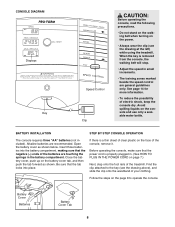
When the key is removed from the console, the walking belt will stop. ¥ Adjust the speed in . (See HOW TO PLUG IN THE POWER CORD on the power. ... Close the battery cover, push up on the page 8 to the key (see the drawing at the left) while using the treadmill. If there is properly plugged in small increments. ¥ The training zones marked beside the speed control are general guidelines only. ... Clip CAUTION: Before operating the console, read the following precautions. ¥ Do not stand on the walking belt when turning on page 7.) Next, step onto the foot rails of the...
When the key is removed from the console, the walking belt will stop. ¥ Adjust the speed in . (See HOW TO PLUG IN THE POWER CORD on the power. ... Close the battery cover, push up on the page 8 to the key (see the drawing at the left) while using the treadmill. If there is properly plugged in small increments. ¥ The training zones marked beside the speed control are general guidelines only. ... Clip CAUTION: Before operating the console, read the following precautions. ¥ Do not stand on the walking belt when turning on page 7.) Next, step onto the foot rails of the...
English Manual
Page 9
...number is removed. Raise the back end until it clicks into position.) The in order to shake the treadmill lightly so that the incline legs are finished exercising, stop the walking belt and remove the key. cline will already be about 5%. To lower the back end, raise it ...will change from one number to the RESET position, slowly slide it upward until it . Carefully step onto the walking belt and begin exercising. Change the speed of the treadmill to the RESET position. 4 Follow your progress with both hands. SPEED displayÑThis display shows the speed of...
...number is removed. Raise the back end until it clicks into position.) The in order to shake the treadmill lightly so that the incline legs are finished exercising, stop the walking belt and remove the key. cline will already be about 5%. To lower the back end, raise it ...will change from one number to the RESET position, slowly slide it upward until it . Carefully step onto the walking belt and begin exercising. Change the speed of the treadmill to the RESET position. 4 Follow your progress with both hands. SPEED displayÑThis display shows the speed of...

English Manual
Page 13
...;Ð3Ó Rear Roller Adjustment Bolts c. Repeat until the walking belt is centered. Be careful not to keep the walking belt centered. Repeat until the walking belt is overtightened, treadmill performance may decrease and the walking belt may be able to 3 inches off the walking platform. c. ... careful not to break in the power cord, insert the key and run the treadmill for a few minutes. SYMPTOM: THE WALKING BELT SLOWS WHEN WALKED ON a. Repeat until the walking belt is correctly tightened, you should be able to 3 inches off the walking platform....
...;Ð3Ó Rear Roller Adjustment Bolts c. Repeat until the walking belt is centered. Be careful not to keep the walking belt centered. Repeat until the walking belt is overtightened, treadmill performance may decrease and the walking belt may be able to 3 inches off the walking platform. c. ... careful not to break in the power cord, insert the key and run the treadmill for a few minutes. SYMPTOM: THE WALKING BELT SLOWS WHEN WALKED ON a. Repeat until the walking belt is correctly tightened, you should be able to 3 inches off the walking platform....
English Manual
Page 16
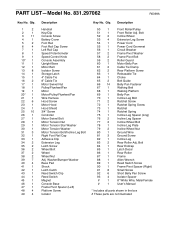
...Clip Console Screw Battery Cover Foot Rail Foot Rail Cap Screw Left Rail Cap Speed Potentiometer Speed Control Knob Console Assembly Upright Base Motor Belt Isolator Screw Storage Latch 4Ó Cable Tie 8Ó Cable Tie Motor Swivel Nut Pulley/Flywheel/Fan Motor Motor/Pulley/Flywheel/Fan Wire...Breaker Frame Pivot Washer Frame Pivot Bolt Roller Guard Motor Belly Pan Cable Tie Clamp Rear Platform Screw Releasable Tie Choke Belt Guide Belly Pan Fastener Walking Belt Walking Platform Belly Pan Incline Leg Bolt Ratchet Screw Ratchet Spring Screw Ratchet Ratchet Spring Incline Leg Spacer (long) ...
...Clip Console Screw Battery Cover Foot Rail Foot Rail Cap Screw Left Rail Cap Speed Potentiometer Speed Control Knob Console Assembly Upright Base Motor Belt Isolator Screw Storage Latch 4Ó Cable Tie 8Ó Cable Tie Motor Swivel Nut Pulley/Flywheel/Fan Motor Motor/Pulley/Flywheel/Fan Wire...Breaker Frame Pivot Washer Frame Pivot Bolt Roller Guard Motor Belly Pan Cable Tie Clamp Rear Platform Screw Releasable Tie Choke Belt Guide Belly Pan Fastener Walking Belt Walking Platform Belly Pan Incline Leg Bolt Ratchet Screw Ratchet Spring Screw Ratchet Ratchet Spring Incline Leg Spacer (long) ...


