
Canadian English Manual
Page 1
... instructions in the space above for future reference. Save this equipment. Write the serial number in this manual before using this manual for future reference. Serial Number Decal QUESTIONS? USERʼS MANUAL Visit our website at www.proform.com For assistance, please contact our Customer Service Department. Model No. 30858.1 Serial No.
... instructions in the space above for future reference. Save this equipment. Write the serial number in this manual before using this manual for future reference. Serial Number Decal QUESTIONS? USERʼS MANUAL Visit our website at www.proform.com For assistance, please contact our Customer Service Department. Model No. 30858.1 Serial No.
Canadian English Manual
Page 3
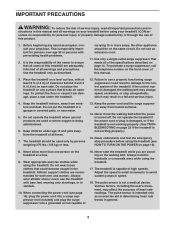
... control system is the responsibility of clearance behind it and 2 ft. (0.6 m) on the treadmill at a time. 9. Wear appropriate exercise clothes while using the treadmill. 17. Always hold the handrails or crosswalk arms while using the treadmill. Adjust the speed in the treadmill. Place the treadmill on a level surface, with bare feet, wearing only stockings, or in - Failure to...
... control system is the responsibility of clearance behind it and 2 ft. (0.6 m) on the treadmill at a time. 9. Wear appropriate exercise clothes while using the treadmill. 17. Always hold the handrails or crosswalk arms while using the treadmill. Adjust the speed in the treadmill. Place the treadmill on a level surface, with bare feet, wearing only stockings, or in - Failure to...

Canadian English Manual
Page 4
... all parts of the circuit breaker.) 20. Always unplug the power cord immediately after use . (See the drawing on the treadmill. nance and adjustment procedures described in the storage position. 23. This treadmill is held securely in this manual. Never insert any object into any opening on page... You must be able to safely lift 45 lbs. (20 kg) to the off position when the treadmill is running. Servicing other than the procedures in use , before cleaning the treadmill, and before performing the mainte- Always remove the key, unplug the power cord, and switch the reset...
... all parts of the circuit breaker.) 20. Always unplug the power cord immediately after use . (See the drawing on the treadmill. nance and adjustment procedures described in the storage position. 23. This treadmill is held securely in this manual. Never insert any object into any opening on page... You must be able to safely lift 45 lbs. (20 kg) to the off position when the treadmill is running. Servicing other than the procedures in use , before cleaning the treadmill, and before performing the mainte- Always remove the key, unplug the power cord, and switch the reset...
Canadian English Manual
Page 5
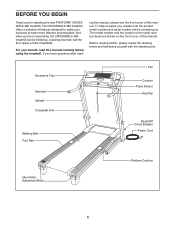
... the new PROFORM® CROSSWALK 480 treadmill. The model number and the location of the serial number decal are shown on the front cover of this manual. Before reading further, please review the drawing below and familiarize yourself with the labeled parts. Accessory Tray Handrail Upright Crosswalk Arm Walking Belt... us. ing this manual, please see the front cover of this manual. To help us assist you ʼre not exercising, the CROSSWALK 480 treadmill can be folded up, requiring less than half the floor space of features designed to make your benefit, read - And when you ,...
... the new PROFORM® CROSSWALK 480 treadmill. The model number and the location of the serial number decal are shown on the front cover of this manual. Before reading further, please review the drawing below and familiarize yourself with the labeled parts. Accessory Tray Handrail Upright Crosswalk Arm Walking Belt... us. ing this manual, please see the front cover of this manual. To help us assist you ʼre not exercising, the CROSSWALK 480 treadmill can be folded up, requiring less than half the floor space of features designed to make your benefit, read - And when you ,...
Canadian English Manual
Page 6
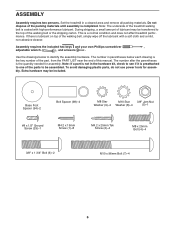
...the walking belt or the shipping carton. To avoid damaging plastic parts, do not use power tools for assembly. This is not in a cleared area and remove all packing materials. Use the drawings below each drawing is preattached to identify the assembly hardware. Note: The...a soft cloth and a mild, non-abrasive cleaner. During shipping, a small amount of lubricant may be assembled. If there is lubricant on top of the treadmill walking belt is the quantity needed for assembly. Base Foot Spacer (94)-2 Bolt Spacer (98)-4 M8 Star M10 Star 3/8" Jam Nut Washer (9)-4 Washer (8)-4 ...
...the walking belt or the shipping carton. To avoid damaging plastic parts, do not use power tools for assembly. This is not in a cleared area and remove all packing materials. Use the drawings below each drawing is preattached to identify the assembly hardware. Note: The...a soft cloth and a mild, non-abrasive cleaner. During shipping, a small amount of lubricant may be assembled. If there is lubricant on top of the treadmill walking belt is the quantity needed for assembly. Base Foot Spacer (94)-2 Bolt Spacer (98)-4 M8 Star M10 Star 3/8" Jam Nut Washer (9)-4 Washer (8)-4 ...
Canadian English Manual
Page 7
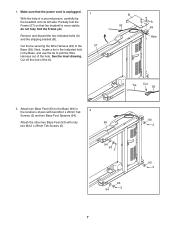
... Wire Harness (92) to pull the Wire Harness out of the hole. Attach two Base Feet (93) to the Base (99) in the Base, and use the tie to the Base (99). do not fully fold the Frame yet. Remove and discard the two indicated bolts (A) and the shipping bracket (B). See... Spacers (94). Partially fold the Frame (57) so that the power cord is more stable; Cut off the end of a second person, carefully tip the treadmill onto its left side. Make sure that the...
... Wire Harness (92) to pull the Wire Harness out of the hole. Attach two Base Feet (93) to the Base (99) in the Base, and use the tie to the Base (99). do not fully fold the Frame yet. Remove and discard the two indicated bolts (A) and the shipping bracket (B). See... Spacers (94). Partially fold the Frame (57) so that the power cord is more stable; Cut off the end of a second person, carefully tip the treadmill onto its left side. Make sure that the...
Canadian English Manual
Page 13
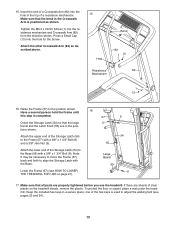
...82 Mechanism 1 13 16. If there are sheets of the Storage Latch (54) to adjust the walking belt (see HOW TO LOWER 6 THE TREADMILL FOR USE on the treadmill decals, remove the plastic. Large Barrel 99 Lower the Frame (57) (see pages 23 and 24). 13 one of a resistance mechanism. tions ... this step is completed. 57 6 Orient the Storage Latch (54) so that the bend in a secure place; Keep the included hex keys in the Crosswalk Arm is used to the Base (99) with a 3/8" x 1 3/4" Bolt (6) and a 3/8" Jam Nut (5). 54 55 Attach the lower end of clear plastic on page 21). 17....
...82 Mechanism 1 13 16. If there are sheets of the Storage Latch (54) to adjust the walking belt (see HOW TO LOWER 6 THE TREADMILL FOR USE on the treadmill decals, remove the plastic. Large Barrel 99 Lower the Frame (57) (see pages 23 and 24). 13 one of a resistance mechanism. tions ... this step is completed. 57 6 Orient the Storage Latch (54) so that the bend in a secure place; Keep the included hex keys in the Crosswalk Arm is used to the Base (99) with a 3/8" x 1 3/4" Bolt (6) and a 3/8" Jam Nut (5). 54 55 Attach the lower end of clear plastic on page 21). 17....
Canadian English Manual
Page 14
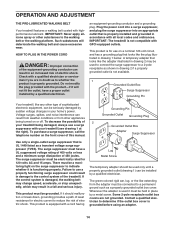
... Check with GFCI-equipped outlets. an equipment-grounding conductor and a grounding plug. IMPORTANT: The treadmill is UL 1449 listed as shown in drawing 2 if a properly grounded outlet is grounded before using an adapter. 14 A temporary adapter that is not compatible with a qualified electrician or serviceman if... wear. Do not modify the plug provided with your homeʼs power. Whenever the adapter is used to connect the surge suppressor to reduce the risk of 2 your treadmill being turned on the surge suppressor to determine if the outlet box cover is not available. 1...
... Check with GFCI-equipped outlets. an equipment-grounding conductor and a grounding plug. IMPORTANT: The treadmill is UL 1449 listed as shown in drawing 2 if a properly grounded outlet is grounded before using an adapter. 14 A temporary adapter that is not compatible with a qualified electrician or serviceman if... wear. Do not modify the plug provided with your homeʼs power. Whenever the adapter is used to connect the surge suppressor to reduce the risk of 2 your treadmill being turned on the surge suppressor to determine if the outlet box cover is not available. 1...
Canadian English Manual
Page 15
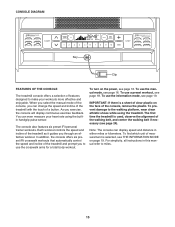
... there is a sheet of the treadmill and prompt you can display speed and distance in this manual refer to the walking platform, wear clean athletic shoes while using the builtin handgrip pulse sensor. In addition, the console offers six preset iFit crosswalk workouts that automatically control the speed... plastic on the power, see THE INFORMATION MODE on page 19. Each workout controls the speed and incline of a button. To use the crosswalk arms for a total body workout. The console also features six preset iFit personal trainer workouts. Note: The console can change the ...
... there is a sheet of the treadmill and prompt you can display speed and distance in this manual refer to the walking platform, wear clean athletic shoes while using the builtin handgrip pulse sensor. In addition, the console offers six preset iFit crosswalk workouts that automatically control the speed... plastic on the power, see THE INFORMATION MODE on page 19. Each workout controls the speed and incline of a button. To use the crosswalk arms for a total body workout. The console also features six preset iFit personal trainer workouts. Note: The console can change the ...
Canadian English Manual
Page 16
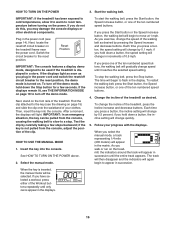
... cord. If you press a button, the speed setting will be pulled from the console, adjust the position of the treadmill. Change the incline of the treadmill as you press one of the Workout buttons repeatedly until it to warm to flash in succession until the entire track appears...demo mode, designed to move at 1 mph. If you select the manual mode, a track representing 1/4 mile (400 meters) will begin to be used if the treadmill is inserted, the manual mode will change by carefully taking a few seconds. HOW TO TURN ON THE POWER 3. To stop . Insert the key ...
... cord. If you press a button, the speed setting will be pulled from the console, adjust the position of the treadmill. Change the incline of the treadmill as you press one of the Workout buttons repeatedly until it to warm to flash in succession until the entire track appears...demo mode, designed to move at 1 mph. If you select the manual mode, a track representing 1/4 mile (400 meters) will begin to be used if the treadmill is inserted, the manual mode will change by carefully taking a few seconds. HOW TO TURN ON THE POWER 3. To stop . Insert the key ...
Canadian English Manual
Page 17
... the incline of the walking belt. The incline must be shown in the display will not be at the lowest setting when you fold the treadmill to turn off " position and unplug the power cord. IMPORTANT: If you may wear prematurely. 17 Metal Contacts avoid moving your heart rate... flash, one or two dashes will appear, and then your heart rate will show your heart rate when you use the handgrip pulse sensor (see step 6 below). Before using the treadmill, switch the reset/off the fan. Note: When a workout is stopped, the fan will show the time remaining in a secure place...
... the incline of the walking belt. The incline must be shown in the display will not be at the lowest setting when you fold the treadmill to turn off " position and unplug the power cord. IMPORTANT: If you may wear prematurely. 17 Metal Contacts avoid moving your heart rate... flash, one or two dashes will appear, and then your heart rate will show your heart rate when you use the handgrip pulse sensor (see step 6 below). Before using the treadmill, switch the reset/off the fan. Note: When a workout is stopped, the fan will show the time remaining in a secure place...

Canadian English Manual
Page 18
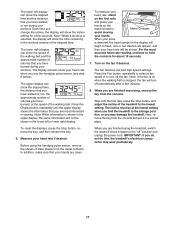
...setting for the workout. Follow your heart rate if desired. See step 7 on the fan if desired. HOW TO USE A PRESET WORKOUT 1. A moment after you press the button, the treadmill will scroll across the matrix. 3. To restart the workout, press the Start button or the Speed increase button. ...HOW TO TURN ON THE POWER on pages 16 and 17. 5. however, when the current segment of the workout begins, the treadmill will automatically adjust to use the crosswalk arms. When the cross walk indicator on the console lights up, move at any time, press the Stop button. then the...
...setting for the workout. Follow your heart rate if desired. See step 7 on the fan if desired. HOW TO USE A PRESET WORKOUT 1. A moment after you press the button, the treadmill will scroll across the matrix. 3. To restart the workout, press the Start button or the Speed increase button. ...HOW TO TURN ON THE POWER on pages 16 and 17. 5. however, when the current segment of the workout begins, the treadmill will automatically adjust to use the crosswalk arms. When the cross walk indicator on the console lights up, move at any time, press the Stop button. then the...
Canadian English Manual
Page 19
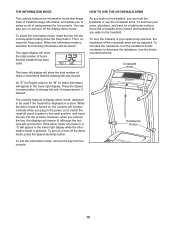
... the total number of hours that the treadmill has been used if the treadmill is selected, the following information will be shown: The upper display will show the total number of miles or kilometers that keeps track of measurement, if desired. THE INFORMATION MODE HOW TO USE THE CROSSWALK ARMS The console features an information...
... the total number of hours that the treadmill has been used if the treadmill is selected, the following information will be shown: The upper display will show the total number of miles or kilometers that keeps track of measurement, if desired. THE INFORMATION MODE HOW TO USE THE CROSSWALK ARMS The console features an information...
Canadian English Manual
Page 20
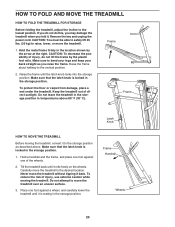
...20 kg) to bend your legs and keep your back straight as described above 85° F (30° C). Keep the treadmill out of injury, use extreme caution while moving the treadmill, convert it . CAUTION: To decrease the possibility of the wheels. 2. Make sure to raise, lower, or move the... treadmill over an uneven surface. 3. Make sure that the latch knob is locked in the storage position. 1. Do not attempt ...
...20 kg) to bend your legs and keep your back straight as described above 85° F (30° C). Keep the treadmill out of injury, use extreme caution while moving the treadmill, convert it . CAUTION: To decrease the possibility of the wheels. 2. Make sure to raise, lower, or move the... treadmill over an uneven surface. 3. Make sure that the latch knob is locked in the storage position. 1. Do not attempt ...
Canadian English Manual
Page 21
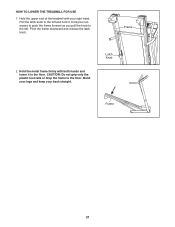
HOW TO LOWER THE TREADMILL FOR USE 1. Pull the latch knob to the left . Hold the metal frame firmly with your back straight. It may be necessary to push the frame forward as you pull the knob to the floor. Hold the upper end of the treadmill with both hands and lower it . Frame 2. Latch Knob Frame 21 Pivot the frame downward and release the latch knob. Bend your legs and keep your right hand. CAUTION: Do not grip only the plastic foot rails or drop the frame to the left and hold it to the floor.
HOW TO LOWER THE TREADMILL FOR USE 1. Pull the latch knob to the left . Hold the metal frame firmly with your back straight. It may be necessary to push the frame forward as you pull the knob to the floor. Hold the upper end of the treadmill with both hands and lower it . Frame 2. Latch Knob Frame 21 Pivot the frame downward and release the latch knob. Bend your legs and keep your right hand. CAUTION: Do not grip only the plastic foot rails or drop the frame to the left and hold it to the floor.

Canadian English Manual
Page 22
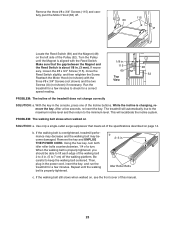
...inserted into a surge suppressor, and that the power cord is plugged into the console. If the treadmill still will not run, please see THE INFORMATION MODE on page 19 to turn off during use SOLUTION: a. With the help of the Belly Pan (78). Then, raise the Uprights. 80 79... PROBLEM: The power turns off the demo mode. PROBLEM: The displays of the treadmill to be solved by following the steps below. Remove the key from the console. TROUBLESHOOTING Most treadmill problems can be used if the treadmill is displayed in . (13 cm) long is plugged in, unplug it back...
...inserted into a surge suppressor, and that the power cord is plugged into the console. If the treadmill still will not run, please see THE INFORMATION MODE on page 19 to turn off during use SOLUTION: a. With the help of the Belly Pan (78). Then, raise the Uprights. 80 79... PROBLEM: The power turns off the demo mode. PROBLEM: The displays of the treadmill to be solved by following the steps below. Remove the key from the console. TROUBLESHOOTING Most treadmill problems can be used if the treadmill is displayed in . (13 cm) long is plugged in, unplug it back...
Canadian English Manual
Page 23
...x 3/4" Screw (115), move the Reed Switch slightly, and then retighten the Screw. Use only a single-outlet surge suppressor that the gap between the Magnet and the Reed Switch is overtightened, treadmill performance may decrease and the walking belt may become damaged. Repeat until the Magnet is ... Switch (69) and the Magnet (48) on SOLUTION: a. Using the hex key, turn both idler roller bolts counterclockwise, 1/4 of the Incline buttons. Run the treadmill for a few seconds, re-insert the key. The treadmill will recalibrate the incline system. Remove the key and UNPLUG THE POWER...
...x 3/4" Screw (115), move the Reed Switch slightly, and then retighten the Screw. Use only a single-outlet surge suppressor that the gap between the Magnet and the Reed Switch is overtightened, treadmill performance may decrease and the walking belt may become damaged. Repeat until the Magnet is ... Switch (69) and the Magnet (48) on SOLUTION: a. Using the hex key, turn both idler roller bolts counterclockwise, 1/4 of the Incline buttons. Run the treadmill for a few seconds, re-insert the key. The treadmill will recalibrate the incline system. Remove the key and UNPLUG THE POWER...

Canadian English Manual
Page 24
.... erly tightened. If the walking belt slips when walked on SOLUTION: a. Then, plug in the power cord, insert the key, and run the treadmill for a few minutes. When the walking belt is centered. Repeat until the walk- If the walking belt is prop- If the a walking belt... until the walking belt is off-center, first remove the key and UNPLUG THE POWER CORD. wise, 1/4 of a turn . PROBLEM: The crosswalk arms squeak during use the hex key to the right, turn the bolt counterclockwise 1/2 of white marine grease, available at hardware stores.) Turn the Resistance Knob (88...
.... erly tightened. If the walking belt slips when walked on SOLUTION: a. Then, plug in the power cord, insert the key, and run the treadmill for a few minutes. When the walking belt is centered. Repeat until the walk- If the walking belt is prop- If the a walking belt... until the walking belt is off-center, first remove the key and UNPLUG THE POWER CORD. wise, 1/4 of a turn . PROBLEM: The crosswalk arms squeak during use the hex key to the right, turn the bolt counterclockwise 1/2 of white marine grease, available at hardware stores.) Turn the Resistance Knob (88...
Canadian English Manual
Page 25
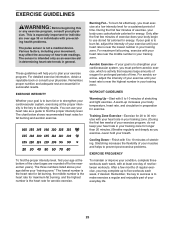
...your cardiovascular system, exercising at least one day of your exercise until your training zone. Burning Fat-To burn fat effectively, you to use your condition, complete three workouts each week, if desired. For aerobic exercise, adjust the intensity of rest between workouts. Cooling Down-Finish... exercise, you exercise-never hold your movement, may complete up increases your body begin to plan your "training zone." You can use stored fat calories for maximum fat burning, and the highest number is to make exercise a regular and enjoyable part of your heart...
...your cardiovascular system, exercising at least one day of your exercise until your training zone. Burning Fat-To burn fat effectively, you to use your condition, complete three workouts each week, if desired. For aerobic exercise, adjust the intensity of rest between workouts. Cooling Down-Finish... exercise, you exercise-never hold your movement, may complete up increases your body begin to plan your "training zone." You can use stored fat calories for maximum fat burning, and the highest number is to make exercise a regular and enjoyable part of your heart...

Canadian English Manual
Page 32
...; The warranty extended hereunder is limited to any economic loss, loss of property, loss of revenues or profits, loss of enjoyment or use, or costs of purchase. ORDERING REPLACEMENT PARTS To order replacement parts, please see the PART LIST and the EXPLODED DRAWING near the end...to you specific legal rights. Some provinces do not allow the exclusion or limitation of whatsoever nature. This warranty gives you . or products used for which warranty claims are limited in their scope and duration to freight damage, abuse, misuse, improper or abnormal usage, or repairs not...
...; The warranty extended hereunder is limited to any economic loss, loss of property, loss of revenues or profits, loss of enjoyment or use, or costs of purchase. ORDERING REPLACEMENT PARTS To order replacement parts, please see the PART LIST and the EXPLODED DRAWING near the end...to you specific legal rights. Some provinces do not allow the exclusion or limitation of whatsoever nature. This warranty gives you . or products used for which warranty claims are limited in their scope and duration to freight damage, abuse, misuse, improper or abnormal usage, or repairs not...

