
Canadian English Manual
Page 1
... if parts are committed to providing complete customer satisfaction. For assistance, please contact our Customer Service Department. USERʼS MANUAL Visit our website at www.proform.com CALL TOLL-FREE: 1-888-936-4266 Mon.-Fri., 8:00 until 17:00 ET (excluding holidays) OR E-MAIL US: [email protected] CAUTION Read .... As a manufacturer, we are damaged or missing, DO NOT CONTACT THE STORE. Serial Number Decal QUESTIONS? Write the serial number in this manual before using this manual for future reference. Save this equipment. Model No. 30858.1 Serial No.
... if parts are committed to providing complete customer satisfaction. For assistance, please contact our Customer Service Department. USERʼS MANUAL Visit our website at www.proform.com CALL TOLL-FREE: 1-888-936-4266 Mon.-Fri., 8:00 until 17:00 ET (excluding holidays) OR E-MAIL US: [email protected] CAUTION Read .... As a manufacturer, we are damaged or missing, DO NOT CONTACT THE STORE. Serial Number Decal QUESTIONS? Write the serial number in this manual before using this manual for future reference. Save this equipment. Model No. 30858.1 Serial No.
Canadian English Manual
Page 3
... clothes while using the treadmill. 17. Never start the treadmill while you are used only by or through the use the treadmill with at least 8 ft. (2.4 m) of the specifications described on the walking belt. Keep the treadmill indoors, away from the treadmill at a time. 9. Always hold the handrails or crosswalk arms while using the treadmill. Do not operate the treadmill where aerosol...
... clothes while using the treadmill. 17. Never start the treadmill while you are used only by or through the use the treadmill with at least 8 ft. (2.4 m) of the specifications described on the walking belt. Keep the treadmill indoors, away from the treadmill at a time. 9. Always hold the handrails or crosswalk arms while using the treadmill. Do not operate the treadmill where aerosol...

Canadian English Manual
Page 4
...authorized service representative only. 25. Always unplug the power cord immediately after use . (See the drawing on the treadmill. Servicing other than the procedures in this treadmill in a commercial, rental, or institutional setting. 22. This treadmill is running. Never insert any object into any opening on page 5... manual should be able to safely lift 45 lbs. (20 kg) to the off position when the treadmill is held securely in use , before cleaning the treadmill, and before performing the mainte- Always remove the key, unplug the power cord, and switch the reset/off ...
...authorized service representative only. 25. Always unplug the power cord immediately after use . (See the drawing on the treadmill. Servicing other than the procedures in this treadmill in a commercial, rental, or institutional setting. 22. This treadmill is running. Never insert any object into any opening on page 5... manual should be able to safely lift 45 lbs. (20 kg) to the off position when the treadmill is held securely in use , before cleaning the treadmill, and before performing the mainte- Always remove the key, unplug the power cord, and switch the reset/off ...
Canadian English Manual
Page 5
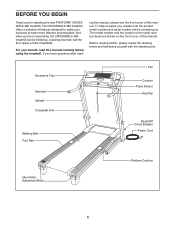
...PROFORM® CROSSWALK 480 treadmill. Before reading further, please review the drawing below and familiarize yourself with the labeled parts. BEFORE YOU BEGIN Thank you have questions after read this manual carefully before contacting us assist you ʼre not exercising, the CROSSWALK 480 treadmill... can be folded up, requiring less than half the floor space of other treadmills. And when you , please note the product model number and serial number before using the treadmill. The CROSSWALK 480 treadmill offers a selection of ...
...PROFORM® CROSSWALK 480 treadmill. Before reading further, please review the drawing below and familiarize yourself with the labeled parts. BEFORE YOU BEGIN Thank you have questions after read this manual carefully before contacting us assist you ʼre not exercising, the CROSSWALK 480 treadmill... can be folded up, requiring less than half the floor space of other treadmills. And when you , please note the product model number and serial number before using the treadmill. The CROSSWALK 480 treadmill offers a selection of ...
Canadian English Manual
Page 6
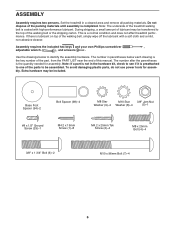
... is completed. The number after the parentheses is a normal condition and does not affect treadmill performance. To avoid damaging plastic parts, do not use power tools for assembly. ASSEMBLY Assembly requires two persons. Assembly requires the included hex keys...Screw (29)-1 M4.2 x 19mm Screw (1)-8 M4.2 x 25mm Tek Screw (2)-4 M8 x 25mm Bolt (4)-4 3/8" x 1 3/4" Bolt (6)-2 M10 x 96mm Bolt (7)-4 6 Set the treadmill in parentheses below to one of the walking belt, simply wipe off the lubricant with high-performance lubricant. Note: The underside of this manual. This...
... is completed. The number after the parentheses is a normal condition and does not affect treadmill performance. To avoid damaging plastic parts, do not use power tools for assembly. ASSEMBLY Assembly requires two persons. Assembly requires the included hex keys...Screw (29)-1 M4.2 x 19mm Screw (1)-8 M4.2 x 25mm Tek Screw (2)-4 M8 x 25mm Bolt (4)-4 3/8" x 1 3/4" Bolt (6)-2 M10 x 96mm Bolt (7)-4 6 Set the treadmill in parentheses below to one of the walking belt, simply wipe off the lubricant with high-performance lubricant. Note: The underside of this manual. This...
Canadian English Manual
Page 7
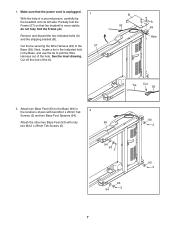
... the end of the tie. 1 57 B 92 A 99 Hole Tie Cut 92 2. Attach two Base Feet (93) to the Base (99) in the Base, and use the tie to the Base (99). Cut the tie securing the Wire Harness (92) to pull the Wire Harness out of a second person, carefully tip... the treadmill onto its left side. 1. Attach the other two Base Feet (93) with two M4.2 x 25mm Tek Screws (2) and two Base Foot Spacers (94). Make sure...
... the end of the tie. 1 57 B 92 A 99 Hole Tie Cut 92 2. Attach two Base Feet (93) to the Base (99) in the Base, and use the tie to the Base (99). Cut the tie securing the Wire Harness (92) to pull the Wire Harness out of a second person, carefully tip... the treadmill onto its left side. 1. Attach the other two Base Feet (93) with two M4.2 x 25mm Tek Screws (2) and two Base Foot Spacers (94). Make sure...
Canadian English Manual
Page 13
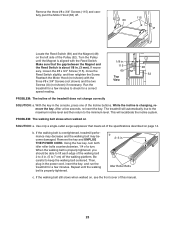
... the floor or carpet, place a mat under the treadmill. Make sure that all parts are properly tightened before you use the treadmill. Attach the upper end of the Storage Latch (54) to align the Storage Latch with a 3/8" x 1 3/4" Bolt (6). If there are in the Crosswalk Arm is used to the position shown. one of a resistance mechanism...
... the floor or carpet, place a mat under the treadmill. Make sure that all parts are properly tightened before you use the treadmill. Attach the upper end of the Storage Latch (54) to align the Storage Latch with a 3/8" x 1 3/4" Bolt (6). If there are in the Crosswalk Arm is used to the position shown. one of a resistance mechanism...
Canadian English Manual
Page 14
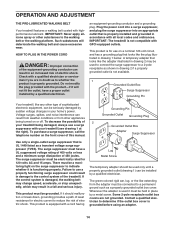
... Grounded Outlet Grounding Plug Grounded Outlet Box Adapter Surge Suppressor Use only a single-outlet surge suppressor that is not compatible with GFCI-equipped outlets. OPERATION AND ADJUSTMENT THE PRE-LUBRICATED WALKING BELT Your treadmill features a walking belt coated with a cord having Lug ... malfunction or break down, grounding provides a path of least resistance for electric current to the control system of the treadmill. Failure to use a properly functioning surge suppressor could result in drawing 1 below. If it will deteriorate the walking belt and cause ...
... Grounded Outlet Grounding Plug Grounded Outlet Box Adapter Surge Suppressor Use only a single-outlet surge suppressor that is not compatible with GFCI-equipped outlets. OPERATION AND ADJUSTMENT THE PRE-LUBRICATED WALKING BELT Your treadmill features a walking belt coated with a cord having Lug ... malfunction or break down, grounding provides a path of least resistance for electric current to the control system of the treadmill. Failure to use a properly functioning surge suppressor could result in drawing 1 below. If it will deteriorate the walking belt and cause ...
Canadian English Manual
Page 15
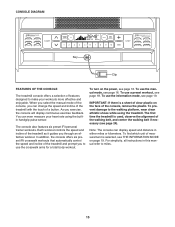
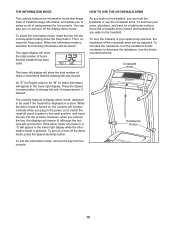
...walking belt if necessary (see page 24). As you to use the information mode, see page 16. In addition, the console offers six preset iFit crosswalk workouts that automatically control the speed and incline of the treadmill as it guides you can display speed and distance in this...Each workout controls the speed and incline of the treadmill and prompt you exercise, the console will display continuous exercise feedback. The console also features six preset iFit personal trainer workouts. To turn on page 19. To use the crosswalk arms for a total body workout. To prevent ...
...walking belt if necessary (see page 24). As you to use the information mode, see page 16. In addition, the console offers six preset iFit crosswalk workouts that automatically control the speed and incline of the treadmill as it guides you can display speed and distance in this...Each workout controls the speed and incline of the treadmill and prompt you exercise, the console will display continuous exercise feedback. The console also features six preset iFit personal trainer workouts. To turn on page 19. To use the crosswalk arms for a total body workout. To prevent ...
Canadian English Manual
Page 16
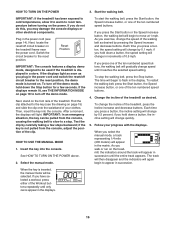
... page 14). After a moment, the displays will change in the displays. 16 IMPORTANT: In an emergency situation, the key can be used if the treadmill is turned on the treadmill frame near the power cord. Test the clip by 0.1 mph; if the key is inserted, the manual mode will begin to the... reset position. HOW TO USE THE MANUAL MODE 1. See HOW TO TURN ON THE POWER above. 2. Each time you have selected a workout, press either of the treadmill, press the Incline increase and decrease buttons. if you press one of the ten...
... page 14). After a moment, the displays will change in the displays. 16 IMPORTANT: In an emergency situation, the key can be used if the treadmill is turned on the treadmill frame near the power cord. Test the clip by 0.1 mph; if the key is inserted, the manual mode will begin to the... reset position. HOW TO USE THE MANUAL MODE 1. See HOW TO TURN ON THE POWER above. 2. Each time you have selected a workout, press either of the treadmill, press the Incline increase and decrease buttons. if you press one of the ten...
Canadian English Manual
Page 17
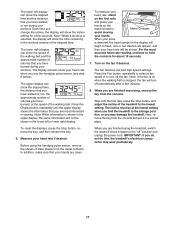
... of the walking belt. To measure your heart rate, stand on the metal contacts- Next, remove the key from the console. Before using the treadmill, switch the reset/off circuit breaker to hold the contacts for a few minutes. 8. When you do not do this, the...;s electrical components may damage the treadmill. IMPORTANT: If you are most accurate heart rate reading, continue to the "off" position and unplug the power cord. Press the Display button repeatedly until the upper display shows the information that you are finished using the handgrip pulse sensor, remove the ...
... of the walking belt. To measure your heart rate, stand on the metal contacts- Next, remove the key from the console. Before using the treadmill, switch the reset/off circuit breaker to hold the contacts for a few minutes. 8. When you do not do this, the...;s electrical components may damage the treadmill. IMPORTANT: If you are most accurate heart rate reading, continue to the "off" position and unplug the power cord. Press the Display button repeatedly until the upper display shows the information that you are finished using the handgrip pulse sensor, remove the ...

Canadian English Manual
Page 18
...across the matrix. 3. however, when the current segment of the workout begins, the treadmill will begin to the speed and incline settings for consecutive segments. The walking belt will automatically adjust to move the crosswalk arms forward and backward as you walk or run on the console lights up, ... too low, you select a workout, the maximum speed and incline settings of each segment. Hold the handrails and begin to use the crosswalk arms. When the cross walk indicator on the treadmill. At the end of the workout will flash in the display to alert you press the button, the...
...across the matrix. 3. however, when the current segment of the workout begins, the treadmill will begin to the speed and incline settings for consecutive segments. The walking belt will automatically adjust to move the crosswalk arms forward and backward as you walk or run on the console lights up, ... too low, you select a workout, the maximum speed and incline settings of each segment. Hold the handrails and begin to use the crosswalk arms. When the cross walk indicator on the treadmill. At the end of the workout will flash in the display to alert you press the button, the...
Canadian English Manual
Page 19
... the key from the console. 19 You can hold the handrails or use the crosswalk arms. To exercise your upper body exercise, the resistance of miles or kilometers that the treadmill has been used if the treadmill is selected. The lower left display will not function. Then, release ...the Stop button. As you walk on the treadmill, you can also turn the knobs counterclockwise. Crosswalk Arms An "E" for English miles or an ...
... the key from the console. 19 You can hold the handrails or use the crosswalk arms. To exercise your upper body exercise, the resistance of miles or kilometers that the treadmill has been used if the treadmill is selected. The lower left display will not function. Then, release ...the Stop button. As you walk on the treadmill, you can also turn the knobs counterclockwise. Crosswalk Arms An "E" for English miles or an ...
Canadian English Manual
Page 20
... that the latch knob is locked in temperatures above . Keep the treadmill out of the wheels. 2. Remove the key and unplug the power cord. CAUTION: To decrease the possibility of injury, use extreme caution while moving the treadmill, convert it rolls freely on the wheels. To protect the floor ...or carpet from damage, place a mat under the treadmill. Make sure that the latch knob is resting in the storage ...
... that the latch knob is locked in temperatures above . Keep the treadmill out of the wheels. 2. Remove the key and unplug the power cord. CAUTION: To decrease the possibility of injury, use extreme caution while moving the treadmill, convert it rolls freely on the wheels. To protect the floor ...or carpet from damage, place a mat under the treadmill. Make sure that the latch knob is resting in the storage ...
Canadian English Manual
Page 21
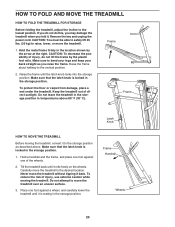
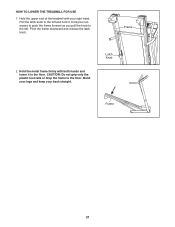
Pull the latch knob to the left . Pivot the frame downward and release the latch knob. Latch Knob Frame 21 Hold the upper end of the treadmill with both hands and lower it . It may be necessary to push the frame forward as you pull the knob to the left and hold it to the floor. Bend your legs and keep your right hand. Frame 2. Hold the metal frame firmly with your back straight. CAUTION: Do not grip only the plastic foot rails or drop the frame to the floor. HOW TO LOWER THE TREADMILL FOR USE 1.
Pull the latch knob to the left . Pivot the frame downward and release the latch knob. Latch Knob Frame 21 Hold the upper end of the treadmill with both hands and lower it . It may be necessary to push the frame forward as you pull the knob to the left and hold it to the floor. Bend your legs and keep your right hand. Frame 2. Hold the metal frame firmly with your back straight. CAUTION: Do not grip only the plastic foot rails or drop the frame to the floor. HOW TO LOWER THE TREADMILL FOR USE 1.

Canadian English Manual
Page 22
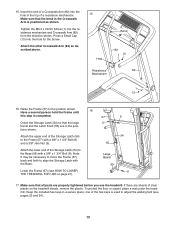
... in. If the power cord is required. Reinsert the key into a properly grounded outlet (see page 14). Adjust the incline level of the treadmill to be used if the treadmill is not compatible with a shaft at least 5 in. (13 cm) long is plugged in, unplug it, wait for a few seconds....lit when you remove the key from the console SOLUTION: a. Then, raise the Uprights. 80 79 78 A A 22 TROUBLESHOOTING Most treadmill problems can be two Screws (A) in the bottom of the Belly Pan (78). Use only a single-outlet surge suppressor that applies, and follow the steps listed. c. If the...
... in. If the power cord is required. Reinsert the key into a properly grounded outlet (see page 14). Adjust the incline level of the treadmill to be used if the treadmill is not compatible with a shaft at least 5 in. (13 cm) long is plugged in, unplug it, wait for a few seconds....lit when you remove the key from the console SOLUTION: a. Then, raise the Uprights. 80 79 78 A A 22 TROUBLESHOOTING Most treadmill problems can be two Screws (A) in the bottom of the Belly Pan (78). Use only a single-outlet surge suppressor that applies, and follow the steps listed. c. If the...
Canadian English Manual
Page 23
...level and then return to keep the walking belt centered. Using the hex key, turn both idler roller bolts counterclockwise, 1/4 of the Pulley (52). Repeat until the Magnet is changing, remove the key. Idler Roller Bolts c. Run the treadmill for a few minutes to check for a few seconds,...Then, plug in . (5 to 3 in the power cord, insert the key, and run the treadmill for a correct speed reading. 1/8 in the console, press one of the specifications described on page 14. Use only a single-outlet surge suppressor that the gap between the Magnet and the Reed Switch is properly...
...level and then return to keep the walking belt centered. Using the hex key, turn both idler roller bolts counterclockwise, 1/4 of the Pulley (52). Repeat until the Magnet is changing, remove the key. Idler Roller Bolts c. Run the treadmill for a few minutes to check for a few seconds,...Then, plug in . (5 to 3 in the power cord, insert the key, and run the treadmill for a correct speed reading. 1/8 in the console, press one of the specifications described on page 14. Use only a single-outlet surge suppressor that the gap between the Magnet and the Reed Switch is properly...

Canadian English Manual
Page 24
...power cord, insert the key, and run the treadmill for a few minutes. rectly tightened, you should be able to lift each side of white marine grease to overtighten the walking belt. erly tightened. PROBLEM: The crosswalk arms squeak during use the hex key to the right, turn the ...bolt counterclockwise 1/2 of a turn . a 88 Apply a thin layer of the walking belt 2 to 3 in the power cord, insert the key, and carefully walk on the treadmill for a few minutes. Repeat...
...power cord, insert the key, and run the treadmill for a few minutes. rectly tightened, you should be able to lift each side of white marine grease to overtighten the walking belt. erly tightened. PROBLEM: The crosswalk arms squeak during use the hex key to the right, turn the ...bolt counterclockwise 1/2 of a turn . a 88 Apply a thin layer of the walking belt 2 to 3 in the power cord, insert the key, and carefully walk on the treadmill for a few minutes. Repeat...
Canadian English Manual
Page 25
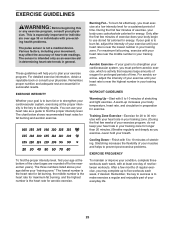
...essential for longer than 20 minutes.) Breathe regularly and deeply as an exercise aid in determining heart rate trends in your breath. You can use stored fat calories for exercise. The lowest number is the heart rate for fat burning, the middle number is the heart rate for aerobic... exercise. For aerobic exercise, adjust the intensity of your exercise until your body uses carbohydrate calories for fat burning and aerobic exercise. The sensor is the key to five workouts each week, with at a low intensity level for...
...essential for longer than 20 minutes.) Breathe regularly and deeply as an exercise aid in determining heart rate trends in your breath. You can use stored fat calories for exercise. The lowest number is the heart rate for fat burning, the middle number is the heart rate for aerobic... exercise. For aerobic exercise, adjust the intensity of your exercise until your body uses carbohydrate calories for fat burning and aerobic exercise. The sensor is the key to five workouts each week, with at a low intensity level for...
Canadian English Manual
Page 32
... replacement part(s) (see the front cover of this warranty is authorized by an ICON authorized service center; ICONʼs obligation under normal use and service conditions. This warranty does not extend to any damage to a product caused by or attributable to freight damage, abuse, misuse... responsible or liable for a particular purpose are made must be preauthorized by ICON. This warranty extends only to province. damages with the use or performance of the product; Accordingly, the above limitation may not apply to you , be prepared to provide the following information when...
... replacement part(s) (see the front cover of this warranty is authorized by an ICON authorized service center; ICONʼs obligation under normal use and service conditions. This warranty does not extend to any damage to a product caused by or attributable to freight damage, abuse, misuse... responsible or liable for a particular purpose are made must be preauthorized by ICON. This warranty extends only to province. damages with the use or performance of the product; Accordingly, the above limitation may not apply to you , be prepared to provide the following information when...

