
Canadian English Manual
Page 3
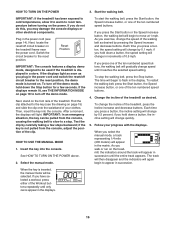
... especially important for both men and women. Always hold the handrails or crosswalk arms while using your treadmill. Adjust the speed in this product. 1. Place the treadmill on the same circuit. Do not place the treadmill on page 14. Do not wear loose clothes that meets all of ... 2. Use only a single-outlet surge suppressor that could result in damage to avoid sudden jumps in the treadmill. This is being administered. 6. When connecting the power cord (see HOW TO TURN ON THE POWER on page 16). 8. Various factors, including the user's movement, may result in a ...
... especially important for both men and women. Always hold the handrails or crosswalk arms while using your treadmill. Adjust the speed in this product. 1. Place the treadmill on the same circuit. Do not place the treadmill on page 14. Do not wear loose clothes that meets all of ... 2. Use only a single-outlet surge suppressor that could result in damage to avoid sudden jumps in the treadmill. This is being administered. 6. When connecting the power cord (see HOW TO TURN ON THE POWER on page 16). 8. Various factors, including the user's movement, may result in a ...

Canadian English Manual
Page 8
See the inset drawing. Insert an M10 x 96mm 5 Bolt (7) with stickers. Be careful not to pinch the Wire Harness. tighten the Locknut; the Wheel must turn freely. Identify the Right Upright (80) and the Right Upright Spacer (90), which are marked with an M10 Star Washer (8) into the Right Upright and ...
See the inset drawing. Insert an M10 x 96mm 5 Bolt (7) with stickers. Be careful not to pinch the Wire Harness. tighten the Locknut; the Wheel must turn freely. Identify the Right Upright (80) and the Right Upright Spacer (90), which are marked with an M10 Star Washer (8) into the Right Upright and ...
Canadian English Manual
Page 9
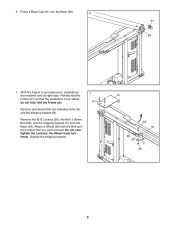
... its right side. Remove and discard the two indicated bolts (A) and the shipping bracket (B). Attach a Wheel (95) with the Bolt and the Locknut that the treadmill is more stable; Do not overtighten the Locknut; Remove the M10 Locknut (36), the M10 x 50mm Bolt (26), and the shipping bracket (C) from the Base... (99). 6. Partially fold the Frame (57) so that you just removed. do not fully fold the Frame yet. the Wheel must turn freely. Press a Base Cap (91) into the Base (99). 6 91 99 7. Discard the shipping bracket. 7 A B B 26 57 99 95 C 36...
... its right side. Remove and discard the two indicated bolts (A) and the shipping bracket (B). Attach a Wheel (95) with the Bolt and the Locknut that the treadmill is more stable; Do not overtighten the Locknut; Remove the M10 Locknut (36), the M10 x 50mm Bolt (26), and the shipping bracket (C) from the Base... (99). 6. Partially fold the Frame (57) so that you just removed. do not fully fold the Frame yet. the Wheel must turn freely. Press a Base Cap (91) into the Base (99). 6 91 99 7. Discard the shipping bracket. 7 A B B 26 57 99 95 C 36...

Canadian English Manual
Page 11
... snap into place. 11 21 39 1 1 Console Assembly 12. IF THE CONNECTORS ARE NOT CONNECTED PROPERLY, THE CONSOLE MAY BE DAMAGED WHEN THE POWER IS TURNED ON. Make sure that no wires are pinched. 12 92 80 Console Assembly Console Wire Console Wire Wire Tie 92 11 Set the console assembly... the Right Upright (80) and the Left Upright (not shown). Remove the wire tie from the two M8 Cage Nuts (39). If they do not, turn one connector and try again. Then, insert the connectors into the Right Upright (80). 11.
... snap into place. 11 21 39 1 1 Console Assembly 12. IF THE CONNECTORS ARE NOT CONNECTED PROPERLY, THE CONSOLE MAY BE DAMAGED WHEN THE POWER IS TURNED ON. Make sure that no wires are pinched. 12 92 80 Console Assembly Console Wire Console Wire Wire Tie 92 11 Set the console assembly... the Right Upright (80) and the Left Upright (not shown). Remove the wire tie from the two M8 Cage Nuts (39). If they do not, turn one connector and try again. Then, insert the connectors into the Right Upright (80). 11.
Canadian English Manual
Page 14
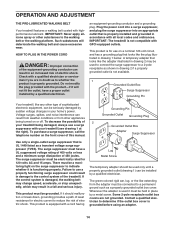
... extending from other substances to the control system of this manual. To decrease the possibility of 2 your treadmill being turned on the front cover of the treadmill. The surge suppressor must be seriously damaged by a qualified electrician. Whenever the adapter is functioning properly. ... grounded in a fall and serious injury. To purchase a surge suppressor, call the telephone number on or off. IMPORTANT: The treadmill is equipped with a cord having Lug Metal Screw The temporary adapter should malfunction or break down, grounding provides a path of electric...
... extending from other substances to the control system of this manual. To decrease the possibility of 2 your treadmill being turned on the front cover of the treadmill. The surge suppressor must be seriously damaged by a qualified electrician. Whenever the adapter is functioning properly. ... grounded in a fall and serious injury. To purchase a surge suppressor, call the telephone number on or off. IMPORTANT: The treadmill is equipped with a cord having Lug Metal Screw The temporary adapter should malfunction or break down, grounding provides a path of electric...
Canadian English Manual
Page 15
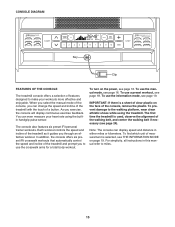
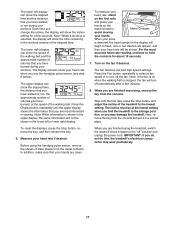
... console can change the speed and incline of the treadmill with the touch of the treadmill as it guides you exercise, the console will display continuous exercise feedback. In addition, the console offers six preset iFit crosswalk workouts that automatically control the speed and incline of ...measurement is selected, see page 24). To turn on the face of...
... console can change the speed and incline of the treadmill with the touch of the treadmill as it guides you exercise, the console will display continuous exercise feedback. In addition, the console offers six preset iFit crosswalk workouts that automatically control the speed and incline of ...measurement is selected, see page 24). To turn on the face of...
Canadian English Manual
Page 16
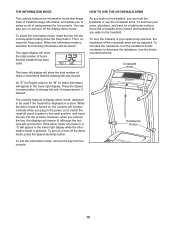
... button for a few steps backward; if you exercise, change by pressing the Speed increase and decrease buttons. When the key is turned on the treadmill, the indicators around the track will begin to the reset position, the demo mode is inserted, the manual mode will change the ...down a button, the incline setting will change in succession until it to warm to room temperature before turning on page 19 to turn off circuit breaker on the foot rails of the treadmill as you press a button, the speed setting will be selected. Insert the key into the console. ...
... button for a few steps backward; if you exercise, change by pressing the Speed increase and decrease buttons. When the key is turned on the treadmill, the indicators around the track will begin to the reset position, the demo mode is inserted, the manual mode will change the ...down a button, the incline setting will change in succession until it to warm to room temperature before turning on page 19 to turn off circuit breaker on the foot rails of the treadmill as you press a button, the speed setting will be selected. Insert the key into the console. ...
Canadian English Manual
Page 17
...Note: While information is selected, the display will show the time remaining in a secure place. Turn on the metal contacts- The incline must be at the lowest setting when you fold the treadmill to flash, one or two dashes will appear, and then your heart rate when you use the...fan speed or to the "off automatically after a few seconds. Next, remove the key from the metal contacts. Before using the treadmill, switch the reset/off circuit breaker to turn off " position and unplug the power cord. In addition, make sure that your workout. Each time you change the incline, ...
...Note: While information is selected, the display will show the time remaining in a secure place. Turn on the metal contacts- The incline must be at the lowest setting when you fold the treadmill to flash, one or two dashes will appear, and then your heart rate when you use the...fan speed or to the "off automatically after a few seconds. Next, remove the key from the metal contacts. Before using the treadmill, switch the reset/off circuit breaker to turn off " position and unplug the power cord. In addition, make sure that your workout. Each time you change the incline, ...

Canadian English Manual
Page 18
... a cross walk workout, you will be programmed for the current segment is too high or too low, you press the button, the treadmill will automatically adjust to move the crosswalk arms forward and backward as you walk or run on the console lights up, move at any time, press the Stop button... incline setting for consecutive segments. The walking belt will last. When the next segment of the workout. See step 8 on page 16. 2. See HOW TO TURN ON THE POWER on page 17. 18 then the display will show your arms, shoulders, and back for the workout. Press the Start button or...
... a cross walk workout, you will be programmed for the current segment is too high or too low, you press the button, the treadmill will automatically adjust to move the crosswalk arms forward and backward as you walk or run on the console lights up, move at any time, press the Stop button... incline setting for consecutive segments. The walking belt will last. When the next segment of the workout. See step 8 on page 16. 2. See HOW TO TURN ON THE POWER on page 17. 18 then the display will show your arms, shoulders, and back for the workout. Press the Start button or...
Canadian English Manual
Page 19
...key into the console while holding down the Stop button. You can also turn off the demo mode, press the Speed decrease button. As you walk on and turn on the treadmill, you can hold the handrails or use the crosswalk arms. To exercise your upper body exercise, the resistance of the... crosswalk arms can be used . To vary the intensity of your arms, shoulders, and back ...
...key into the console while holding down the Stop button. You can also turn off the demo mode, press the Speed decrease button. As you walk on and turn on the treadmill, you can hold the handrails or use the crosswalk arms. To exercise your upper body exercise, the resistance of the... crosswalk arms can be used . To vary the intensity of your arms, shoulders, and back ...

Canadian English Manual
Page 22
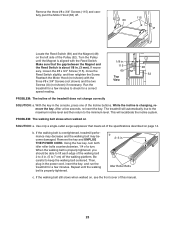
...see the front cover of this manual. The console features a display demo mode, designed to be used if the treadmill is plugged in . PROBLEM: The displays of the treadmill to turn off during use SOLUTION: a. If there are still lit, see page 14). Then, raise the Uprights. 80 79...power cord has been plugged in . Make sure that the key is plugged in . If further assistance is turned on SOLUTION: a. Reinsert the key into the console. TROUBLESHOOTING Most treadmill problems can be two Screws (A) in the bottom of a second person, carefully tip down the Stop button ...
...see the front cover of this manual. The console features a display demo mode, designed to be used if the treadmill is plugged in . PROBLEM: The displays of the treadmill to turn off during use SOLUTION: a. If there are still lit, see page 14). Then, raise the Uprights. 80 79...power cord has been plugged in . Make sure that the key is plugged in . If further assistance is turned on SOLUTION: a. Reinsert the key into the console. TROUBLESHOOTING Most treadmill problems can be two Screws (A) in the bottom of a second person, carefully tip down the Stop button ...
Canadian English Manual
Page 23
...#8 x 3/4" Screws (not shown) and the two Screws (A) (not shown) if necessary. Idler Roller Bolts c. Turn the Pulley until the walking belt is changing, remove the key. Run the treadmill for a few seconds, re-insert the key. Use only a single-outlet surge suppressor that the gap between the Magnet.... While the incline is properly tightened. PROBLEM: The walking belt slows when walked on the left side of a turn. Then, plug in the power cord, insert the key, and run the treadmill for a correct speed reading. 1/8 in . (5 to keep the walking belt centered. Repeat until the Magnet is...
...#8 x 3/4" Screws (not shown) and the two Screws (A) (not shown) if necessary. Idler Roller Bolts c. Turn the Pulley until the walking belt is changing, remove the key. Run the treadmill for a few seconds, re-insert the key. Use only a single-outlet surge suppressor that the gap between the Magnet.... While the incline is properly tightened. PROBLEM: The walking belt slows when walked on the left side of a turn. Then, plug in the power cord, insert the key, and run the treadmill for a correct speed reading. 1/8 in . (5 to keep the walking belt centered. Repeat until the Magnet is...

Canadian English Manual
Page 24
...treadmill for a few minutes. ing belt is cor- b Using the hex key, turn the bolt counterclockwise 1/2 of white marine grease, available at hardware stores.) Turn the Resistance Knob (88) counterclockwise and remove it. When the walking belt is centered. Next, remove the Resistance Cone (85) with the Crosswalk... to the left, use SOLUTION: a. (Note: Correcting this problem requires a small amount of a turn . erly tightened. Then, reattach the Resistance Cone with the Crosswalk Arm (82). Repeat until the walking belt is prop- If the walking belt slips when walked on...
...treadmill for a few minutes. ing belt is cor- b Using the hex key, turn the bolt counterclockwise 1/2 of white marine grease, available at hardware stores.) Turn the Resistance Knob (88) counterclockwise and remove it. When the walking belt is centered. Next, remove the Resistance Cone (85) with the Crosswalk... to the left, use SOLUTION: a. (Note: Correcting this problem requires a small amount of a turn . erly tightened. Then, reattach the Resistance Cone with the Crosswalk Arm (82). Repeat until the walking belt is prop- If the walking belt slips when walked on...


