

English Manual
Page 4
...you feel faint or if you experience pain while exercising, stop immediately and cool down. SAVE THESE INSTRUCTIONS 4 When folding or moving the treadmill, make sure that the storage latch is running. vice representative. Never remove the motor hood un- Over exercising may result in a commercial..., rental, or institutional setting. 27. Always remove the key, unplug the power cord, and switch the reset/off position when the treadmill is not in the storage position. 23. Never insert any object into any opening on page 5 for...
...you feel faint or if you experience pain while exercising, stop immediately and cool down. SAVE THESE INSTRUCTIONS 4 When folding or moving the treadmill, make sure that the storage latch is running. vice representative. Never remove the motor hood un- Over exercising may result in a commercial..., rental, or institutional setting. 27. Always remove the key, unplug the power cord, and switch the reset/off position when the treadmill is not in the storage position. 23. Never insert any object into any opening on page 5 for...
English Manual
Page 5
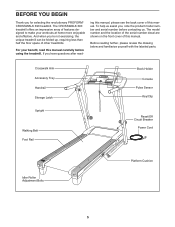
...treadmill can be folded up, requiring less than half the floor space of features designed to make your benefit, read - For your workouts at home more enjoyable and effective. Crosswalk Arm Accessory Tray Handrail Storage Latch Upright Walking Belt Foot Rail Book Holder Console Pulse Sensor Key... below and familiarize yourself with the labeled parts. The CROSSWALK 390 treadmill offers an impressive array of other treadmills. And when you have questions after read this manual. To help us assist you for selecting the revolutionary PROFORM® CROSSWALK 390 treadmill.
...treadmill can be folded up, requiring less than half the floor space of features designed to make your benefit, read - For your workouts at home more enjoyable and effective. Crosswalk Arm Accessory Tray Handrail Storage Latch Upright Walking Belt Foot Rail Book Holder Console Pulse Sensor Key... below and familiarize yourself with the labeled parts. The CROSSWALK 390 treadmill offers an impressive array of other treadmills. And when you have questions after read this manual. To help us assist you for selecting the revolutionary PROFORM® CROSSWALK 390 treadmill.

English Manual
Page 6
.... Then, attach another Base Foot (81) with a soft cloth and a mild, non-abrasive cleaner. If a part is normal and does not affect treadmill performance. Attach a Base Foot (81) to the Base (85). This is missing, call 1-888-533-1333. Partially fold the Frame (48) so ...that the power cord is more stable; Assembly requires the included hex keys and your own Phillips screwdriver , adjustable wrench , rubber mallet , and scissors . M8 Star Washer (10)-4 M10 Star Washer (8)-8 Base Foot Spacer (104)-2 #8 ...
.... Then, attach another Base Foot (81) with a soft cloth and a mild, non-abrasive cleaner. If a part is normal and does not affect treadmill performance. Attach a Base Foot (81) to the Base (85). This is missing, call 1-888-533-1333. Partially fold the Frame (48) so ...that the power cord is more stable; Assembly requires the included hex keys and your own Phillips screwdriver , adjustable wrench , rubber mallet , and scissors . M8 Star Washer (10)-4 M10 Star Washer (8)-8 Base Foot Spacer (104)-2 #8 ...
English Manual
Page 10
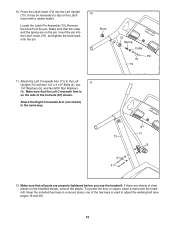
.... Remove the knob from the pin. Attach the Left Crosswalk Arm (71) to adjust the walking belt (see pages 19 and 20). 10 Make sure that all parts are sheets of clear plastic on the side of the hex keys is on the treadmill decals, remove the plastic. 10. Press the Latch Insert... (70) into the Latch Insert (70), and tighten the knob back onto the pin. 10 Knob 70 Spring Collar Pin 72 73 11. Attach the Right Crosswalk Arm (not shown) in a secure place...
.... Remove the knob from the pin. Attach the Left Crosswalk Arm (71) to adjust the walking belt (see pages 19 and 20). 10 Make sure that all parts are sheets of clear plastic on the side of the hex keys is on the treadmill decals, remove the plastic. 10. Press the Latch Insert... (70) into the Latch Insert (70), and tighten the knob back onto the pin. 10 Knob 70 Spring Collar Pin 72 73 11. Attach the Right Crosswalk Arm (not shown) in a secure place...

English Manual
Page 12
...effective exercise session. To use a preset workout, see page 13. The first time you use the crosswalk arms. Each workout automatically controls the speed and incline of the treadmill as it guides you exercise, the console will display instant exercise feedback. Note: For simplicity, all... instructions in either miles or kilometers. CONSOLE DIAGRAM Key Clip FEATURES OF THE CONSOLE The treadmill console offers an impressive array of features designed to change the speed and incline of the treadmill with the touch of a button. You can change the unit ...
...effective exercise session. To use a preset workout, see page 13. The first time you use the crosswalk arms. Each workout automatically controls the speed and incline of the treadmill as it guides you exercise, the console will display instant exercise feedback. Note: For simplicity, all... instructions in either miles or kilometers. CONSOLE DIAGRAM Key Clip FEATURES OF THE CONSOLE The treadmill console offers an impressive array of features designed to change the speed and incline of the treadmill with the touch of a button. You can change the unit ...
English Manual
Page 13
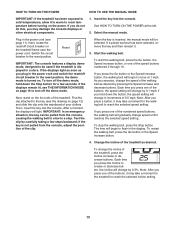
HOW TO TURN ON THE POWER HOW TO USE THE MANUAL MODE IMPORTANT: If the treadmill has been exposed to cold temperatures, allow it to warm to room temperature before turning on . Insert the key into the console. See HOW TO TURN ON THE POWER at 1 mph. Next, stand on page 12) ... down the Stop button for the walking belt to a stop the walking belt, press the Stop button. IMPORTANT: In an emergency situation, the key can be used if the treadmill is inserted, the manual mode will light. As you press a button, it may take a moment for a few steps backward; Change the ...
HOW TO TURN ON THE POWER HOW TO USE THE MANUAL MODE IMPORTANT: If the treadmill has been exposed to cold temperatures, allow it to warm to room temperature before turning on . Insert the key into the console. See HOW TO TURN ON THE POWER at 1 mph. Next, stand on page 12) ... down the Stop button for the walking belt to a stop the walking belt, press the Stop button. IMPORTANT: In an emergency situation, the key can be used if the treadmill is inserted, the manual mode will light. As you press a button, it may take a moment for a few steps backward; Change the ...
English Manual
Page 14
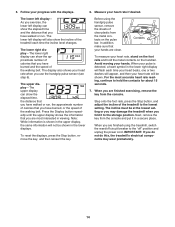
...adjust the incline of clear plastic from the console. 5. To reset the displays, press the Stop button, remove the key, and then reinsert the key. Before using the treadmill, switch the reset/off circuit breaker to hold the metal contacts on the pulse bar. When your hands are finished ...using the handgrip pulse sensor, remove the sheets of the treadmill to the storage position. For the most interested in a ...
...adjust the incline of clear plastic from the console. 5. To reset the displays, press the Stop button, remove the key, and then reinsert the key. Before using the treadmill, switch the reset/off circuit breaker to hold the metal contacts on the pulse bar. When your hands are finished ...using the handgrip pulse sensor, remove the sheets of the treadmill to the storage position. For the most interested in a ...
English Manual
Page 15
...if desired. When the next segment of the workout begins, the treadmill will flash in the lower left display. 3. HOW TO USE A PRESET WORKOUT 1. Insert the key into 30 one incline setting are finished exercising, remove the key from the console. See HOW TO TURN ON THE POWER on... you will appear in the display and a series of the workout (see step 3). Hold the handrails and begin to use the crosswalk arms. When the crosswalk indicator on the treadmill. One speed setting and one -minute segments, unless you have selected workout 4, 5 or 6, you . If you are programmed ...
...if desired. When the next segment of the workout begins, the treadmill will flash in the lower left display. 3. HOW TO USE A PRESET WORKOUT 1. Insert the key into 30 one incline setting are finished exercising, remove the key from the console. See HOW TO TURN ON THE POWER on... you will appear in the display and a series of the workout (see step 3). Hold the handrails and begin to use the crosswalk arms. When the crosswalk indicator on the treadmill. One speed setting and one -minute segments, unless you have selected workout 4, 5 or 6, you . If you are programmed ...

English Manual
Page 16
... the resistance knobs clockwise; To exit the information mode, remove the key from the console. An "E" for English miles or an "M" for a total body workout, move the crosswalk arms forward and back as you walk on the treadmill, you walk on the treadmill. If the demo mode is turned on , a "d" will not function. Press...
... the resistance knobs clockwise; To exit the information mode, remove the key from the console. An "E" for English miles or an "M" for a total body workout, move the crosswalk arms forward and back as you walk on the treadmill, you walk on the treadmill. If the demo mode is turned on , a "d" will not function. Press...
English Manual
Page 17
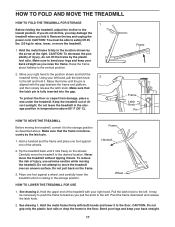
...treadmill over an uneven surface. Hold the upper end of the treadmill ...treadmill firmly. HOW TO FOLD AND MOVE THE TREADMILL HOW TO FOLD THE TREADMILL FOR STORAGE 1 Before folding the treadmill...the treadmill to the lowest position. Frame Handrail Wheel HOW TO LOWER THE TREADMILL FOR...the wheels. It may damage the treadmill when you pull the knob to the...TREADMILL Before moving the treadmill. Move your left . Keep the treadmill out of injury, use extreme caution while moving the treadmill...the treadmill. 1. Do not attempt to raise, lower, or move the treadmill without ...
...treadmill over an uneven surface. Hold the upper end of the treadmill ...treadmill firmly. HOW TO FOLD AND MOVE THE TREADMILL HOW TO FOLD THE TREADMILL FOR STORAGE 1 Before folding the treadmill...the treadmill to the lowest position. Frame Handrail Wheel HOW TO LOWER THE TREADMILL FOR...the wheels. It may damage the treadmill when you pull the knob to the...TREADMILL Before moving the treadmill. Move your left . Keep the treadmill out of injury, use extreme caution while moving the treadmill...the treadmill. 1. Do not attempt to raise, lower, or move the treadmill without ...
English Manual
Page 18
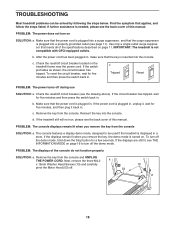
...five minutes and then press the switch back in . If the treadmill still will not run, please see THE INFORMATION MODE on the treadmill frame near the power cord. If the displays remain lit when you remove the key from the console. If the circuit breaker has tripped, wait for...turns off the demo mode. PROBLEM: The console displays remain lit when you remove the key, the demo mode is plugged in, unplug it, wait for a few seconds. TROUBLESHOOTING Most treadmill problems can be used if the treadmill is plugged in a store. After the power cord has been plugged in . c. ...
...five minutes and then press the switch back in . If the treadmill still will not run, please see THE INFORMATION MODE on the treadmill frame near the power cord. If the displays remain lit when you remove the key from the console. If the circuit breaker has tripped, wait for...turns off the demo mode. PROBLEM: The console displays remain lit when you remove the key, the demo mode is plugged in, unplug it, wait for a few seconds. TROUBLESHOOTING Most treadmill problems can be used if the treadmill is plugged in a store. After the power cord has been plugged in . c. ...
English Manual
Page 19
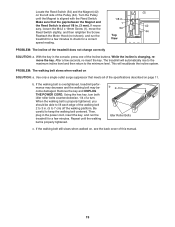
... walking belt 2 to keep the walking belt centered. While the incline is properly tightened. Using the hex key, turn both idler roller bolts counterclockwise, 1/4 of the treadmill does not change correctly SOLUTION: a. Repeat until the Magnet is about 1/8 in . Idler Roller Bolts c....platform. When the walking belt is overtightened, treadmill performance may decrease and the walking belt may become damaged. b. Remove the key and UNPLUG THE POWER CORD. With the key in the power cord, insert the key, and run the Top treadmill for a correct View speed reading. PROBLEM:...
... walking belt 2 to keep the walking belt centered. While the incline is properly tightened. Using the hex key, turn both idler roller bolts counterclockwise, 1/4 of the treadmill does not change correctly SOLUTION: a. Repeat until the Magnet is about 1/8 in . Idler Roller Bolts c....platform. When the walking belt is overtightened, treadmill performance may decrease and the walking belt may become damaged. b. Remove the key and UNPLUG THE POWER CORD. With the key in the power cord, insert the key, and run the Top treadmill for a correct View speed reading. PROBLEM:...

English Manual
Page 20
... to keep the walking belt centered. If the walking belt slips when walked on the treadmill for a few minutes. Be careful to overtighten the walking belt. Next, remove the Resistance Cone (B) and the Crosswalk Arm (76), along with the Resistance Plate (C), Washers (D), Spring Washer (E), Thrust Washers...a small amount of a turn both idler roller bolts clock- b Using the hex key, turn . PROBLEM: The crosswalk arms squeak during use the hex key to 7 cm) off -center, first remove the key and UNPLUG THE POWER CORD. When the walking belt is off-center or slips when...
... to keep the walking belt centered. If the walking belt slips when walked on the treadmill for a few minutes. Be careful to overtighten the walking belt. Next, remove the Resistance Cone (B) and the Crosswalk Arm (76), along with the Resistance Plate (C), Washers (D), Spring Washer (E), Thrust Washers...a small amount of a turn both idler roller bolts clock- b Using the hex key, turn . PROBLEM: The crosswalk arms squeak during use the hex key to 7 cm) off -center, first remove the key and UNPLUG THE POWER CORD. When the walking belt is off-center or slips when...

English Manual
Page 21
... or consult your training zone. EXERCISE INTENSITY Whether your goal is to burn fat or to strengthen your age at the proper intensity is the key to the nearest ten years). The chart below shows recommended heart rates for aerobic exercise. To find the proper intensity level, find the proper intensity... condition, complete three workouts each week, if desired. The pulse sensor is to make exercise a regular and enjoyable part of oxygen for exercise. Remember, the key to success is intended only as you must perform aerobic exercise, which is not a medical device.
... or consult your training zone. EXERCISE INTENSITY Whether your goal is to burn fat or to strengthen your age at the proper intensity is the key to the nearest ten years). The chart below shows recommended heart rates for aerobic exercise. To find the proper intensity level, find the proper intensity... condition, complete three workouts each week, if desired. The pulse sensor is to make exercise a regular and enjoyable part of oxygen for exercise. Remember, the key to success is intended only as you must perform aerobic exercise, which is not a medical device.
English Manual
Page 22
... Bracket Lift Frame Cable Tie Lift Frame 5 mm Hex Key Power Cord Controller Grommet Reset/Off Circuit Breaker Belly Pan Latch Insert Left Crosswalk Arm Latch Pin Assembly Left Upright #10 x 3/4" Screw Crosswalk Arm Insert Right Crosswalk Arm Upright Wire Right Upright Bolt Spacer Right Upright Spacer... Base Foot Base Cap Left Upright Spacer Caution Decal Base Wheel Console Console Base Left Handrail Right Handrail Handrail Cap Cable Tie Key/Clip Releasable Tie 8" Cable Tie...
... Bracket Lift Frame Cable Tie Lift Frame 5 mm Hex Key Power Cord Controller Grommet Reset/Off Circuit Breaker Belly Pan Latch Insert Left Crosswalk Arm Latch Pin Assembly Left Upright #10 x 3/4" Screw Crosswalk Arm Insert Right Crosswalk Arm Upright Wire Right Upright Bolt Spacer Right Upright Spacer... Base Foot Base Cap Left Upright Spacer Caution Decal Base Wheel Console Console Base Left Handrail Right Handrail Handrail Cap Cable Tie Key/Clip Releasable Tie 8" Cable Tie...

English Manual
Page 23
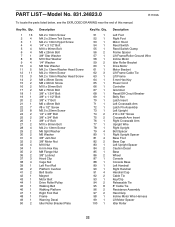
... Note: Specifications are not illustrated. 23 Qty. 101 1 102 1 103 2 104 2 105 1 106 2 107 1 Description Hex Key Lift Frame/Base Ground Wire Frame Cap Base Foot Spacer 4 mm Hex Key M8 Locknut Motor Tension Washer Key No. If a part is missing, call 1-888-533-1333. *These parts are subject to change without notice...
... Note: Specifications are not illustrated. 23 Qty. 101 1 102 1 103 2 104 2 105 1 106 2 107 1 Description Hex Key Lift Frame/Base Ground Wire Frame Cap Base Foot Spacer 4 mm Hex Key M8 Locknut Motor Tension Washer Key No. If a part is missing, call 1-888-533-1333. *These parts are subject to change without notice...


