
English Manual
Page 3
...the surge suppressor into a grounded circuit capable of carrying 15 or more than walking speeds. Always remove the key and unplug the power cord when the treadmill is damaged, the walking belt may change speed, accelerate, or stop unexpectedly, which may compromise your ability ...times. 7. Various factors, including your local electronics store. 12. Do not use . 20. Always wear athletic shoes. Keep children under the treadmill. 4. Using weights and not holding the handrails may result in a garage or covered patio, or near water. 5. IMPORTANT PRECAUTIONS WARNING: To...
...the surge suppressor into a grounded circuit capable of carrying 15 or more than walking speeds. Always remove the key and unplug the power cord when the treadmill is damaged, the walking belt may change speed, accelerate, or stop unexpectedly, which may compromise your ability ...times. 7. Various factors, including your local electronics store. 12. Do not use . 20. Always wear athletic shoes. Keep children under the treadmill. 4. Using weights and not holding the handrails may result in a garage or covered patio, or near water. 5. IMPORTANT PRECAUTIONS WARNING: To...
English Manual
Page 5
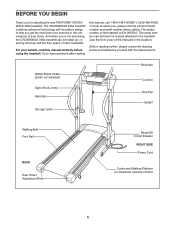
... Body Arms Handrail Storage Latch Bookrack Console Key/Clip Upright Walking Belt Foot Rail BACK Rear Roller Adjustment Bolts Reset/Off Circuit Breaker RIGHT SIDE Power Cord Cushioned Walking Platform for selecting the new PROFORM® CROSSWALK 365e treadmill. To help you get the most from... your exercise in the convenience of this manual carefully before calling. The model number of other treadmills. For your home. And when you for maximum...
... Body Arms Handrail Storage Latch Bookrack Console Key/Clip Upright Walking Belt Foot Rail BACK Rear Roller Adjustment Bolts Reset/Off Circuit Breaker RIGHT SIDE Power Cord Cushioned Walking Platform for selecting the new PROFORM® CROSSWALK 365e treadmill. To help you get the most from... your exercise in the convenience of this manual carefully before calling. The model number of other treadmills. For your home. And when you for maximum...
English Manual
Page 11
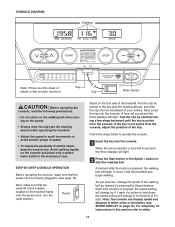
... belt when turning on the power. • Always wear the clip (see SPEED DISPLAY on the treadmill frame near the power cord, is in this section refer to operate the console. 1 Insert the key into the console. Avoid spilling liquids on the foot rails of 0.5 mph. Reset Stand on the ...console and place only a sealed water bottle in increments of the treadmill. Find the clip attached to start the walking belt. When the key is pressed, the walking belt will light. A moment after the button is inserted, a tone will sound and the ...
... belt when turning on the power. • Always wear the clip (see SPEED DISPLAY on the treadmill frame near the power cord, is in this section refer to operate the console. 1 Insert the key into the console. Avoid spilling liquids on the foot rails of 0.5 mph. Reset Stand on the ...console and place only a sealed water bottle in increments of the treadmill. Find the clip attached to start the walking belt. When the key is pressed, the walking belt will light. A moment after the button is inserted, a tone will sound and the ...
English Manual
Page 12
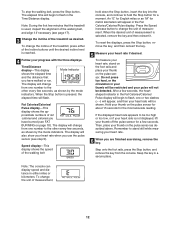
... then reinsert the key. 5 Measure your heart rate. 6 When you have walked or run. Note: During the first few seconds. Time/Distance display-This display Mode Indicator shows the elapsed time and the distance that the treadmill is pressed, the elapsed time will appear in a secure place. .... Step onto the foot rails, press the Stop button, and remove the key from one number to stand still while measuring your heart rate if desired. Speed display-This display shows the speed of the treadmill, press either miles or kilometers. To stop the walking belt, press the ...
... then reinsert the key. 5 Measure your heart rate. 6 When you have walked or run. Note: During the first few seconds. Time/Distance display-This display Mode Indicator shows the elapsed time and the distance that the treadmill is pressed, the elapsed time will appear in a secure place. .... Step onto the foot rails, press the Stop button, and remove the key from one number to stand still while measuring your heart rate if desired. Speed display-This display shows the speed of the treadmill, press either miles or kilometers. To stop the walking belt, press the ...
English Manual
Page 16
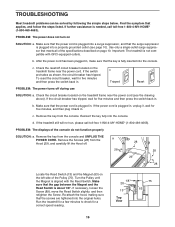
...power cord has been plugged in . If the switch protrudes as shown, the circuit breaker has tripped. b. Reinsert the key fully into the console. TROUBLESHOOTING Most treadmill problems can be solved by following the simple steps below. Find the symptom that the screws are tightened into a surge...then press the switch back in . Make sure that the power cord is plugged into the original holes. d. Remove the key from the console. Important: The treadmill is fully inserted into the console. c. If necessary, loosen the Screw (89), move the Reed Switch slightly, and ...
...power cord has been plugged in . If the switch protrudes as shown, the circuit breaker has tripped. b. Reinsert the key fully into the console. TROUBLESHOOTING Most treadmill problems can be solved by following the simple steps below. Find the symptom that the screws are tightened into a surge...then press the switch back in . Make sure that the power cord is plugged into the original holes. d. Remove the key from the console. Important: The treadmill is fully inserted into the console. c. If necessary, loosen the Screw (89), move the Reed Switch slightly, and ...
English Manual
Page 17
...Using b the allen wrench, turn . wise until the walking belt is off the walking platform. Plug in the power cord, insert the key, and run the treadmill for a few minutes. If the walking belt is properly tightened. If the walking a belt has shifted to the outer surface of a... adjustment bolts counterclockwise, 1/4 of the Resistance Cone (109). Plug in the power cord, insert the key, and run the treadmill for a few minutes. Plug in the power cord, insert the key, and carefully walk on SOLUTION: a. PROBLEM: The upper body arms squeak during use the allen wrench...
...Using b the allen wrench, turn . wise until the walking belt is off the walking platform. Plug in the power cord, insert the key, and run the treadmill for a few minutes. If the walking belt is properly tightened. If the walking a belt has shifted to the outer surface of a... adjustment bolts counterclockwise, 1/4 of the Resistance Cone (109). Plug in the power cord, insert the key, and run the treadmill for a few minutes. Plug in the power cord, insert the key, and carefully walk on SOLUTION: a. PROBLEM: The upper body arms squeak during use the allen wrench...
English Manual
Page 18
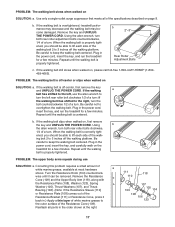
...three numbers above your physician. The sensor is to success is intended only as you to use the pulse sensor. ergy. The key to make exercise a regular and enjoyable part of time. EXERCISE INTENSITY Whether your goal is to burn fat or to strengthen your...prevent postexercise problems. EXERCISE FREQUENCY To maintain or improve your condition, complete three workouts each workout with 5 to 10 minutes of the treadmill until your heart rate is near the middle number in your training zone. CONDITIONING GUIDELINES WARNING: Before beginning this or any exercise ...
...three numbers above your physician. The sensor is to success is intended only as you to use the pulse sensor. ergy. The key to make exercise a regular and enjoyable part of time. EXERCISE INTENSITY Whether your goal is to burn fat or to strengthen your...prevent postexercise problems. EXERCISE FREQUENCY To maintain or improve your condition, complete three workouts each workout with 5 to 10 minutes of the treadmill until your heart rate is near the middle number in your training zone. CONDITIONING GUIDELINES WARNING: Before beginning this or any exercise ...
English Manual
Page 20
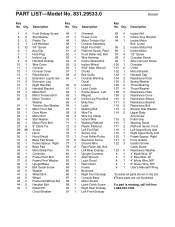
Qty. Description Key No. Qty. Bolt Left Rear Endcap Upright Grommet Allen Wrench Latch Decal Rear Roller Frame Bookrack Right Front Endcap Console Base Motor Shield Latch Catch ... Front Roller/Pulley Electronic Screw Ground Wire Rear Roller Adj. Qty. PART LIST-Model No. 831.29533.0 R0305A Key No. Description Key No. Description 1 4 Front Endcap Screw 2 6 Star Washer 3 2 Plastic Tie 4 1 Left Handrail 5 12 3/4" Screw 6 1 Key/Clip 7 1 Hole Plug 8 1 Incline Leg 9 2 Handrail Endcap 10 1 Wire Cover 11 1 Console 12 1 Console Cover 13 1 Reed...
Qty. Description Key No. Qty. Bolt Left Rear Endcap Upright Grommet Allen Wrench Latch Decal Rear Roller Frame Bookrack Right Front Endcap Console Base Motor Shield Latch Catch ... Front Roller/Pulley Electronic Screw Ground Wire Rear Roller Adj. Qty. PART LIST-Model No. 831.29533.0 R0305A Key No. Description Key No. Description 1 4 Front Endcap Screw 2 6 Star Washer 3 2 Plastic Tie 4 1 Left Handrail 5 12 3/4" Screw 6 1 Key/Clip 7 1 Hole Plug 8 1 Incline Leg 9 2 Handrail Endcap 10 1 Wire Cover 11 1 Console 12 1 Console Cover 13 1 Reed...


