
English Manual
Page 1
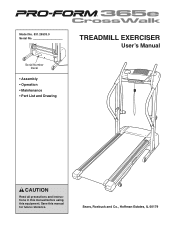
Model No. 831.29533.0 Serial No. Serial Number Decal • Assembly • Operation • Maintenance • Part List and Drawing TREADMILL EXERCISER User's Manual CAUTION Read all precautions and instructions in this manual before using this manual for future reference. Sears, Roebuck and Co., Hoffman Estates, IL 60179 Save this equipment.
Model No. 831.29533.0 Serial No. Serial Number Decal • Assembly • Operation • Maintenance • Part List and Drawing TREADMILL EXERCISER User's Manual CAUTION Read all precautions and instructions in this manual before using this manual for future reference. Sears, Roebuck and Co., Hoffman Estates, IL 60179 Save this equipment.
English Manual
Page 2
TABLE OF CONTENTS IMPORTANT PRECAUTIONS 3 BEFORE YOU BEGIN 5 ASSEMBLY 6 OPERATION AND ADJUSTMENT 10 HOW TO FOLD AND MOVE THE TREADMILL 14 TROUBLESHOOTING 16 CONDITIONING GUIDELINES 18 ORDERING REPLACEMENT PARTS Back Cover FULL 90 DAY WARRANTY Back Cover Note: An EXPLODED DRAWING and a PART LIST are attached in the center of this manual. 2
TABLE OF CONTENTS IMPORTANT PRECAUTIONS 3 BEFORE YOU BEGIN 5 ASSEMBLY 6 OPERATION AND ADJUSTMENT 10 HOW TO FOLD AND MOVE THE TREADMILL 14 TROUBLESHOOTING 16 CONDITIONING GUIDELINES 18 ORDERING REPLACEMENT PARTS Back Cover FULL 90 DAY WARRANTY Back Cover Note: An EXPLODED DRAWING and a PART LIST are attached in the center of this manual. 2
English Manual
Page 3
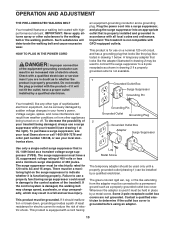
... treadmill are standing on the walking belt. The pulse sensor is damaged, the walking belt may change speed, accelerate, or stop unexpectedly, which may result in a fall and serious injury. 13. Do not wear loose clothes that blocks air openings. To purchase a surge suppressor, see your local Sears store or call 1-800-366-7278 and order part number 146148, or see page 10), plug the power cord...
... treadmill are standing on the walking belt. The pulse sensor is damaged, the walking belt may change speed, accelerate, or stop unexpectedly, which may result in a fall and serious injury. 13. Do not wear loose clothes that blocks air openings. To purchase a surge suppressor, see your local Sears store or call 1-800-366-7278 and order part number 146148, or see page 10), plug the power cord...
English Manual
Page 4
... properly tighten all instructions before performing the maintenance and adjustment procedures described in this treadmill in -home use , before cleaning the treadmill, and before using. Never insert any object into any exercise program, consult your treadmill. Always unplug the power cord immediately after use only. Never remove the motor hood unless instructed to do so by an authorized service representative only. 25. Do not use of the treadmill regularly. 23. DANGER: 24. Sears...
... properly tighten all instructions before performing the maintenance and adjustment procedures described in this treadmill in -home use , before cleaning the treadmill, and before using. Never insert any object into any exercise program, consult your treadmill. Always unplug the power cord immediately after use only. Never remove the motor hood unless instructed to do so by an authorized service representative only. 25. Do not use of the treadmill regularly. 23. DANGER: 24. Sears...
English Manual
Page 5
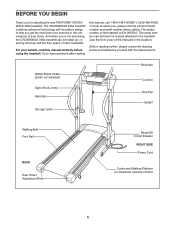
..., please review the drawing below and familiarize yourself with innovative design to the treadmill (see the front cover of other treadmills. Watter Bottle Holder (bottle not included) Upper Body Arms Handrail Storage Latch Bookrack Console Key/Clip Upright Walking Belt Foot Rail BACK Rear Roller Adjustment Bolts Reset/Off Circuit Breaker RIGHT SIDE Power Cord Cushioned Walking Platform for selecting the new PROFORM® CROSSWALK 365e treadmill. If you have questions after reading this manual carefully...
..., please review the drawing below and familiarize yourself with innovative design to the treadmill (see the front cover of other treadmills. Watter Bottle Holder (bottle not included) Upper Body Arms Handrail Storage Latch Bookrack Console Key/Clip Upright Walking Belt Foot Rail BACK Rear Roller Adjustment Bolts Reset/Off Circuit Breaker RIGHT SIDE Power Cord Cushioned Walking Platform for selecting the new PROFORM® CROSSWALK 365e treadmill. If you have questions after reading this manual carefully...
English Manual
Page 6
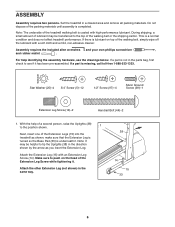
... on top of the treadmill walking belt is completed. Assembly requires the included allen wrenches and your own phillips screwdriver , and rubber mallet . Star Washer (25)-4 3/4" Screw (5)-12 1/2" Screw (97)-4 Silver Ground Screw (99)-1 Extension Leg Screw (14)-2 Handrail Bolt (44)-2 1. With the help identifying the assembly hardware, see if it . Attach the Extension Leg (15) with high-performance lubricant. ASSEMBLY Assembly requires two persons. During...
... on top of the treadmill walking belt is completed. Assembly requires the included allen wrenches and your own phillips screwdriver , and rubber mallet . Star Washer (25)-4 3/4" Screw (5)-12 1/2" Screw (97)-4 Silver Ground Screw (99)-1 Extension Leg Screw (14)-2 Handrail Bolt (44)-2 1. With the help identifying the assembly hardware, see if it . Attach the Extension Leg (15) with high-performance lubricant. ASSEMBLY Assembly requires two persons. During...

English Manual
Page 7
... Bracket 2 with an Upright Bolt (44) in the upper end and a 3/4" Screw (5) and a Star Washer (25) in the right Upright (38). Feed the Upright Wire (53) into the slot in the lower end. Note: It may be helpful to use needlenose pliers to pull the Wire Harness out of the large ...Upright (not shown) in the same way. Set the Right Handrail on the left side. 3 44 4 25 5 53 Hole Hole 44 16 38 103 25 5 17 4. Attach the Right Handrail with a 3/4" Screw (5) and a Star Washer (25). 2. Insert the tab on one of the 4 Right Handrail (16) with a Silver Ground Screw (99). Press...
... Bracket 2 with an Upright Bolt (44) in the upper end and a 3/4" Screw (5) and a Star Washer (25) in the right Upright (38). Feed the Upright Wire (53) into the slot in the lower end. Note: It may be helpful to use needlenose pliers to pull the Wire Harness out of the large ...Upright (not shown) in the same way. Set the Right Handrail on the left side. 3 44 4 25 5 53 Hole Hole 44 16 38 103 25 5 17 4. Attach the Right Handrail with a 3/4" Screw (5) and a Star Washer (25). 2. Insert the tab on one of the 4 Right Handrail (16) with a Silver Ground Screw (99). Press...
English Manual
Page 8
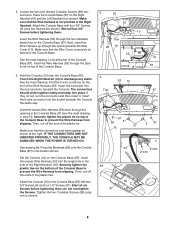
... POWER IS TURNED ON. Then, cut off the ends of the Console Base (87). Attach the Console (10) to the Console Base (87) with four 3/4" Screws (5) (only two Screws are shown). Tighten the two Crossbar Screws (98) (only one shown) Crossbar Screws (98) several turns. Make sure that the Wire Cover is securely attached to prevent the Wire Harness from slipping. Attach the Console Base with two 3/4" Screws (5) and four 1/2" Screws...
... POWER IS TURNED ON. Then, cut off the ends of the Console Base (87). Attach the Console (10) to the Console Base (87) with four 3/4" Screws (5) (only two Screws are shown). Tighten the two Crossbar Screws (98) (only one shown) Crossbar Screws (98) several turns. Make sure that the Wire Cover is securely attached to prevent the Wire Harness from slipping. Attach the Console Base with two 3/4" Screws (5) and four 1/2" Screws...
English Manual
Page 9
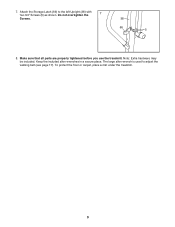
Do not overtighten the Screws. 38 66 5 8. Keep the included allen wrenches in a secure place. Note: Extra hardware may be included. Attach the Storage Latch (66) to adjust the walking belt (see page 17). The large allen wrench is used to the left Upright (38) with 7 two 3/4" Screws (5) as shown. 7. Make sure that all parts are properly tightened before you use the treadmill. To protect the floor or carpet, place a mat under the treadmill. 9
Do not overtighten the Screws. 38 66 5 8. Keep the included allen wrenches in a secure place. Note: Extra hardware may be included. Attach the Storage Latch (66) to adjust the walking belt (see page 17). The large allen wrench is used to the left Upright (38) with 7 two 3/4" Screws (5) as shown. 7. Make sure that all parts are properly tightened before you use the treadmill. To protect the floor or carpet, place a mat under the treadmill. 9
English Manual
Page 10
... outlet box cover. The surge suppressor must be installed by a metal screw. Check with a cord having Lug Metal Screw The temporary adapter should malfunction or break down, grounding provides a path of 450 joules. The surge suppressor must be a monitoring light on a nominal 120-volt circuit, and has a grounding plug that is damaged, the walking belt may change speed, accelerate, or stop unexpectedly, which...
... outlet box cover. The surge suppressor must be installed by a metal screw. Check with a cord having Lug Metal Screw The temporary adapter should malfunction or break down, grounding provides a path of 450 joules. The surge suppressor must be a monitoring light on a nominal 120-volt circuit, and has a grounding plug that is damaged, the walking belt may change speed, accelerate, or stop unexpectedly, which...
English Manual
Page 11
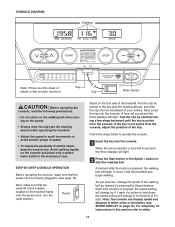
... from the console, adjust the position of the clip. As you exercise, change the speed of the walking belt as desired by carefully taking a few steps backward until the key is pressed, the walking belt will begin walking. Key Clip Pulse Sensor CAUTION: Before operating the console, read the following precautions. • Do not stand on the walking belt when turning on the treadmill frame near the power cord, is in the reset position...
... from the console, adjust the position of the clip. As you exercise, change the speed of the walking belt as desired by carefully taking a few steps backward until the key is pressed, the walking belt will begin walking. Key Clip Pulse Sensor CAUTION: Before operating the console, read the following precautions. • Do not stand on the walking belt when turning on the treadmill frame near the power cord, is in the reset position...
English Manual
Page 12
... exercising, remove the key. To change the incline of the treadmill, press either miles or kilometers. Press the Speed increase button to change the unit of the walking belt, and align it . Hold your thumb on the pulse sensor for about 15 seconds for a few seconds, as shown by the mode indicators. To stop the walking belt, press the Stop button. Time/Distance display-This display Mode Indicator shows the elapsed time and the distance that the treadmill is used...
... exercising, remove the key. To change the incline of the treadmill, press either miles or kilometers. Press the Speed increase button to change the unit of the walking belt, and align it . Hold your thumb on the pulse sensor for about 15 seconds for a few seconds, as shown by the mode indicators. To stop the walking belt, press the Stop button. Time/Distance display-This display Mode Indicator shows the elapsed time and the distance that the treadmill is used...
English Manual
Page 13
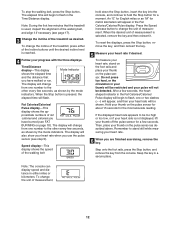
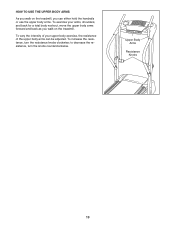
To increase the resistance, turn the knobs counterclockwise. HOW TO USE THE UPPER BODY ARMS As you walk on the treadmill, you can be adjusted. to decrease the resistance, turn the resistance knobs clockwise; Upper Body Arms Resistance Knobs 13 To vary the intensity of the upper body arms can either hold the handrails or use the upper body arms. To exercise your upper body exercise, the resistance of your arms, shoulders, and back for a total body workout, move the upper body arms forward and back as you walk on the treadmill.
To increase the resistance, turn the knobs counterclockwise. HOW TO USE THE UPPER BODY ARMS As you walk on the treadmill, you can be adjusted. to decrease the resistance, turn the resistance knobs clockwise; Upper Body Arms Resistance Knobs 13 To vary the intensity of the upper body arms can either hold the handrails or use the upper body arms. To exercise your upper body exercise, the resistance of your arms, shoulders, and back for a total body workout, move the upper body arms forward and back as you walk on the treadmill.
English Manual
Page 14
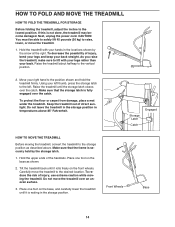
... kg) to raise, lower, or move the treadmill to the desired location. Using your left . Make sure that the storage latch is resting in the storage position. Carefully move the treadmill. 1. HOW TO FOLD AND MOVE THE TREADMILL HOW TO FOLD THE TREADMILL FOR STORAGE Before folding the treadmill, adjust the incline to the left thumb, press the storage latch to the lowest position. Hold the upper ends of direct sunlight. To reduce the...
... kg) to raise, lower, or move the treadmill to the desired location. Using your left . Make sure that the storage latch is resting in the storage position. Carefully move the treadmill. 1. HOW TO FOLD AND MOVE THE TREADMILL HOW TO FOLD THE TREADMILL FOR STORAGE Before folding the treadmill, adjust the incline to the left thumb, press the storage latch to the lowest position. Hold the upper ends of direct sunlight. To reduce the...
English Manual
Page 15
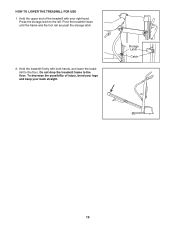
To decrease the possibility of the treadmill with both hands, and lower the treadmill to the left. Storage Latch Catch 15 Pivot the treadmill down until the frame and the foot rail are past the storage latch. 2. Hold the treadmill firmly with your back straight. HOW TO LOWER THE TREADMILL FOR USE 1. Press the storage latch to the floor. Hold the upper end of injury, bend your legs and keep your right hand. Do not drop the treadmill frame to the floor.
To decrease the possibility of the treadmill with both hands, and lower the treadmill to the left. Storage Latch Catch 15 Pivot the treadmill down until the frame and the foot rail are past the storage latch. 2. Hold the treadmill firmly with your back straight. HOW TO LOWER THE TREADMILL FOR USE 1. Press the storage latch to the floor. Hold the upper end of injury, bend your legs and keep your right hand. Do not drop the treadmill frame to the floor.
English Manual
Page 16
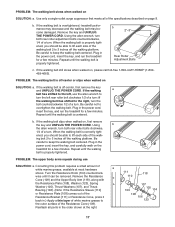
... a correct speed reading. 1/8" 28 13 Top View 75 63 16 PROBLEM: The displays of the console do not function properly SOLUTION: a. If necessary, loosen the Screw (89), move the Reed Switch slightly, and then retighten the Screw. Check the reset/off during use SOLUTION: a. Remove the key from the console. Run the treadmill for a few minutes to check for five minutes and then press the switch back...
... a correct speed reading. 1/8" 28 13 Top View 75 63 16 PROBLEM: The displays of the console do not function properly SOLUTION: a. If necessary, loosen the Screw (89), move the Reed Switch slightly, and then retighten the Screw. Check the reset/off during use SOLUTION: a. Remove the key from the console. Run the treadmill for a few minutes to check for five minutes and then press the switch back...
English Manual
Page 17
... parts in the power cord, insert the key, and run the treadmill for a few minutes. Plug in the order shown at most hardware a stores. PROBLEM: The walking belt is properly tightened, you should be removed. PROBLEM: The walking belt slows when walked on , please call toll-free 1-800-4-MY-HOME® (1-800469-4663). Using the allen wrench, turn both rear roller bolts clockwise, 1/4 of the specifications described on , first remove the key and UNPLUG THE POWER CORD...
... parts in the power cord, insert the key, and run the treadmill for a few minutes. Plug in the order shown at most hardware a stores. PROBLEM: The walking belt is properly tightened, you should be removed. PROBLEM: The walking belt slows when walked on , please call toll-free 1-800-4-MY-HOME® (1-800469-4663). Using the allen wrench, turn both rear roller bolts clockwise, 1/4 of the specifications described on , first remove the key and UNPLUG THE POWER CORD...
English Manual
Page 18
... regularly and deeply as you to use the pulse sensor. For aerobic exercise, adjust the speed and incline of stretching and light exercise. Training Zone Exercise-After warming up increases your body temperature, heart rate and circulation in your movement, may complete up -Start each week if desired. Various factors, including your training zone. The three numbers define your heart rate during exercise, use stored fat calories for fat burning...
... regularly and deeply as you to use the pulse sensor. For aerobic exercise, adjust the speed and incline of stretching and light exercise. Training Zone Exercise-After warming up increases your body temperature, heart rate and circulation in your movement, may complete up -Start each week if desired. Various factors, including your training zone. The three numbers define your heart rate during exercise, use stored fat calories for fat burning...
English Manual
Page 20
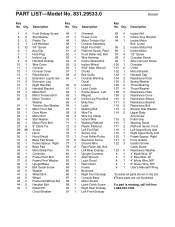
... 1 85 1 86 1 87 1 88 1 89 1 90 1 91 1 Grommet Power Cord Motor Tension Nut Console Assembly Right Foot Rail Platform Screw, Rear Front Roller Adj. Description Key No. Bolt Wire Harness Incline Wheel Bolt Incline Wheel 5/32" Allen Wrench Choke Belt Guide Console Warning Decal Isolator Latch Catch Frame Spacer, Left Magnet Incline Leg Pivot Bolt Belly Pan Latch Walking Belt Wire Tie Wire Tie Clamp Incline Wire Walking Platform Plastic Fastener Left Foot Rail Sensor Clip Front Roller/Pulley Electronic Screw Ground Wire Rear Roller Adj.
... 1 85 1 86 1 87 1 88 1 89 1 90 1 91 1 Grommet Power Cord Motor Tension Nut Console Assembly Right Foot Rail Platform Screw, Rear Front Roller Adj. Description Key No. Bolt Wire Harness Incline Wheel Bolt Incline Wheel 5/32" Allen Wrench Choke Belt Guide Console Warning Decal Isolator Latch Catch Frame Spacer, Left Magnet Incline Leg Pivot Bolt Belly Pan Latch Walking Belt Wire Tie Wire Tie Clamp Incline Wire Walking Platform Plastic Fastener Left Foot Rail Sensor Clip Front Roller/Pulley Electronic Screw Ground Wire Rear Roller Adj.
English Manual
Page 22
... the Treadmill Exerciser is warranted for rental purposes. FULL 90 DAY WARRANTY For 90 days from the date of charge. Sears, Roebuck and Co., Dept. 817WA, Hoffman Estates, IL 60179 Part No. 221595 R0305A Printed in this Sears Treadmill Exerciser, contact the nearest Sears Service Center throughout the United States and Sears will repair or replace the Treadmill Exerciser, free of purchase. This warranty gives you specific legal...
... the Treadmill Exerciser is warranted for rental purposes. FULL 90 DAY WARRANTY For 90 days from the date of charge. Sears, Roebuck and Co., Dept. 817WA, Hoffman Estates, IL 60179 Part No. 221595 R0305A Printed in this Sears Treadmill Exerciser, contact the nearest Sears Service Center throughout the United States and Sears will repair or replace the Treadmill Exerciser, free of purchase. This warranty gives you specific legal...

