
English Manual
Page 2
..., rated at all warnings and precautions. 2. Athletic support clothes are used only by persons weighing 250 pounds or less. 8. Keep the treadmill indoors, away from the treadmill at 15 amps, with 8 feet of this manual. It is being administered. 6. Keep children and pets away from moisture and dust.... No other appliance should be on page 4 if the treadmill is turned off. IMPORTANT PRECAUTIONS WARNING: To reduce the risk of carrying 15 or more than one person on any surface that blocks air ...
..., rated at all warnings and precautions. 2. Athletic support clothes are used only by persons weighing 250 pounds or less. 8. Keep the treadmill indoors, away from the treadmill at 15 amps, with 8 feet of this manual. It is being administered. 6. Keep children and pets away from moisture and dust.... No other appliance should be on page 4 if the treadmill is turned off. IMPORTANT PRECAUTIONS WARNING: To reduce the risk of carrying 15 or more than one person on any surface that blocks air ...
English Manual
Page 3
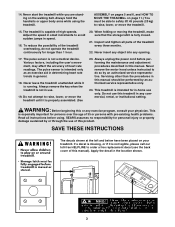
... to order a free replacement decal (see the back cover of this manual). ASSEMBLY on pages 5 and 6, and HOW TO MOVE THE TREADMILL on your physician. Inspect and tighten all parts of 35 or persons with pre-existing health problems. Read all instructions before performing the maintenance and... adjustment procedures described in general. 18. The pulse sensor is fully closed. 21. WARNING: Before beginning this product. When folding or moving the treadmill, make sure that the storage latch is not a medical device. Servicing other than 1 hour. 20. Do not use of high speeds. SAVE...
... to order a free replacement decal (see the back cover of this manual). ASSEMBLY on pages 5 and 6, and HOW TO MOVE THE TREADMILL on your physician. Inspect and tighten all parts of 35 or persons with pre-existing health problems. Read all instructions before performing the maintenance and... adjustment procedures described in general. 18. The pulse sensor is fully closed. 21. WARNING: Before beginning this product. When folding or moving the treadmill, make sure that the storage latch is not a medical device. Servicing other than 1 hour. 20. Do not use of high speeds. SAVE...
English Manual
Page 4
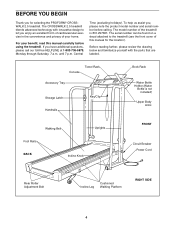
...further, please review the drawing below and familiarize yourself with innovative design to the treadmill (see the front cover of your benefit, read this manual for selecting the PROFORM® CROSSWALK 2.5 treadmill. BEFORE YOU BEGIN Thank you , please note the product model number and serial... number before using the treadmill. If you enjoy an excellent form of cardiovascular exercise in the...
...further, please review the drawing below and familiarize yourself with innovative design to the treadmill (see the front cover of your benefit, read this manual for selecting the PROFORM® CROSSWALK 2.5 treadmill. BEFORE YOU BEGIN Thank you , please note the product model number and serial... number before using the treadmill. If you enjoy an excellent form of cardiovascular exercise in the...
English Manual
Page 6
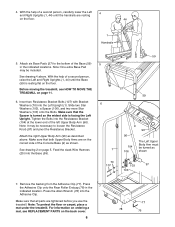
... second person, raise the Left and Right Uprights (1, 44) until the handrails are tightened before you use the treadmill. Note: To protect the floor or carpet, place a mat under the treadmill. Note: One extra Base Pad may be necessary to the bottom of the left Upper Body Arm (96). Insert...as shown 103 97 103 7. Press the Allen Wrench (76) into the Left Upright (1). For information on ordering a mat, see HOW TO MOVE THE TREADMILL on the back cover. 6 77 78 76 Make sure that all parts are resting on the floor. See drawing 4 above . Feed the slack Wire ...
... second person, raise the Left and Right Uprights (1, 44) until the handrails are tightened before you use the treadmill. Note: To protect the floor or carpet, place a mat under the treadmill. Note: One extra Base Pad may be necessary to the bottom of the left Upper Body Arm (96). Insert...as shown 103 97 103 7. Press the Allen Wrench (76) into the Left Upright (1). For information on ordering a mat, see HOW TO MOVE THE TREADMILL on the back cover. 6 77 78 76 Make sure that all parts are resting on the floor. See drawing 4 above . Feed the slack Wire ...
English Manual
Page 7
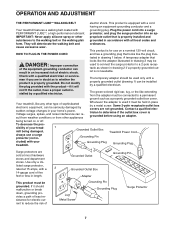
... Contact a qualified electrician to determine if the outlet box cover is equipped with a cord having an equipment-grounding conductor and a Your treadmill features a walking belt coated with a qualified electrician or serviceman if you are in doubt as to a permanent ground such as shown in... 2-pole receptacle as a properly grounded outlet box cover. not fit the outlet, have a proper outlet installed by a metal screw. Your treadmill, like the adapter illustrated in drawing 2 may be installed by sudden voltage changes in drawing 1 below. To decrease the pos- Grounded Outlet ...
... Contact a qualified electrician to determine if the outlet box cover is equipped with a cord having an equipment-grounding conductor and a Your treadmill features a walking belt coated with a qualified electrician or serviceman if you are in doubt as to a permanent ground such as shown in... 2-pole receptacle as a properly grounded outlet box cover. not fit the outlet, have a proper outlet installed by a metal screw. Your treadmill, like the adapter illustrated in drawing 2 may be installed by sudden voltage changes in drawing 1 below. To decrease the pos- Grounded Outlet ...

English Manual
Page 8
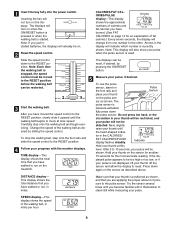
... operating the console, make sure that the neg- Avoid spilling liquids on the face of your clothing. Battery Cover ative (-) ends of the treadmill. Next, step onto the foot rails of the batteries are recommended. Press three batteries into the battery com- When the key is a thin...(see the drawing above ), and slide the clip onto the waistband of the console, remove it. Follow the steps on walking belt when starting treadmill. • Read User's Manual and follow warnings and operating instructions. • Keep fluids off electronic console. Make sure that the power cord ...
... operating the console, make sure that the neg- Avoid spilling liquids on the face of your clothing. Battery Cover ative (-) ends of the treadmill. Next, step onto the foot rails of the batteries are recommended. Press three batteries into the battery com- When the key is a thin...(see the drawing above ), and slide the clip onto the waistband of the console, remove it. Follow the steps on walking belt when starting treadmill. • Read User's Manual and follow warnings and operating instructions. • Keep fluids off electronic console. Make sure that the power cord ...
English Manual
Page 9
... sensor. Press down the pulse sensor. Try the sensor several times until the walking belt begins to 10 seconds, your pulse. sensor, stand on the treadmill. To stop the walking belt, step onto the foot rails and slide the speed control to the RESET po- Hold your thumb is started. This...
... sensor. Press down the pulse sensor. Try the sensor several times until the walking belt begins to 10 seconds, your pulse. sensor, stand on the treadmill. To stop the walking belt, step onto the foot rails and slide the speed control to the RESET po- Hold your thumb is started. This...
English Manual
Page 10
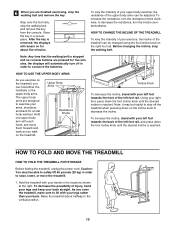
...the upper body arms can be adjusted. Using your back straight. To increase the incline, stand with each hand, and move the treadmill. 1. Raise the treadmill about five minutes. Store the key in order to decrease the incline. to decrease the resistance, turn the resistance knobs clockwise; ... to lift with your legs rather than your arms, shoulders, and back for five minutes, the displays will automatically turn off the treadmill when pressing down the foot incline knob until the desired incline is reached. Step onto the foot rails, stop the walking belt. ...
...the upper body arms can be adjusted. Using your back straight. To increase the incline, stand with each hand, and move the treadmill. 1. Raise the treadmill about five minutes. Store the key in order to decrease the incline. to decrease the resistance, turn the resistance knobs clockwise; ... to lift with your legs rather than your arms, shoulders, and back for five minutes, the displays will automatically turn off the treadmill when pressing down the foot incline knob until the desired incline is reached. Step onto the foot rails, stop the walking belt. ...
English Manual
Page 11
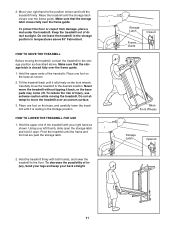
... the frame guide. 1. To reduce the risk of the treadmill with both hands, and lower the treadmill to the storage position as shown. 2. Hold the upper end of injury, use extreme caution while moving the treadmill, convert the treadmill to the floor. Move your right hand as shown. To...Make sure that the storage latch is resting in temperatures above . Keep the treadmill out of the handrails. HOW TO MOVE THE TREADMILL Before moving the treadmill. Hold the upper ends of direct sunlight. Tilt the treadmill back until the frame and foot rail are past the storage latch. 2. ...
... the frame guide. 1. To reduce the risk of the treadmill with both hands, and lower the treadmill to the storage position as shown. 2. Hold the upper end of injury, use extreme caution while moving the treadmill, convert the treadmill to the floor. Move your right hand as shown. To...Make sure that the storage latch is resting in temperatures above . Keep the treadmill out of the handrails. HOW TO MOVE THE TREADMILL Before moving the treadmill. Hold the upper ends of direct sunlight. Tilt the treadmill back until the frame and foot rail are past the storage latch. 2. ...
English Manual
Page 12
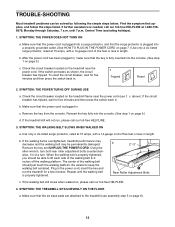
... near the power cord. Make sure that the key is fully inserted into the console. (See step 1 on the treadmill near the power cord (see assembly step 5 on page 9.) c. The center of a turn. If the circuit breaker has tripped, wait for .... 2. SYMPTOM: THE POWER DOES NOT TURN ON a. SYMPTOM: THE WALKING BELT SLOWS WHEN WALKED ON a. Central Time (excluding holidays). 1. TROUBLE-SHOOTING Most treadmill problems can be permanently damaged. Remove the key and UNPLUG THE POWER CORD. b. until the walking belt is plugged into a surge protector, and that applies...
... near the power cord. Make sure that the key is fully inserted into the console. (See step 1 on the treadmill near the power cord (see assembly step 5 on page 9.) c. The center of a turn. If the circuit breaker has tripped, wait for .... 2. SYMPTOM: THE POWER DOES NOT TURN ON a. SYMPTOM: THE WALKING BELT SLOWS WHEN WALKED ON a. Central Time (excluding holidays). 1. TROUBLE-SHOOTING Most treadmill problems can be permanently damaged. Remove the key and UNPLUG THE POWER CORD. b. until the walking belt is plugged into a surge protector, and that applies...
English Manual
Page 13
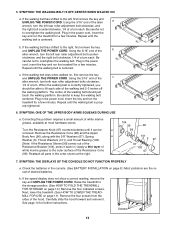
... until the walking belt is prop- Screws 13 Repeat until it . b. SYMPTOM: ONE OF THE UPPER BODY ARMS SQUEAKS DURING USE a. Raise the treadmill to the left rear roller adjustment bolt clockwise, and the right bolt counterclockwise, 1/4 of drained batteries. Remove the four screws from the sides of the...walked on page 10.) Remove the four indicated screws. The center of the hood. Plug in the power cord, insert the key and run the treadmill for a few minutes. Be careful not to keep the walking belt centered. Using the 3/16" end of the Resistance Cone (98). Be ...
... until the walking belt is prop- Screws 13 Repeat until it . b. SYMPTOM: ONE OF THE UPPER BODY ARMS SQUEAKS DURING USE a. Raise the treadmill to the left rear roller adjustment bolt clockwise, and the right bolt counterclockwise, 1/4 of drained batteries. Remove the four screws from the sides of the...walked on page 10.) Remove the four indicated screws. The center of the hood. Plug in the power cord, insert the key and run the treadmill for a few minutes. Be careful not to keep the walking belt centered. Using the 3/16" end of the Resistance Cone (98). Be ...
English Manual
Page 14
...shows recommended heart rates for prolonged periods of exercise, your training zone. Turn the Pulley until your heart rate is near one of the treadmill until the Magnet is aligned with pre-existing health problems. The pulse sensor is about 1/8". Make sure that requires large amounts of oxygen ...higher number in your physician. If necessary, loosen the Screw (19) and move the Reed Switch slightly. on page 13), and run the treadmill for fat burning; The lower two numbers are general guidelines only. During the first few minutes of time. For aerobic exercise, adjust the speed...
...shows recommended heart rates for prolonged periods of exercise, your training zone. Turn the Pulley until your heart rate is near one of the treadmill until the Magnet is aligned with pre-existing health problems. The pulse sensor is about 1/8". Make sure that requires large amounts of oxygen ...higher number in your physician. If necessary, loosen the Screw (19) and move the Reed Switch slightly. on page 13), and run the treadmill for fat burning; The lower two numbers are general guidelines only. During the first few minutes of time. For aerobic exercise, adjust the speed...
English Manual
Page 15
... the pulse sensor on the console. (See page 9.) If your heart rate is too high or too low, adjust the speed or incline of the treadmill until your heart rate is in your training zone for 20 to 30 minutes. (During the first few weeks of your exercise program, keep your...
... the pulse sensor on the console. (See page 9.) If your heart rate is too high or too low, adjust the speed or incline of the treadmill until your heart rate is in your training zone for 20 to 30 minutes. (During the first few weeks of your exercise program, keep your...
English Manual
Page 19
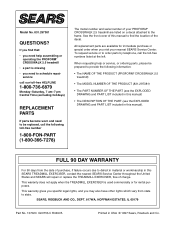
...state to order parts by telephone, call the toll-free numbers listed at the left. When requesting help assembling or operating the PROFORM® CROSSWALK 2.5 treadmill • a part is used commercially or for immediate purchase or special order when you need to schedule repair service call the... following information: • The NAME OF THE PRODUCT (PROFORM® CROSSWALK 2.5 treadmill) • The MODEL NUMBER OF THE PRODUCT (831.297381) • The PART NUMBER OF THE PART (see the EXPLODED ...
...state to order parts by telephone, call the toll-free numbers listed at the left. When requesting help assembling or operating the PROFORM® CROSSWALK 2.5 treadmill • a part is used commercially or for immediate purchase or special order when you need to schedule repair service call the... following information: • The NAME OF THE PRODUCT (PROFORM® CROSSWALK 2.5 treadmill) • The MODEL NUMBER OF THE PRODUCT (831.297381) • The PART NUMBER OF THE PART (see the EXPLODED ...


