
English Manual
Page 1
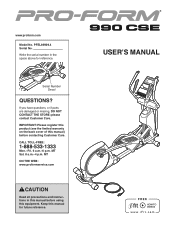
... using this equipment. CALL TOLL-FREE: 1-888-533-1333 Mon.–-Fri. 6 a.m.–-6 p.m. Keep this manual before contacting Customer Care. USER’'S MANUAL Write the serial number in this manual for reference. please contact Customer Care. MT Sat. 8 a.m.–-4 p.m. MT ON THE WEB: www.proformservice.com CAUTION Read all precautions and instructions in...
... using this equipment. CALL TOLL-FREE: 1-888-533-1333 Mon.–-Fri. 6 a.m.–-6 p.m. Keep this manual before contacting Customer Care. USER’'S MANUAL Write the serial number in this manual for reference. please contact Customer Care. MT Sat. 8 a.m.–-4 p.m. MT ON THE WEB: www.proformservice.com CAUTION Read all precautions and instructions in...
English Manual
Page 2
...WARNING DECAL PLACEMENT 2 IMPORTANT PRECAUTIONS 3 BEFORE YOU BEGIN 4 PART IDENTIFICATION CHART 5 ASSEMBLY 6 HOW TO USE THE ELLIPTICAL 13 MAINTENANCE AND TROUBLESHOOTING 20 EXERCISE GUIDELINES 22 PART LIST 23 EXPLODED DRAWING 25 ORDERING REPLACEMENT PARTS Back Cover LIMITED ...WARRANTY Back Cover WARNING DECAL PLACEMENT This drawing shows the location(s) of this manual and request a free replacement decal. If a decal is a registered trademark of ICON IP, Inc. 2 Note: The decal(s) may not ...
...WARNING DECAL PLACEMENT 2 IMPORTANT PRECAUTIONS 3 BEFORE YOU BEGIN 4 PART IDENTIFICATION CHART 5 ASSEMBLY 6 HOW TO USE THE ELLIPTICAL 13 MAINTENANCE AND TROUBLESHOOTING 20 EXERCISE GUIDELINES 22 PART LIST 23 EXPLODED DRAWING 25 ORDERING REPLACEMENT PARTS Back Cover LIMITED ...WARRANTY Back Cover WARNING DECAL PLACEMENT This drawing shows the location(s) of this manual and request a free replacement decal. If a decal is a registered trademark of ICON IP, Inc. 2 Note: The decal(s) may not ...
English Manual
Page 3
... To reduce the risk of serious injury, read all important precautions and instructions in this manual and all warnings on your elliptical before using your back. 7. Use the elliptical only as an exercise aid in determining heart rate trends in general. 13. Always wear ... and rear of the elliptical and 2 ft. (0.6 m) on the elliptical. Keep the elliptical indoors, away from the elliptical at least 3 ft. (0.9 m) of clearance in this manual. 9. The elliptical does not have a freewheel; The elliptical should not be used by or through the use the elliptical in a garage or covered...
... To reduce the risk of serious injury, read all important precautions and instructions in this manual and all warnings on your elliptical before using your back. 7. Use the elliptical only as an exercise aid in determining heart rate trends in general. 13. Always wear ... and rear of the elliptical and 2 ft. (0.6 m) on the elliptical. Keep the elliptical indoors, away from the elliptical at least 3 ft. (0.9 m) of clearance in this manual. 9. The elliptical does not have a freewheel; The elliptical should not be used by or through the use the elliptical in a garage or covered...
English Manual
Page 4
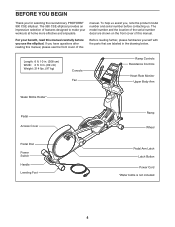
...Cover Ramp Wheel Pedal Disc Power Switch Handle Leveling Foot Pedal Arm Latch Latch Button Power Cord *Water bottle is not included 4 manual. Length: 6 ft. 10 in. (208 cm) Width: 2 ft. 3 in the drawing below. BEFORE YOU BEGIN Thank you have questions...reading this manual, please see the front cover of this Before reading further, please familiarize yourself with the parts that are shown on the front cover of features designed to make your benefit, read this manual. If you for selecting the revolutionary PROFORM® 990 CSE elliptical. The 990 CSE elliptical provides ...
...Cover Ramp Wheel Pedal Disc Power Switch Handle Leveling Foot Pedal Arm Latch Latch Button Power Cord *Water bottle is not included 4 manual. Length: 6 ft. 10 in. (208 cm) Width: 2 ft. 3 in the drawing below. BEFORE YOU BEGIN Thank you have questions...reading this manual, please see the front cover of this Before reading further, please familiarize yourself with the parts that are shown on the front cover of features designed to make your benefit, read this manual. If you for selecting the revolutionary PROFORM® 990 CSE elliptical. The 990 CSE elliptical provides ...
English Manual
Page 5
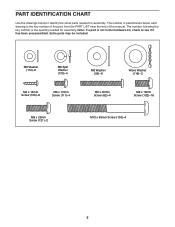
The number following the key number is the key number of the part, from the PART LIST near the end of this manual. M6 Washer (112)–-8 M8 Split Washer (103)–-4 M4 x 16mm Screw (106)–-8 M6 x 12mm Screw (111)–-4 M8 Washer (95)–-8 M6 x 50mm ...
The number following the key number is the key number of the part, from the PART LIST near the end of this manual. M6 Washer (112)–-8 M8 Split Washer (103)–-4 M4 x 16mm Screw (106)–-8 M6 x 12mm Screw (111)–-4 M8 Washer (95)–-8 M6 x 50mm ...
English Manual
Page 15
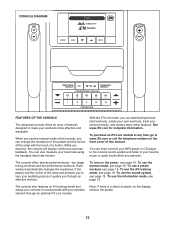
When you use the manual mode, see page 19. See www.iFit.com for complete information. Each workout automatically ...and enjoyable. The console also features an iFit training mode that allows your console to communicate with the touch of this manual. To use a preset workout, see page 16. CONSOLE DIAGRAM FEATURES OF THE CONSOLE The advanced console offers an array... go to www.iFit.com or call the telephone number on the front cover of a button. To use the manual mode of the console, you can even connect your MP3 player or CD player to the console sound system and listen...
When you use the manual mode, see page 19. See www.iFit.com for complete information. Each workout automatically ...and enjoyable. The console also features an iFit training mode that allows your console to communicate with the touch of this manual. To use a preset workout, see page 16. CONSOLE DIAGRAM FEATURES OF THE CONSOLE The advanced console offers an array... go to www.iFit.com or call the telephone number on the front cover of a button. To use the manual mode of the console, you can even connect your MP3 player or CD player to the console sound system and listen...
English Manual
Page 16
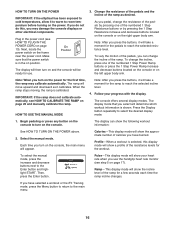
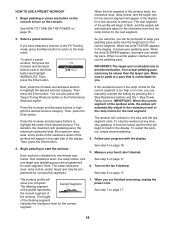
... a workout or the iFit Training mode, press the Menu button to return to select the desired display mode. 1. Select the manual mode. To select the manual mode, press the increase and decrease buttons next to reach the selected resistance level. To vary the motion of the numbered 1 ... information is calibrated. Calories—-This display mode will then turn on page 17). HOW TO TURN ON THE POWER IMPORTANT: If the elliptical has been exposed to cold temperatures, allow it to warm to reach the selected incline level. 4. The console offers several display modes....
... a workout or the iFit Training mode, press the Menu button to return to select the desired display mode. 1. Select the manual mode. To select the manual mode, press the increase and decrease buttons next to reach the selected resistance level. To vary the motion of the numbered 1 ... information is calibrated. Calories—-This display mode will then turn on page 17). HOW TO TURN ON THE POWER IMPORTANT: If the elliptical has been exposed to cold temperatures, allow it to warm to reach the selected incline level. 4. The console offers several display modes....
English Manual
Page 17
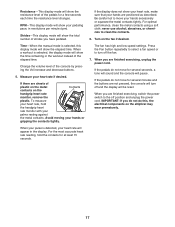
... metal Contacts contacts on the handgrip heart rate monitor, remove the plastic. Be careful not to clean the contacts. 6. Time—-When the manual mode is selected, this , the electrical components on the fan if desired. Press the Fan button repeatedly to select a fan speed or to... volume level of the elapsed time. never use alcohol, abrasives, or chemicals to move your pedaling pace, in the display. Turn on the elliptical may wear prematurely. Measure your hands or gripping the contacts tightly. The fan has high and low speed settings. If the pedals do not move...
... metal Contacts contacts on the handgrip heart rate monitor, remove the plastic. Be careful not to clean the contacts. 6. Time—-When the manual mode is selected, this , the electrical components on the fan if desired. Press the Fan button repeatedly to select a fan speed or to... volume level of the elapsed time. never use alcohol, abrasives, or chemicals to move your pedaling pace, in the display. Turn on the elliptical may wear prematurely. Measure your hands or gripping the contacts tightly. The fan has high and low speed settings. If the pedals do not move...
English Manual
Page 18
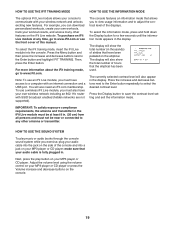
... the display, increase your progress with the display. See step 4 on page 16. See step 7 on page 17. 18 Follow your pedaling pace. You can manually override the setting by pressing the 1 Step Resistance buttons and the 1 Step Power Ramp buttons.
... the display, increase your progress with the display. See step 4 on page 16. See step 7 on page 17. 18 Follow your pedaling pace. You can manually override the setting by pressing the 1 Step Resistance buttons and the 1 Step Power Ramp buttons.
English Manual
Page 19
..., plug your wireless network and unlocks exciting new features. Then, press the Enter button. You will also appear in thousands) of strides that the elliptical has been used. The display will also show the total number (in the display. make sure that allows you to view usage information and to...11b router with SSID broadcast enabled (hidden networks are not supported). HOW TO USE THE SOUND SYSTEM To play button on the side of this manual. To select the iFit training mode, insert the iFit Live module into a jack on the console. 19 The console features an information mode that...
..., plug your wireless network and unlocks exciting new features. Then, press the Enter button. You will also appear in thousands) of strides that the elliptical has been used. The display will also show the total number (in the display. make sure that allows you to view usage information and to...11b router with SSID broadcast enabled (hidden networks are not supported). HOW TO USE THE SOUND SYSTEM To play button on the side of this manual. To select the iFit training mode, insert the iFit Live module into a jack on the console. 19 The console features an information mode that...
English Manual
Page 24
... Medium Snap Ring #6 x 3/8" Screw Frame Wire Harness Ground Wire Lift Motor Wire Harness Motor Power Wire Harness M5 Washer Blue Wire White Wire User’'s Manual Assembly Tool Grease Packet Note: Specifications are not illustrated. 24 For information about ordering replacement parts, see the back cover of this...
... Medium Snap Ring #6 x 3/8" Screw Frame Wire Harness Ground Wire Lift Motor Wire Harness Motor Power Wire Harness M5 Washer Blue Wire White Wire User’'s Manual Assembly Tool Grease Packet Note: Specifications are not illustrated. 24 For information about ordering replacement parts, see the back cover of this...

English Manual
Page 28
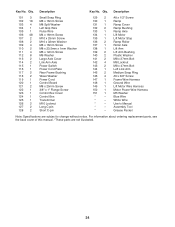
... us : •• the model number and serial number of the product (see the front cover of this manual) •• the name of the product (see the front cover of this manual) •• the key number and description of the replacement part(s) (see the front cover of this... a minimal handling charge. ORDERING REPLACEMENT PARTS To order replacement parts, please see the PART LIST and the EXPLODED DRAWING near the end of this manual) LIMITED WARRANTY IMPORTANT: You must be voided if the product is used as a store display model, if the product is purchased or transported outside...
... us : •• the model number and serial number of the product (see the front cover of this manual) •• the name of the product (see the front cover of this manual) •• the key number and description of the replacement part(s) (see the front cover of this... a minimal handling charge. ORDERING REPLACEMENT PARTS To order replacement parts, please see the PART LIST and the EXPLODED DRAWING near the end of this manual) LIMITED WARRANTY IMPORTANT: You must be voided if the product is used as a store display model, if the product is purchased or transported outside...


