

User Manual
Page 1
....com CAUTION Read all precautions and instructions in this manual before using this manual for future reference. ¨ USER'S MANUAL If you . TO AVOID UNNECESSARY DELAYS, PLEASE CALL DIRECT TO OUR TOLL-FREE CUSTOMER HOT LINE. Save this equipment. Serial Number Decal QUESTIONS? As a manufacturer, we are missing or damaged parts, we will provide immediate assistance, free of charge to you have...
....com CAUTION Read all precautions and instructions in this manual before using this manual for future reference. ¨ USER'S MANUAL If you . TO AVOID UNNECESSARY DELAYS, PLEASE CALL DIRECT TO OUR TOLL-FREE CUSTOMER HOT LINE. Save this equipment. Serial Number Decal QUESTIONS? As a manufacturer, we are missing or damaged parts, we will provide immediate assistance, free of charge to you have...

User Manual
Page 2
¨ TABLE OF CONTENTS IMPORTANT PRECAUTIONS 3 BEFORE YOU BEGIN 5 ASSEMBLY 6 OPERATION AND ADJUSTMENT 7 HOW TO FOLD AND MOVE THE TREADMILL 13 MAINTENANCE AND TROUBLE-SHOOTING 14 CONDITIONING GUIDELINES 16 PART LIST 18 ORDERING REPLACEMENT PARTS Back Cover LIMITED WARRANTY Back Cover Note: An EXPLODED DRAWING is attached in the center of this manual. 2
¨ TABLE OF CONTENTS IMPORTANT PRECAUTIONS 3 BEFORE YOU BEGIN 5 ASSEMBLY 6 OPERATION AND ADJUSTMENT 7 HOW TO FOLD AND MOVE THE TREADMILL 13 MAINTENANCE AND TROUBLE-SHOOTING 14 CONDITIONING GUIDELINES 16 PART LIST 18 ORDERING REPLACEMENT PARTS Back Cover LIMITED WARRANTY Back Cover Note: An EXPLODED DRAWING is attached in the center of this manual. 2

User Manual
Page 3
... not wear loose clothing that blocks air openings. Never move the walking belt while the power is not working properly.) 4. The treadmill is the responsibility of the owner to persons, read the following important precautions and information before the personal trainer describes the change . No other appliance should not be attempted only by pressing the speed and incline buttons. IMPORTANT PRECAUTIONS DANGER: To reduce the...
... not wear loose clothing that blocks air openings. Never move the walking belt while the power is not working properly.) 4. The treadmill is the responsibility of the owner to persons, read the following important precautions and information before the personal trainer describes the change . No other appliance should not be attempted only by pressing the speed and incline buttons. IMPORTANT PRECAUTIONS DANGER: To reduce the...

User Manual
Page 4
... Customer Service Department, toll-free, to order a free replacement decal (see ORDERING REPLACEMENT PARTS on the back cover of the treadmill by or through the use this or any exercise program, consult your treadmill. Never leave the treadmill unattended while it is not in this manual. Do not change the incline of this product. Apply the decal in any opening. When folding or moving the treadmill, make sure that the storage latch...
... Customer Service Department, toll-free, to order a free replacement decal (see ORDERING REPLACEMENT PARTS on the back cover of the treadmill by or through the use this or any exercise program, consult your treadmill. Never leave the treadmill unattended while it is not in this manual. Do not change the incline of this product. Apply the decal in any opening. When folding or moving the treadmill, make sure that the storage latch...

User Manual
Page 5
... selecting the innovative PROFORM¨ 985 CD treadmill. If you get the most from every workout. CD Case Holder Water Bottle Holder (Bottle not included) Accessory Tray Book Holder Hand Weights Handrails Storage Latch LEFT SIDE Key/Clip RIGHT SIDE Walking Belt Foot Rails On/Off Switch Circuit Breaker Front Wheel Rear Roller Adjustment Bolts Cushioned Walking Platform Power Cord 5 The model number of this manual carefully before calling. To...
... selecting the innovative PROFORM¨ 985 CD treadmill. If you get the most from every workout. CD Case Holder Water Bottle Holder (Bottle not included) Accessory Tray Book Holder Hand Weights Handrails Storage Latch LEFT SIDE Key/Clip RIGHT SIDE Walking Belt Foot Rails On/Off Switch Circuit Breaker Front Wheel Rear Roller Adjustment Bolts Cushioned Walking Platform Power Cord 5 The model number of this manual carefully before calling. To...

User Manual
Page 6
... in a cleared area and remove all parts are on page 13. 75 79 Using a phillips screwdriver, remove the Screw (75) and the 120 102 Rear Foot (120) from the Lock Pin (97). Place a mat under the treadmill to the treadmill Frame (79). With the help of the treadmill walking belt is completed. Hold the treadmill firmly with high-performance lubricant. Note: Keep the included...
... in a cleared area and remove all parts are on page 13. 75 79 Using a phillips screwdriver, remove the Screw (75) and the 120 102 Rear Foot (120) from the Lock Pin (97). Place a mat under the treadmill to the treadmill Frame (79). With the help of the treadmill walking belt is completed. Hold the treadmill firmly with high-performance lubricant. Note: Keep the included...

User Manual
Page 7
... least resistance for use a surge protector (not in your treadmill. Do not modify the plug provided with your homeÕs power. This product is for electric current to a 2-pole receptacle as a properly grounded outlet box cover. grounded in drawing 1 below. Plug the power cord into an ap- This product is equipped with a cord having an equipment-grounding conductor and a Your treadmill features a walking belt...
... least resistance for use a surge protector (not in your treadmill. Do not modify the plug provided with your homeÕs power. This product is for electric current to a 2-pole receptacle as a properly grounded outlet box cover. grounded in drawing 1 below. Plug the power cord into an ap- This product is equipped with a cord having an equipment-grounding conductor and a Your treadmill features a walking belt...

User Manual
Page 8
... Clip Key CAUTION: Before operating the console, read the instructions included with the CD as well as the instructions on page 12). The console also features revolutionary PROFORM¨ CD COACH technology. And with the included hand weights, you can display speed and distance in the console. ¥ Before using the CD program mode, read the following precautions. ¥ Do not stand on the walking belt when turning...
... Clip Key CAUTION: Before operating the console, read the instructions included with the CD as well as the instructions on page 12). The console also features revolutionary PROFORM¨ CD COACH technology. And with the included hand weights, you can display speed and distance in the console. ¥ Before using the CD program mode, read the following precautions. ¥ Do not stand on the walking belt when turning...

User Manual
Page 9
... speed range is inserted, the manual mode will change in the on position. To stop the walking belt and reset the displays, press the STOP button, remove the key, and then reinsert the key. 4 Adjust the incline as desired. Note: When one number to flash. As you have selected the CD program mode, press the SELECT MODE button to select the manual mode. 3 Press the SPEED v button to move at 1.0 mph. To stop the walking belt, press the STOP button. Follow the steps below to the key...
... speed range is inserted, the manual mode will change in the on position. To stop the walking belt and reset the displays, press the STOP button, remove the key, and then reinsert the key. 4 Adjust the incline as desired. Note: When one number to flash. As you have selected the CD program mode, press the SELECT MODE button to select the manual mode. 3 Press the SPEED v button to move at 1.0 mph. To stop the walking belt, press the STOP button. Follow the steps below to the key...

User Manual
Page 10
... open the CD player 5 Press the play Play button is inserted, the four displays and the manual indicator will change to the off switch to 1.5% when this treadmill. 2 Insert the key into the console. Press the SELECT MODE button to the card accompanying this mode is selected. 4 Insert Disc 1 into the clip, as the CD interactively controls the speed and incline of the treadmill will begin guiding you through your workout...
... open the CD player 5 Press the play Play button is inserted, the four displays and the manual indicator will change to the off switch to 1.5% when this treadmill. 2 Insert the key into the console. Press the SELECT MODE button to the card accompanying this mode is selected. 4 Insert Disc 1 into the clip, as the CD interactively controls the speed and incline of the treadmill will begin guiding you through your workout...

User Manual
Page 11
... using the two workout programs. Program Select Buttons walking belt will begin after track 1, and can also be prepared for speed and/or incline changes. CAUTION: Always listen for a few seconds and then the number Ò2Ó will move . Make sure that the incline of the treadmill is completed, press the STOP button. 6 Adjust the volume if desired. While music CDÕs are playing, the number of Disc 1, your personal trainer...
... using the two workout programs. Program Select Buttons walking belt will begin after track 1, and can also be prepared for speed and/or incline changes. CAUTION: Always listen for a few seconds and then the number Ò2Ó will move . Make sure that the incline of the treadmill is completed, press the STOP button. 6 Adjust the volume if desired. While music CDÕs are playing, the number of Disc 1, your personal trainer...

User Manual
Page 12
... number of measurement, total time, and total distance, remove the key from the console. HOW TO PURCHASE STEREO SPEAKERS If you are finished viewing the unit of hours that the walking belt has moved. grams or listen to music CDÕs without headphones, your treadmill and connect easily to use CD workout pro- NieKbirekrgall The stereo speakers mount directly to your treadmill can display speed and distance in miles...
... number of measurement, total time, and total distance, remove the key from the console. HOW TO PURCHASE STEREO SPEAKERS If you are finished viewing the unit of hours that the walking belt has moved. grams or listen to music CDÕs without headphones, your treadmill and connect easily to use CD workout pro- NieKbirekrgall The stereo speakers mount directly to your treadmill can display speed and distance in miles...
User Manual
Page 13
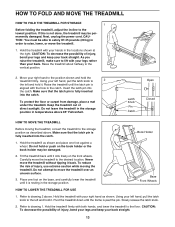
... your back. HOW TO FOLD AND MOVE THE TREADMILL HOW TO FOLD THE TREADMILL FOR STORAGE 1 Before folding the treadmill, adjust the incline to drawing 1. Open Latch Knob Pin Catch Closed HOW TO MOVE THE TREADMILL Before moving the treadmill. Slowly release the latch knob. 2. Pivot the treadmill down until the latch pin is not done, the treadmill may be able to the left and hold the treadmill firmly. Insert the latch pin into the catch. Keep...
... your back. HOW TO FOLD AND MOVE THE TREADMILL HOW TO FOLD THE TREADMILL FOR STORAGE 1 Before folding the treadmill, adjust the incline to drawing 1. Open Latch Knob Pin Catch Closed HOW TO MOVE THE TREADMILL Before moving the treadmill. Slowly release the latch knob. 2. Pivot the treadmill down until the latch pin is not done, the treadmill may be able to the left and hold the treadmill firmly. Insert the latch pin into the catch. Keep...

User Manual
Page 14
... for five minutes and then press the switch back in . b. Remove the key from the console and UNPLUG THE POWER CORD. If necessary, 26 107 loosen the Reed Switch Screw (121) and move the Reed Switch slightly. Find the symptom that the on/off switch located on the treadmill frame near the power cord. SYMPTOM: THE POWER TURNS OFF DURING USE a. above). Reinsert the key fully into the console as far as shown...
... for five minutes and then press the switch back in . b. Remove the key from the console and UNPLUG THE POWER CORD. If necessary, 26 107 loosen the Reed Switch Screw (121) and move the Reed Switch slightly. Find the symptom that the on/off switch located on the treadmill frame near the power cord. SYMPTOM: THE POWER TURNS OFF DURING USE a. above). Reinsert the key fully into the console as far as shown...

User Manual
Page 15
... walking platform. SYMPTOM: The walking belt slows when walked on , first remove the key and UNPLUG THE POWER CORD. If the walking belt slips when walked on a. When the walking belt is properly tightened. 15 Using the allen wrench, turn both rear roller adjustment bolts clockwise, 1/4 of a turn the a left , first remove the key and UNPLUG THE POWER CORD. Plug in length. Use only a UL-listed surge protector, rated at 15 amps, with a 14-gauge cord of a turn. When the walking belt is overtightened, treadmill...
... walking platform. SYMPTOM: The walking belt slows when walked on , first remove the key and UNPLUG THE POWER CORD. If the walking belt slips when walked on a. When the walking belt is properly tightened. 15 Using the allen wrench, turn both rear roller adjustment bolts clockwise, 1/4 of a turn the a left , first remove the key and UNPLUG THE POWER CORD. Plug in length. Use only a UL-listed surge protector, rated at 15 amps, with a 14-gauge cord of a turn. When the walking belt is overtightened, treadmill...

User Manual
Page 16
... is used because your heart rate drops quickly when you exerciseÑnever hold your exercise program. If your exercise must exercise at the top of the chart (ages are recommended heart rates for fat burning, and the highest number is near the highest number in your age. Fat Burning Warming Up To burn fat effectively, you to burn fat, adjust the speed and incline of...
... is used because your heart rate drops quickly when you exerciseÑnever hold your exercise program. If your exercise must exercise at the top of the chart (ages are recommended heart rates for fat burning, and the highest number is near the highest number in your age. Fat Burning Warming Up To burn fat effectively, you to burn fat, adjust the speed and incline of...

User Manual
Page 17
...correct form for several basic stretches is to make exercise a regular and enjoyable part of your back foot flat on the floor. Toe Touch Stretch Stand with your knees bent slightly and slowly bend forward from your extended leg. ...legs. Stretches: Hamstrings, lower back and groin. 3 3. Move slowly as possible. Repeat 3 times for balance, reach back and grasp one foot with at the right. This will develop muscle flexibility and will help to prevent post-exercise problems. To maintain or improve your buttocks as you may complete up to your condition, complete three workouts...
...correct form for several basic stretches is to make exercise a regular and enjoyable part of your back foot flat on the floor. Toe Touch Stretch Stand with your knees bent slightly and slowly bend forward from your extended leg. ...legs. Stretches: Hamstrings, lower back and groin. 3 3. Move slowly as possible. Repeat 3 times for balance, reach back and grasp one foot with at the right. This will develop muscle flexibility and will help to prevent post-exercise problems. To maintain or improve your buttocks as you may complete up to your condition, complete three workouts...

User Manual
Page 18
...Pivot Bolt Frame Pivot Spacer Walking Belt Front Roller/Pulley Small Screw Motor Belt Upright/Base Incline Frame Hood Bracket (long) Bracket Clip 50Ó Power Wire Harness Motor Tension Spacer Nut Lift Motor Shield Incline Motor Bolt Allen Wrench Incline Motor Reed Switch Jack Screw Upright Ground Screw Not Used Wheel Bolt Front Wheel Hood Bracket (short) Motor Nut Pulley/Flywheel/Fan Motor Motor Bolt Motor Isolator Motor Tension Bolt Motor Tension Nut Incline Pivot Bolt Motor Hood Incline Motor Shield Incline Pivot Washer Adj. Qty. Bolt Transformer Electronics Bracket Controller Electronics...
...Pivot Bolt Frame Pivot Spacer Walking Belt Front Roller/Pulley Small Screw Motor Belt Upright/Base Incline Frame Hood Bracket (long) Bracket Clip 50Ó Power Wire Harness Motor Tension Spacer Nut Lift Motor Shield Incline Motor Bolt Allen Wrench Incline Motor Reed Switch Jack Screw Upright Ground Screw Not Used Wheel Bolt Front Wheel Hood Bracket (short) Motor Nut Pulley/Flywheel/Fan Motor Motor Bolt Motor Isolator Motor Tension Bolt Motor Tension Nut Incline Pivot Bolt Motor Hood Incline Motor Shield Incline Pivot Washer Adj. Qty. Bolt Transformer Electronics Bracket Controller Electronics...

User Manual
Page 19
... 1 128 1 129 1 CD Isolator Console Fastener Upright Endcap Upright Grommet Magnet Console Base Back Console Assembly Reed Switch Clip Incline Motor Spacer Optic Disk Optic Switch Nut Optic Switch Washer Optic Switch Bolt Optic Switch 2lbs. Description Key No. Qty. Hand Weight Roller Guard Head Phone Rear Foot Ground Wire Ground Wire Screw Incline Stop Bracket Crossbar Bolt 26Ó Wire Harness 19Ó Stereo Wire Harness 20Ó Wire Harness 60Ó Optic Incline Wire Rhythm Mix CD 130...
... 1 128 1 129 1 CD Isolator Console Fastener Upright Endcap Upright Grommet Magnet Console Base Back Console Assembly Reed Switch Clip Incline Motor Spacer Optic Disk Optic Switch Nut Optic Switch Washer Optic Switch Bolt Optic Switch 2lbs. Description Key No. Qty. Hand Weight Roller Guard Head Phone Rear Foot Ground Wire Ground Wire Screw Incline Stop Bracket Crossbar Bolt 26Ó Wire Harness 19Ó Stereo Wire Harness 20Ó Wire Harness 60Ó Optic Incline Wire Rhythm Mix CD 130...

User Manual
Page 22
... a particular purpose is limited in USA © 1999 ICON Health & Fitness, Inc. Some states do not allow the exclusion or limitation of the product or damages with all other warranty beyond that specifically set forth herein. ORDERING REPLACEMENT PARTS To order replacement parts, call our Customer Service Department toll-free at one of its authorized service centers with respect to products used for commercial or rental...
... a particular purpose is limited in USA © 1999 ICON Health & Fitness, Inc. Some states do not allow the exclusion or limitation of the product or damages with all other warranty beyond that specifically set forth herein. ORDERING REPLACEMENT PARTS To order replacement parts, call our Customer Service Department toll-free at one of its authorized service centers with respect to products used for commercial or rental...


